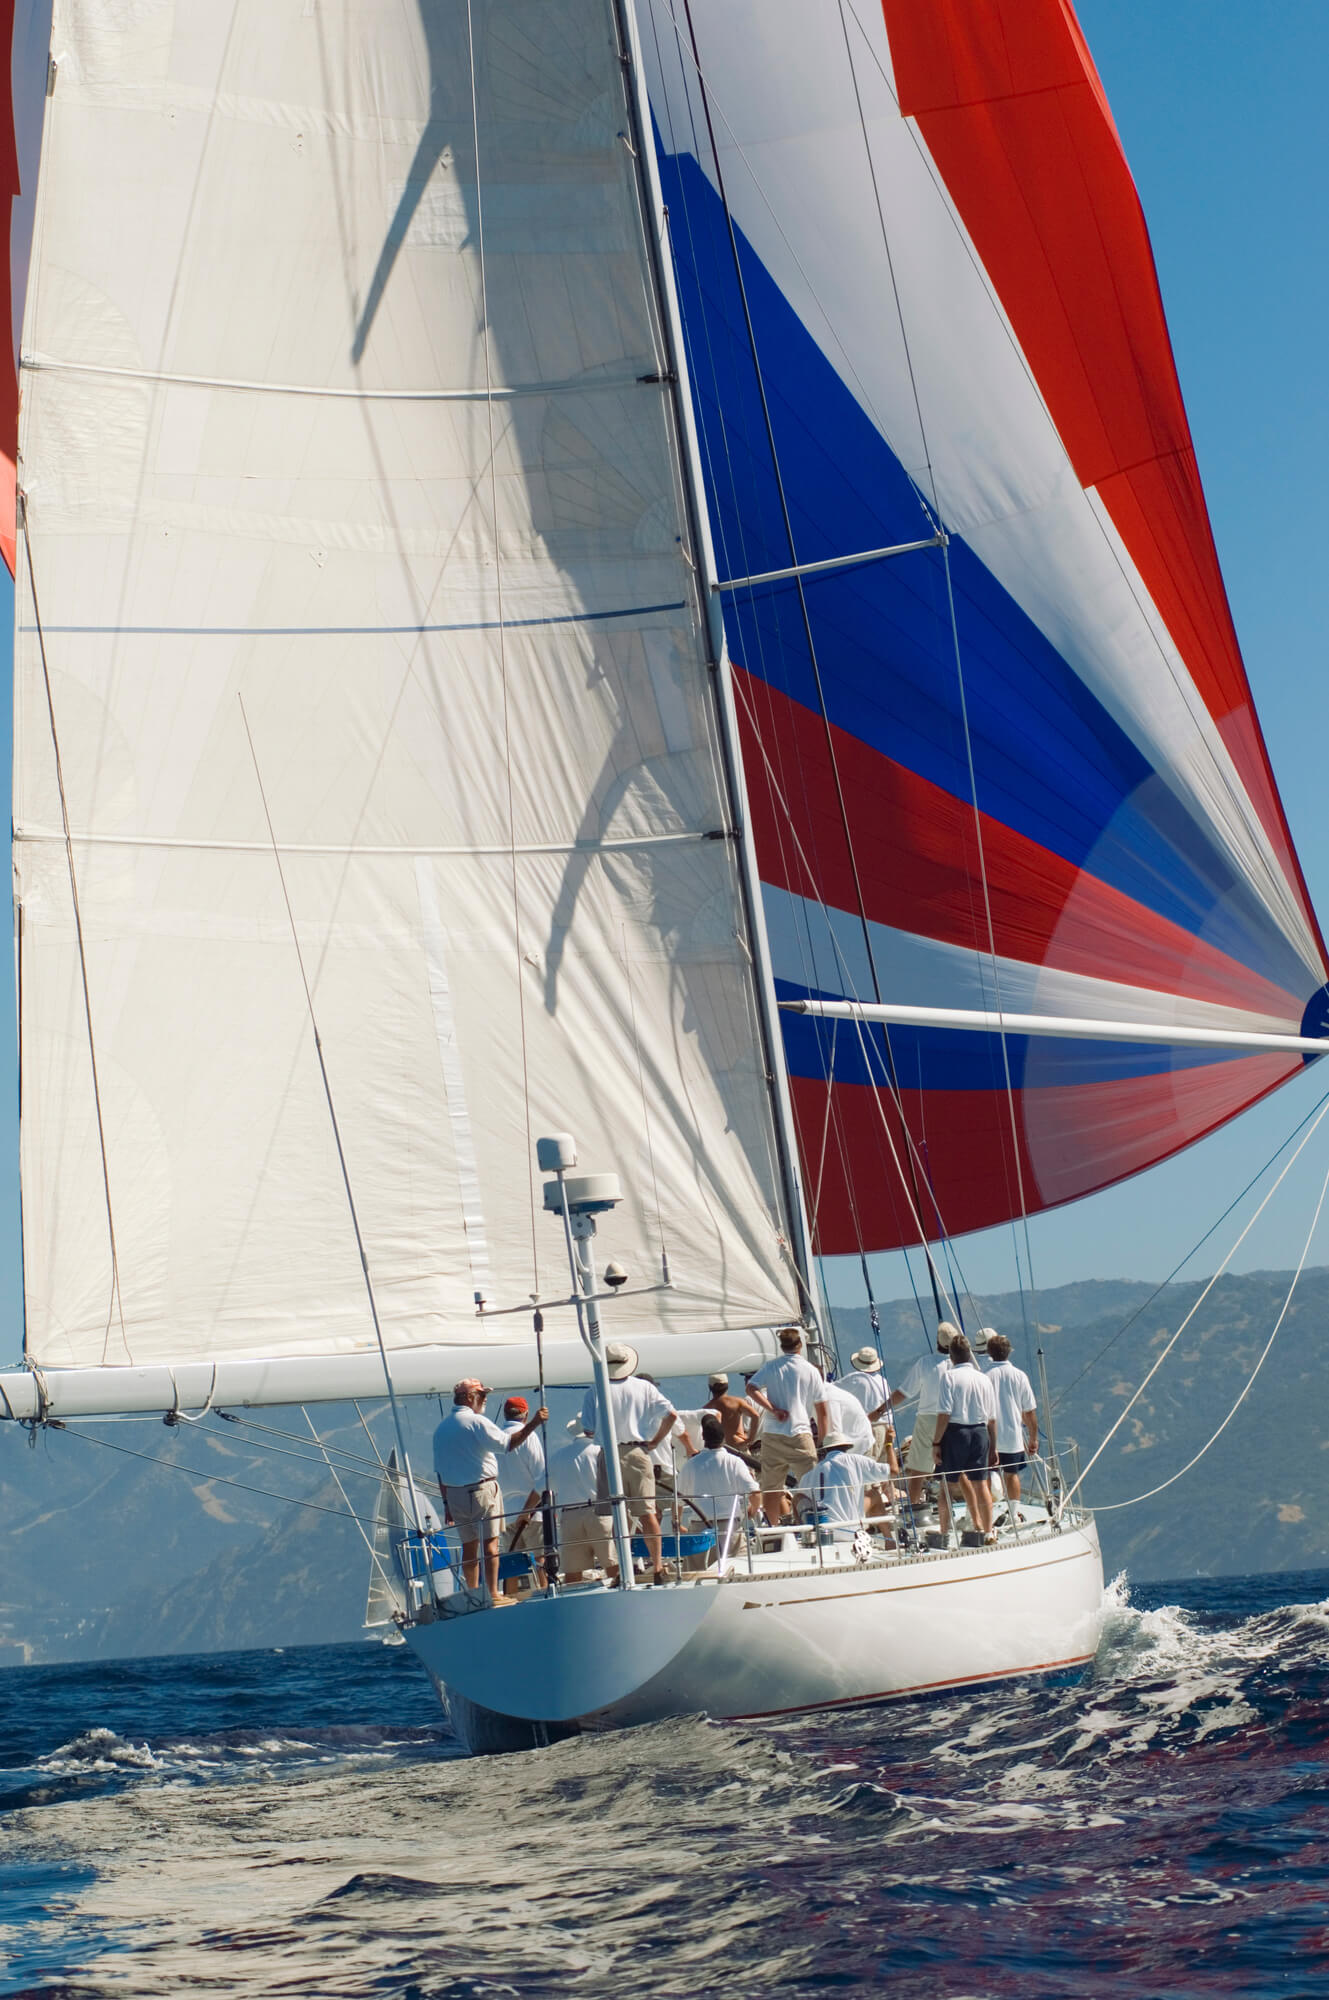
How To Rig, Set Up & Hoist a Spinnaker: Full Guide
It's a beautiful, sunny day. You're sailing upwind, and all around you colorful spinnakers fill and flutter as boats sail the other way. Wouldn't it be nice to break that sail out of the bag for the ride back down wind?
How do you rig, set up and hoist a spinnaker?
- Prepare the kite by finding the corner and making sure the sail isn't twisted
- Run your spinnaker sheets and guys before attaching to tack and clew
- Attach the halyard to the head, make sure it is outside the headstay
- Set the pole by putting the sheets and guys in the pole's jaws
- Hoist the pole
- Hoist the spinnaker
It seems daunting, but the principles of setting a symmetrical spinnaker are the same whether you're on a 420 dinghy or a fifty foot racer. You may have a few more lines, but the general process is: prep the spinnaker, connect the lines to the sail, hoist the pole on the windward side, then hoist and trim the sail.
There's a little more to it (of course), and each step has a few things to get right. But we've got you covered.


On this page:
Spinnaker basics, steps to set it, setting problems, the bear-away set, asymmetrical differences.
Spinnaker come in two types: symmetrical and asymmetrical. The symmetry refers to the length of the sides of the sails. An asymmetrical spinnaker has a tack and a distinct leech . A symmetrical spinnaker has both sides the same length and requires a pole to position. The tack and leech of a symmetrical sail depends on which side the pole is on - the pole side is the tack. Symmetrical sails aresailed deeper downwind with the poles, whereas asymmetrical spinnakers are better at reaching and sailing at higher angles, and are simpler to set and handle.
In this article, we'll focus mainly on symmetrical spinnakers.
Spinnaker Controls and Lines
A spinnaker connects the boat with a halyard at the head of the sail to hoist it, a sheet on the leeward side, and a guy on the windward side. While the guy is a pole control, some boats use dedicated sheets and guys, while some use a single line that switches function between sheet and guy as the sail jibes from side to side. In either case, the guy connects to the sail, not the pole, and runs through the jaws of the pole. The sheet is used to trim the sail as we adjust the pole with the guy.
When the sail is set, the lines not under load are the lazy guy or sheet. The sheet on the windward side and the guy on the leeward side will be the lazy sheet and lazy guy . Not all boats use separate sheets and guys, so there may not be a lazy guy/sheet.
Pole Controls
The spinnaker guy is used to control the position of the pole, and the angle of attack of the sail to the wind. Trim to keep the pole at a right angle to the wind. Most poles have a pole topping lift and a downhaul (also called a foreguy ). On the mast, there will be a pole car or ring with an attachment point which sets the inboard height of the pole. The topping lift and foreguy keep the pole in a level position, perpendicular to the water, and can be adjusted to match the car position. The pole is trimmed lower in lighter air, though a detailed spinnaker trimming guide is outside the scope of this post.
For simplicity, we'll assume you’re out for a simple sail, not racing. The jib is down, and you're ready to turn the boat down wind. Racers do things a little differently, but you will need to master a basic bareheaded set before you get too fancy.
Step 1 - Prepping the Kite
("kite" or "chute" are common nicknames for a spinnaker)
To launch a spinnaker from a bag without twists, someone needs to run the tapes when the spinnaker is packed. Find the head of the sail, run it between your fingers down one edge of the sail (or the tape , referring to the thicker reinforcement on the edge), making sure there are no twists or loops. Continue until you reach the next corner. If you find any twists or loops, work then out. Leave that corner outside the bag, then start again at the head and run the other tape. Leave the head and two clews out. This step can be done at the dock before leaving, or any time, as long as someone knows it has been properly packed . Do not assume.
You can bring the spinnaker bag up on deck for this, or leave it in the v-berth if there is a hatch suitable for pulling it through. This is more common when racing.
Step 2 - Plugging in the Spinnaker
Spinnaker sheets and guys should be run before connecting to the spinnaker. Most sheets and guys go through a fairlead or turning block at the stern of the boat before running forward to the spinnaker.
When you run the lines, take care they are free and outside of all lifelines, jib sheets and other obstructions before connecting to them to the tack and clew of the sail. Take the halyard and connect it to the head, making sure it is outside the headstay and any pole control lines or other entanglements.
Step 3 - Setting the Pole
If the pole isn’t normally stored on the mast, one end will need to connected. Attach the topping lift and down haul, and put the sheets and guys in the jaws now.
Whether the jaws go up or down is a personal preference, and some boats work better than others in different positions. Some argue that spinnaker forces pull up, so that jaws-down holds them from flying out when it's opened. Others maintain it's easier and more natural to slap a non-loaded sheet and guy into a jaws-up pole, with gravity to hold it there. This is a question of comfort and experience.
Hoist the pole to the proper height for the breeze.
Step 4 - Hoist!
When the boat is turned off the wind to the angle you want to sail, you are ready to hoist the sail.
With the pole set forward, hoist the sail up quickly with the halyard, then trim the sail and pole once it is at full hoist.
- You won't be able to trim the pole until the spinnaker is mostly up, but move it back when you can. It will help it fill and stay under control.
- To get the sail up more quickly, you can have someone at the mast to "bump" the halyard by pulling it at the mast while some else takes up the slack.
- If launching from a bag, attach the bag to the boat or you might launch it into the air with the sail. Most bags have Velcro straps or clips on them for connecting to lifelines or other boat hardware.
There are a few problems to watch for when setting. Twists, hourglasses, and forestay wraps are the most common, and can even happen with a properly packed spinnaker with no twists, though that is the most common cause of hour-glassing and wraps.
Avoid pulling too hard or panicking when these things happen, it just wraps things tighter. You can worked twists out if you stop the hoist and pull down from the center of the foot and the clew. If it's too bad, lower the sail, untwist it, rerun tapes, and re-pack the sail.
When racing, it's slow to run "bare headed" without a jib. Racers will do a "bear-away" set, which is like the set described above, except on a few points. It's easier and faster, but it takes more people and a little preparation since a quick set is the goal.
- The jib is left up, so the spinnaker halyard runs outside the jib when the spinnaker is connected.
- The spinnaker can be hoisted earlier as the jib will blanket it.
- The pole can be trimmed back when the sail is out and filling.
- The jib is "blown" - quickly released and gathered on the deck for the down wind leg.
Since there is no pole, an asymmetrical spinnaker is far easier to rig, set, and hoist. There are only two sheets, and no pole controls.
- Most boats will have a short pole on the bow for attaching the tack. There may be an adjustable tack line to set the tack height for different conditions. The pole may also have adjustments.
- The lazy sheet should run around the outside headstay.
- Many asymmetrical spinnakers have a dousing sock or turtle , which makes launching easier. The sail is hoisted inside this cover, then the sock pulled down to let the sail fill.
- Some asymmetrical spinnakers can be rigged on a detachable, lightweight furler.
- Asymmetrical spinnakers can not sail as deep down wind as a symmetrical sail with a pole. However, they can be carried at higher angles of reaching and can make up for the lack of down wind capability with more reaching speed.
You stated for symmetrical spinnaker that the pole is kept “perpendicular to the water - wrong - it should be perpendicular to the wind
Bill Wheary
The pole is kept perpendicular to the MAST to that the luff of the spinnaker is as far as possible from the mast and luff of the main.
Although the pole is usually set as close to perpendicular to the wind, in most cases the pole is adjusted so as to position the the CORD between the spinnaker tack and clew perpendicular to the wind.
Leave a comment
Yachting Monthly
- Digital edition

Spinnaker masterclass: tailored downwind sailing
- James Stevens
- March 15, 2021
There’s more than one way to rig, hoist, set and drop your spinnaker. Choosing the right setup and skills is key to success with the kite, explains James Stevens

Set properly and using the right techniques for your boat, nothing beats a good passage under spinnaker. Credit: David Harding
There are, I suspect a surprising number of cruising yachts which have a spinnaker in their sail locker which has never come out of the bag.
The kind of pictures loved by yachting photographers of racing boats on their ear with spinnakers in the water and crew hanging on by their fingertips do little to encourage cruising yachtsmen.
On the other hand a spinnaker can take hours off a cross-Channel trip and it’s a real pleasure to feel the boat powering downwind with the thought of an early arrival.
It looks good too. But you have to know the ropes because as the pictures show it can go spectacularly wrong on a windy day.
Often cruising sailors will have learned to use a spinnaker, either in dinghies or on a racing boat.
If you try to replicate this on a cruising boat, often with a small crew and with a makeshift rigging setup, you’ll be sailing into troubled waters.

What if it goes pear-shaped? Knowing how to control the sail, and what to do when it goes wrong is the key to mastering the spinnaker. Credit: Rick Tomlinson
Getting the rigging right for your boat and choosing the skills that are going to work best for your crew will help you keep control of the sail and maintain calm on board.
The secret when starting out is to think it through and set it in light winds when making a mistake is easily retrievable.
In displacement yachts, symmetric spinnakers tend to be the most effective way of sailing downwind.
With an asymmetric you’ll need to sail the angles and gybe , but a symmetric lets you sail dead downwind.
They can, however, be used when the wind angle from the bow is from about 80° to 180° so they’re very versatile sails.
The most comfortable point of sail is a broad reach at about 120° to the wind.
Spinnakers become harder to control as the wind moves forward, the apparent wind increases and the boat heels more, or with the wind right aft as the boat slows and there’s a danger of an accidental gybe especially if it’s rough.
The difficult skills are raising, lowering and gybing.
Systems like snuffers can help with this, but we’ll look at the basic skills, which can then be modified.
Once the spinnaker is up it is relatively easy to trim and if the wind is stable and if the helm can steer a straight course, you can enjoy fast, relaxed cruising.
Using the spinnaker: the right sails and setup
Half the battle with flying a spinnaker is making sure you’ve got your setup right before you hoist.
As we all know, the spinnaker halyard exits the mast above the forestay, while the two clews are sheeted back to the cockpit via blocks on the quarter, and the guys are led aft via blocks midships.
The pole height is controlled by an uphaul at the mast and a downhaul, which is led aft via a block on the foredeck.
The pole’s inboard end attaches to the mast, often on an adjustable track, and the windward guy passes through the jaws on the pole’s outboard end next to the windward clew.
Hardware is changing
Racing innovations are helping make life easier for cruising sailors, says David Barden, production director at Allspars.
‘Many racing teams are using modern soft attachments, blocks and rings, including soft Dyneema pad eyes combined with blocks such as Karver KBO and INO blocks that can deal with the high loads but are extremely light. These are also popular in long-distance cruising because they are robust and reliable and don’t have metal fittings that can fatigue.
‘Although blocks still produce less friction, low-friction rings are used all over boats; they work well on tweaker lines. If you are end-to-end gybing, tweakers mean you only need one sheet on each side, and you pull the windward tweaker on to turn the sheet into a guy.
‘Snugging the leeward tweaker down in heavy conditions help stabilise the spinnaker.;
Sail choice is critical
Using the wrong spinnaker could make your life difficult too, says Peter Sanders of Sanders Sails.
‘The chances are that only one spinnaker will be carried so it must cover all the conditions that the crew are capable of using it in. The problem with most symmetric spinnakers on cruising yachts is that they are just too heavy.

Credit: Maxine Heath
‘The cheapest nylon that you can buy is 1.5oz, therefore it is common for sailmakers to offer this weight for all yachts over 30ft, but it is heavy, bulky and requires at least 12 knots of apparent wind to stop it from hanging like a deflated balloon.
‘Sailing downwind, this means a true wind of about 18 knots, which is too much for most cruisers to consider a spinnaker. Most of the time, ‘light is right’, so 0.75oz spinnakers on yacht up to 35ft and 0.9oz above that, are much easier to handle, set and gybe.
‘If you have an old or second-hand spinnaker, it may not be the right size. The result will be instability, rolling and the possibility of broaching, which never helps relations on board. Similarly, spinnakers have some stretch to absorb gusts, but if it’s old, it will become deeper and baggier with tight leech tapes and it will retain water making it hard to set.
‘Most spinnakers today are made with a true-radial panel layout thanks to the advancement in sail design software. In the past, spinnakers were made on the floor so the middle panels were horizontally cut, making it possible for the sailmaker to shape the seams.’
Using a spinnaker: the hoist
The first hoist needs to be in light winds.

Before you hoist, prepare the spinnaker on what will be the leeward side. Credit: Richard Langdon/Ocean Images
It is easier to hoist the spinnaker with the jib set – this avoids the spinnaker wrapping round the forestay before it’s trimmed.
Secure the bag on the foredeck on the leeward side by the rail at the foot of the jib.

Setting the pole is the next step. Make sure that the end jaw is facing upwards so that the pole can drop down and away from the sheet in a gybe. Credit: Richard Langdon/Ocean Images
Attach the sheet and guy to the sail.
Double check that the sheet and guy are over and not through the guardrails – every racing skipper will have had this problem at least once.

If you have enough crew, it’s essential to hoist hand-over-hand at the mast, and you’ll also be able to see the masthead for when the spinnaker is set. Credit: Richard Langdon/Ocean Images
The guy goes round the front of the forestay.
Hoist the heel of the pole on the mast to about head height.
The outer end of the pole should be on the windward side of the forestay.
Put the guy through the jaw of the pole.

Once the sail is full, it’s harder to winch the guy back, so sneak the guy back, bringing the windward clew up to the end of the pole and off the forestay. Credit: Richard Langdon/Ocean Images
Attach the halyard to the head of the sail; this is quite tricky as it has to pass outside the jib.
Hoist the outer end of the pole with the uphaul until it is horizontal.
Have a little slack on the downhaul but secure it or it will lift up too far when the spinnaker fills.

Mark your halyard to show when the sail is fully hoisted, says rigging expert David Barden. Credit: Richard Langdon/Ocean Images
Using the guy pull the corner of the spinnaker out of the bag.
This is known as sneaking the guy.
Hold on to or, if short crewed, secure the sheet and guy so they don’t run when they come under tension.
Right, now for the big moment.
Steer downwind to keep the spinnaker blanketed by the mainsail and pull the spinnaker halyard hand over hand as fast as possible.

With the hoist complete, tidy up on deck, and adjust the pole and sheets to trim the sail. Credit: Richard Langdon/Ocean Images
You might have to winch the last metre or so to get it to the top.
Winch in the guy which will pull the pole back and slowly steer up from a run to a broad reach.
Sheet in the spinnaker and drop or roll up the jib.
Wow! It fills and the boat speed jumps up.
Where it can go wrong

Credit: Richard Langdon/Ocean Images
It’s vital that the crew in the cockpit know what the person on the foredeck is trying to do.
Everyone needs to concentrate and it helps to have someone in charge other than the helm, even if there are only a few crew.
The ropes are often led the wrong way or twisted around another rope or wire. Preparation is the best way to avoid this.
The wind has to be very light to allow you to detach a sheet or guy from a hoisted spinnaker while you undo a tangle. Normally you have to drop and start again.
Sometimes the head of the sail fills with wind and there is a twist in the middle creating a wineglass effect.
To remove this you have to unravel it upwards. The helm has to steer downwind to blanket the spinnaker being careful not to gybe.
Pull on the sheet either from the cockpit or side deck, and try and persuade the twist to move upwards. This isn’t going to work if the spinnaker is filling at the top.
If it’s really jammed it will have to come down.
If the spinnaker fills on the way up it’s going to be hard work winching the halyard. The helm can help by steering downwind.
There are a number of other problems such as hoisting it the wrong way up which means dropping it again and hoping no one notices.
Trimming the spinnaker
Set it right.
The spinnaker is most efficient when there is a flow of air across it.
The leading windward edge should be pulled aft with the guy until it is close to curling inwards.
The height of the pole should be adjusted so both clews of the spinnaker are the same height above the deck.
Wherever the leeward clew is, adjust both ends of the pole to match it and keep the pole horizontal.

When reaching, make sure the pole is not touching the forestay. Credit: Richard Langdon/Ocean Images
If the course is a beam or close reach the guy is eased forward and the sheet wound in.
The pole will need to be lowered to keep the luff tight and the clews level.
Ease the uphaul and tension the downhaul and slide the heel of the pole down the mast. Avoid allowing the pole to press against the forestay as this can cause damage to the foil track for the jib, and in extremis can break the pole.
The main usually has to be sheeted in further than normal for this point of sail to prevent it from being backwinded.
Be ready to ease the main and kicker if you become overpowered.
With the wind further aft the pole is brought back by winding in the guy and easing the sheet all the time keeping the leading edge almost curling.

With the pole too high, the sail pays off, inducing heel rather than drive. Credit: Richard Langdon/Ocean Images
Remember to ease the pole downhaul as the pole comes back.

With the pole too low, the luff is pulled tightly, luffing too early. Credit: Richard Langdon/Ocean Images
Keep the spinnaker close to the boat – don’t let it fly too far away from the forestay or it will rock from side to side.
With wind astern the sail is more stable if the sheet is pulled down to towards the toe rail halfway down the boat by a barber hauler.

Pole back to keep the belly of the sail close to the forestay. Credit: Richard Langdon/Ocean Images
Racing sailors never cleat the guy or the sheet.
What can go wrong
Oversheeting the spinnaker makes the boat less stable and heel over more.
In windy weather, this can cause the boat to screw up into the wind in a broach and it is invariably accompanied by a lot of sail flapping and an alarming amount of heel.
The main and spinnaker sheets need to be eased to allow the helm to steer downwind and get the boat back on its feet.
Releasing the kicking strap will lift the boom and allow wind to spill out of the head of the main.

If you oversheet the spinnaker, it can cause the boat to become unstable. Credit: Rick Tomlinson
This is important if the boat has heeled so far over in the wind that the boom is dragging in the water.
A common mistake is to have the guy too far forward with the sail billowing like washing on the line.
The boat will heel over more than with the correct trim and you’ll need to use more helm, which is slower.
Choose your gybe
Gybing is quite difficult when sailing shorthanded, so many cruising yachtsmen only set the spinnaker when there is a long reach ahead and lower the sail if a gybe is involved.
But of course a gybe is much quicker than dropping and resetting the sail.
On a boat over about 10 metres it is much safer to have twin sheets and guys.
Each clew of the spinnaker is connected to two ropes. The sheet is attached to the sail cringle and the guy is attached to the sheet on the back of the snap shackle.
Each corner of the sail has one rope under tension and the other, the lazy sheet or guy, slack ready for the gybe.
Continues below…

How to reef to sail safely through any weather
Pete Goss delivers his masterclass on when to reef, and explains why it is critical to keeping control of your…

10 tips to make your sails last longer
Professional skipper Simon Phillips shares his tips on how to get better value from your sails

Night pilotage: How to enter unfamiliar harbours
James Stevens looks at how best to prepare for arriving at an unfamiliar harbour after dark and what to be…

How to navigate using waves
Developing a thorough understanding of what the waves are telling you can provide you with a 'sixth sense' when it…
The lazy sheet should be resting above and not below the end of the pole.
It is helpful to have the guys and sheets made of different colours as there is going to be a lot of rope in the cockpit.
The reason for this system is that during the gybe, the spinnaker can be sailed using the two sheets and no pole while the guys are swapped over on the end of the pole.
Sos the foredeck crew is not having to handle a spinnaker pole with a bar-tight rope on the end of it.
Talk this one through before you start. Everyone needs to understand what is happening at both ends of the boat.
The dip pole gybe
Steer on a very broad reach without collapsing the spinnaker.
Raise the heel of the pole up the track on the mast. Wind in the lazy sheet on the windward side on a winch.

1. Grab the guy . Prepare for the gybe by taking the lazy guy forward to the bow. Credit: Richard Langdon/Ocean Images
The guy, which is through the pole, is now slack.
The foredeck crew releases the jaws on the end of the pole and the guy will lift out leaving the spinnaker flying with the sheets and no pole.
The helm has to steer carefully to keep the spinnaker filling especially if it starts swaying from side to side.

2. Catch the pole. If there’s space, a dip-pole gybe can be easier if the bowman is in front of the forestay. As the pole swings across, clip in the new guy. Credit: Richard Langdon/Ocean Images
The cockpit crew ease the pole uphaul allowing the end to drop while the foredeck crew swings the outer end of the pole just above the deck inside the forestay.
If you have the luxury of a bowman they should be on the pulpit facing aft with the new guy in their hand waiting to drop it into the jaws of the pole.
The cockpit crew needs to ensure there is plenty of slack in the new guy.

3. Pole across. During the gybe, the spinnaker is flown without the pole, which requires careful helming. Credit: Richard Langdon/Ocean Images
At this moment a mistake occurs which has happened on nearly every boat I’ve sailed on.
It is very easy to drop the new guy into the jaws the wrong way round so there is a twist when the pole goes up again and the spinnaker is on the new gybe.

4. Flying free. During the gybe, the cockpit crew need to keep the sail flying. Credit: Richard Langdon/Ocean Images
The bowman shouts ‘Made!’ when the new guy is in the pole.
The main is sheeted in and the helmsman gybes as the new guy is wound in, the downhaul eased, the pole raised and the old sheet eased to allow the new guy through the pole to take the strain.

5. Reset the sail . With the pole on the new side, winch on the guy and set the sail. Note that the jib sheet has been kept on top of the pole, ready for when the spinnaker drops. Credit: Richard Langdon/Ocean Images
This isn’t something to try for the first time on a windy day, but it can be taken in slow time in light winds while everyone gets their heads around what’s happening.
Cruising crews are generally short handed so take it steadily and carefully – it takes months of practice for a racing crew to gybe the pole to make it look like an extension of the boom.
End for end gybe
This is a technique used on dinghies and smaller yachts.
It is easier and much safer with twin sheets and guys.
The pole must be attached to both the uphaul and the downhaul with a bridle.

The pole is taken off the mast in an end-for-end gybe, so bridles for the uphaul and downhaul are necessary
The crew ease the guy and fly the spinnaker with the sheets alone.
The foredeck crew takes a bight of the new guy to the mast, detaches the pole from the mast and inserts the new guy into the jaw.
The pole is now pushed out to the new side, the old guy taken out of the jaw and the pole secured to the mast.
The dip pole is more complicated but safer for new crews.
The cockpit crew need to watch the foredeck carefully.
It is really annoying to be perched on the pulpit or by the mast and not have sufficient slack on the new guy to drop it into the jaws of the pole or have insufficient ease on the uphaul to pass the pole under the forestay.

Make sure you give the foredeck enough slack. Credit: Richard Langdon/Ocean Images
The cockpit crew should avoid winding in the new guy before the pole has been hoisted up on the new side.
It takes quite a lot of skill to steer and give instructions. Better to have the crew boss calling the gybe without having to worry about steering at the same time.
If the spinnaker collapses it can wind itself around the forestay.
Most problems with a spinnaker are best sorted by steering downwind, or by dropping it.
Using a spinnaker: the drop
There are several ways of doing this. The most common is to retrieve the spinnaker down the main hatch.
Again, this is easier with twin sheets and guys. Hoist or unroll the jib. Take a bight of the lazy guy directly from the sail on the leeward side under the boom over the rail and into the main hatch.

Pass the lazy guy aft to the companionway hatch while the crew prepares to gather in the sail. Credit: Richard Langdon/Ocean Images
Ease the guy until the pole is just off the forestay. Steer downwind.
The person lowering the halyard makes sure it is clear to run.

With the guy eased, the sail will stream out like a flag behind the main. Credit: Richard Langdon/Ocean Images
At this point the cockpit crew can either let the guy and lazy sheet run through the pole on the windward side or the foredeck crew can ping the snap shackle releasing the sheet and guy from the windward corner of the sail.
Either way the sail is now flapping like a huge flag behind the main, held by the halyard and a crew member in the main hatch, holding the lazy guy.

Don’t drop the halyard too quickly to give the crew time to gather in the sail. Credit: Richard Langdon/Ocean Images
The halyard is eased quickly and the hatch crew gather as it comes down, trying to avoid dragging it in the sea.
Lower the pole and tidy up the lines.
Letterbox drop
On boats with a loose-footed main the spinnaker can be retrieved by passing the lazy guy between the foot of the main and the boom.

A letterbox drop can help avoid trailing the spinnaker in the water. Credit: Richard Langdon/Ocean Images
The spinnaker is pulled down in the lee of the main through this slot into the main hatch – a technique known as a letterbox drop which is effective in removing any wind in the spinnaker and making it less likely to trail in the water.
If the helm steers on a reach rather than a run the spinnaker is harder to retrieve because it won’t be blanketed by the main.
The first third of the halyard should be dropped quickly to de-power the spinnaker but no more or it ends in the sea.

Keeping the spinnaker clear of the water when dropping it is key. Credit: Rick Tomlinson
It’s really important that the spinnaker does not drop into the sea while still held by three corners or the boat will end up as a trawler pulling a huge bag of sail through the water.
You must release the windward ropes fully before lowering the halyard so it is held by only two corners.
It is equally important not to release the ropes from both clews or the sail ends up flying horizontally from the top of the mast.
Steering downwind is the only way of getting it back.
Using a spinnaker: snuffers
To save all this hassle it is possible to rig a snuffer, which is a giant collapsible tube which can slide up and down the sail.
The spinnaker is set with the pole, sheets and guys ready and hoisted like a sausage with the sail in the snuffer.
Using another halyard in the snuffer, the tube is pulled up, releasing the sail from the deck upwards.

Pull the snuffer over the sail before dropping
Once set, the folded tube stays at the head of the sail.
To retrieve the spinnaker, the boat is sailed on a run to blanket the spinnaker and the snuffer tube is pulled back down.
What could be easier – except of course if it jams on the way down. But it is simpler than the traditional drop and the spinnaker doesn’t need repacking

A snuffer can take the stress out of setting the spinnaker, though they sometimes jam. Credit: Richard Langdon/Ocean Images
With a normal drop the cabin by the main hatch ends up full of spinnaker and it is time to repack it.
Many racing boats have a hook on the deckhead in the cabin which takes the head cringle.
This allows the crew to work down the two edges of the sail from the top undoing any twists.

Repack the spinnaker by following the tapes. Credit: Richard Langdon
Having reached the clews, the three corners are gathered and the sail pushed into the bag keeping the corners on the top.

James Stevens, author of the Yachtmaster Handbook, spent 10 of his 23 years at the RYA as Training Manager and Yachtmaster Chief Examiner
The skill is to prevent a twist when it is rehoisted.
Another slower and safer technique is to find the head, sit on it so you know where it is and work down one edge flaking as you go.
When you get to the clew, sit on the folds and work down the other edge from the head.
Sit on all the folds and pack into the bag carefully, leaving the folds until last. If it goes up with a twist the beers at the bar afterwards are on the packer!
Decades ago when offshore racing was less frenetic, sailors used to drop the spinnaker at night.
That is unthinkable when racing now but a good idea for cruising sailors.
Some of my most memorable cruising has been sailing on a summers evening in light airs with a spinnaker powering us towards our destination knowing that the extra speed has allowed us to arrive before dark to enjoy that special thrill of entering a harbour at the end of a great sail.
Thanks to UKSA in Cowes for the use of their Sweden 43 www.uksa.org 01983 294941
Enjoyed reading Spinnaker masterclass: tailored downwind sailing?
A subscription to Yachting Monthly magazine costs around 40% less than the cover price .
Print and digital editions are available through Magazines Direct – where you can also find the latest deals .
YM is packed with information to help you get the most from your time on the water.
- Take your seamanship to the next level with tips, advice and skills from our experts
- Impartial in-depth reviews of the latest yachts and equipment
- Cruising guides to help you reach those dream destinations
Follow us on Facebook , Twitter and Instagram.
The Worldwide Leader in Sailmaking
- Sail Care & Repair
- Sailing Gear
- Find A Loft
- Sail Finder
- Custom Sails
- One Design Sails
- Flying Sails
- New Sail Quote
- 3Di Technology
- Helix Technology
- Sail Design
- NPL RENEW Sustainable Sailcloth
- Sailcloth & Material Guide
- Polo Shirts
- Sweaters & Cardigans
- Sweatshirts & Hoodies
- Accessories
- Summer Sale
- Shop the look
- Mid & Baselayers
- Deckwear & Footwear
- Luggage & Accessories
- Spring Summer '24
- North Sails x 37th America's Cup
- Sailor Jackets
- SALT X North Sails
- NS x Slowear
- T-shirts & Tops
- Sailor Jacket
- Sustainability
- North Sails Blog
- Sail Like A Girl
- World Oceans Day
- Icon Sailor Jacket
- Our Locations
- Certified B Corporation
- North SUP Boards
- North Foils
- North Kiteboarding
- North Windsurfing
SAIL FINDER
SAILING GEAR
COLLECTIONS & COLLAB
COLLECTIONS
WE ARE NORTH SAILS
ACTION SPORTS
Popular Search Terms
Repreve padding
Recycled nylon
Organic cotton
Spread collar
Sorry, no results for ""
Subscription
Welcome aboard, welcome to north sails.
Stay up to date with the latest North Sails news.
Receive a 10% discount code for your first apparel order. Excludes sails and SUP’s. See our Terms and Conditions .
Yes, I agree to the terms of use and privacy policy.
ASYMMETRICAL VS. SYMMETRICAL SPINNAKERS
North sails expert brian janney explains why choosing a spinnaker means first understanding your own sailing style..

When it comes to downwind sails , there are a dizzying array of choices for today’s sailor. There are even two types of spinnaker: asymmetric and symmetric. So how do you decide what would be right for your boat and crew? The first step is to understand the difference between symmetric and asymmetric spinnakers.
What is a Symmetric Spinnaker?
Symmetric spinnakers are exactly the same shape either side of a vertical center line. The head/top of the sail attaches to the halyard. The two bottom corners are called clews (though once the sail is flying, the windward corner becomes the tack).
Symmetric spinnakers become more stable when the windward corner is attached to a spinnaker pole. This added equipment has to be rigged each time the sail is set, which is one reason why spinnakers earned a reputation for being hard to rig, fly, and douse.
The biggest benefit of symmetric spinnakers is the ability to sail deep angles. On some boats they will even fly when sailing dead downwind (180 degrees True Wind Angle, or TWA).
Different Types of Symmetric Spinnakers and Their Designs
We can’t sail DDW all the time, though. Some symmetric spinnakers are meant for reaching rather than running. Reaching spinnakers (designed for 100-135 degrees TWA) are flatter than runners (120-170 degrees TWA). Spinnakers are also designed to match specific wind ranges.
To differentiate between intended uses, sailmakers have developed a naming system that includes a letter and a number. Symmetric spinnaker types start with an S. The number follows these rules:
- Odd numbers are reaching sails
- Even numbers are running sails
- Numbers increase as designed wind strength increases
- Numbers run from 1-6, though 5 and 6 are only included in specialized inventories
So an S1 is a symmetric spinnaker designed for reaching in relatively light winds. An S3 is a symmetric spinnaker designed for reaching in slightly stronger winds. An S2 is ideal for running in lighter winds. An S4 is designed to handle more breeze, so it has less sail area than the S2.

What is an Asymmetric Spinnaker?
Asymmetric spinnakers are more triangular in shape than a symmetric spinnaker and have three distinct corners: head, clew, and tack. The head attaches to the halyard. The tack fastens to a tackline, which is attached to the forward end of a fixed pole or sprit at deck level. Two sheets attach to the clew and lead aft, one on either side of the mast.
The fixed pole or sprit eliminates the need for a floating spinnaker pole, which makes asymmetric spinnakers easier to set and douse than symmetric spinnakers. They do require a pre-rigged pole system, which is either permanently extended or deployed whenever the spinnaker is set.
Asymmetric spinnakers use the same numbering system to indicate different sail types, but they start with an A instead of an S. For example, an A2 is an asymmetric spinnaker designed for sailing deep angles in relatively light winds.

Choosing a Spinnaker: Symmetric vs Asymmetric
Which type of spinnaker is best for you? The quick answer is that symmetric spinnakers sail better at deeper angles and asymmetric spinnakers are better reachers. For a more thorough answer, you’ll need to think about the kind of sailing you do. Do you like to race? Symmetric spinnakers will be the best choice for most around the buoys racing. Offshore racers may want an asymmetric spinnaker to improve reaching speeds.
If you answer “cruising,” an asymmetric spinnaker is probably best. An asymmetric spinnaker requires less equipment, and you don’t need an experienced foredeck crew to set and douse. You can also add a dousing sock, or ask your sailmaker about furling options—that technology has improved dramatically since it was first introduced. Another cruising option is the gennaker , which is an all-purpose asymmetric downwind sail. As a reaching/ (almost) running sail w ith no spinnaker pole to worry about, gennakers are specifically designed to be a one-sail cruising solution.
Need help deciding between an asymmetric and symmetric spinnaker?
Still not sure what style would be best? Ask your local North Sails expert for help. You know your boat, and we know the sails, so together we’ll find the best solution for you.
Ask An Expert

GET IN TOUCH
REQUEST A QUOTE
BROWSE ALL SAILS
FIND YOUR SAIL
Featured stories, offshore sailing guide, how to care for your foul weather gear, npl renew faq.
- Refresh page

Spinnaker Dimensions Every Sailor Should Know
- June 14, 2023
The two types of spinnakers that we use on our boats (symmetrical and asymmetrical) both have a substantial width (girth), which allows then to propel the boat when reaching/running. It is because of this characteristic that the two types have been placed in the same category. Apart from the fact that they are both very wide, the two types of spinnakers are quite different. A symmetrical spinnaker has no defined tack or clew, while an asymmetrical one has three distinct corners, i.e., the Head, the Tack and the Clew. Boat owners therefore need to be familiar with specific dimensions for both types of spinnakers. These dimensions are going to be used for ordering a new spinnaker, putting together a selection of spinnakers according to your type of sailing, and complying with racing regulations.
To Order a New One
If you need to order a new spinnaker , you can simply measure an existing one . All measurements should be taken with the sail under sufficient tension to remove all wrinkles, but you need to make sure that the sail cloth is not stretched. However, you might not have your old spinnaker at hand, or you might want to order more spinnakers in order to have a selection of them on your boat. This will allow you to choose the spinnaker that is best suited for the current weather conditions. The availability and quality of crew is also a factor to consider: for example, using a symmetrical spinnaker will not be possible without sufficient and competent crew. If you are ordering spinnakers that are different from your existing ones, you will need to provide your sailmaker with the following dimensions.
For a symmetrical and asymmetrical spinnakers:
- Measure the max hoist.
- Measure the tack to sheeting block (or bow for symmetric spinnakers)
Read our new spinnaker measurement guide here .
If You Are into Racing
You need to know the following dimensions of your spinnaker in you take part in races (according to PHRF). The measurements should be taken of your largest symmetrical spinnaker and largest asymmetrical spinnaker.
Three dimensions are needed for a symmetrical spinnaker:
- Max girth (MG). When the spinnaker is folded in half, the MG is twice the maximum width of the sail measured from the center fold of the sail to the luff and leech.
- Luff length (LL) is the distance from the projected intersection of the luff and foot with the luff line under moderate tension.
- Foot (SF) is the distance from the tack to the clew measured in the shortest path on the surface of the sail.
Four dimensions are needed for an asymmetrical spinnaker:
- Asymmetrical spinnaker Mid Girth (AMG) which is measured from mid luff to mid leech under moderate tension.
- Luff length (SL or LL) is the distance from the projected intersection of the luff and foot with the luff line under moderate tension.
- Leech length (LE) is the distance from the projected intersection of the leech and foot with line under moderate tension.
- Foot is the distance from the tack to the clew measured in the shortest path on the surface of the sail.
Dimensions Needed for Calculating Spinnaker Area
Knowing the area of your largest symmetrical and asymmetrical spinnaker is necessary for obtaining a rating certificate. It might also enable you to feel more in control of your sailing and improve the planning of your sailing.
The following dimensions are needed to calculate the spinnaker area:
For a symmetrical spinnaker:
- SLE, or Spinnaker Leech.
- SLU, or Spinnaker Luff (same as SLE for a symmetrical spinnaker).
- SHW, or Spinnaker Half Width.
- SF, or Spinnaker Foot.
For an asymmetrical spinnaker:
- SLU, of Spinnaker Luff.
- SHW, or Spinnaker Half Width (distance from mid-point luff to mid-point leech).
The following formula is used for a basic calculation of the spinnaker area:
(SL x(SHW+SF)/2 x 0.95.

The Sailor’s Marketplace for Sailboats and Sails.
Sell Your Sailboat
Sailboats for sale.
- New Sailboats
- Used Sailboats
- Cruising Sailboats
- Racing Sailboats
Sell Your Sails
Sails for sail, sail manufacturers.
- North Sails
- Quantum Sails
- Doyle Sails
- UK Sailmakers
Sailing Reviews
- Sailing Line
- Safety Equipment
- Sailing Accesories
As an Amazon Associate SailTrader earns from qualifying purchases.
This website uses cookies to ensure you get the best experience possible.
Sail better with iSpinnakers.com
Ready to set sail this season?
Downwind sails and furlers: explore our offerings.
Asymmetric or Symmetric
We advise you within our range of options to optimize your sailing experience, budget, and wishes for personalization. Find the perfect fit!
Cover a wide range of AWA
From our Cruising Code Zero to very technical Code Zero sails, our range covers a wide range of AWA. Talk to us for advice on these sails and the right furler for them.
Make your sailing easier!
Furlers are great for sailing with an asymmetrical spinnaker or a code zero. At iSpinnakers, we chose Seldén as the only furler brand we sell.
How to choose your sail?
First spinnaker? Check out our tips for a first spinnaker here . If you are not sure where to start but have some basic knowledge of spinnakers, check our tips for choosing a spinnaker.
Wondering what size to choose? Check our sizing page for a general understanding of how to size a spinnaker, or check our pages by brand to find your boat.
And here are 10 reasons to buy from us .
Customer stories
Our customers sail all around the world! Discover some of their stories
Beneteau oceanis 473, Australia
Ms Connor, owner of Wonderland, is an owner/skipper who races in Australia. iSpinnakers designed a custom color asymmetrical spinnaker with logo for Wonderland. Photo credit: Wonderland
Jeanneau DS45, Spain
Sergi and Raquel sail their Jeanneau 45DS everywhere in the Mediterranean see. iSpinnakers designed a white asymmetrical spinnaker with logo for Viviravela. Photo credit: Viviravela
At iSpinnakers, we know you like to stand out on the water. That’s why you can build you own color theme, either for our standard sails or our custom cut sails. Just use our colorizer. You can even add a logo!
Build your own asymmetrical or symmetrical spinnaker
Choose from 13 colors and personalize your spinnaker Add a logo!
We will help you select the perfect spinnaker based on your budget, sailing experience, and wishes for personalization. These are the starting points to guide you towards the right spinnaker and accessories for your boat.
If you want to buy a spinnaker sail in the USA, use our store in USD.
- Types of Sailboats
- Parts of a Sailboat
- Cruising Boats
- Small Sailboats
- Design Basics
- Sailboats under 30'
- Sailboats 30'-35
- Sailboats 35'-40'
- Sailboats 40'-45'
- Sailboats 45'-50'
- Sailboats 50'-55'
- Sailboats over 55'
- Masts & Spars
- Knots, Bends & Hitches
- The 12v Energy Equation
- Electronics & Instrumentation
- Build Your Own Boat
- Buying a Used Boat
- Choosing Accessories
- Living on a Boat
- Cruising Offshore
- Sailing in the Caribbean
- Anchoring Skills
- Sailing Authors & Their Writings
- Mary's Journal
- Nautical Terms
- Cruising Sailboats for Sale
- List your Boat for Sale Here!
- Used Sailing Equipment for Sale
- Sell Your Unwanted Gear
- Sailing eBooks: Download them here!
- Your Sailboats
- Your Sailing Stories
- Your Fishing Stories
- Advertising
- What's New?
- Chartering a Sailboat
- Spinnaker Sails
Can Spinnaker Sails be The Cruisers' Friends?
Racing skippers hoist their spinnaker sails at the first opportunity in wind strengths that would have me thinking about putting the second reef in. OK, they're normally fully crewed and we on Alacazam are usually just the two of us, but even so...
We cruising types aren't looking to get to our destination before anyone else, but just to sail reasonably quickly, efficiently and in some comfort.
But sailing dead downwind in light airs, nothing beats one of the conventional types of spinnaker. Much less stressful though, and almost as quick, is to bear up a little until the wind's not less than 20 degrees off the stern, and use an 'asymmetric' or 'cruising spinnaker'.
Gennaker, cruising chute, asymmetric or multi-purpose spinnaker, essentially they're all the same thing, although I have heard the asymmetric spinnaker described as 'a cruising chute on steroids'...
The Difference Between Asymmetrics and Conventional Spinnakers
One difference is the spinnaker pole; conventional spinnakers have them and asymmetric spinnakers don't. It's the pole that enables conventional 'symmetric' spinnakers to be squared off and set directly across the airflow, enabling them to pull the boat directly downwind.
In the absence of a pole, asymmetric spinnaker sails have a tackline (rather than the 'guy' of a conventional spinnaker) which is lead back to the cockpit through a block at the stemhead. This means that the sail can be set to one side of the boat or the other, but not equally either side of the boats centreline.
Consequently the luff and leech are different lengths on an asymmetric - the luff being the longer - which is why they're, er, asymmetric.
Finally, the asymmetric has about 25% less area than conventional spinnaker sails, but still about twice the size of a 150% genoa.
Asymmetric Spinnaker Sails

This is what you need when the wind moves further aft and the lightweight genoa collapses, but you should never be tempted to fly it on its own as shown here. Without being able to use a full main to blanket it, you'll have the devil of a job to get it down.
Hoisted on the spinnaker halyard and controlled by a sheet lead through a block on the quarter, spinnaker-like performance can be had on all points of sail from a close-reach to a broad reach without any of the trauma.
When close-reaching, the adjustable tack line is pulled down, tightening the luff and encouraging the sail to act more like a genoa. They're at the operating limit when the wind is on the quarter - any further aft and they'll be blanketed by the main and will collapse.
It's very likely that the foredeck layout, and particularly the pulpit, won't have been designed with one of these sails in mind. There'll probably be nowhere ahead of the forestay you can attach a tackline block to - and if there is, the tackline will chafe against the pulpit or the bow anchor.
Short Bowsprits for Asymmetrics

All of these problems would be solved by a short bowsprit.
At least one spar manufacturer has recognized this and has produced a very neat device that's attached to a ring on the foredeck and is restrained by a collar fixed to the stemhead fitting.
And as it's removable you won't get charged for it in marinas.
Set further forward the sail will be operating in clearer air, and will be more efficient as a result.
Selden Mast Ltd manufacture a short aluminium bowsprit kit for asymmetrics and a much more expensive carbon fibre version.
Panel Design for Asymetric and Conventional Spinnaker Sails
There are three designs for asymmetric and conventional spinnaker sails; all have radially cut heads, and each has a slightly different application:

Starcut: a slightly flatter cut than the next two, and optimized for reaching.

Radial head: cut fuller than the starcut, and with wider shoulders. More stable downwind than the starcut, but less so closer to the wind.

Tri-radial: probably the best allrounder for most of us, easily trimmed and with an operating range of 70° to 160° of the wind.
Conventional Spinnaker Sails
Unlike their asymmetric brothers, which are tacked to the centerline, the tack of a conventional spinnaker is attached to the end of a pole which can be squared-off to the wind. Now operating in clear air, unaffected by the mainsail, this sail will propel you dead downwind.

Artwork by Andrew Simpson
This performance benefit comes at the cost of complexity. Positioning the end of the pole at the correct position in space requires three control lines - a guy, a pole uphaul and a downhaul.
The clew is controlled by a sheet lead through a block on the quarter. In gusty conditions - where this sail's reputation for being unmanageable is usually gained - rapid adjustment to sheet and guy is required.
If allowed to get out of control, heavy rolling can develop leading in all probability to a broach. A broach to leeward is no fun, but a windward broach (putting the spinnaker pole into the water and causing a crash gybe of the boom and mainsail) can have very serious consequences indeed.
Many cruising sailors view all of this with a deal of trepidation, but others - often those used to inshore racing around the cans - gleefully drag out the spinnaker bag whenever the wind gets aft of the beam.
Snuffers, or Socks, for Spinnaker Sails

Whilst racing crews will launch their spinnaker sails ('throw the kite up', as they may nonchalantly remark) directly from the spinnaker bag and subsequently wrestle it to the deck at the leeward mark, we cruisers should give a collective vote of the thanks for the existence of the spinnaker snuffer.
Very much along the lines of a bottomless plastic bucket at the lower end of a canvas sock the whole shebang is operated from the foredeck by an endless rope.
Hoist the sail to its full height in the snuffer. Secure the tack line, then ease the sock line and trim the sheet. The snuffer will lift to the head as the sail fills.
Dropping: ~
Ease the sheet and haul on the snuffer line. Once the sail is secure in its snuffer it can be lowered to the deck.
More about Sails...

Are Molded and Laminate Sails One Step Too Far for Cruising Sailors?
Although woven sails are the popular choice of most cruising sailors, laminate sails and molded sails are the way to go for top performance. But how long can you expect them to last?

Is Carrying Storm Sails on Your Cruising Boat Really Necessary?
It's good insurance to have storm sails available in your sail locker if you are going offshore, and these are recommended fabric weights and dimensions for the storm jib and trysail

Understanding Sail Dimensions and Sail Area Calculation
You might think that the only sail dimensions you need to calculate their areas would be the length of the foot and the height of the luff. But you would be wrong
The Mainsail on a Sailboat Is a Powerful Beast and Must Be Controlled
Learn how to hoist the mainsail, jibe it, tack it, trim it, reef it and control it with the main halyard, the outhaul, the mainsheet and the kicker.
Is Dacron Sail Cloth Good Enough for Your Standard Cruising Sails?
Whilst Dacron sail cloth is the least expensive woven fabric for standard cruising sails, do the superior qualities of the more hi-tech fabrics represent better value for money?
Recent Articles
A Hunter Passage 42 for Sale
Jul 16, 24 01:41 PM
The Wauquiez Centurion 40 Sailboat
Jul 15, 24 04:50 AM
The Elan 431 Sailboat
Jul 13, 24 03:03 AM
Here's where to:
- Find Used Sailboats for Sale...
- Find Used Sailing Gear for Sale...
- List your Sailboat for Sale...
- List your Used Sailing Gear...
Our eBooks...

A few of our Most Popular Pages...

Copyright © 2024 Dick McClary Sailboat-Cruising.com
Please verify you are a human
Access to this page has been denied because we believe you are using automation tools to browse the website.
This may happen as a result of the following:
- Javascript is disabled or blocked by an extension (ad blockers for example)
- Your browser does not support cookies
Please make sure that Javascript and cookies are enabled on your browser and that you are not blocking them from loading.
Reference ID: 61d87508-456e-11ef-a466-d90af92293e0
Powered by PerimeterX , Inc.
Don't Miss a Weekend of Sailing, Order Our In-Stock Sails
Country/region
- Anguilla USD $
- Antigua & Barbuda USD $
- Aruba USD $
- Australia USD $
- Austria USD $
- Bahamas USD $
- Barbados USD $
- Belgium USD $
- Belize USD $
- Bermuda USD $
- British Virgin Islands USD $
- Canada USD $
- Caribbean Netherlands USD $
- Cayman Islands USD $
- Costa Rica USD $
- Curaçao USD $
- Czechia USD $
- Denmark USD $
- Dominica USD $
- Dominican Republic USD $
- El Salvador USD $
- Finland USD $
- France USD $
- Germany USD $
- Greenland USD $
- Grenada USD $
- Guadeloupe USD $
- Guatemala USD $
- Haiti USD $
- Honduras USD $
- Hong Kong SAR USD $
- Ireland USD $
- Israel USD $
- Italy USD $
- Jamaica USD $
- Japan USD $
- Malaysia USD $
- Martinique USD $
- Mexico USD $
- Montserrat USD $
- Netherlands USD $
- New Zealand USD $
- Nicaragua USD $
- Norway USD $
- Panama USD $
- Poland USD $
- Portugal USD $
- Singapore USD $
- Sint Maarten USD $
- South Korea USD $
- Spain USD $
- St. Barthélemy USD $
- St. Kitts & Nevis USD $
- St. Lucia USD $
- St. Martin USD $
- St. Pierre & Miquelon USD $
- St. Vincent & Grenadines USD $
- Sweden USD $
- Switzerland USD $
- Trinidad & Tobago USD $
- Turks & Caicos Islands USD $
- United Arab Emirates USD $
- United Kingdom USD $
- United States USD $
Item added to your cart
Collection: spinnakers, cruising spinnaker - 25.5, cruising spinnaker - 48.0, cruising spinnaker - 52.0, cruising spinnaker - 54.0, cruising asymmetrical spinnaker - size 0, cruising asymmetrical spinnaker - size 1, cruising asymmetrical spinnaker - size 2, cruising asymmetrical spinnaker - size 3, cruising asymmetrical spinnaker - size 4, cruising asymmetrical spinnaker - size 5, cruising asymmetrical spinnaker - size 6, cruising asymmetrical spinnaker - size 7, cruising asymmetrical spinnaker - size 8, cruising asymmetrical spinnaker - size 9, cruising asymmetrical spinnaker - size 10, cruising asymmetrical spinnaker - size 11.
- Choosing a selection results in a full page refresh.
- Opens in a new window.
Rigging a spinnaker
The spinnaker is a powerful sail that provides plenty of downwind sailing fun. The asymmetric spinnaker shown here is the spinnaker of choice for all modern dinghy classes, having taken over from the traditional and more complex symmetrical spinnaker.
RIGGING A SPINNAKER
When not in use, a modern spinnaker is stowed, ready rigged, in a chute that runs the length of the foredeck and back toward the cockpit. The spinnaker halyard is a continuous loop of rope led through the spinnaker chute to the bow of the dinghy, diagonally up to a fixed block on the mast, down the mast, and back around a turning block inside the cockpit. Pulling the halyard backward hoists the spinnaker up the mast; pulling the halyard forward pulls the spinnaker back inside its chute.
Choose a quiet day for rigging, put the boat where there is plenty of space, and lay the spinnaker out flat beside it. First of all, look carefully at the shape of the sail to identify the three corners.
The tack (bottom forward corner) is secured to the forward end of the spinnaker pole; the head (top corner), is attached to the uphaul end of the halyard; the clew, or outer corner, is attached to sheets. There are patches supporting rings on the vertical mid-line of the sail, through which the downhaul is led. These help to gather the sail into the chute when it is lowered.
after rigging, do a test hoist before you go on the water. Face the boat into the wind and pull up the halyard slowly to ensure that there are no twists in the sail or sheets, and that you have the three corners of the sail the right way round. Then retrieve it carefully into the chute, keeping it well clear of anything that might snag the sail.

RIGGING A spinnaker

3 Tie the two free ends of the spinnaker sheets together in the cockpit. When the crew grabs the sheet, it can be pulled either way.
4 The downhaul end of the halyard passes through a tack ring to a patch further up the sail. This helps gather the sail when you pull it down.

5 Check that the downhaul pulls the whole sail inside the chute, with just the head and clew protruding. The spinnaker is now ready for hoisting.
HANDLiNG THE spiNNAKER
To hoist, drop, or jibe the spinnaker, the helmsman must bear off downwind until sideways force on the rig is reduced to a minimum. This ensures that both crew can work safely from the center of the boat, with the mainsail blanketing the spinnaker area.

1T0 hoist the spinnaker, pull the halyard hand over hand as fast as possible to ensure that the sail does not catch on the bow.
As the crew continues to hoist the spinnaker, the helmsman maintains a steady downwind course to prevent the spinnaker filling too soon.
3 With the spinnaker fully hoisted and the halyard cleated, the crew sheets in as the helmsman luffs on to a broad reach to power the sail.
The powerful spinnaker quickly lifts the dinghy on to a plane

Sailing with a spinnaker
The popular asymmetric spinnaker shown here is easy to use and provides boost when sailing downwind on a broad reach and responds to the slightest of breezes.
STEERING WITH A SPINNAKER
The technique for sailing with an asymmetric spinnaker relies on sailing the boat flat at full speed on a broad reach, bearing away when a gust hits so that the boat stays level with less sideways pressure on the sails, then luffing as the gust passes to keep the boat flat with increased sideways pressure. This means that unless the wind is absolutely steady, you will never sail perfectly straight line toward your target. Instead, you will keep steering in a series of smooth curves to port or starboard to ensure the boat stays flat and fully powered.
Never sail low and go slow with a spinnaker. Always head up and sail fast, then bear away on the apparent wind.
DROPPING A SPINNAKER
Bear right away for the drop, so that the spinnaker is blanketed and the crew can work from the center of the boat. To control the drop, the crew can stand on the sheet or pass it to the helmsman, then take up all slack on the retrieval line before uncleating the halyard. Pull the spinnaker back into its chute as quickly as possible.

Upwind "no spinnaker" zone
BALANCING THE BOAT
Helmsman and crew should work together to keep the boat as level as possible on the water for maximum speed. The crew constantly trims the spinnaker to make the most of the wind.
Zone to raise spinnaker
SAFE SPINNAKER WORK
There is least pressure on the spinnaker when the wind is directly astern of the dinghy. As soon as the boat luffs on to a broad reach, you move into a "power zone" where the spinnaker will catch the wind, power up, and make hoisting or dropping the spinnaker less safe.
Power zone sailing with a spinnaker
JIBING WITH A SPINNAKER
Dinghies with asymmetric spinnakers sail a direct downwind course by jibing from side to side on a series of broad reaches. When jibing with a spinnaker, the helm should steer a gentle curve from broad reach to broad reach, matching the speed of the turn to the ability of the crew to cross the boat and sheet in the spinnaker on the new side. The boat should stay flat and keep moving at speed throughout the jibe, rather than slowing right down and getting knocked over by the apparent wind.
While concentrating on the spinnaker, don't forget that the mainsail is also jibing, with the boom swinging across the cockpit.

Keep speed up throughout the jibe. Sailing fast reduces load on the rig as the mainsail comes across and the crew sheets in on the new side.

The crew gets ready for the jibe by moving into the cockpit and taking up slack on the new sheet.

2 Bearing off downwind, the crew pulls on the old sheet to flatten the spinnaker in mid-jibe.
4 The helmsman straightens the boat out on the new course.
The crew trims the spinnaker so the luff is just starting to curl, which provides maximum power.
3 The crew pulls in the new sheet and lets the old sheet run free, while moving onto the side deck.

"a good helmsman... uses all his senses—even his sense of smell!'
Arthur Knapp
Continue reading here: Simple trapezing
Was this article helpful?
Recommended Programs

Myboatplans 518 Boat Plans
Related Posts
- Inverted capsize drill - Sailing Techniques
- Setting a symmetrical spinnaker
- Setting an asymmetrical spinnaker
- Using Symmetrical and Asymmetrical Spinnakers
- Rigging the Flopper Stopper
- Storing and transporting a dinghy
Readers' Questions
How t rig a 49er for the spinnaker?
Rigging a 49er for the spinnaker involves a series of steps and requires specific equipment. Here's a general guide on how to do it: Gather the necessary equipment: You will need a spinnaker sail, spinnaker halyard, two spinnaker sheets, two spinnaker blocks, two spinnaker cleats, and a spinnaker pole. Attach the spinnaker halyard: Attach one end of the spinnaker halyard to the head of the spinnaker sail and run the other end through the masthead sheave and down to the cockpit. Install the spinnaker blocks: Attach the spinnaker blocks to the port and starboard side of the hull, near the mast. These blocks will guide the spinnaker sheets. Install the spinnaker cleats: Attach the spinnaker cleats close by the spinnaker blocks. These cleats will secure the spinnaker sheets once they are adjusted. Attach the spinnaker pole: Connect the spinnaker pole to the mast and secure it with a pole-up hauler. Rig the spinnaker sheets: Attach each spinnaker sheet to the spinnaker clew and run them through the spinnaker blocks. Make sure the sheets are free of any twists or tangles. Set up the control lines: Adjust the spinnaker halyard tension using a halyard tensioning system. Connect the pole-downhaul line to the pole and run it back to the cockpit for easy control. Prepare the spinnaker: Flake the spinnaker sail and attach the spinnaker sock or bag to contain the sail when not in use. Hoist the spinnaker: Hoist the spinnaker by pulling the halyard while someone guides the spinnaker with the control lines, ensuring it flows smoothly. Control the spinnaker: Use the spinnaker sheets for controlling the sail's angle of attack and adjust the pole position and downhaul to maintain a proper shape. Keep in mind that this is a general guide and specific rigging steps may vary depending on the type of 49er or personal preferences. It's always recommended to consult your boat's manual or a professional for detailed instructions.
“As an Amazon Associate I earn from qualifying purchases at no additional cost to you”
Types of Spinnakers Symmetrical vs Asymmetrical vs Gennakers
So, what’s the difference between Symmetrical Spinnakers, Asymmetrical Spinnakers and Gennakers? What are they each best suited for? Let’s find out.
Starting with the basics; a spinnaker is a large balloon-like downwind sail typically used on points of sail between a beam reach and a run. Modern sailboat designs tend to be a little inefficient going downwind and spinnakers help to speed things up. We’re going to cover three types of spinnakers; symmetrical, asymmetrical and gennakers (a cross between a genoa (a big jib) and a spinnaker).
Note: This is a plain english guide so please forgive the lack of terminology if you’re a more advanced sailor.
The key physical differences between spinnaker types
Symmetrical Spinnakers are attached at these 3 points:
- The top is hoisted up the mast typically to about 2/3rds of it’s height.
- The leeward side (side furthest from the wind eg. on the same side as boom) flies freely with a sheet attached coming back to the cockpit.
- The windward side (side closest to the wind eg. opposite side to boom) is attached to a pole and a sheet; the sheet goes back to the cockpit and the pole is clipped on it’s other side to the mast.
The pole is typically supported by two sheets; an uphaul and a foreguy. The uphaul holds the pole up and is connected to a higher point on the mast. The foreguy is attached to a point towards the bow of the boat and pulls the pole forward towards the bow or is loosened to allow it to move further back towards the cockpit.
Asymmetrical Spinnakers are attached at these 3 points;
- The top is typically attached to the top of the mast by a halyard.
- The bottom is attached to a bowsprit (essentially a pole sticking out from the bow of the boat)
- The remaining end has two sheets attached to it, these allow it to be sheeted in back at the cockpit. One sheet is for the port side while the other is for the starboard side.
When the spinnaker is out on the port side for example, the port side sheet will be connecting this end of the spinnaker to the cockpit. If the boat is gybed then the starboard sheet is used to pull the spinnaker around to the starboard side of the boat. The sheet not in use is either led through the gap between the forestay (wire connecting mast to bow of boat) and the top of the bowsprit or if space doesn’t allow then it is led around the front of the bowsprit.

Gennakers are attached at these 3 points:
- The top is attached to the top of the mast by a halyard.
- The bottom is attached to the bow of the boat. ( This is the key difference between a gennaker and an asymmetric spinnaker)
- The remaining end is sheeted back to the cockpit with a similar sheet setup to that described for asymmetrics above.
So, a gennaker is basically the same as an asymmetric spinnaker except it is attached to the bow of the boat rather than to a bowsprit.

Pros & Cons and best use for each type
Symmetrical
- Well suited to deeper downwind courses from broad reaches to straight runs.
- Large & Powerful sail
- Can be difficult to set up and handle due to the pole.
- Requires more experienced crew to fly effectively.
- Gybing is a trickier process.
Symmetrical spinnakers are best suited for sailing straight downwind (a run). They provide the best power on this point of sail and are one of the few sails suited to this point of sail.
Asymmetrical
- Easier to handle, set up and gybe than symmetrical due to the lack of a pole.
- Efficient on beam reaches through to broad reaches.
- Simpler equipment
- Inefficient on runs as they fall into the wind shadow of the mainsail.
- Requires boat to have a bowsprit.
Asymmetrical Spinnakers are best suited to sailing between beam and broad reaches. Many competitive sailors find it is faster to sail in a zigzag course of broad reaches using an asymmetrical rather than to sail on a run with a symmetrical. This is made easier by the fact that they are simpler to gybe with also.
- Requires minimal equipment (eg. no bowsprit or pole required)
- Really simple to set up, handle and gybe.
- Inefficient on runs as it’s also in the wind shadow of the mainsail.
- Less powerful than asymmetrical or symmetrical.
Gennakers are best suited for sailing between beam reaches and broad reaches where the boat does not have a bowsprit. It may be more suitable than an asymmetric for stronger winds and /or less experienced crews due to its lesser power and greater ease of use.

Hopefully you now understand the main differences and best use cases for these sails! To do a quick recap:
To sail effectively on a straight run ; use a symmetrical spinnaker. Just make sure you practice the process of setting it up and handling it with your crew as the pole can make it a tad more difficult than other sails.
For the best efficiency and ease of use ; consider using an asymmetric spinnaker, it has great power and is a lot easier to handle and gybe with. Best suited to broad reach zigzags downwind rather than straight runs.
For simplicity and ease of use, especially in stronger winds ; use a gennaker, it’s basically as easy to handle and set up as a Jib while being considerably more powerful for points of sail between beam and broad reach.
Related Read:
The Top Best Comfortable Drysuits for Dinghy Sailing
The 5 Best Offshore Life Jackets for Sailing
Thanks for reading! Have any questions or feedback? Feel free to leave a comment below.

Bill has been involved in sailing for the past 11 years and previously worked as an ISA sailing & powerboat instructor.
2 thoughts on “Spinnaker Types (Asymmetrical vs Symmetrical vs Gennaker)”

Thanks for this. So I have never sailed with any of these large spinnaker type sails…but am about to I think. My understanding is there is also a “drifter’ which is more of an upwind light air sail…is that true?

No problem, thanks for getting in touch! Exciting stuff, they are definitely exciting and challenging sails to get started with. A day with lighter winds (5-10 knots) would be ideal for getting to grips with them. So, a drifter is essentially a very lightweight genoa which can be used effectively in light winds when a heavier spinnaker may not fly effectively, here’s a link to a nice article I found about them; https://www.riggingdoctor.com/life-aboard/2018/7/9/most-useful-sail-the-drifter
Cheers and thanks for reading, Bill
Leave a Reply Cancel reply
Your email address will not be published. Required fields are marked *
- Techniques & Guides
- Yacht Equipment
- Personal Gear
Made by Dancing Data.
Disclosure . Terms and Conditions . Privacy Policy
JavaScript seems to be disabled in your browser. For the best experience on our site, be sure to turn on Javascript in your browser.
- My Wish List
- Compare Products
- Create an Account
- Dealer Locator
DISCOVER ORBIT WINCHES™
Official Sponsors of the Australian Sailing Team
Spinnaker Rigging: Everything You Need to Know
by Emma Sullivan | Aug 5, 2023 | Sailboat Gear and Equipment

Short answer: Spinnaker rigging
Spinnaker rigging refers to the arrangement of ropes, lines, and hardware used in setting up and controlling a spinnaker sail on a sailboat. It involves attaching the spinnaker to a halyard, sheets, and guys that allow for hoisting, trimming, and adjusting the sail’s position and shape while sailing downwind.
Understanding the Basics of Spinnaker Rigging: A Comprehensive Guide
It’s no secret that sailing is an intricate and captivating sport. As enthusiasts, we often find ourselves delving into various aspects of this beautiful activity, seeking to improve our knowledge and skills on and off the water. One area that deserves our attention is spinnaker rigging — an essential component of sailboat racing and cruising alike.
At first glance, spinnaker rigging may seem like a complex tapestry of ropes and hardware, but with a careful understanding of its basics, you’ll be able to effortlessly maneuver your boat through the winds like a seasoned sailor. In this comprehensive guide, we will dive into the world of spinnaker rigging, unraveling its intricacies while providing you with all the essential tips and tricks you need to know.
So, what exactly is spinnaker rigging? In simple terms, it refers to the setup and configuration needed for hoisting, controlling, and dousing your spinnaker sail . The spinnaker sail itself is a large, billowing sail used primarily on downwind courses to catch as much wind as possible. Its unique shape enables sailors to harness favorable wind angles that would otherwise be unattainable with conventional sails.
Now that we understand the purpose of a spinnaker sail let’s dive into its rigging specifics! The first fundamental aspect to consider when setting up your spinnaker rigging is the halyard. This rope controls how high or low your spinnaker sits relative to other sails . To ensure optimal performance, it’s crucial to have a tight halyard tension while allowing some flexibility for adjustments during different wind conditions.
Next up are sheets – ropes used for controlling the actual position of the spinnaker relative to your boat’s course. They are responsible for managing both trim (achieved by adjusting tension) and ease (letting out some rope to allow the sail to fill with wind). Proper sheet control is paramount in maximizing the spinnaker’s effectiveness, as even slight adjustments can significantly impact boat speed and stability.
But wait, there’s more! The concept of guys comes into play when it’s time to stabilize your spinnaker. Guys are essentially ropes that prevent excessive movement of the spinnaker while keeping it in check during various maneuvers like jibes or gybes . These typically run from the corners of the sail down to strategic positions on your boat ‘s deck, ensuring that everything stays in place as you traverse through different wind conditions.
Now that we’ve unraveled some basic elements of spinnaker rigging let’s delve into a crucial consideration – setting up a snuffer system. Snuffers are ingenious devices designed to ease the deployment and retrieval processes of your bulky spinnaker. They work by encapsulating the sail within their confines and allowing for efficient hoisting and dousing without fear of tangling or uncontrolled flying.
In addition to understanding each component individually, it is crucial to comprehend how they all interact harmoniously. The interplay between halyard tension, sheet control, guy positioning, and snuffer dynamics will determine how efficiently your spinnaker operates – ultimately leading to enhanced performance on the water.
While mastering these basics is vital, it’s equally important never to underestimate personal experience and practice. Sailing is an art form where intuition plays a significant role in making real-time decisions. So get out on the water and experiment with different rigging setups until you find what works best for you and your boat!
With this comprehensive guide under your belt, you should now feel equipped to take on the world of spinnaker rigging with confidence. Remember, mastering this aspect of sailing will not only enhance your overall skills but also breathe new life into every adventure you embark upon. Happy sailing!
Step-by-Step Guide to Spinnaker Rigging: From Start to Finish
Are you ready to take your sailing adventures to the next level? Then it’s time to master the art of spinnaker rigging. The spinnaker is a powerful sail that can propel your boat with incredible speed and grace, but rigging it correctly is crucial for optimal performance. In this step-by-step guide, we will walk you through the entire process, from start to finish, ensuring that you become a true expert in spinnaker rigging.
Step 1: Prepare Your Boat and Gear Before diving into the intricacies of spinnaker rigging, it’s essential to ensure that your boat is in perfect condition and properly stocked. Check if all lines, blocks, pulleys, and other equipment are functional and appropriately sized for your sailboat . With everything set up beforehand, you’ll save valuable time during the rigging process.
Step 2: Understand Your Spinnaker Spinnakers come in various shapes and sizes depending on their intended use. Familiarize yourself with different types such as asymmetrical or symmetrical spinnakers and understand their specific purposes. Make sure you have the right one for your needs before proceeding.
Step 3: Set Up Your Tack Line The tack line plays a crucial role in maintaining control over the lower corner of the spinnaker sail when hoisted. Attach one end securely near the bow sprit or anchor roller using an appropriate hook or snap shackle. Run it towards the cockpit area through any necessary fairleads or blocks to enable easy adjustment later on.
Step 4: Positioning Sheet Lines Sheet lines are responsible for controlling the shape of your spinnaker by adjusting tension on its corners throughout different wind conditions. Place each sheet line near their respective positions at either side of your boat ‘s stern or cockpit area. Ensure they are free from twists or kinks, enabling smooth operation during spinnaker rigging.
Step 5: Attach and Hoist the Spinnaker Carefully connect the head of your spinnaker sail to a halyard using a shackle or appropriate knot. Take note of any pre-marked measurements on your halyard for consistent hoisting. Apply tension to avoid excessive sagging without causing any unnecessary strain on both the sail and halyard. Slowly raise it until fully extended, maintaining control throughout this process.
Step 6: Adjust Your Tack Line With the spinnaker hoisted, gradually adjust the tack line’s length to achieve the desired shape and position of the lower corner. A shorter tack line will bring the sail closer to the centerline while a longer one allows for more extensive reaching angles. Experiment with different settings until finding an optimal balance between speed and control.
Step 7: Fine-tune Sheet Lines Now that everything is set up, focus on fine-tuning your sheet lines to optimize performance . Keep in mind that wind conditions may vary, requiring adjustments as you sail. Communicate with your crew members and know when to ease or trim these lines accordingly for maximum efficiency.
Step 8: Know When It’s Time to Douse As experts say, all good things must come to an end – even exhilarating sailing adventures ! Familiarize yourself with proper dousing techniques well in advance. Practice communication and coordination within your crew to ensure safe and efficient spinnaker removal before it gets out of hand in stronger winds or tricky situations.
Congratulations! You have now successfully completed our step-by-step guide to spinnaker rigging from start to finish. With practice and experience, you’ll become a master at setting up this incredible sail that opens up new possibilities for thrilling sailing experiences.
Remember, always prioritize safety during every aspect of sailing – from preparation to execution – as with any water activity. So, go ahead and embrace the exhilaration of spinnaker rigging while staying confident and in control on the high seas!
Commonly Asked Questions about Spinnaker Rigging, Answered
Introduction:
Spinnaker rigging is an important aspect of sailing that can greatly enhance your racing or cruising experience . However, it often comes with a multitude of questions and uncertainties. In this blog post, we will tackle some commonly asked questions about spinnaker rigging and provide detailed, professional, witty, and clever explanations to help you navigate through the waters smoothly.
1. What is spinnaker rigging, and why is it essential?
Spinnaker rigging refers to the system of lines, blocks, and fittings used to control the deployment and trimming of a spinnaker sail . This specialized setup allows sailors to optimize their sailing performance by harnessing the power of down wind winds efficiently . By effectively managing spinnaker rigging, not only can you improve speed but also maintain better control over your boat ‘s balance.
2. How do I choose the right size and material for my spinnaker sheets?
When selecting spinnaker sheets – the lines attached to the corners of the sail – there are two crucial factors to consider: size and material.
Size: The appropriate size depends on your boat’s dimensions and intended use for the spinnaker sail . Generally, larger yachts require thicker sheets for increased strength while smaller boats can get away with smaller diameters for weight-saving purposes.
Material: Common materials used for spinnaker sheets include polyester, polypropylene, or a blend of both. Polyester offers excellent grip and durability while polypropylene offers lower stretch characteristics ideal for lighter wind conditions. A clever solution would be using a hybrid sheet made from both materials strategically – providing strength where needed while keeping weight down in other areas.
3. How can I prevent my pole from collapsing when flying a symmetric spinnaker?
The collapse of a spinnaker pole can quickly turn into comedy (or tragedy) at sea! To avoid this hilarious mishap during symmetrical spinnaker usage:
– Ensure the topping lift tension is adequately adjusted, keeping it tight enough to support the weight of the pole without hindering its vertical movement. – Use a guy or downhaul line to secure the spinnaker pole and counteract downward forces caused by the sail’s pull. – Implement a preventer system that restricts horizontal movements, thus preventing excessive lateral load on the pole.
By combining these techniques and ensuring proper adjustment, your spinnaker pole will be dancing with joy rather than collapsing in despair.
4. How can I improve my gybing technique with an asymmetrical spinnaker?
Gybing an asymmetrical spinnaker efficiently requires practice, precision, and a touch of finesse. Here are some professional tips for executing smooth gybes:
– Start by easing the old sheet slightly before initiating the gybe to relieve tension and facilitate a controlled transfer. – Time the gybe carefully with waves or gusts to utilize their momentum for smoother transitions. – Maintain communication with your crew – witty banter during intense moments can lighten up any situation! – Utilize a boom brake or preventer system to control boom movement during gybes, preventing sudden jolts and potential accidents.
Remember, perfection comes with practice. With time and determination, your asymmetrical spinnaker gybes will be polished pieces of sailing artistry!
Conclusion:
Spinnaker rigging may appear daunting initially, but armed with knowledge and some quirky humor along the way, you’ll become a masterful sailor capable of navigating through any question thrown at you. By understanding key concepts such as choosing appropriate materials, employing smart techniques for handling poles or sails and refining your gybing skills – there will be no challenge too great for you to conquer! So go ahead, set sail into the vast ocean of spinnaker rigging expertise – adventure awaits!
Mastering the Art of Spinnaker Rigging: Expert Tips and Techniques
Title: Mastering the Art of Spinnaker Rigging: Expert Tips and Techniques
Introduction: Sailing enthusiasts will agree that there’s no better feeling than harnessing the power of a spinnaker sail , gracefully propelling your boat through the water. However, mastering the art of spinnaker rigging can be a daunting task for even experienced sailors. To make your journey towards becoming a spinnaker rigging expert both enjoyable and rewarding, we have compiled a set of tried-and-tested tips and techniques that will help you raise your sailing game to new heights.
1. Understanding Spinnakers: Before delving into the intricacies of rigging, it’s crucial to understand different types of spinnakers and their role in sailing. From asymmetrical to symmetrical designs, each variant serves a specific purpose depending on wind conditions and desired boat performance. Acquaint yourself with these variations to ensure optimal selection for various scenarios.
2. Choosing the Appropriate Spinnaker Rigging Gear: To master anything, one must first have reliable tools at their disposal. When it comes to spinnaker rigging, investing in high-quality equipment is essential . Opt for top-notch halyards, sheets, blocks, shackles, and winches suitable for your boat’s specifications. This ensures fluid adjustments during operation while minimizing any potential snags or malfunctions.
3. The Art of Tying Perfect Knots: Successful spinnaker rigging relies heavily on secure knots that won’t unexpectedly unravel under pressure while allowing easy adjustment if needed. Apart from classic knots like bowline or clove hitch , learning specialty knots like the “twist lock” or “figure-eight knot” specifically designed for spinnakers can make all the difference when hoisting or trimming these sails.
4. Preparing Your Rigging System: Effective preparation is key to smooth sailing experiences with spinnakers onboard. Ensure that your mast, boom, blocks, and halyards are all correctly positioned and in good functional condition. Regular maintenance of these components will not only extend their lifespan but also enhance your overall rigging efficiency .
5. The Art of Setting Up Controls: Adjusting controls while sailing is essential for optimizing your boat’s performance with a spinnaker sail. Understanding techniques such as barber hauling or gybing the pole can significantly impact your ability to maintain optimal sail shape, improve speed, and achieve higher angles of attack. Perfecting these control mechanisms through practice is paramount in becoming a genuinely skilled spinnaker sailor.
6. Mastering the Rigging Sequence: Efficiency in rigging setup is the hallmark of an expert. Familiarize yourself with the correct sequence for hoisting the spinnaker sail, setting up pole controls, attaching sheets to clews, and tensioning halyards for optimal shape and trim. Practicing this sequence repeatedly will not only save you time but also ensure safety during your sailing endeavors.
7. Advanced Techniques: Gybing Made Easy: While gybing with a spinnaker may seem daunting at first, mastering this maneuver opens up new possibilities on the water . Timing plays a crucial role here; learning how to synchronize movements between crew members when executing a smooth gybe will prevent accidental snags or spills while maintaining consistent boat speed.
8. Safety Considerations: Last but certainly not least, prioritize safety throughout your spinnaker rigging journey. Ensure all crew members are well-informed about potential risks involved and have proper training in responding to emergency situations related to spinnakers. Regularly inspect lines for signs of wear or damage that could compromise both performance and safety on board.
Conclusion: Becoming an expert in spinnaker rigging takes patience, practice, and dedication. By following these expert tips, understanding different types of sails, selecting suitable gear & equipment, honing knot tying skills, maintaining your rigging system, and mastering advanced techniques, you’ll elevate your sailing experience to new heights. Always remember that safety should be paramount, so prioritize it in all your endeavors on the water. So set sail with confidence and embrace the thrill of mastering the art of spinnaker rigging!
Unleashing Your Sail’s Potential with Proper Spinnaker Rigging
Sailing enthusiasts know that the thrill of catching the wind and harnessing its power is unparalleled. It is this exhilarating experience that drives sailors to constantly seek ways to maximize their sail ‘s potential. One technique that can significantly enhance your sailing performance is proper spinnaker rigging. So, let’s delve into the intricacies of spinnaker rigging and unlock a world of improved speed, balance, and control on the water.
Picture this: you’re out on your boat, cruising along smoothly with the main sail up and feeling confident in your skills as a sailor. But what if we told you that there’s a way to unleash even more speed, giving you an edge over other boats? The answer lies in mastering the art of spinnaker rigging.
The spinnaker is a specialized sailing sail designed to catch downwind breezes effortlessly. With its distinctive balloon-like shape, it allows sailors to capitalize on favorable wind angles when sailing away from the wind direction. However, without proper rigging techniques, unlocking this immense potential becomes rather challenging.
The first step in unleashing your sail ‘s potential starts with understanding the equipment required for properly rigging a spinnaker. This includes a spinnaker pole or bowsprit for support, sheets and guys for controlling the sail position, masthead sheaves for hoisting, tack lines for adjusting height, and cleats for securing everything in place.
Once equipped with these tools of precision sailing, it’s time to consider practical tips for effective spinnaker rigging – after all, knowledge is power!
1. Proper setup: Start by ensuring that all lines are properly installed and aligned. A well-organized setup minimizes frictional losses while maximizing responsiveness during maneuvers.
2. Tension control: Maintaining consistent tension throughout various rig components is essential for optimal performance. Be mindful of loose or overly tight lines, as they can negatively affect sail shape, control, and speed.
3. Sail trim: Proper spinnaker trim involves adjusting the angles of the sheets and guys to achieve the desired sail shape and balance. Experiment with different settings to find your boat’s sweet spot for maximum power and efficiency .
4. Team coordination: Rigging a spinnaker isn’t a solo endeavor; it requires seamless teamwork between helmsman, trimmers, and tacticians. Effective communication is crucial for successful rigging execution, ensuring everyone is on the same page when launching or dousing the spinnaker.
5. Safety first: As with any sailing activity, safety should be a top priority. Equip your crew with proper safety gear and make sure they are familiar with emergency procedures related to spinnaker rigging.
Now that you have some insight into effective spinnaker rigging techniques—let’s explore why it matters so much!
Properly rigged sails result in improved boat balance by allowing for better weight distribution at various points of sail. A balanced boat leads to enhanced stability while reducing unwanted side-forces during maneuvers, ultimately boosting overall performance. With optimized sail trim, you can also harness the wind more efficiently by avoiding excessive spills or stalls that may slow you down.
But there’s more! The art of spinnaker rigging won’t just unlock incredible speed potential; it will also impress fellow sailors with your professional approach. Seamlessly orchestrating flawless gybes and takedowns becomes a hallmark of expertise—a testament to your rigorous dedication in understanding proper sail optimization techniques.
So next time you set off on the water, armed with knowledge in effective spinnaker rigging techniques, take pride in unleashing your sail’s true potential while leaving others in awe of your sailing prowess. Remember that every adjustment counts – from setup precision to trim finesse – as this attention to detail separates average sailors from those who truly excel. Stay safe, have fun, and enjoy the exhilarating pleasure of sailing at its finest!
Demystifying the Process: How to Efficiently Handle Spinnaker Rigging
Title: Demystifying the Process: Mastering the Art of Efficiently Handling Spinnaker Rigging
Introduction: Spinnaker rigging, an integral part of sailing, is often regarded as a complex and daunting task by sailors. With its intricate ropes, pulleys, and hardware, mastering spinnaker rigging can undoubtedly be challenging. However, fear not! In this comprehensive guide, we will unravel the mystery surrounding spinnaker rigging and equip you with valuable tips to efficiently handle this essential sailing maneuver.
1. Understanding the Spinnaker Rigging Components: Before diving into the process itself, it is crucial to familiarize yourself with the key components involved in spinnaker rigging:
a) The Halyard: The halyard serves as the primary rope responsible for raising and lowering the spinnaker sail .
b) Sheets: The sheets are ropes attached to both corners of the spinnaker that control its positioning relative to wind direction.
c) Guy: Connected to one corner of the spinnaker, the guy controls lateral movement while providing stability when jibing or tacking.
d) Tack Line: This adjustable line allows you to set the position of your tack – generally used for racing or optimizing performance.
e) Clew Lines: These lines connect to both corners at the bottom edge of the spinnaker sail, adjusting its shape and tension.
2. Step-by-Step Guide to Effortlessly Handle Spinnaker Rigging: Now that you are well acquainted with the fundamental components let’s delve into our step-by-step guide on how to efficiently handle spinnaker rigging:
Step 1: Preparation: Inspect your equipment thoroughly before setting sail . Ensure all ropes are untangled and free from any signs of wear and tear. A well-maintained setup sets a strong foundation for success!
Step 2: Setting up Halyard & Sheets: Attach the halyard to the head of the spinnaker sail, utilizing a secure knot or clip. Feed the sheets through their respective blocks and attach them to each spinnaker clew using bowline knots. Ensure there are no twists in these lines to prevent potential snags during deployment.
Step 3: Preparing the Tack Line & Guy: Attach one end of the tack line and guy to their designated corners on the spinnaker sail. Ensure both lines are untangled and run smoothly through their respective pulleys or blocks, allowing easy adjustability when needed.
Step 4: Deck Preparations: Create ample space on deck by clearing any obstructions that could impede a smooth spinnaker launch or retrieval. Establish clearly marked storage areas for each line, minimizing confusion during time-critical maneuvers.
Step 5: Deploying the Spinnaker: Once you’ve positioned your boat upwind with favorable wind conditions, hoist the spinnaker using the halyard while simultaneously easing out the sheets. Assure adequate tension on all lines to achieve optimal shape and trimming.
Step 6: Controlled Maneuvering with Guy & Sheets: Use gentle adjustments of the guy and sheets to maintain appropriate control over your spinnaker’s position relative to wind direction. Apply gradual changes rather than abrupt movements to avoid destabilization or accidental gybes.
Step 7: Mastering Jibing & Tacking: When maneuvering downwind or performing jibes/tacks, release tension from both sheets simultaneously while adjusting primary controls like tack line and guy accordingly. Practicing these maneuvers regularly will enhance your rigging skills significantly.
Conclusion: By demystifying this intricate process of handling spinnaker rigging, we have provided you with valuable insights into mastering this essential sailing technique. Remember, practicing patience, attentiveness, and constant communication with your crew will greatly contribute to efficiently handling this challenging task. So, set sail with confidence, as you now possess the expertise to navigate the complexities of spinnaker rigging like a seasoned sailor!
Recent Posts

- Sailboat Gear and Equipment
- Sailboat Lifestyle
- Sailboat Maintenance
- Sailboat Racing
- Sailboat Tips and Tricks
- Sailboat Types
- Sailing Adventures
- Sailing Destinations
- Sailing Safety
- Sailing Techniques
- PaddleWays App
Suggestions
More Products »
WindPaddle Makani SUP Sail

Product Details
- Simply clip the WindHarness rigging clips to a bungee or deck line for rigging the sail to your SUP.
- This isn't just a downwind sail; you can tack and maneuver up to 180 degree with simple tugs on the sail lines.
- The windowed sail is supported by a laminated, non-corroding, highly elastic and virtually unbreakable perimeter batten.
- Low-stretch 1/2-ounce rip-stop polyester spinnaker sailcloth, the same material used on racing yachts, will not absorb water or become heavy when wet.
- 56" diameter sail gives you plenty of speed for a stable yet thrilling ride.
- When not in use, the sail quickly coils into a 20" diameter package that stows flat on the deck. A pull on the control lines instantly launches the sail.
- Practical, fun and a new challenge!
| Material: | 1/2 oz rip-stop polyester spinnaker sailcloth |
|---|---|
| Dimensions: | ) |
| Weight: | 22 oz. (0.6327 kg) |
| Off-wind Sailing Envelope: | Approximately 150° |
You May Also Like

NRS Wedge Rescue Throw Bag

Carlisle Oar Blade 8" Outfitter

NRS Vapor PFD

NRS Latex Neck Gasket Repair Kit

NRS Men's Short-Sleeve Guide Shirt

NRS Boundary Boots
Stay up to date on new arrivals, email exclusives, sales and more.
By providing this information, you are opting to receive email communications from nrs.com and agreeing that you have read our privacy & cookie policies.
877.677.4327
Give us a call.
Send an Email
Drop us a line anytime.
Find a Dealer
Locate our retail partners.
Learn Center
How-to articles, videos and more.
Flagship Store
Showcasing the best of NRS in Moscow, ID.
Let them pick exactly what they want.
- Duct Tape Diaries Blog
- Discount Programs
- International
- NRS Pro Deals
Customer Service
- Free Shipping*
- Rock Solid Guarantee
- Return Instructions
- Warranty Registration
- Notice at Collection
- Terms & Conditions
- Privacy & Security
- Cookie Policy
- Sun Protection
- Base Layers
- Jackets & Hoodies
- Splash Wear
- Life Jackets
- Safety Equipment
- Cleaning & Maintenance
- Apparel & Gasket Repair
- Warranty Info
- Logo T-Shirts
- Whitewater Kayaking
- Kayak Touring
- Stand-Up Paddleboarding
- Packrafting
- Dry Duffels
- Map & Electronic Cases
- Yakima Racks
- Locks & Security
- Foam Rack Kits
- Whitewater Paddles
- Touring Paddles
- SUP Paddles
- Raft Paddles
- Canoe Paddles
- Paddle Accessories
- Rescue PFDs
- Fishing PFDs
- Low-Profile PFDs
- Women’s PFDs
- Kids’ PFDs
- Accessories
- Knives & Tools
- Rope & Webbing
- Carabiners & Rescue Hardware
- Touring Safety & Accessories
- Rescue Kits
- Medical Kits
- Safety Accessories
- Chairs & Tables
- Hammocks & Shelters
- Sleeping Pads
- Stoves & Firepans
- Camp Kitchen
- Purest Duffels & Bags
- Ground Mats
- Toilet & Waste Systems
- Water Filters
- Toys & Fun
- Lights & Headlamps
- Audio & Accessories
- Waterproof Cases
- Expedition Series
- Otter Series
- Otter Livery Series
- Slipstream Fishing Series
- Approach Fishing Series
- Outlaw Series
- Select Series
- Starlite Series
- NRS Catarafts
- STAR Catarafts
- AIRE Catarafts
- Cataraft Accessories
- Tributary IKs
- IK Accessories
- Raft Frames & Parts
- Oars & Accessories
- Outfitting & Accessories
- Dry Bags & Cases
- Inflatable SUP Boards
- SUP Accessories
- Fishing Rafts
- Fishing Raft Frames & Parts
- Personal Fishing Inflatables
- Fishing Outerwear
- Fishing Apparel
- Kayak Outfitting
- Roof Racks & Transport
- NRS Apparel
- Chaco Footwear
- STAR Inflatables
- Used Apparel
- Used Inflatables

FIND IT, PLAN IT, PADDLE IT
Cruise Routes (Interactive Map)
Request a quote download brochure
Russian River Cruises
- Find your cruise
- Moscow — St. Petersburg
- Moscow — Astrakhan
- Astrakhan — St. Petersburg
- St. Petersburg
- Cruise Highlights
- News & Travel Tips
Russia is again welcoming travelers!
- A negative PCR test is all that's needed to enter Russia
- Regular flights are now operating to / from Russia
- Visas can be issues quickly (Volga Dream provides your invitation)
- All Volga Dream personnel and guides are fully vacinated
- Bookings are transferable without penalty for 12 months
- Volga Dream arranges PCR-tests if needed for your outbound flight
Check our COVID-19 Policy page to learn more.
Lorem Ipsum
Luxurious river cruises in russia.
Explore authentic Russian cities. Enjoy premium service and engaging activities as you sail the Volga River.

2022 Cruise Season
Join our signature small group journeys and cruise in luxury along the Russian Volga river!

The Russian Odyssey
An extended 'South to North' view of Russia from Astrakhan to St. Petersburg through Moscow.

Explore Moscow, St. Petersburg and Russia’s Golden Ring in greater depth. Stay at gorgeous Four Seasons hotels. Enjoy special access to iconic cultural sites.

Lower Volga
Treat yourself to an unforgettable experience cruising the Volga river from Moscow to Astrakhan. The tour includes 2 nights in Moscow.

Find Your Cruise
Select destination Moscow — St. Petersburg Moscow — Astrakhan Astrakhan — St. Petersburg
View all months
A Volga river cruise is more than a geographical voyage; it’s also a journey through Russia’s rich and captivating history. No other experience takes you so completely to another place and time. The Volga is Europe’s longest and largest river; it meanders through the stories of Ivan the Terrible and his rise to power, the two historic ‘Greats’ Peter and Catherine, and then on into today. It’s a unique opportunity to see modern Russia in the context of its intriguing history, ably assisted by friendly and professional academics and tour guides. A Volga Dream Russian river tour promises to leave you with an unforgettable afterglow of fond memories.

Moscow to St. Petersburg River Cruise
Moscow and St. Petersburg are Russia’s best-known cities, but the towns of Russia’s historic Golden Ring are delightful too. The luxurious Volga Dream offers a unique opportunity to visit these Russian gems by sailing gently along the Volga River on an unforgettable cruising experience. In small, exclusive groups you’ll enjoy preferential access to some of Russia’s most significant cultural sites.

Moscow to Astrakhan River Cruise
Your River Cruise on the luxurious MS Volga Dream takes you from Moscow along Russia’s grand Volga River to the legend that is Volgograd (formerly Stalingrad) and Astrakhan on the Caspian Sea. Along the way, you’ll discover the treasures of Yaroslavl, the oldest city on the Volga, medieval Nizhniy Novgorod and beautiful Kazan, the ancient Tatar capital. We plan our tour carefully to combine the very best of Moscow with a world-class Volga River cruise.
Discover Russia with MS Volga Dream - Click-through map

We love hearing from guests about their time in Russia and one comment often hear is how surprised people are by the Russian capital. We can’t say for certain what people expected but we do know that it’s always far removed from what they imagined! It’s been called a modern metropolis, a cosmopolitan city, an historic gem, an architectural treasure and a cultural powerhouse, among other descriptions. Majestic Moscow has always surprised our guests and left them with lasting and fond memories.
Russia’s famous Golden Ring is an archipelago of historic towns surrounding Moscow. Uglich is one of the oldest and was founded under Igor, the last Varangian prince. It once resisted the Mongol invasion and its ancient walls saw the grisly murder of young Dmitri, son of Ivan the Terrible. The impressive Church of St. Dmitri on the Blood, with its classic onion domes and blood red walls, is a fine example of classic Russian architecture. The tour ends with an enchanting choral concert.
This, the oldest city on the Volga River, and now a UNESCO World Heritage site, boasts a wealth of ancient orthodox treasures. The impressive Transfiguration of the Savior, adorned with murals depicting St. John’s apocalyptic visions can be seen in the Spassky Monastery. The Church of St. Elijah the Prophet is decorated with an awe-inspiring selection of rich frescoes. For a real taste of pre-revolutionary Russia, visitors are entertained by a costumed reception at the Governor’s House.
Close to the shores of White Lake once were the ‘tsar’s fishing grounds’. It lies in a place so serene that ancient monks chose to build no fewer than three holy sites here, including the Ferapontov Monastery. Listed as a UNESCO World Heritage site, its chapels boast magnificent frescoes by Dionysius, one of Russia’s most renowned icon painters. The Kirillo-Belozersky Monastery was a refuge for many nobles during tumultuous times and later a fortress that successfully repelled invading armies.
The Karelia region is a vast and naturally beautiful wilderness that spreads all the way from St. Petersburg to the Arctic Circle. The glorious island village of Kizhi consists almost entirely of the traditionally styled wooden buildings of ‘Old Russia’. Among them is the famous Transfiguration Church built in 1714. Remarkably, and in testament to the craftsmen of the time, not a single nail was used in its construction! Kizhi is one of the favorite stops on the river cruise to St. Petersburg.
A typical rural hamlet brought to life by warm and welcoming villagers. Volga Dream guests are invited into local homes to enjoy classic Russian fare, tea with jam and ‘pirozhki’ (pies). Enthusiastic hosts share Russian traditions and the appeal of village life while proudly showing off their scrupulously kept homes and kitchen gardens. The tour continues with a brief bus ride to see a unique World War II memorial and then, for a real glimpse of Russian life, a visit to a local primary school.
Nizhny Novgorod
This was once a wealthy city thanks to its proximity to rich eastern trading routes. During the Soviet era, the city was closed to outsiders because of its military importance. It’s also where many political prisoners were sent to live out their days in exile. The 16th-century Kremlin ramparts offer spectacular views and the city is known for its elaborately decorated churches. For Volga Dream cruise guests, the highlight of the day is an evening folk concert performed by local children.
Sailing along the Volga river, the riverbank gradually ceases to be dominated by Orthodox churches. Instead, beautiful mosques appear as the river crosses into Tatarstan where the first stop is scenic Kazan, the region’s capital. Inside the white walls of the citadel, the famous Kul Sharif mosque and the old Cathedral of Peter and Paul stand side-by-side symbolizing the two faiths’ long and peaceful coexistence in the region. A concert of traditional Tatar music ends the Volga Dream tour in Kazan.
Passing the Zhigulevskie Mountains offers wonderful views from the sundeck before touring the city. One of the key attractions is the fascinating Space Museum, which offers a revealing glimpse of how the Soviet Union pursued its ambitious journey to the cosmos. The town is also noted for its beautiful esplanade, perfect for a relaxed stroll beside the Volga river. This in turn leads to the Samara State Art Museum. Founded in 1897, it is home to a collection of more than 16,000 works of art.
This city is best known for its close associations with cosmonaut, Yuri Gagarin. The Russian hero who achieved worldwide fame as the first man in space lived and studied here. Saratov used to be home to a large German community, a heritage that can still be seen in the local architecture. The Volga Dream tour visits the Radishchev State Art Museum, the first picture gallery in Russia outside Moscow and St. Petersburg.
Originally called Tsaritsyn, the city was renamed Stalingrad from 1925 to 1961 in honor of the USSR’s leader. During World War II, the city’s residents put up a heroic defense, repelling an advancing Nazi invasion. The battle for Stalingrad has gone down in history as a pivotal moment in the bloody conflict on the eastern front. The most ferocious and deadly fighting took place on Mamayev Hill, where an imposing memorial now stands close to the excellent Battle of Stalingrad Panorama Museum.
Saint Petersburg
If Moscow surprises, then St Petersburg delights. Peter the Great founded the city to showcase Russia’s newfound enlightenment. He wanted to show the modern world a cultured and advanced society. In short, he built the city to impress and in that he succeeded splendidly! The striking buildings were designed by some of the finest architects Europe had to offer and even now, the ‘Venice of the North’ never fails to enchant with its spectacular buildings and impressive canal network. It is a city of true grandeur.
Cocktails with the Captain
Commanding any ship is a complex role that calls for a long list of skills. Captains know their vessels inside out as well as well as the routes they sail and when things don’t go to plan, they have to make instant decisions. Above all though, the most important part of the job, underpinning everything they do, is to keep the ship and everyone aboard safe. The Captain’s cocktail party is a great and a wonderful opportunity for passengers and crew to get acquainted as the gets underway.
Matryoshka doll painting
There is nothing more typically Russian than a Matryoshka. It embodies the fact that there’s always something deeper to be found in every aspect of Russian life. Learning the traditional designs and techniques used to decorate these iconic dolls offers a pleasant diversion and some cathartic creativity!
Superb Service & Dining
Our restaurant serves the highest standard of international cuisine, freshly made by our Cordon Bleu Chef. Choose either a sumptuous buffet or set menu for lunch while dinner is always four or five courses with full service. High praise for the exquisite quality of meals is yet another constantly recurring feature in feedback from our guests.
Meet the Professor
From the Mongol hordes to Soviet times, Russia’s history is, like all of Europe’s, a complex web of political intrigue, war and peace, trade and treaties, as well as heroes and villains. Academics devote whole lifetimes to studying Russia’s long past and one of them presents a series of lectures shedding light on everything from Gorbachev to Chekhov, Khrushchev to Ivan the Terrible and of course, contemporary Russia. Our Professor is on board throughout the river cruise for informal conversation.
Beginner’s Russian
The Russian language can be rather beautiful and poetic and we know that many seasoned travelers enjoy trying their hand at different languages. Our onboard teachers provide an introduction to the riches of Russian, so guests can try out a few useful words and phrases on real Russians during the exciting river tours from Moscow to St. Petersburg or from Moscow to Volgograd!
Russian tea tasting
The drink we tend to associate with Russia is vodka, but tea, in fact, is the much more universal beverage of choice throughout the country. Guests will get acquainted with the Russian tea etiquette, a fundamental component of the country's social culture, and enjoy the traditional tea ceremony while cruising from St. Petersburg to Moscow or taking a Grand Volga river tour.
Russian Dinner & Vodka Tasting
All our dining is international but for Russian Dining night, the Chef includes a selection of traditional Russian dishes: Chicken Kiev, Kulebyaka and no Russian table is complete without Borsch. To add to the ‘Taste of Russia’ optional Russian dress, or at least a touch of Russian style, is provided along with enthusiastic help from our staff!
Russian Cooking Class
A plate of pelmeni might not look like much to the untrained eye, but it forms the heart of Russian cuisine and culture. Basically, it's a type of dumpling: small portions of meat and onion wrapped in a thin sheet of unleavened dough and boiled, a little like ravioli. Guests can join a Russian cooking class onboard the MS Volga Dream to learn how to cook this delicious Russian dish.
Tchaikovsky and Rachmaninov Piano Recital
Some of the greatest classical music ever written comes from Russia. It’s hard to imagine a more fitting stage for a virtuoso solo recital by our resident concert pianist than the mighty Volga or a better backdrop than the heart of Tchaikovsky and Rachmaninov’s own serene homeland.
Russian River Cruise Aboard Volga Dream
Moscow to St. Petersburg
Why Volga Dream

Family Owned & Operated
MS Volga Dream is Russia’s only family-owned river cruise ship. She can accommodate up to 100 guests, far fewer than most other cruise ships on the river making for a uniquely friendly and intimate atmosphere aboard.

Five-Star Central Hotels
We at Volga Dream are completely convinced that, our guests should stay in great 5-star hotels in Moscow and St. Petersburg within comfortable walking distance of all the major attractions, theaters and restaurants, rather than having to waste time in traffic.

Luxurious Accommodation
The MS Volga Dream is the most intimate and elegant 5-star cruise vessel in Russia. She boasts 56 cabins, all river facing, ranging from comfortable Standard Cabins to spacious Junior Suites and the luxurious forward facing Owner's Suite.

Russian Cultural Experience
Explore Russia's past with the help of professional tour guides. Our on-board program includes fascinating talks on Russian history and politics, Russian language lessons, a festival of Russian cuisine (including vodka tasting!), and much more.

Gourmet Dining
Our on board restaurant serves international cuisine to the highest standard, all freshly made by our Cordon Bleu Chef. For Russian Dining night, he prepares a selection of traditional Russian dishes: Chicken Kiev, Kulebyaka and Borsch.

Tailored Service
All our service crew members are native Russians who are fluent in English and handpicked by the Owner. Proudly, the Volga Dream is famous for her hard working and very hospitable personnel who take care of every aspect of your life aboard.
Download Our Brochure
It's never been easier to plan your next holiday in Russia. Download our free brochure to learn more about authentic Russian river cruises.

Escape the hassle and bustle and add a satisfyingly informative element to your trip and bring together a colorful mosaic of people, history, traditions, religion, music and art. These are the many strands that time has woven into what is known today as Russia.
What people are saying
Jacqueline Lapwood
Great Britain
Rick Dowden
United States
Alexander Powell
Monique Verbrugge
Peter & Annemieke English
Philippa Calnan
Sign Up for Our Newsletter
Sign up for our newsletter and keep up to date with the latest offers, savings and news at Volga Dream
IMAGES
VIDEO
COMMENTS
A spinnaker is a sail designed specifically for sailing off the wind on courses between a reach (wind at 90° to the course) to downwind (course in the same direction as the wind). Spinnakers are constructed of lightweight fabric, usually nylon, and are often brightly colored. They may be designed to perform best as either a reaching or a ...
In short, a gennaker has a genoa's form (asymmetric, head and tack pinned, sheets tied to the clew) with the wide girth of a spinnaker. The gennaker is an all-purpose downwind sail, while spinnakers are built for specific downwind apparent wind angles. Because designs are changing so quickly, the term gennaker can seem complicated.
A spinnaker connects the boat with a halyard at the head of the sail to hoist it, a sheet on the leeward side, and a guy on the windward side. While the guy is a pole control, some boats use dedicated sheets and guys, while some use a single line that switches function between sheet and guy as the sail jibes from side to side. In either case ...
Furler: Over the past few years, "top-down" furlers for spinnakers have become widely available, and these are the most efficient—though not the cheapest—way for a small crew to launch and stow an A-sail. These furlers have a flat drum turned by a continuous line that is taken aft to the cockpit. The drum spins a stiff anti-torque rope connected to a swivel that rolls up the sail ...
Pull the snuffer over the sail before dropping. Once set, the folded tube stays at the head of the sail. To retrieve the spinnaker, the boat is sailed on a run to blanket the spinnaker and the snuffer tube is pulled back down. What could be easier - except of course if it jams on the way down.
Stingy stage 3 - Add a spinnaker halyard and masthead block. This stage solves the problem of chafing caused by reusing the jib halyard. As you can see in the following drawing, when the jib halyard runs under the forestay pin and then in front of the forestay, it can make a quarter turn around the forestay.
So an S1 is a symmetric spinnaker designed for reaching in relatively light winds. An S3 is a symmetric spinnaker designed for reaching in slightly stronger winds. An S2 is ideal for running in lighter winds. An S4 is designed to handle more breeze, so it has less sail area than the S2. 📸 Rick Tomlinson.
Three dimensions are needed for a symmetrical spinnaker: Max girth (MG). When the spinnaker is folded in half, the MG is twice the maximum width of the sail measured from the center fold of the sail to the luff and leech. Luff length (LL) is the distance from the projected intersection of the luff and foot with the luff line under moderate tension.
Viviravela. Sergi and Raquel sail their Jeanneau 45DS everywhere in the Mediterranean see. iSpinnakers designed a white asymmetrical spinnaker with logo for Viviravela. At iSpinnakers, we know you like to stand out on the water. That's why you can build you own color theme, either for our standard sails or our custom cut sails.
Hoisted on the spinnaker halyard and controlled by a sheet lead through a block on the quarter, spinnaker-like performance can be had on all points of sail from a close-reach to a broad reach without any of the trauma. When close-reaching, the adjustable tack line is pulled down, tightening the luff and encouraging the sail to act more like a ...
The spinnaker is a specialized sail that gives sailboats extra power when sailing downwind. It has a distinctive shape, resembling a colorful balloon, and is often referred to as the "big kite" or "magic carpet." Although it may seem intimidating at first, mastering this unique sail can greatly enhance your sailing experience. ...
The asymmetrical spinnaker is the category-defining sail for hot racing boats known as "sportboats" that have bowsprits and sail very fast at "hotter" reaching angles. Boats like the Melges 24, J105 and others use asymmetricals. Many cruisers are also flying asymmetrical chutes, and we recommend them highly because they allow an increased ...
Shop By Boat; Canvas; Furlers; Accessories; Buying Sails. Measuring Guide Sail Buying Tips Stock Sail Info ... a great product. If you want to maximize racing performance, contact us for a custom Symmetrical or Asymmetrical Spinnaker. Cruising Spinnaker - 25.5 Sale. Cruising Spinnaker - 25.5 Regular price $675.00 USD Regular price $ ...
Pulling the halyard backward hoists the spinnaker up the mast; pulling the halyard forward pulls the spinnaker back inside its chute. Choose a quiet day for rigging, put the boat where there is plenty of space, and lay the spinnaker out flat beside it. First of all, look carefully at the shape of the sail to identify the three corners.
Starting with the basics; a spinnaker is a large balloon-like downwind sail typically used on points of sail between a beam reach and a run. Modern sailboat designs tend to be a little inefficient going downwind and spinnakers help to speed things up. We're going to cover three types of spinnakers; symmetrical, asymmetrical and gennakers (a ...
A spinnaker fly refers to the act of hoisting and using a spinnaker sail on a sailboat. The spinnaker sail is specifically designed for downwind sailing, catching wind from behind the boat to increase speed. It features a large balloon-like shape that helps propel the vessel forward in optimal wind conditions.
Spinnaker pole car system for keel boats up to 10m (33ft) in length. 3:1 raise and lower purchase on recirculating ball bearing traveller car makes dip pole gybing a breeze. High load blocks utilised on lower purchase system to counter higher loads encountered with pole skying. The proper way to rig the trip line (yellow) in a spinnaker pole ...
Short answer: Spinnaker rigging. Spinnaker rigging refers to the arrangement of ropes, lines, and hardware used in setting up and controlling a spinnaker sail on a sailboat. It involves attaching the spinnaker to a halyard, sheets, and guys that allow for hoisting, trimming, and adjusting the sail's position and shape while sailing downwind.
Boat Class Code DPN DPN1 DPN2 DPN3 DPN4. PRECALCULATED D-PN HANDICAPS CENTERBOARD CLASSES FJ (Int.) Centerboard FJ 97.90 100.90 99.30 98.20 (95.80) Flipper Centerboard FLIP (99.40) (99.50) Flipper (Canadian) Centerboard FLCA 97.00 (98.70) Flying Cloud Centerboard FLCL (133.00) [134.0] Flying Dutchman (Int.) Centerboard. FD.
It's made to look like a spinnaker sail billowing in the wind, from which it gets its name. Rising 560 feet high, it's one of the tallest accessible structures in the United Kingdom outside ...
The windowed sail is supported by a laminated, non-corroding, highly elastic and virtually unbreakable perimeter batten. Low-stretch 1/2-ounce rip-stop polyester spinnaker sailcloth, the same material used on racing yachts, will not absorb water or become heavy when wet. 56" diameter sail gives you plenty of speed for a stable yet thrilling ride.
Moscow to Astrakhan River Cruise. Your River Cruise on the luxurious MS Volga Dream takes you from Moscow along Russia's grand Volga River to the legend that is Volgograd (formerly Stalingrad) and Astrakhan on the Caspian Sea. Along the way, you'll discover the treasures of Yaroslavl, the oldest city on the Volga, medieval Nizhniy Novgorod ...