- BOAT OF THE YEAR
- Newsletters
- Sailboat Reviews
- Boating Safety
- Sailing Totem
- Charter Resources
- Destinations
- Galley Recipes
- Living Aboard
- Sails and Rigging
- Maintenance

How To Install Mast Steps
- By Don Street
- Updated: March 15, 2018

With the almost universal use of GPS and chart plotters, eyeball navigation has largely been forgotten, and in some cases, the result has been disastrous. One can argue endlessly over paper versus e-charts, but one thing’s certain: Over-reliance on electronic navigation supports the local salvagers. Note the case of a Swan 90 hard aground on the western side of Antigua’s Spithead Channel. The grounding occurred because the skipper was looking at his chart plotter rather than using eyeball navigation. The salvage and repair costs ended up in the $800,000 ballpark. If you use common sense — not heading west to enter harbors after 1500 or heading east in reef-encumbered areas before 1100 — you can cruise the Caribbean relying completely on eyeball navigation, as is proved by two stories, one from the late 1950s, the other from the early 1960s.
Marv Berning and Bill Bailey, both in their very early 20s, were crewing on Le Voyageur (now Mariette) , a 131-foot Herreshoff schooner. They saved their money, left the boat and bought a 20-foot Bequia double-ender. They installed a deck with a big hatch so they had sleeping accommodations out of the spray and rain, then took off, spending two months cruising from Bequia to St. Thomas, in the U.S. Virgin Islands .
Their navigational equipment consisted of an Esso road map that showed all the islands and a dry Boy Scout compass. To keep the compass level so it would work, they glued it to a piece of wood that they floated in a half-filled gourd whose top had been cut off. They chocked the gourd so it did not fall over; the compass needle gave them north, and they estimated the other compass points. (Note: This was in the days when all sailors had to learn to box the compass, reading off the 32 points and the quarter points!)

In the early ’60s, my yawl Iolaire departed Grenada on a one-month sail to St. Thomas. The trip was a charter, and on board was a group of six young doctors doing their medical residency at Bellevue Hospital in New York. As we reached the northwest corner of Grenada, I discovered that, because of crossed wires, our charts of the Grenadines had been left in the Grenada Yacht Club bar. Neither I, nor my 18-year-old crewmember, Ed Pionkowski, had ever sailed the Grenadines. The only guide available was my Norie and Wilson Sailing Directions for the West Indies, published in 1867. It was an excellent guide, but for the Grenadines it gave no information other than that one should hire a local pilot.
I was not willing to go back to St. George’s to pick up the charts. Instead, I told Ed to take two small cockpit cushions to the lower spreaders and secure one on each so someone on either spreader would have a comfortable seat. We had a flag halyard on the starboard spreader and rigged another on the port spreader so that no matter which tack we were on, the person on the spreader could be supplied with cold Heineken.
In my early days of chartering and exploring the eastern Caribbean, often without the aid of a detailed chart, one of my crew or I would spend a lot of time conning Iolaire from a perch up the mast.
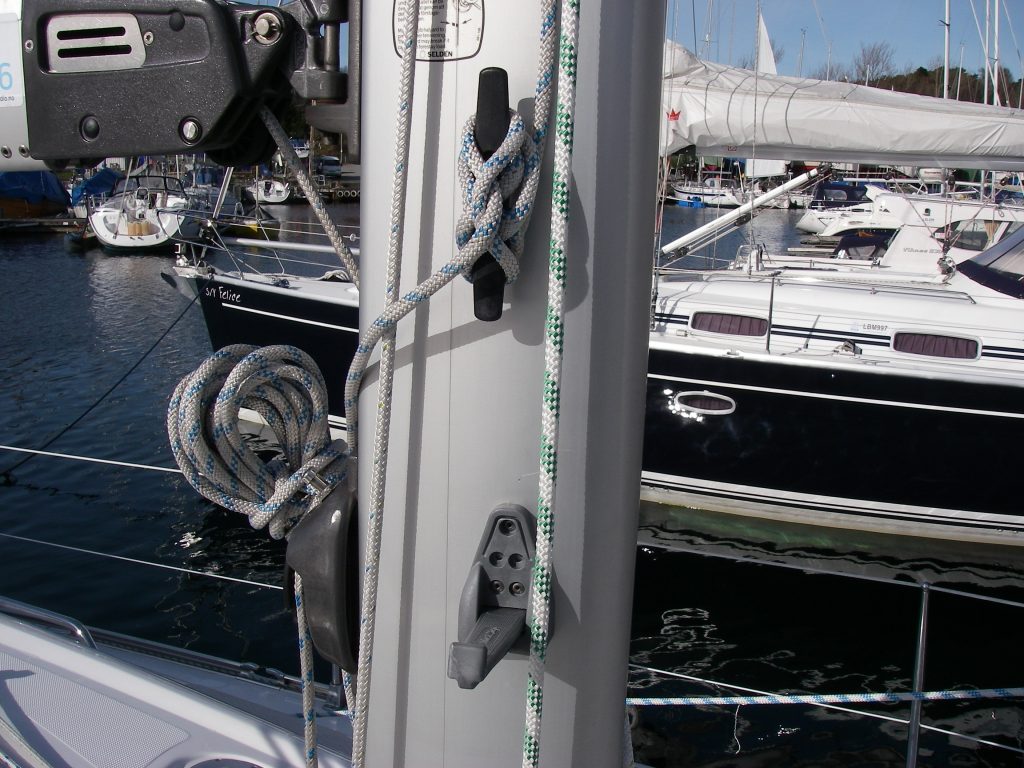
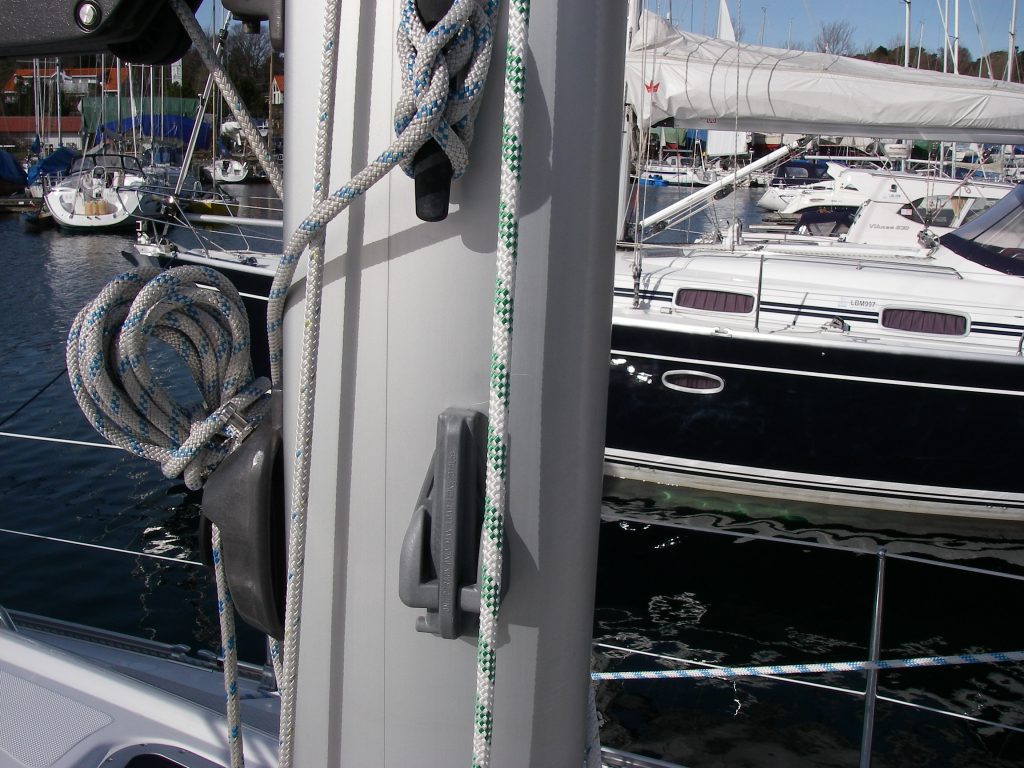
We spent a week cruising the Grenadines and later entered the Tobago Cays from the southern entrance, a pass that today the bareboat charter managers and guide authors claim is too difficult to use. We found that if there is good light and the skipper reads carefully the sailing instructions on the back of Imray Iolaire chart B31 or B311, or the piloting directions found in Street’s Cruising Guide to the Eastern Caribbean: Martinique to Trinidad, and uses eyeball navigation with a crewmember on the foredeck or up the mast, the southern entrance is not that difficult. Eyeball navigation is much better from the bow than from the cockpit, and standing on top of the bow pulpit is better still than standing on deck. If it is a tight situation or the light is fading, a crewmember piloting from the lower spreaders makes everything clear. In my early days of chartering and exploring the eastern Caribbean, often without the aid of a detailed chart, one of my crew or I would spend a lot of time conning Iolaire from a perch up the mast. Before the late 1970s, when Imray Iolaire charts became available in the marine hardware stores throughout the eastern Caribbean, obtaining charts in the islands was extremely difficult. We ordered ours from the United States or England, and it often took six weeks for them to arrive.
When I first bought Iolaire in 1957, she had a wooden mast with external halyards, thus it was no problem to climb aloft. But over time, rig problems eventually got to me. In 1962 we lost the mast in Anegada Passage. To salvage it, we towed the spar in to Norman Island — at that time, Iolaire had a very small engine that sometimes ran — and hoisted it on deck; powered back to St. Thomas; shortened and scarfed the spar; and were out on charter 11 days later.
Then, in 1966, we lost the top 10 feet of the mast off Dominica. The engine did not run, so we came up with a jury rig and sailed back to Grenada. We averaged 5.5 knots with me, daughter Dory, 7, and a young Grenadian crew aboard.
I decided finally I’d had enough of wooden spars that had to be regularly varnished and whose glue joints let go with disastrous consequences, so I installed an aluminum mast. Even so, I maintained the external halyards, and until I reached my mid-70s, I could still climb Iolaire’s mast without the aid of a bosun’s chair.

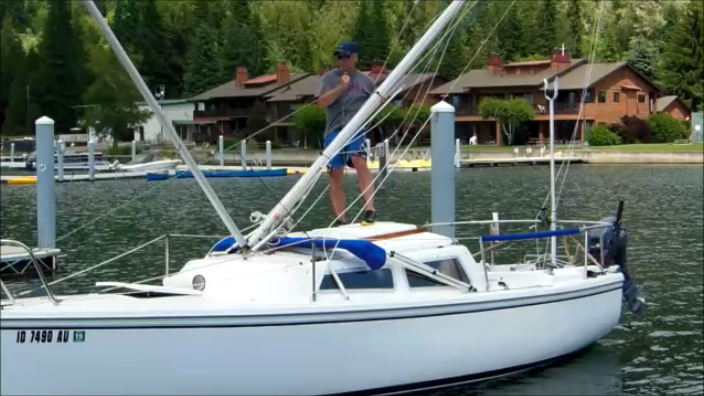
As my red beard started going gray and sailors began to ask how old I was, I would reply, “As long as my wife looks young enough to be my daughter and I can climb to the spreaders without the aid of a bosun’s chair, I am 38 and holding!” However, when we moved Iolaire to Europe and I started sailing about the Caribbean aboard Lil’ Iolaire, a 28-foot yawl that had an aluminum mast with internal halyards, I learned that climbing such a spar is only for the young and very fit. Once I realized it was almost impossible for me to climb to the spreaders, I immediately installed mast steps. Despite being over 70, I regularly went up the rig when entering harbors and exploring. In fact, the view from the lower spreaders is great!
Given that nearly all boats now have internal halyards, anyone headed for the Caribbean should check the various catalogs, find steps that are appealing and install them at least to the lower spreaders. Rigging steps is a job that can be done by ship’s crew with the mast in the boat.
Whenever there is a tricky pilotage situation, if someone is on the lower spreaders, everything becomes crystal clear. Also, at anchor, crew who are too nervous to go aloft under sail can climb the mast via the steps and obtain wonderful views and photographs that are not visible from deck level.
- More: coral , How To , mast , navigation
- More How To

How To Prioritize Your Sailboat’s Spring Checklist

How to Protect Your Spars from Corrosion

Sailing Totem Refit Series: The Forward Head Makeover

Fatty Goodlander: Dealing with Chafe While Cruising

TradeWinds Debuts 59-foot TWe6 Smart Electric Yacht

Good Bread for Good Health

Center of Effort

The Halfway Point: Sailing to Bermuda
- Digital Edition
- Customer Service
- Privacy Policy
- Email Newsletters
- Cruising World
- Sailing World
- Salt Water Sportsman
- Sport Fishing
- Wakeboarding
- Navigating the High Seas: A Comprehensive Guide to Sailboat Masts
Sailboat masts are the unsung heroes of the sailing world, silently supporting the sails and ensuring a smooth journey across the open waters. Whether you're a seasoned sailor or a novice, understanding the intricacies of sailboat masts is essential for a safe and enjoyable voyage. In this comprehensive guide, we will delve into the world of sailboat masts, discussing their types, maintenance, and everything in between.
Types of Sailboat Masts
Sailboat masts come in various configurations, each with its advantages and drawbacks. The two primary types are keel-stepped and deck-stepped masts.
Keel-Stepped Masts
Keel-stepped masts are the most common type, extending through the deck and resting on the boat's keel. They provide excellent stability and are suitable for larger sailboats. However, they require careful maintenance to prevent water intrusion into the boat's cabin.
Deck-Stepped Masts
Deck-stepped masts rest on the deck of the boat, making them easier to install and remove. They are commonly found on smaller sailboats and are more forgiving in terms of maintenance. However, they may offer slightly less stability than keel-stepped masts.
Components of a Sailboat Mast
To understand mast maintenance better, it's essential to know the various components of a sailboat mast. The key parts include the masthead, spreaders, shrouds, and halyard sheaves.
The masthead is the topmost section of the mast, where the halyards are attached to raise and lower the sails. It also often houses instruments such as wind indicators and lights.
Spreaders and Shrouds
Spreaders are horizontal supports attached to the mast to help maintain the proper angle of the shrouds (cables or rods that provide lateral support to the mast). Properly adjusted spreaders and shrouds are crucial for mast stability and sail performance.
Mast Materials: Choosing the Right One
Sailboat masts are typically constructed from three primary materials: aluminum, wood, and carbon fiber. Each material has its unique characteristics and is suited to different sailing preferences.
Aluminum Masts
Aluminum masts are lightweight, durable, and relatively easy to maintain. They are commonly used in modern sailboats due to their cost-effectiveness and longevity.
Wooden Masts
Wooden masts, while classic and beautiful, require more maintenance than other materials. They are best suited for traditional or vintage sailboats, where aesthetics outweigh convenience.
Carbon Fiber Masts
Carbon fiber masts are the pinnacle of mast technology. They are incredibly lightweight and strong, enhancing a sailboat's performance. However, they come at a premium price.
Mast Maintenance
Proper mast maintenance is essential for safety and longevity. Regular cleaning, inspection, and addressing minor issues promptly can prevent costly repairs down the line.
Cleaning and Inspection
Regularly clean your mast to remove salt, dirt, and grime. Inspect it for signs of corrosion, wear, or damage, paying close attention to the masthead, spreaders, and shrouds.
Common Repairs and Their Costs
Common mast repairs include fixing corroded areas, replacing damaged spreaders, or repairing shrouds. The cost of repairs can vary widely, depending on the extent of the damage and the materials used.
Extending the Lifespan of Your Mast
Taking steps to prevent damage is essential. Avoid over-tightening halyards, protect your mast from UV radiation, and keep an eye on corrosion-prone areas.
Read our top notch articles on topics such as sailing , sailing tips and destinations in our Magazine .
Stepping and Unstepping a Mast
Stepping and unstepping a mast is a crucial skill for any sailboat owner. This process involves removing or installing the mast on your boat. Here's a step-by-step guide for safe mast handling.
Step-by-Step Guide for Safe Mast Handling
- Gather the necessary tools and equipment.
- Disconnect all electrical and rigging connections.
- Use a crane or mast-stepping system to safely lower or raise the mast.
- Secure the mast in its proper place.
- Reconnect all electrical and rigging connections.
When and Why to Unstep a Mast
You may need to unstep your mast for various reasons, such as transporting your sailboat or performing extensive maintenance. It's crucial to follow the manufacturer's recommendations and ensure a safe unstepping process.
Sailboat Mast Boot: Protecting Your Mast
A mast boot is a simple yet effective way to protect your mast from water intrusion and damage caused by the elements. Here's what you need to know.
The Purpose of a Mast Boot
A mast boot is a flexible material that wraps around the mast at the deck level. It prevents water from entering the cabin through the mast opening, keeping your boat dry and comfortable.
Installing and Maintaining a Mast Boot
Installing a mast boot is a straightforward DIY task. Regularly inspect and replace it if you notice any signs of wear or damage.
Replacing a Sailboat Mast
Despite your best efforts in maintenance, there may come a time when you need to replace your sailboat mast. Here's what you should consider.
Signs That Your Mast Needs Replacement
Common signs include severe corrosion, structural damage, or fatigue cracks. If your mast is beyond repair, it's essential to invest in a replacement promptly.
The Cost of Mast Replacement
The cost of mast replacement can vary significantly depending on the type of mast, materials, and additional rigging needed. It's advisable to obtain multiple quotes from reputable marine professionals.
Yacht Masts: Sailing in Style
For those looking to take their sailing experience to the next level, upgrading to a yacht mast can be a game-changer.
Differences Between Sailboat and Yacht Masts
Yacht masts are typically taller and offer enhanced sail performance. They are often equipped with advanced rigging systems and technology for a more luxurious sailing experience.
Upgrading to a Yacht Mast
Consult with a marine professional to determine if upgrading to a yacht mast is feasible for your sailboat. It can be a significant investment but can transform your sailing adventures.
Sailboat Mast Steps: Climbing to the Top
Mast steps are handy additions to your mast, allowing easier access to perform maintenance or enjoy panoramic views. Here's how to use them safely.
Using Mast Steps Safely
Always use proper safety equipment when climbing mast steps. Make sure they are securely attached to the mast and regularly inspect them for wear or damage.
The Advantages of Mast Steps
Mast steps provide convenience and accessibility, making sailboat maintenance tasks more manageable. They also offer an elevated vantage point for breathtaking views while at anchor.
Mast Maintenance Tips for Beginners
If you're new to sailboat ownership, these mast maintenance tips will help you get started on the right foot.
Essential Care for First-Time Sailboat Owners
- Establish a regular maintenance schedule.
- Seek advice from experienced sailors.
- Invest in quality cleaning and maintenance products.
Preventing Common Mistakes
Avoid common pitfalls, such as neglecting inspections or using harsh cleaning agents that can damage your mast's finish.
Sailing with a Mast in Top Condition
A well-maintained mast contributes to a safer and more enjoyable sailing experience. It enhances your boat's performance and ensures you can rely on it in various weather conditions.
How a Well-Maintained Mast Improves Performance
A properly maintained mast helps maintain sail shape, reducing drag and improving speed. It also ensures that your rigging remains strong and secure.
Safety Considerations
Never compromise on safety. Regularly inspect your mast, rigging, and all associated components to prevent accidents while at sea.
Sailboat masts are the backbone of any sailing adventure, and understanding their intricacies is crucial for a successful voyage. From choosing the right mast material to proper maintenance and upgrading options, this guide has covered it all. By following these guidelines, you can sail the high seas with confidence, knowing that your mast is in top condition.
So what are you waiting for ? Take a look at our range of charter boats and head to some of our favourite sailing destinations .
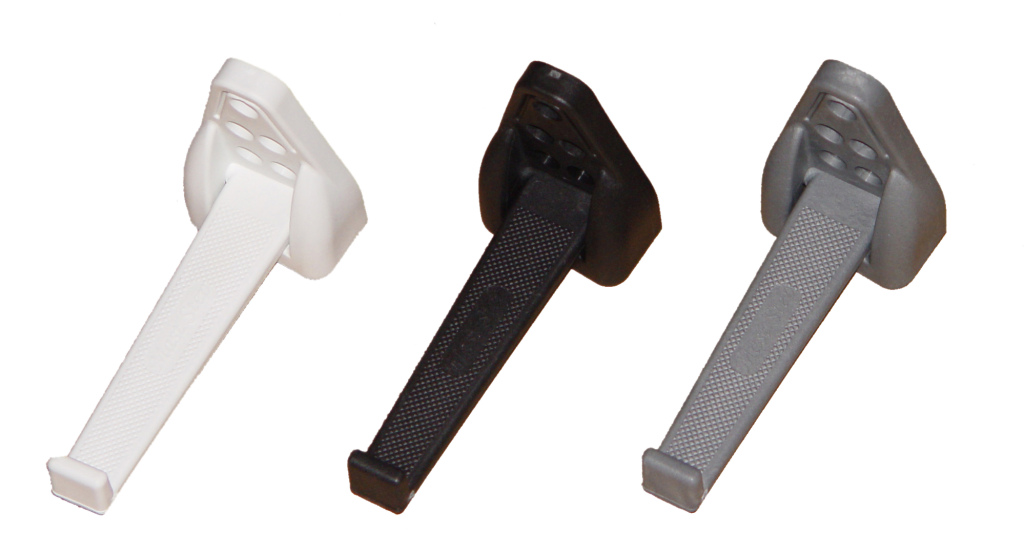
Folding steps for easier & safer sail stowing or climbing the mast!
How many yachtsmen have struggled to reach the gooseneck, the highest reef point or the top of the sail cover by attempting to balance on a halyard, winch or something even smaller? Well now there’s a quick and simple solution for the risky and dangerous activity.
Glass nylon injection moulding
Lightweight and uv resistant, aerodynamic and snag free profile, no rattling in wind at anchor or at mooring, each step individually tested at factory, available in white, black and grey.
The lightweight, rattlefree, aesthetic, strong and foldable Mast Steps. These Steps are easily unobtrusively fitted to the mast providing safe and secure footholds while climbing or working on the mast.
The “Mast Step” is a anufactured from a special combination of “nylon/glass fibre” which together with its design gives the step enormous strength. The save working load of the step is 140kg/310Lbs. The material is totally UV stabilized what makes the mast step UV resistant and prevents material degradation.
The steps weighs only 165 grams each (weight is alwas a consideration for products up a mast), and when folded does not snag ropes or sails due to the ‘snag-free’ design. At anchor or on a mooring the steps do not rattle in the wind and there is a choice of colours to match the mast – White, black and grey.
The steps are placed on opposite sides of the mast with a recommended spacing of 375mm and two opposite each other 1200mm down from the top of the mast for stable and safe working on sheaves, halyards and masthead instruments. Due to it’s construction and the materials used, it is easy to adjust the step to fit the radius of the mast. Simply tape a sheet of sandpaper on the position where the step is to be fitted, rub the saddle of the step up and down until the step snugly fit’s the mast curvature.
When using the steps to climb the mast, one simply unfolds the steps in front as one ascends folds them behind him as you descend the mast. The steps also provide a secure foothold but is always strongly recommended to use a harness with a safety line attatched.
For inquiries and distribution information please contact:
Mast Products Herenweg 64, Unit 22 3602 AR Maarssen The Netherlands Tel: +31 (0) 346 28 70 62
Euro Marine Trading
- Whisper Power
FOLDING MAST STEPS for EASIER & SAFER SAIL STOWING! or climbing the mast
How many yachtsmen have struggled to reach the gooseneck, the highest reef point or the top of he sail cover by attempting to balance on a halyard, winch or something even smaller? Well now there’s a quick and simple solution for this risky and dangerous activity.
Now available are the new “lightweight, rattle free, aesthetic, strong and foldable” mast steps. These steps are easily unobtrusively fitted to the mast providing safe and secure footholds while climbing or working the mast.
The folding mast step is manufactured from a special combination of Nylon/Glass fiber which together with its design gives the step enormous strength. With a 3% additive, it makes the mast step UV resistant and prevents material degradation.
The steps weighs only 165grams each (weight is always a consideration for products up a mast), and when folded does not snag ropes or sails due to the ‘snag-free’ design. At anchor or on a mooring the steps do not rattle in the wind and there is a choice of colors to match the mast – white, black and grey.
The steps are placed on opposite sides of the mast with a recommended spacing of 375mm and two opposite each other 1200mm down from the top of the mast for stable and safe working on sheaves, halyards and masthead instruments. Due to its construction and the materials used, it is easy to adjust the step to fit the radius of the mast. Simply tape a sheet of sand paper at the position where the step is to be fitted, rub the saddle of the step up and down until the step snugly fit’s the mast curvature.
When using the steps to climb the mast, one simply unfolds the steps in front as one ascends and folds them behind him as you descend the mast. The steps also provide a secure foothold but it is always strongly recommended to use a harness with a safety line attached.
There are many benefits of using the reinforced Nylon/Glass fiber folding mast steps, here are a few of them:
- Lightweight
- Corrosion free
- No electrolysis as with stainless steel fitted to aluminum
- No rattling
- Available in Grey, Black and White
- UV resistant

The $tingy Sailor
Diy trailerable sailboat restoration and improvement without throwing your budget overboard.
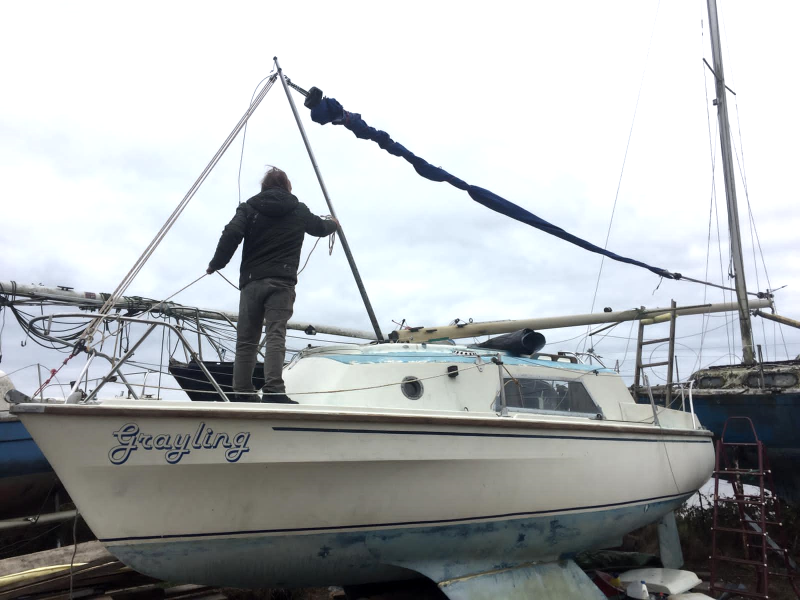
How to Step a Mast Single-Handed With or Without Using the Boom as a Gin Pole
How do you step the mast on your trailerable sailboat? With a gin pole? With the trailer winch? With the help of friends or family? With your fingers crossed? No single system works for every sailboat or for every skipper. If you’re new to mast stepping, you don’t like your current method, or you just want to simplify or speed up the process, this post is for you. I must warn you though, this is a long post, even for me. To make it as short as possible, I’ve included five YouTube videos that show how this system works. By the end of this post, you’ll know everything about how I step the mast on Summer Dance single-handed in minutes, even on the water.
I’ll describe two ways that I step the mast, including one way that doesn’t use a gin pole at all. Both are fast and mostly use the boat’s own rigging and very little extra gear.
I’ll also explain some topics that lead up to and follow mast stepping, like how I:
- Use a DIY telescoping mast crutch for easier stepping and secure trailering.
- Tie down the mast and rigging for trailering.
- Keep my mast in tune without having to loosen and re-tighten the shroud turnbuckles to step the mast.
What do you really need?
When I started trailering Summer Dance years ago, I researched a lot about mast stepping. The Catalina 22 Owner’s Manual and General Handbook is pretty brief on the subject.
Walk the mast aft and drop the mast foot into the mast step on top of the deck, keeping the mast in center line of boat, insert the pivot bolt and locking nut. One crew member should pull on a line tied securely to the forestay while another pushes up on the mast and walks from the cockpit forward. With the mast erect, attach the forestay and forward lower shrouds.
Poorly written but pretty simple, huh? One crew member pulls on the forestay while another pushes on the mast. That’s how the mast was designed to be stepped and it works well if you’re young, strong, and there are two or more of you to do the job.
But what if you don’t normally have a second able crew member? What if you need to step the mast on the water? What if you want to lower the mast to go under a bridge? What if you or your crew have a physical impairment that prevents them from performing one of the tasks? That system may not work for you and you need an alternative. If you believe in the rule that you should have a backup for every critical part and system, then you also need a backup mast stepping plan even if you normally step the mast with the factory recommended method.
I’ve read about lots of different systems. Maybe you have too:
- Factory-built gin poles, braces, guy wires, and mast-ups
- DIY wooden gin poles with winches, bridles, and brace poles
- Blocks attached to the pulpit to reuse the trailer winch cable
- Electric winches on the trailer or in the tow vehicle
- Jumbo bungee cord connected to the forestay
- Assorted Rube Goldberg variations on all the above
They all struck me as overkill for the real problem. What do you really need once you have the mast bolted to the step? What do all of these system have in common? Some mechanical advantage to raise the mast and a way to keep it from swinging too far sideways until the shrouds tighten.
If you’ve read this blog for very long at all, you know that I’m really big on reusing or repurposing things for other uses. It’s something of a prerequisite to be a stingy sailor. If you’re lucky, it’s in your DNA and it comes easily to you. Being an armchair engineer qualifies too.
Let’s see — sailboat design is all about capturing, multiplying, and redirecting forces for mechanical advantage: the hull, keel, rudder, mast, sails, rigging, almost everything. What’s the most compact, portable piece of gear on a sailboat that creates mechanical advantage? The main sheet or the boom vang typically multiplies the force applied to it by three or four times. What are all gin poles in their most basic form? A big stick. Is there already a long, stiff, portable, stick onboard? The boom. Can we raise and lower the mast single-handed with the main sheet and the boom?
As it turns out, it’s really pretty easy to do. But it’s not very easy to describe in words, so rather than write an entire book about it, I’ve made a series of short videos that each show a different aspect of my mast stepping system. I’ll give you an overview of each aspect in the text below but to really get it, you should watch the videos.
Getting it to the water
Besides being simpler, one of the basic principles of this system is to make launching and retrieving the boat as quick as possible while also being safe. That starts with securing the mast and rigging for trailering. For me, it has to be secure enough to tow for a hundred miles over bumpy state highways and county backroads to my favorite cruising spots. This is in north Idaho, mind you, which is relatively remote compared to the Florida coast or southern California.
I use a combination of DIY mast supports, motorcycle straps, and inexpensive ball cords to secure the rig. The mast is supported on both ends and in the middle. This follows closely the Catalina 22 Owner’s Manual and General Handbook recommendation.
Tie the mast and boom securely to the bow and stern pulpits. The spars should also be supported in the middle by the cabin top. Pad the mast at all contact points to prevent damage.
No tools or knot tying are needed for my system and any one of them works in seconds and stows easily either onboard or in my pickup.
Here’s a tour of the rig tied down just before I step the mast.
The previous video mentions my DIY mast stepper, also called a Mastup by a popular online Catalina parts retailer. I haven’t yet devoted a blog post to it but it was pretty easy to make. If you’re interested in a fabrication drawing and materials list, keep reading to the end of this post and a special offer.
I bought the steel myself from the cutoff pile at a local metal distributor. I took the metal and my drawing to a local welder who advertised on craigslist.com. I painted and assembled it myself. The total cost was half the price of the commercial version and in some ways, works even better. I especially like the D rings, which make it simple to secure the top of the mast stepper to the aft mooring cleats while trailering. It holds the mast very solid that way. And because the pintles are welded in place instead of adjustable, they can’t accidentally loosen and drop the mast.
Following is a close-up video of just the mast stepper. You can see it in action in the last two videos.
Setting up the boom as a gin pole
The basic theory of a gin pole is to lift a heavy object below one end while it remains stationary at the other end. Support lines called guys position the lifting end over the object that is raised. A mast raising gin pole has one end stationary near the base of the mast, uses the forestay to support the lifting end, and uses a winch or a block and tackle to theoretically raise the bow of the sailboat to the end of the gin pole. In reality, the bow stays stationary and the entire gin pole system including its base (the mast) are raised towards the bow.
Most C-22 gin poles use one of two methods to attach the gin pole to the mast:
- A peg on one end of the pole that fits in a hole in the mast (the factory system for 2nd generation C-22s)
- A saddle on the end of the gin pole that fits around and is strapped to the mast (most DIY systems)
Neither of those gin poles serve any purpose after the mast is raised. They’re useless extra weight that takes extra storage space.
The system I use attaches using a small right angle bracket. I fabricated it out of a piece of scrap aluminum I already had. One side of the bracket is bolted through the mast step and the cabin top in front of the mast. The other side the bracket points upward and has a 1/4″ hole through it to act as a hinge for the gooseneck (stationary lower) end of the boom. If you’re a follower of this blog and have the password, you can find a scale drawing of this bracket on the Downloads page.
I connect the gooseneck fitting to the bracket with the same quick pin (drop cam or toggling bimini type) that I use to connect the gooseneck fitting to the mast slide while sailing. The pin is tethered to the boom with a stainless steel lanyard so it can’t get lost and it’s always near at hand.
I connect the forestay to a shackle on the top side of the (upper) end of the boom. On the opposite (bottom) side of the boom from the forestay, I connect the end of my main sheet tackle that doesn’t have the cam cleat. This is the same configuration as when the main sheet is attached for sailing. I connect the other end of the main sheet (that’s normally attached to the traveler car) to the stem plate where the forestay is normally attached.
To hold the boom vertical during raising, I sometimes use two pieces of pre-tied accessory cord. They connect to the sides of the boom with clips through the eye straps where my boom topping lift and jiffy reefing lines attach. The other ends of the cords have loops tied into them that I tie to the upper ends of the midship lifeline stanchions with girth (cow) hitches. The mast step is nearly in-line with the tops of the stanchions, so the cords rotate around the same pivot point as the mast and the boom.
If your sailboat doesn’t have the same style of gooseneck fitting as a Catalina 22 or you can’t use your boom for some other reason but you do have a spinnaker pole, you might be able to use it instead as this picture from a Westerly 21 owner shows. This picture also shows that a gin pole can be a great help with lifting the extra weight added by a furler.
That’s kind of hard to visualize, so here’s a short video that takes you on a tour of the setup.
This is a stickup with a boom!
After I rig the boom like shown above, the hard part is over. The rest is just pulling the main sheet with one hand while I steady the mast with my other hand. I also watch the stays and shrouds to be sure they don’t catch on anything as they raise off the deck.
With the main sheet cam cleat at the stem plate, I can easily stop raising the mast at any point, cleat the line with a sharp tug, and then clear snags or move to a better lifting position. Then I uncleat the main sheet at the stem plate first and hold light tension on the main sheet while I get into position to resume raising the mast.
The mast only needs to be held centered until it reaches about a 45° angle. Then the upper shrouds begin to tighten and they hold it centered the rest of the way up.
When the mast is vertical, I reconnect the forestay and forward lower shrouds using quick release levers . The mast is back in tune and requires no further adjustment. I disconnect the boom from the system and attach it in its normal place between the mast slide and the topping lift or backstay pendant. I disconnect the main sheet and attach it to the traveler car. All I need to put away are the two accessory cords if I used them, which I typically only do when it’s windy, when I’m setting up in a unlevel area, or on the water when its choppy.
Here’s a video showing the entire process completed in about 4 and a half leisurely minutes.
Single-handed speed stepping
In good conditions (light breeze, level area, or calm water), I skip over using the boom as a gin pole entirely and just use the main sheet to pull the mast up by the forestay. It saves several minutes and is nearly as easy to do but you should be fitter than average to attempt it. It’s the single-handed equivalent of having a crew member in front of the boat pull a line attached to the forestay. Bystanders seem to enjoy watching me raise the mast by myself in seconds.
Here’s what it looks like when it’s done on the water.
Back to the beginning
At the end of a road trip, I never look forward to tearing down Summer Dance , pulling her out of the water, and tying her down for the ride home. I’ve had a great time but I’m tired and there’s many miles to go before I sleep. I don’t want to spend an hour lowering the mast and tying the rig down. I want it to be quick and simple.
Almost always, I lower the mast without using the boom as a gin pole even if I raised it that way. A gin pole is just not usually necessary so long as the mast comes down slow enough and lands in the crutch. You might not want to do it that way your first few times, so here’s what it looks like using the boom as a gin pole.
Then I tie it all down in a few minutes like shown in the first video.
Special offer for blog followers
Whew! That’s a lot of info. If you stuck with me through it, I really appreciate it. I want to thank you by offering not one, but two free bonuses to my blog followers.
The first is the launch checklist that I use to prepare and launch Summer Dance . It’s two pages of items that can help make sure you don’t forget something important for your next cruise — everything from an umbrella for the first mate while she waits for you to step the mast, to step-by-step instructions that you can have on deck for the gin pole method described above. Use it as a starting point to add and remove items to make your own checklist.
The second bonus is a dimensioned drawing and materials list for my DIY mast crutch that is described at the beginning of this post. Use it to build your own and save some money for something else.
If you’re already a subscriber to this blog, you can download both of the free bonuses from my Downloads page using the password that you received when you subscribed. If you’re not already a subscribed to this blog, sign up and you’ll join the thousands of other stingy sailors. Just enter your email address in the box at the bottom of this page and then click the Subscribe button. You can unsubscribe at any time and I won’t share your address with anyone, ever.
I hope you’ve picked up some tips from this post that you can use to optimize your mast stepping system and spend more time on the water.
Would you like to be notified when I publish more posts like this? Enter your email address below to follow this blog and receive notifications of new posts by email. You will also receive occasional newsletters with exclusive info and deals only for followers and the password to the Downloads page. It’s free and you can unsubscribe at any time but almost nobody does!
Subscribe to Blog via Email
Enter your email address to subscribe to this blog and receive notifications of new posts by email.
Email Address:
Share this:
58 thoughts on “ how to step a mast single-handed with or without using the boom as a gin pole ”.
Love your vids on raising mast. Could you send a pic of quick release on forward shrouds and forstay and the pin you spoke of in vid.
Stay tuned here for a separate post on the quick releases and maintaining mast tune that’s coming soon!
I like the idea of using PVC tube & fence to make mast supports.
Just some scraps I had on hand; lightweight, strong, and they don’t look too ghetto.
Hey $tingy,
Thanks for another great post.
You mention the newsletter. I am definitely a long time blog follower, and look forward to every post, but I have never gotten a newsletter. Could you add me to whatever email list you use? I don’t want to miss any more.
Hi, CapnRehab
You weren’t receiving the newsletter initially because you’re a WordPress user so if you follow, my posts should show up in your Reader list instead of by email. But I added your email address to the newsletter recipient list back on May 11. The last newsletter went out on May 21 titled What’s Your Favorite DIY Project? Did you get that one? I’ll probably shoot out the next one at the end of the month. If you don’t get it, I don’t know what more I can do on my end.
Brilliant repurpose of mainsheet. I’ve struggled with this procedure for years, just man-handling it up there. Can’t wait to try this!
I hope it works for you. Let me know how it goes!
For mast raising and lowering, I have it a little easier with a 16ft boat, and can raise the mast single handed juat by manually lifting and walking forward in the cockpit and onto the keel case with the hatch slid forward, although I usually have my wife tension the forestay for some extra assurance.
I like your use of the “ball ties” for securing the rigging on the trailer. I usually use the halyards to tie everything up, but that takes more time than it should. I use some “sail ties” which are very similar to your ball ties to secure the sail on the boom and the boom is stowed inside the cabin. I think I will either get some more sail ties for securing the rigging on the trailer, or make up some velcro webbing straps. At the bow, my mast is tied down using my bowline and the DIY timber A frame mast crutch tied down at the rear with a rope tied to cleats on either side of the transom. The boat is held to the trailer using a stern ratchet strap and a turnbuckle on the bow, and the winch cable attached.
I really like the idea of using the boom as a gin pole. Brilliant. I wonder if you could post a picture of the L-shaped aluminum bracket that you fabricated and how it is attached to the boom? Making that may be the tricky part for me to get this thing. I could not really see a clear picture of it in your videos. Thanks!
I’ll add a close-up shot of it soon.
I added a close-up picture of the hinge bracket about midway through the post.
Excellent blog and report. I struggle with the mast raising and have an assistant. I will give your system a try. I finally understand the function of a gin pole and how to use it.
That’s awesome, Richie. I’m really glad it helped. In the case of a sailboat, it’s just a long, temporary lever. Aha moments are great!
Excellent report and diagram on the mast stepper. What would you think about using aluminum to build it instead of steel?
I think aluminum would work great so long as the wall thickness of the tubes is adequate. You wouldn’t need to be concerned about painting or rust. The critical area is where the outer tube overlaps the inner tube when the crutch is extended. Depending on how close the fit is and how much overlap, when you’re rolling the mast back to set it in the step, there can be considerable strain on that “joint.” A thin wall or soft aluminum might deform so make it beefy there.
Thanks for your comment, Michael!
I spoke to my fabricator friend about using aluminum and, him not knowing about the stepping process was most concerned about the hinges holding weight while trailering over the road. He also suggested using a beefier thickness if choosing aluminum just like your suggestion.
thanks for all you do!!!
The gudgeons can easily handle the weight so long as the pintles on the crutch are sturdy.
Send us a good picture of the final product and I’ll add it at the end of the post as an example!
Great post. Just started following your site. You have a lot of good projects on here. Where did you find such thin-walled square tubing for your mast stepper? All I can find is telescoping 1-3/4 & 1″ tubing. I don’t think I need that much strength or weight. Also, I receive the posts by e-mail but I never received the password for the download section. Thanks
There are a couple of industrial metal suppliers in my area that sell their cut-offs retail to the public by the pound. One of them also sells small quantities of standard sizes. I found all the sizes I needed with very little cutting. You definitely don’t need much strength and as little weight as possible. Aluminum would be even better if you can get it welded.
I’ll send you the password by email.
Thanks for your question.
I really like the simplicity of raising the mast without a gin pole. I use a gin pole now but prefer a simpler approach. How to you lower your mast? Do you use your mainsheet tackle when lowering? Thanks for the great video.. Jim Mathews
That’s right, Jim. I lower the mast by the same method but in reverse, which helps to remember the steps in both directions.
Thanks for your question!
Hi. I’m making the mast crutch and downloaded the drawing. How far down is the second hole in the 1″ tubing? ie. the hole where I would put the lock pin when the crutch is raised. Thanks.
That’s an excellent question, Jim, since it wasn’t shown on the drawing. I’ve since revised the drawing to show the hole 2″ up from the bottom of the inner tube.
The distance isn’t critical but depending on how tight the fit is between the inner and the outer tube, the hole might work better even farther up the inner tube. Try it at 2″ and if the top tube is too loose for you and it wobbles around, drill another hole farther up the inner tube, say at 4″ and try that. The mast will sit 2″ lower but it shouldn’t affect how you step the mast other than by making the crutch sturdier. Then you will have two holes to choose from. You can even drill more holes at different heights for different purposes.
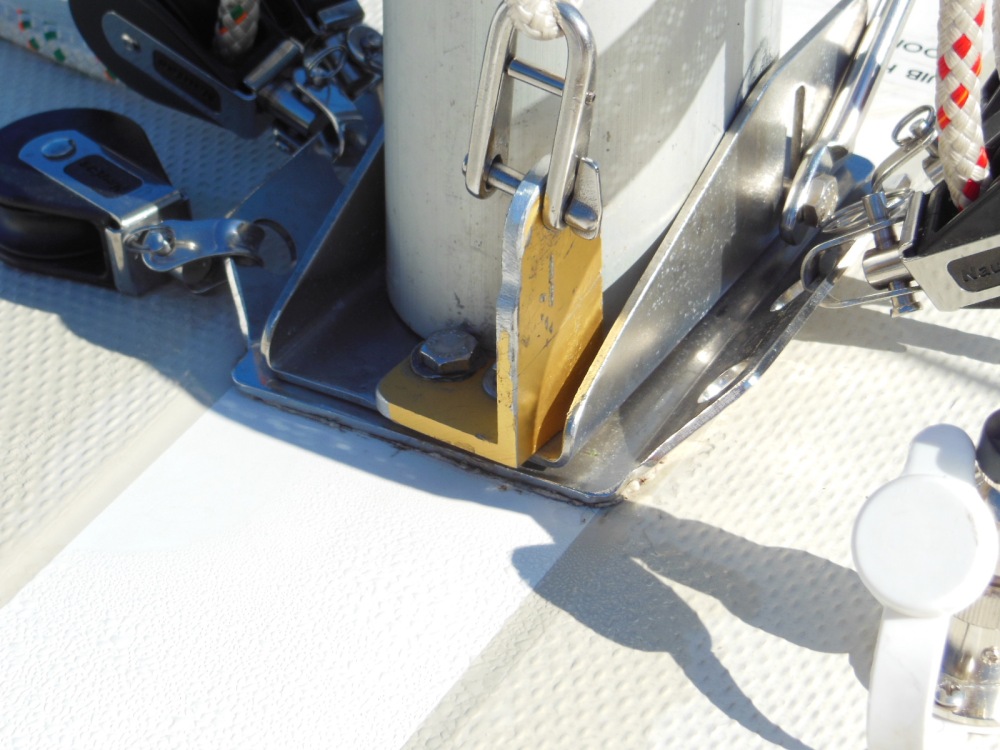
Hi Thanks for the blog. Some pretty interesting ideas here, I’m borrowing some, especially related to the sails… Seeing your “system” to step the mast, I’m trying to adapt it to my boat, a ’82 French Rocca Super Chausey. The mast step has no pin to lock to the mast foot, it just falls into place between two pins that limit its longitudinal travel. Hence, nothing for the mast to pivot on. Any thoughts on how I could achieve that effect? Thanks.
If you have the tools and the ambition, you could replace your existing tabernacle with a custom made pivoting one. Find a piece of heavy gauge aluminum channel that you can cut into a shape similar to the C-22 tabernacle shown in the picture above. The channel should be just wide enough for the mast to sit into and the height a couple of inches. Cut slots in the sides for the through bolt to slide up and down. Cut the channel long enough and drill holes in the bottom of the channel to fit your existing deck bolts.
Then drill a hole through the base of the mast to accept the through bolt. It should be close to the bottom of the mast, 1/4″-1/2″ from the bottom. Angle the aft edge of the end of the mast so that it will rotate without binding in both directions. As it rotates backward during unstepping, the bottom end of the mast and the through bolt should ride up in the slots. Put a wingnut on the end of the through bolt for easy removal and you’ve got a pivoting mast.
If you don’t have the resources to make one yourself, maybe you can find a friend or a metal fabricator to help.
Good luck with your projects and thanks for your question! $tingy
When installing the gin pole hinge bracket you drill through the cabin roof. Have you experienced any water penetration through this hole?
I sealed the plate and hole perimeters with butyl tape, so no problems.
Wow! Love the post and videos!! So clear and easy to follow. I’m going to try this for my Columbia 8.3. I tried to follow you but got an error code. Can you manually add me, please?
Please try following again and if the error repeats, send me the text or a screenshot of the error so I can investigate.
My Venture 21 tabernacle and mast look like yours (sans the plate for your swivel blocks) and I have often wondered if there is wear on the trailing edge of the mast foot after repeated raising/lowering? Or does yours have some reinforcement?
Also, have you ever noticed the boom baby stays pulling too much on the stantions? I wonder if mounting the ropes at the base would be less apt to damage them if the mast were to go somewhat off-center (to the exrent the upper shrouds allowed)?
Love your site. I shared the 2017 DIY competition on Small Craft Advisor Magazine’s Facebook page and I noticed the 10 most popular projects link…most of which are on my to-do list!
There is a tiny bit of wear after 36 years but not enough to matter. Tying the baby stays to the stanchion bases would be more solid but then their pivot points would be too low. The reason that I tie them up at the top of the stanchions is so that the baby stays keep in relatively constant tension throughout the range of motion of the mast/boom. They’re almost perfectly aligned with the tabernacle. The stanchions aren’t in much danger because the boom doesn’t weight much and it can’t wander very far at all since it’s held in tension between the forestay (running aft) and the main sheet (running forward). They really just help to hold the boom vertical while you’re setting the system up until you begin to raise the mast. The mast can wander side to side some until its raised about halfway, then the upper shrouds come taught and keep it centered.
Thanks for the share!
Your site has been a tremendous help and inspiration for me and my 1988 Cat 22. My mast step has welded loops fore and aft. Can you suggest a structurally sound way to secure the boom to the loop for lifting/lowering?
Link showing the step: http://www.catalinadirect.com/index.cfm/product/345_18/mast-step-c-22-cp-22brcp-18-wwelded-vang-loop.cfm
Hello, KGUNN
Since the loop is perpendicular to the line of the mast/boom rotation, it won’t work well using only off the shelf parts. I suggest you consider mounting a tang like the Garhauer BT-1 to the bottom of the mast instead. You can pin the boom to it similar to how I do it to my bracket. The boom will then rotate with the mast as it raises and lowers.
Great suggestion. Thanks!
Hmmm, this asks more questions for than answers. I don’t have the lower stays, nor do I have any of the attachment point on the mast that I can see. The thing is the boat is smaller 20′ vs 22′ I have no lifelines nor a rear rail, walking down the side of the boat would be a challange, never mind running lines while doing so. The mini stays have no place to attach to. Not sure how to go about raising the mast without help…even with this setup…
A smaller sailboat could indeed be trickier to step the mast single-handed since it has less rigging to aid the process. If you’re not committed to perfecting a single-handed technique, I’d suggest you consider a two-handed process with one crew member in the cockpit to steady the mast laterally while the second crew member pulls the mast up by the forestay or foresail halyard from the bow or on the ground in front of the bow. A mast crutch would also help in that case. Otherwise, you might be looking at extensive fabrications or commercial mast stepping hardware with a winch.
Where there’s a will, there’s a way!
How could your system be used with a furling 150 genoa on a Catalina 25?
Hello, Thomas
It could be used in a similar way on your C-25 with a couple of adjustments. First, your mast is longer and heavier than a C-22 so I would always use the boom as a gin pole. You’ll need the leverage for the extra weight, especially with the addition of the furler. Second and more importantly, you’d need to lift the furler as well as the mast somehow. I’d suggest using a main or spinnaker halyard to hold the mast and furler together. Wrap it around them from top to bottom before you lower the mast, then handle them as one unit until after you raise the mast again and unwrap the halyard to reconnect the forestay/furler. Use the jib halyard with its working end securely tied off instead of the forestay to connect the masthead to the boom/gin pole. The rest of the process would work the same.
Stay tuned because I’ll be publishing a post soon about choosing and using a furler with a trailerable sailboat.
Appreciate your reply Stingy. I need to carefully review your technique but it seems one’s boom would remain upward; although I’m sure you lower it when finished? Sorry for my ignorance. I’m also looking at the idea from the clever MacGregor 26 mast raising pole that uses a winch on the pole with baby stays with a special one to automatically keep the lowered furler up off the deck. I read about it on TropicalBoating ( https://www.tropicalboating.com/2010/04/the-perfect-solo-mast-raising-system-for-small-sailboats ). I’ll have a look at your mast crutch but I can’t use the gudgeons for the rudder as I’ll need to motor over to the Cave Run Lake (KY) boat launch for the haul out. Thanks!!
Winch-powered mast raising systems are a good choice for owners with impaired physical abilities. I might have to resort to one as I get older and am not able to do everything I once could. Beats giving up sailing!
One needs to attach a mast bail with the MacGregor 26 solo mast stepping system. I’m reluctant to drill into the mast though. This is my first cruiser (purchased in July) and I’ve much to learn from your blog. I was only introduced to sailing two years ago when I bought a Sunfish.
My C-25 teak companionway/hatchboards need replacement after 20 years, probably all standing rigging needs replacement even though it all looks fine at deck level (in the Lake continuously since ‘08), etc., etc. I pulled two through hull Airmar transducers out to check them and found only thin layer of algae on them – tells me the lake water has been very clean. The old KVH display is dead so I’ll switch it out (plugging holes with marine plastic and epoxy) with a new RayMarine i40.
I see that the boom is removed of course in your video. I also see the stress on the mast crutch essentially dictates one use the transom gudgeons for support. I had thought I could use 1” pipe secured to the stanchions but then there would not be enough telescoping height available either. You’ve devised a very clever approach- I’ve never remounted my boom so will need how I can attach it to the fore ring on the step plate.
You might consider modifying my crutch design so that the bottom end rests in the cockpit sole forward of the transom instead of on the rudder gudgeons. It would probably need additional support or to be fastened to the mast to keep it from falling over. Offset to one side a little, you should still be able to use your rudder to steer. That, or use the outboard tiller instead of the rudder to get to the ramp if you can. I do that sometimes.
Just what I have been looking for to give me some information to guide me in raising and lowering the mast for maintenance on my 26 foot Grampian without the expensive use of a crane this spring.
Hi, I like your idea of the mast raising system without a gin pole. Does your block & tackle include a ratchet or brake? Thanks!
Hello, Laura
Since I use my mainsheet tackle, no, but if you want to use a separate tackle, that would be a good idea.
Thanks, $tingy
Sure beats my system of using 2 sons to help out, they’re never around when you need them !
Thanks for the video on the no pole lift, that’s pretty much how I need to do it though I usually am working on the hard before getting a lift in.
I have tried raising the mast as you show in the video. I have the same quick release. But when I try to lift the mast with the forstay can’t do. I’m wondering maybe your mast is lighter or do I have the wrong set up to raise mast. I have the mast step which I can raise for a better angle…but it’s not happening.
Hello, Mark
Are you using a gin pole or trying to lift it only by the forestay? Either way, it takes quite a bit of strength to get the mast up that first few feet since you’re not pulling directly vertically on the masthead. If you’re not able to do it by yourself, you might need a helper for at least that part of the setup.
Dear sir My name is Mark Monteverdi. I have followed your web site for a while…and always turned out good. I have looked at the mast rising video countless times. I have the quick release for the shrouds. I’m guessing you are using a basic vang ? Well either I’m very weak or i have the vang set up incorrect or my mast is made of different material …when i go to raise my mast it will fall off to one side it just feels as though I’m pulling a truck up a hill. If you would be kind enough to send a pic of what ever type of pulley system i would greatly appreciate that very much. It’s hard to get any one to go sailing with me and that’s more just so i have some one to push and one work the winch. Thank you Mark
I’m sorry to hear you’re having trouble. When raising or lowering my mast, it too will tend to swing to one side or the other until it’s about half way up and the upper shrouds tighten and hold it centered the rest of the way up. That’s why I always have at least one hand on the mast to keep it centered during the lower half of the lift. I use the standard C-22 main sheet tackle which has a 3:1 mechanical advantage. You could use a stronger tackle (try 4:1) if you need the additional lifting power. You can see the whole main sheet in the video in Quit Spending Setup Time on Turnbuckles .
Hope that helps, $tingy
Hi Stingy Sailor, First of all, thanks for all your tips, tricks, and videos. Your site is awesome and very helpful! I have a C-25 with swing keel so most of all your tips are applicable, very nice, and handy. I really like your mast securing device located at the bow for trailering; easy and simple. I was wondering if you do have the drawings available for it so I could use it to build my own? Thanks! Alex
I did not make a fabrication drawing for the pulpit saddle because of the complex angles of the railing cutouts. Most readers wouldn’t be able to cut them accurate enough, so it’s a trial and error fit. Lay your material centered across the top of the pulpit, trace the railing edges onto the underside of the material, then cut a little at a time until the saddle sits down securely over the rails. Do the same with the mast on top of your material and you’re done.
Good morning, what a beautiful boat you have there ! that is an ingenious way to raise a mast,nice work ! I am curious about what the black,plastic/rubber item is that looks like it’s attached to the stern rail by the mast crutch @ 2:45 of the first video Please respond because my curiosity is killing me because I don’t get it. Thanks, Mick
You can read all about it in Add a Solar-Powered Flood Light in Your Cockpit .
Hi! I just subscribed to your blog, and I’d like the instructions for building a mast crutch like yours. Wasn’t sure whether that would be sent out automatically, or whether I needed to specifically ask for them. Thanks!
Lenny, You can find a dimensioned drawing of the mast crutch on my Downloads page if you’re a subscriber. The password to open that page was sent to you when you subscribed. $tingy
Leave a comment Cancel reply
This site uses Akismet to reduce spam. Learn how your comment data is processed .

- Already have a WordPress.com account? Log in now.
- Subscribe Subscribed
- Copy shortlink
- Report this content
- View post in Reader
- Manage subscriptions
- Collapse this bar
How to Step a Mast

Before stepping the mast there needs to be several preparations in order for everything to go smoothly once the crane arrives. So take your time and double, triple check everything in order to keep from having to go aloft, or worse, having to re-step the mast once the mast has been stepped. Below you’ll see a few tips and guidelines on how we step a mast…
First, we fill out our pre-step checklist. So before we are even ready for the crane we must:
- Build the mast either track up or track down depending on whether the crane will be set up forward of where the mast sits or aft of where the mast sits (bow-in or stern-to)
- Hang all standing rigging
- Ensure all turnbuckles and stays are new or have been inspected and serviced
- Install spreaders and make/ seize spreader ends onto the wire
- Install spreader boots
- Test all light fixtures through the mast
- Ensure mast butt/step has proper drain
- Ensure mast butt/step has proper electrical access or wiring hole
- Rig mast boot if keel stepped
- Ensure all halyards are run correctly and on the correct side of the spreaders and root bars (if present)
- Run-in halyards or tie all messengers to be used to deck level, leave all unused messengers tied off tight aloft
- Ensure all clevis pins are inserted properly and cotter pins are bent correctly
- Silicone any remaining wiring holes or spreader cotter pin legs
- The Windex has been installed and aligned
- All remaining masthead gear and electrical items have been installed
- The chain plates are in place and clevis pins and NEW cotter pins have been laid out next to chain plates
- The mast step is in place, clean and secure
- The deck ring (if keel stepped) is in place and secure
- The foresail furler(s) has/have been pinned and secured
- The rigging and the furler(s) has/have been lashed to the mast, ready to be lifted

Now we are ready for the crane.
When rigging the crane’s hook to the mast, we use a 4′ endless lifting loop (this is generally long enough for most mast diameters, for larger masts a 6′ loop may be a good idea) which is rated adequately.
~Ultimately we suggest seeking the counsel of the crane operator.
First we tape open the mousing latch. Then we rig the loop in a ‘single basket hitch’ , making sure not to trap any halyards (except for maybe one or two that can be used to help retrieve the loop later). It is also important to be mindful of which side of the loop the forestay(s) (or backstay, depending on the mast being track up or down) is placed relative to the crane. The correct side (port or starboard) can be determined by where the crane is set up relative to the boat’s fore and aft center-line (the stay needs to be opposite the crane).
Before attaching the lifting loop to the crane hook we have a heavy duty tag line with a large bowline tied in one end. The bowline is then slipped over the two ears of the lifting loop’s basket hitch and attached to the crane’s hook (see picture above).
~The loop NEEDS to be placed somewhere above the masts balancing point, this is VERY, VERY important and can cause the rig to upend if not picked from above the balancing point.
In doing this, be mindful of any gear on the front of the mast that might snag on the crane once vertical. Finally, the lifting loop is slightly tensioned by the crane, and the tag line is tied off tight using three half hitches around the mast. These three hitches should be placed at a strong point near the deck (underneath halyard winches, the goose neck or any available horn cleats).

Once the mast is sitting securely on the mast step, pin and lightly tension all of the stays. If for some reason you still find either the backstay or the headstay has been ‘locked out’ by the crane, make sure you have something, halyard or alternate stay, to take either forward or aft depending on your situation. If the mast is keel stepped there is slightly less of a chance of anything detrimental happening. However, you should still take every precaution before releasing the crane.
TIP: On a multiple spreader mast, the loop likely needs to be attached above the lower spreader. Therefore it might be difficult to retrieve the lifting gear without going aloft once stepped. In this situation we will tie a retrieval line (long enough to be reached from deck level) to the lifting loop. This helps to retrieve the loop once it is off the hook. Also before stepping take note if the crane’s hook can swivel freely. If so, attach another small control line to the crane’s hook itself (If the hook is fixed just make sure the open end is facing the masthead). This will help to manipulate the swiveling effect, and get the loop off of the hook.

Now that the crane is out of the way, the mast has been technically stepped! There is still lots to do before you can go sailing. Next, take all halyards and lines away from the mast so that you can see what you are doing. Then chock and boot the mast at the partners (if keel stepped). Next, tune , pin and tape the standing rigging. Now, hang/rig the boom, connect all electrical items, and finish running the lines…………as I always like to say, ready for sails! ~exit the rigger
Have a question? Leave us a comment!
Related article: How to Un-step the Mast .
Similar Posts
Deck tie downs.
What is a deck tie down? A deck tie down keeps the deck from being pulled up on keel stepped masts, where the mast does not sit on the deck. When the halyards are led aft via turning blocks attached to either the mast collar or the deck surrounding it, the deck will try and…
Stamm’s Handful
Stole this one again from sailinganarchy.com. This might be what happens when you try and go sailing around the world by yourself, in a race. Fast forward to 00:50 to begin the action. Enjoy…. [youtube http://www.youtube.com/watch?v=QgJhkkXK8ik&w=560&h=315] ….Good on him though for staying so patient and calm. Was that noise the hydraulic canting keel? Pretty smooth…
The Clipper Around the World Race is my latest discovery (although I am sure most of you already know of this). This is essentially a Volvo Ocean Race for amateurs of all shapes and sizes. It seems the boats are all one design and fully rigged and equipped to handle the challenges of the open…
The New Volvo Ocean Race 2014-2015……
…….will have an all woman team. Awesome! Quite the line up as well. Boys you better step up your game. Remember, the new VOR boats will be one design. I can’t wait! [youtube http://www.youtube.com/watch?v=PdroQqOuMVE&w=560&h=315]
Harken Travelers
Harken dominates the sailboat parts market in many areas. Travelers are no exception. Don’t think for a minute that this product is only for racers, it is for cruisers too! There is nothing more frustrating than not being able to move the traveler while under load (what’s the point of having one otherwise?). Of course there…
Views from Aloft
Our Views from Aloft segment made it’s 2014 debut last week at Muller Marine in beautiful downtown Eastport, Annapolis, MD. Here I went aloft using our self hoist. This was a full inspection for insurance, not part of our FREE inspection promo. This type of inspection covers every rigging related nut, bolt and pin via…
Leave a Reply Cancel reply
Your email address will not be published. Required fields are marked *
Save my name, email, and website in this browser for the next time I comment.
hi… have always wondered if putting the entire weight of the mast and rigging under the spreader fittings via a canvas loop is the best idea when hoisting the mast. Are the spreader fittings designed for this type of sheer loading..? Seems to me using a long loop of say 1″ line cleated at both ends at the base of the mast and long enough to reach above the center of balance under which you would place the canvas loop might be a better idea. Comments please..? thank you Garry Hargreaves
The load shouldn’t be exclusively on the spreaders if the loop is rigged under the 1st spreader. A tie down line or a tag line is needed to keep the load on the lifting loop. On multiple spreader masts for instance, the loop will be positioned in the middle portion of the span. The end result is much like what you are suggesting. The loop however needs to be a high load lifting loop of some sort, not just canvas.
With that, you have brought to my attention a part of the article that appears to be missing for some reason….we’ll have to sort that out, but for now, here’s what’s missing:
“When rigging the crane’s hook to the mast, we use a 4′ endless lifting loop (this is generally long enough for most mast diameters, for larger masts a 6′ loop may be a good idea) which is rated adequately.
~Ultimately we suggest seeking the counsel of the crane operator.
First we tape open the mousing latch. Then we rig the loop in a ‘single basket hitch’, making sure not to trap any halyards (except for maybe one or two that can be used to help retrieve the loop later). It is also important to be mindful of which side of the loop the forestay(s) (or backstay, depending on the mast being track up or down) is placed relative to the crane. The correct side (port or starboard) can be determined by where the crane is set up relative to the boat’s fore and aft center-line (the stay needs to be opposite the crane).
Before attaching the lifting loop to the crane hook we have a heavy duty tag line with a large bowline tied in one end. The bowline is then slipped over the two ears of the lifting loop’s basket hitch and attached to the crane’s hook (see picture above).
In doing this, be mindful of any gear on the front of the mast that might snag on the crane once vertical. Finally, the lifting loop is slightly tensioned by the crane, and the tag line is tied off tight using three half hitches around the mast. These three hitches should be placed at a strong point near the deck (underneath halyard winches, the goose neck or any available horn cleats).”
…THANKS for taking the time to comment as it brought this to our attention.
Cheers, ~T.R.C.
you write “When rigging the crane’s hook to the mast, we use a 4′ endless lifting loop (this is generally long enough for most mast diameters, for larger masts a 6′ loop may be a good idea) which is rated adequately.” I can’t understand this direction or how it relates to the photo.. looks like this loop, once tensioned, will bind onto the mast and will never slide down… particularly since there are fittings in the way. It doesn’t make sense to me but I probably don’t understand. My problem is that I spent over an hour trying to step the mast on my Cal 34, connected the wiring and had the mast on the step but could not control the vertical position of the mast so could only connect stays on one side or the other, bow or stern of the boat…
Thanks for the question. It’s hard to picture exactly the problem is on your end, feel free to send pictures and/or more descriptions to [email protected] . Are you trying to step the mast or unstep it?
I think this may at least the answer one of your questions….
The loop is rigged in a basket fashion (not a choker), like a U shape around the mast. See this link for an image https://www.rigginginstitute.com/wp-content/uploads/basket_hitch_demo.gif . This will then have a large bowline knot (with a strong line) slipped over both handles (if you will) of the basket before you connect the crane’s hook (like the image in the article if you look closely). The other end of the line is taken down and tied around the mast at a strong point (winches, goose neck, or big cleats) near the deck so that you can untie it once the mast is vertical.
This line and sling need to be strong enough to hold more than twice the weight of the mast, just FYI. DON’T FORGET….Always, always always, rig the sling above the balancing point. When in doubt talk to your crane operator.
Pro tip: tape open any mousing latch for easier retrieval of the lifting gear after stepped. Also, Keep one or more halyards untrapped so that you can go aloft if you need to retrieve the gear manually.
Last note, if you end up rigging sling under the first spreader the loop should just fall to the deck or come down with the crane. We like to rig a tiny line to the crane’s hook, that is long enough to reach the deck level, this is so that we can manipulate the hook in case it spins around keeping the sling captive.
Hope that Helps,
Username or Email Address
Remember Me
Lost your password?
Review Cart
No products in the cart.
- Privacy Overview
- Strictly Necessary Cookies
This website uses cookies so that we can provide you with the best user experience possible. Cookie information is stored in your browser and performs functions such as recognising you when you return to our website and helping our team to understand which sections of the website you find most interesting and useful.
Strictly Necessary Cookie should be enabled at all times so that we can save your preferences for cookie settings.
If you disable this cookie, we will not be able to save your preferences. This means that every time you visit this website you will need to enable or disable cookies again.

Mast Mate Climbing System
Mast Mate is an alternating-step flexible mast ladder made of 2 inch-wide nylon webbing. The sewn tensile strength of the webbing is 3,000 pounds. The distance between the alternating steps is 17 inches. The sail boat ladder steps are double reinforced with the same webbing. The steps are not sewn on to a main strap, but rather are formed by two continuous parallel straps of webbing, one sewn to form the step, the other straight, and visa versa, over the length of the ladder. Thus the Mast Mate is one contiguous unit.
A No. 3 spur grommet is attached between each step (25 grommets for the 35-foot and 36 grommets for the 50-foot). A stout D ring is affixed at the top for halyard connection. Nylon retainer shackles are provided for connecting the step grommets to the appropriate slides or slugs provided by the owner. There is a double step at the top, 3 feet below the halyard connection, for equal footing when working. The double step can be positioned at any point along the mast, A No. 3 grommet is provided between the halyard connection and the double step for gear attachment, bosun’s chair, tool bag, or safety harness.
Mast Mate is raised only when needed. It is hoisted just as is the mainsail. If the particular track or slot system has a gate, Mast Mate is fed in above the lowered main; otherwise, the main must be taken off the track or slot. A downhaul is recommended, but the weight of the climber will take the slack out of the system.
A common problem, main halyard retrieval, can be solved with Mast Mate by using the jib halyard (masthead rig only) or adjustable topping lift. If a spare halyard is available, Mast Mate affixed will provide a means to lessen the burden of going aloft in the bosun’s chair by taking the weight off the wincher. Mast Mate can also be used as an emergency boarding ladder by looping a step over a winch and casting the rest overboard. When not in use, Mast Mate is rolled compactly (per instructions) and stowed in the nylon bag provided. The 35ft MAST MATE weighs 8 pounds and it’s dimensions rolled are 14″ X 2″, the 50′ Mast Mate weighs 11.5 pounds and is 16″ X 2″ rolled.
Mast Mate is manufactured in the United States, It is a simple device, a combination of old and new ideas and modern materials. Used with common sense and good judgment, it is a very helpful tool. The statement most often heard when Mast Mate is seen at boat shows or in private use is: “Why didn’t I think of that?”

Tool Bag Workbelt
The design is similar to a linesman’s belt, consisting of an adjustable waist belt with a tool bag conveniently affixed at the back and a tether strap that goes around the mast and clips back onto the opposite side of the belt. This allows for a comfortable work position with both hands free. I feel the use of this workbelt greatly reduces any risk that could be incurred by on the spot solutions to securing yourself to the mast. When used to hold you to the mast, regular safety harnesses with a single front attachment point, although useful for a back up safety line, tend to make you swing side to side making working difficult at best. With the Mast Mate Workbelt you are fully supported from your backside greatly reducing swing . It is a must when working off the Mast Mate and is equally useful when using permanent mast steps.

Used Mast Mates Available
On occasion we have various sizes of Mast Mates available at reduced cost.

Click Here for Sailors with In-Mast Furling
Sail Batten Stiffeners
Even I will admit that one of the difficulties in using the mast mate while standing and doing work in the top adjacent steps is foot fatigue. This is caused by the very thing that makes the mast mate so safe to climb, the flexible webbing that surrounds and grips your feet as you climb. But, when you stand in the steps for any length of time, this grip and flexing also causes foot fatigue . In the past this has been dealt with by finding ways to lessen the pressure on the feet by either leaning back in the workbelt or climbing harness or by sitting in the bosuns chair. Now there is a way to even lessen this pressure more by using a stiffener in the bottom of the top double steps. The stiffener is a strip of sturdy sail batten stock with rubber cap ends which slides securely into a pocket formed by the double webbing reinforcer. This provides a stiff bottom on the adjacent top steps which prevents them from collapsing around the foot. A pair of stiffeners is now included with every Mast Mate at no additional cost .

Rigging - Turnbuckles , Toggles , Wire & Rod Components, Norseman Cones & Fittings.
Furling Systems - Systems and replacement parts from a variety of Manufacturers.
Traveller Systems - Adjustable Track Systems for Mainsheet and other applications.
Sailboat Hardware - Rope Clutches, Blocks, Track & Fittings, Winches, etc.
Custom Parts - Custom items, or those out of production or otherwise unavailable.
Consultation - Special projects, research, or information not detailed on-site.
Copyright 1996 - 2024, Rig-Rite, Inc. Disclaimer Web Site maintained by The WATER Group
- Forums New posts Unanswered threads Register Top Posts Email
- What's new New posts New Posts (legacy) Latest activity New media
- Media New media New comments
- Boat Info Downloads Weekly Quiz Topic FAQ 10000boatnames.com
- Classifieds Sell Your Boat Used Gear for Sale
- Parts General Marine Parts Hunter Beneteau Catalina MacGregor Oday
- Help Terms of Use Monday Mail Subscribe Monday Mail Unsubscribe
Installing Mast Steps
- Thread starter DannyS
- Start date Apr 10, 2021
- Forums for All Owners
- Ask All Sailors

There is usually not enough material on a mast to get three threads of a metal screw to hold in the aluminum of the mast. If there is vibration, the screw could back out until corrosion builds up between the screw and the mast, then you can't get the screw out, no matter what. Since the pop rivets flare inside the mast, they have better holding power than a screw and you can drill them out if you need to remove the attachment. The subject of rivet material came up on this thread and the general consensus was aluminum Pop-Rivet Selection for Mast Steps | Sailboat Owners Forums . Others in forum may have other opinions about using stainless steel. You might find this article helpful: Installing mast steps with rivetnuts - Practical Boat Owner (pbo.co.uk)

Rich Stidger
I have that same type of mast steps as you. I looked for pictures to see how I mounted mine but cold not find the mounting detail. But I am pretty sure I used S/S machine screws into tapped holes in the mast. But sure to use Tef-Gel or some kind of anti-seize compound. One suggestion- At the location where you will be standing to work on your sail and sail cover, put a step on each side of the mast so your feet will be even. Also be sure that the distance between the steps is a comfortable distance and that you are not stretching to reach the next step either up or down. Edited: FWIW, my steps have been in place for 23+ years with no loosening or issues. I'm not saying it can't happen, just that it is not my experience. YMMV.

Always coarse threads for soft metals. Any engineering reference. If the boat is big enough that you can reach the boom easily at the mast, the mast is thick enough for this purpose. You can probably measure the thickness at some opening. Rivets are fine, but bolts with Tefgel make it easier to move them if you decide they are the wrong place, you don't like them, or they break. I'd test the height with a step stool or similar first. It will make the process less nerve wracking.

Stu Jackson
I had exactly the same experience as Rich, and the same 23 years.
- This site uses cookies to help personalise content, tailor your experience and to keep you logged in if you register. By continuing to use this site, you are consenting to our use of cookies. Accept Learn more…
Stepping a Mast: A Step-by-Step Guide
by Emma Sullivan | Aug 11, 2023 | Sailboat Maintenance
Short answer stepping a mast: Stepping a mast refers to the process of installing or raising a sailboat’s mast. It involves carefully aligning and securing the mast on the boat’s deck, while ensuring proper tension and stability. Various techniques and equipment can be used for this task, depending on the boat’s design and size.
Stepping a Mast: An Essential Guide for Sailors
Setting sail on the open seas is an exhilarating experience for any sailor. The wind in your hair, the waves crashing against the hull, and the sense of freedom that comes with being at one with nature. However, before you can embark on this nautical adventure, there is a crucial process that every sailor must master – stepping a mast. In this comprehensive guide, we will delve into the intricate details of this essential task, providing professional insights and offering witty and clever explanations throughout.
Firstly, let’s understand what stepping a mast actually means. Essentially, it refers to the process of erecting or raising a sailing vessel ‘s mast into an upright position. This pivotal step sets the foundation for proper rigging and ultimately ensures smooth sailing ahead.
Now that we’ve established its significance, let’s dive deeper into the process itself – step by step. Imagine yourself standing next to your beloved vessel ready to embark on this journey.
1. Assess Your Equipment: Before even thinking about stepping a mast, it is important to ensure that you have all the necessary equipment at hand. Take stock of your tools such as rigging screws, halyard lines, shackles, turnbuckles, and winches. Each tool has its own role in successfully completing this task and overlooking even one can lead to unnecessary complications later on.
2. Prepare Your Boat: Once you have gathered all the essential tools and materials required to complete this feat of engineering excellence (okay maybe not that dramatic!), it’s time to prepare your boat for the mast-stepping process. Ensure that your vessel is securely anchored or moored in order to minimize any movement during this delicate operation.
3. Assemble Your Crew: Stepping a mast is not something one can typically achieve alone – teamwork is key! Gather a crew of experienced sailors who are familiar with this task or be prepared to provide thorough instructions to any novices on board. Communication and cooperation are vital throughout this entire process.
4. Disconnect the Rigging: Now that your team is assembled, it’s time to disconnect the rigging. Carefully loosen and detach all halyards, stays, shrouds, and any other sail control lines that may be attached to the mast. Bear in mind that some lines might be under tension, so take caution when releasing them, ensuring no injuries occur.
5. Align and Position: Once all rigging has been cleared away, align the base of the mast with its designated step on deck – hence the term ‘stepping a mast’. Measuring twice before placing it once is crucial here! Ensure that alignment is precise to prevent any missteps (pun intended) during future maneuvers.
6. Engage Your Crew: Prepare for some heavy lifting! Each member of your crew should take their positions around the base of the mast while keeping clear communication channels open. Raise the mast using proper lifting techniques – an upward force applied in synchronization by all hands involved will steadily guide it into position .
7. Secure It All: Once in place, secure the mast by inserting necessary supports such as wedges or chocks underneath its base, ensuring stability throughout your sailing journey.
8. Reattach Rigging: After successfully stepping your mast and securing it firmly in place, reconnecting the rigging can commence. Attach each line carefully according to their designated fixings and ensure proper tensioning for optimal sail control during navigation.
9. Celebrate Your Success: You did it! Take a moment to appreciate your accomplishment with your crewmates while visualizing all those incredible sailing adventures that lie ahead.
Stepping a mast may seem arduous at first glance but mastering this essential skill guarantees smooth sailing experiences in return for every sailor daring enough to embark on this voyage. Harnessing professional insights paired with witty explanations ensures both efficiency and enjoyment throughout this process. So, set your sights on the horizon, dear sailor, while confidently stepping your mast into position – for a world of endless nautical possibilities awaits!
How to Step a Mast: A Step-by-Step Tutorial for Beginners
Stepping a mast might sound like a daunting task, especially if you’re new to sailing or boat maintenance. However, with the right knowledge and approach, stepping a mast can be executed smoothly and efficiently. In this step-by-step tutorial, we will provide you with all the instructions and insights you need to successfully tackle this essential boating procedure.
Before we dive into the process itself, let’s briefly explain what stepping a mast entails. “Stepping” refers to the act of raising the sailboat’s mast into its proper position on deck. This is an essential step before heading out onto the water as it secures all the necessary rigging and allows your sailboat to harness wind power effectively.
Now that we have clarified its importance, let us guide you through each stage of stepping a mast:
1. Preparation: Firstly, ensure that all required tools and equipment are gathered nearby. This includes shrouds, turnbuckles, forestay tangs, spreaders, sidestays, halyards, and any other pertinent hardware. Checking their condition beforehand helps avoid any unexpected surprises during installation.
2. Verify Rigging Integrity: Thoroughly examine all components of your rigging for any signs of wear or damage. It is crucial to address these issues prior to stepping the mast to ensure safety while sailing .
3. Gather Assistance: Stepping a mast is undoubtedly more efficient with assistance from others – preferably two or more individuals capable of providing support during this balancing act. Clear communication among team members throughout the process is key.
4. Loosen Shrouds and Stays: Before lifting the mast in place, loosen both the upper shrouds (sidestays) and lower shrouds using turnbuckles or pins as instructed by your sailboat’s manual or manufacturer guidelines.
5. Place Mast Base: Position your temporarily detached mast near its intended location on deck. Ensure proper alignment with partners or securing holes in the boat ‘s structure.
6. Raise the Mast: Carefully lift the mast into an upright position, making sure it remains stable and straightened by distributing weight evenly during this initial stage. Continue to hold the mast while others help secure it into place.
7. Attach Shrouds and Stays: Begin attaching shrouds and stays, working from top to bottom, ensuring that each one is adequately tightened as you go along. Symmetry is vital here, so be mindful of equal tension across both sides of the sailboat.
8. Check Alignment: Before moving forward, confirm that your mast stands perpendicular to your boat ‘s deck using a level or a plumb bob – small tools worth investing in for accuracy.
9. Tighten all Key Components: Now that everything is correctly attached, tighten all turnbuckles, pins, and connections while periodically rechecking alignment during this final phase.
10. Inspect Rigging Once More: After successfully stepping your mast , take a moment to perform a thorough inspection of attached rigging elements for security and integrity. Look out for any signs of loosening or twisting, ensuring everything remains properly aligned before setting sail.
By following these step-by-step instructions tailored for beginners like yourself, you’ll become proficient at stepping a mast in no time! Remember that practice makes perfect—the more you carry out this process safely and efficiently, the more confident you’ll feel handling every aspect of your sailboat maintenance .
Now go forth with empowering knowledge and newfound expertise—a smooth voyage awaits!
FAQ About Stepping a Mast: Your Top Questions Answered
Stepping a mast may seem like a daunting task for many sailors, especially beginners. The process involves raising and securing the mast onto a sailboat’s deck, ensuring its stability and allowing for smooth sailing . If you’re new to this procedure or simply want to brush up on your knowledge, we’ve compiled a list of frequently asked questions about stepping a mast to provide you with detailed professional insights. So let’s dive in and have your top questions answered!
1. What does it mean to step a mast? “Stepping a mast” refers to the act of raising and installing the sailboat’s mast into its vertical position on the deck.
2. Why is proper mast stepping important? Properly stepping a mast ensures optimal performance and safety while sailing. A securely installed mast enhances stability and minimizes the risk of structural damage due to excessive movement during navigation.
3. Can I step my boat’s mast alone? While it is possible for experienced sailors, it is generally recommended to have at least one other person assisting you when stepping a mast. This will ensure smoother handling and reduce the chances of accidents or mishaps.
4. What tools are required for stepping a mast? The necessary tools typically include halyards, shrouds, turnbuckles, winches, rigging tape, cotter pins (or locking rings), wrenches, shackles, and possibly an electric drill for boats with motorized systems .
5. How do I prepare my sailboat before stepping the mast ? Before embarking on the actual process of stepping the mast , ensure that all electrical cables or other obstructions are clear from underneath it. Additionally, make sure that necessary rigging lines are properly untangled and ready for use.
6. What precautions should I take during the process? Ensure that all participants wear appropriate personal protective equipment like gloves and harnesses if needed. Communicate effectively with your assistant(s) throughout each step of the process and maintain a slow, controlled pace to avoid accidents caused by rushed movements.
7. How do I align the mast properly? Use a spirit level or inclinometer to ensure that the mast is in perfect alignment with the boat ‘s centerline. Adjust shrouds and wiring if necessary to achieve proper alignment before fully securing the mast .
8. How tight should I tension the rigging? The rigging tension may vary depending on your sailboat ‘s specifications. However, as a general rule, you should aim for even tension on both sides of the mast to maintain balance and stability. Consult your sailboat’s manual or seek professional guidance for specific recommendations.
9. Are there any post-stepping checks I should perform? After stepping the mast, double-check all connections, turnbuckles, clevis pins, cotter pins (or locking rings), and other hardware for security. This will help identify any loose fittings that require immediate attention before setting sail .
10. Can I step my mast every time I go sailing ? Stepping a mast is typically reserved for larger boats or when undergoing maintenance tasks like cleaning or repair work that requires lowering it temporarily. For most recreational sailors on smaller vessels, leaving the mast stepped is more practical and convenient.
Now armed with expert knowledge about stepping masts, you can confidently approach this essential task with ease and precision on your next sailing adventure! Remember always to prioritize safety first while enjoying everything that comes with exploring new horizons on your beloved sailboat .
The Importance of Properly Stepping a Mast: Avoiding Common Mistakes
Stepping a mast may sound like a minor detail in the grand scheme of boat maintenance, but make no mistake – it is crucial to do it properly. Neglecting this essential task can lead to all kinds of trouble on the water, from weakened rigging to disastrous accidents. In this blog post, we will explore the significance of correctly stepping a mast and delve into some common mistakes that must be avoided at all costs.
First and foremost, let’s understand what exactly stepping a mast entails. Stepping refers to the process of installing or lowering the mast onto its base. It is not as simple as it might seem at first glance, as there are numerous factors that need to be considered for a successful operation.
The primary reason why proper mast stepping is imperative lies in its impact on overall boat stability and balance. The mast plays a pivotal role in supporting the sails and distributing their forces appropriately. If the mast isn’t stepped correctly, it can cause significant imbalance and compromise the vessel’s ability to sail smoothly through varying weather conditions .
One common mistake many sailors make when stepping their masts is failing to take accurate measurements beforehand. Each boat has unique specifications that determine how high and straight the mast should be positioned. Neglecting these measurements can result in an uneven distribution of weight and strain on various parts of the structure.
Another error frequently made during mast installation involves rushing through or skipping important steps in an attempt to save time or effort. This can lead to loose connections, improperly secured rigging, or even structural damage over time. It’s crucial never to underestimate how vital every step is in ensuring a safe sailing experience.
Underestimating environmental challenges is yet another mistake novice sailors often succumb to when stepping their masts. Unfavorable weather conditions like strong winds or turbulent seas increase the difficulty level exponentially – professionals agree that adverse conditions should always be taken into account before attempting this task.
Apart from compromised stability, improper mast stepping can also put unnecessary strain on the rigging. The rigging, which comprises various wires used to support the mast, is a vital part of the sailboat ‘s structure. Failure to properly step the mast may lead to excessive tension or slack in the rigging, causing it to weaken or fail when under stress. This can result in catastrophic accidents like broken masts or torn sails .
To ensure these mistakes are avoided, seeking professional assistance when stepping a mast is highly recommended. Professionals possess the experience and expertise necessary to handle this delicate operation with finesse, minimizing risks and maximizing sailing performance . Additionally, they often utilize specialized equipment that ensures precision and accuracy during installation.
In conclusion, properly stepping a mast is not just another item on your boat maintenance checklist – it is an essential task that directly impacts safety and sailing performance. Neglecting this crucial operation or making common mistakes can have dire consequences for both you and your vessel. By taking accurate measurements, avoiding rushing or skipping steps, considering environmental challenges, and seeking professional help if needed, you will set sail with confidence knowing that your mast is secure and ready for smooth navigation through any waters .
Pro Tips and Tricks for Smoothly Stepping a Sailboat’s Mast
Stepping a sailboat’s mast can often be an intimidating and challenging task, especially for those new to sailing or who may lack experience in this particular aspect of boat maintenance. However, fear not! With a few pro tips and tricks up your sleeve, you’ll be smoothly stepping that mast like a seasoned sailor in no time.
Firstly, it’s essential to ensure that all necessary preparations have been made before attempting to step the mast. These preparations include gathering the right tools and equipment such as shrouds, spreaders, and a sturdy gin pole or mast crane. Additionally, make sure the mast is properly prepared by removing any obstructing wires, halyards, or sails.
Once everything is set up on deck and the crew is ready for action, communication becomes key. Assign specific roles and responsibilities to each member involved in the process to create a smooth workflow. This ensures everyone knows their part and prevents any confusion or mishaps during this delicate operation.
As you begin moving the mast towards its upright position using either a gin pole or mast crane, take note of any potential obstacles such as surrounding boats or objects on deck. It’s crucial to have someone guiding the mast from below while another crew member simultaneously communicates with them from above. This coordination guarantees precise movement throughout the entire process.
One crucial aspect novice sailors tend to overlook is adjusting tension in the rigging once the mast is fully upright. Before tightening anything down, give all standing rigging thorough inspection to ensure it’s correctly attached and showing no signs of damage or wear. Then proceed cautiously, incrementally adding tension until you reach proper levels specified by your boat’s manufacturer guidelines .
If navigating rough weather conditions when stepping your sailboat’s mast, extra safety measures should be taken into consideration. Be sure to check weather forecasts beforehand and avoid attempting this procedure if strong gusts are predicted. If unavoidable due to unforeseen circumstances at sea – consider seeking professional help or advice.
Now, let’s not forget the witty and clever part of this explanation. Stepping a mast can sometimes feel like trying to solve a complex puzzle, but with these pro tips in your arsenal, you’ll have all the pieces fitting together smoothly. Just remember, practice makes perfect, and soon enough you’ll be stepping that mast with style, poise, and a grin that says “I’ve got this!”
So there you have it – our comprehensive breakdown of pro tips and tricks for smoothly stepping a sailboat’s mast. With proper preparation, clear communication, attention to detail, and a sprinkle of humor sprinkled throughout the process, you’ll find yourself mastering this essential skill in no time. Happy sailing!
Troubleshooting Common Issues While Stepping a Mast
Troubleshooting Common Issues While Stepping a Mast: A Comprehensive Guide for Sailors
As sailors, we all know that stepping a mast can sometimes be a challenging and daunting task. It requires careful planning, expertise, and attention to detail. Whether you are an experienced sailor or a novice, there are certain common issues that can arise during the process of stepping your mast. In this blog post, we will dive into these issues one by one and provide you with professional and clever solutions to troubleshoot them.
Issue #1: Misalignment One of the most common problems encountered while stepping a mast is misalignment between the mast and its base. This issue can lead to various complications such as difficulty in securing the mast properly or improper distribution of weight . To tackle misalignment, it is crucial to carefully measure and level both the mast step and the base before attempting to step the mast. Don’t forget to use a spirit level – it’s your best friend in achieving perfect alignment!
Issue #2: Rigging Tension Another concern that often arises is improper tensioning of rigging once the mast is stepped. Insufficient tension can result in excessive movement of the mast, leading to unwanted vibrations and potential damage while sailing. On the other hand, excessively tight rigging can put unnecessary strain on your boat ‘s structure. The key here is finding the perfect balance – just enough tension for stability without compromising safety or functionality.
To achieve ideal rigging tension, invest in an appropriate tool like a Loos gauge or consult with an expert rigger to ensure correct adjustments according to your boat specifications.
Issue #3: Electrical Connectivity With modern sailboats becoming more electronically advanced, electrical connectivity has become increasingly critical. Often overlooked during mast stepping, problems relating to wiring connections can cause headaches down the line – pun intended! Ensure all electrical connections related to instruments, lights, antennas, or wind instruments are securely attached before raising the mast. It’s wise to meticulously inspect all the connections, tighten them if needed, and conduct thorough testing to avoid electrical malfunctions while out at sea.
Issue #4: A Stuck Mast Step Imagine everything aligning perfectly, rigging tension ideal, and electrical connectivity intact – but suddenly, you encounter a stubborn mast step that just won’t budge. This can be a nightmare for any sailor eager to set sail ! Fear not; clever solutions exist.
Firstly, applying lubricating agents like penetrating oil or silicone spray around the step can help loosen it. Using mild heat with a heat gun or hairdryer can also assist in expanding metal components slightly and facilitating movement. However, be mindful of excessive heat as it might damage surrounding areas or weaken adhesives.
If all else fails, consider seeking expert assistance. Sometimes professional guidance is the ultimate solution when dealing with intricate issues such as stuck mast steps!
In conclusion, stepping a mast comes with its fair share of challenges. However, by being prepared and equipped with knowledge on troubleshooting common issues like misalignment, rigging tensioning, electrical connectivity problems, and stuck mast steps – you can confidently tackle any hiccups along the way. Remember to approach these troubleshooting moments professionally yet witty in your problem-solving approach because sailing calls for equal parts expertise and well-honed humor!
Fair winds and smooth sailing!
Recent Posts

- Sailboat Gear and Equipment
- Sailboat Lifestyle
- Sailboat Maintenance
- Sailboat Racing
- Sailboat Tips and Tricks
- Sailboat Types
- Sailing Adventures
- Sailing Destinations
- Sailing Safety
- Sailing Techniques
- New Sailboats
- Sailboats 21-30ft
- Sailboats 31-35ft
- Sailboats 36-40ft
- Sailboats Over 40ft
- Sailboats Under 21feet
- used_sailboats
- Apps and Computer Programs
- Communications
- Fishfinders
- Handheld Electronics
- Plotters MFDS Rradar
- Wind, Speed & Depth Instruments
- Anchoring Mooring
- Running Rigging
- Sails Canvas
- Standing Rigging
- Diesel Engines
- Off Grid Energy
- Cleaning Waxing
- DIY Projects
- Repair, Tools & Materials
- Spare Parts
- Tools & Gadgets
- Cabin Comfort
- Ventilation
- Footwear Apparel
- Foul Weather Gear
- Mailport & PS Advisor
- Inside Practical Sailor Blog
- Activate My Web Access
- Reset Password
- Customer Service

- Free Newsletter
What You Can Learn on a Quick Test Sail

Cabo Rico’s Classic Cutter

Bob Perrys Salty Tayana 37-Footer Boat Review

Tartan 30: An Affordable Classic

Preparing Yourself for Solo Sailing

Your New Feature-Packed VHF Radio

Preparing A Boat to Sail Solo

Solar Panels: Go Rigid If You have the Space…

When Should We Retire Dyneema Stays and Running Rigging?

Rethinking MOB Prevention

Top-notch Wind Indicators

The Everlasting Multihull Trampoline

Taking Care of Your 12-Volt Lead-Acid Battery Bank

Hassle-free Pumpouts

What Your Boat and the Baltimore Super Container Ship May Have…

Check Your Shorepower System for Hidden Dangers

Waste Not is the Rule. But How Do We Get There?

How to Handle the Head

The Day Sailor’s First-Aid Kit

Choosing and Securing Seat Cushions

How to Select Crew for a Passage or Delivery

Re-sealing the Seams on Waterproof Fabrics

Waxing and Polishing Your Boat

Reducing Engine Room Noise

Tricks and Tips to Forming Do-it-yourself Rigging Terminals

Marine Toilet Maintenance Tips

Learning to Live with Plastic Boat Bits
- Sails, Rigging & Deck Gear
Revive Your Mast Like a Pro
Each spar section has unique signs of trouble to look for during inspection..

Unobtainium is the metal at the top of every Naval Architect’s wish list. It’s a perfect marine material; light, strong, stiff yet flexible—it’s as inert as gold, but costs only pennies per pound. Sadly, like the search for El Dorado, this metal quest remains more alchemy than chemistry.
For now, aluminum, especially the alloy 6061-T6, is the solid performer. It singlehandedly upstaged spruce as the mast material of choice, and for decades it’s done its job admirably. The alloy isn’t perfect, but by understanding its vulnerabilities, and mitigating those negative characteristics, the functional lifespan of an aluminum spar can be measured in decades not years.
Yes, carbon fiber spars are in many ways the next step forward. But for those intent on being cost effective and not in the hunt for a few tenths of a knot increase in boat speed, aluminum remains the cost effective alternative. In a future issue we’ll focus on carbon’s influence on spars, hulls, rigging, and sails.
Most metal masts are made from long, cylindrical billets of aluminum alloy. Each tube section is created using a powerful ram to force a heated billet (400-500 C) through a set of dies that squeeze and shape the billet into the cross section and wall thickness of a specific spar. Lots of lubricating release agent and 15,000 tons of ram pressure are used to reshape the malleable aluminum.
Billet residue is captured and recycled, while the tube shape undergoes quenching as it moves off on the runout table. The next stop in the line involves a process that draws (pulls) and straightens the tube section.

Once fully cooled, it goes through a T6 heat tempering process that elevates tensile strength from 35,000 to 45,000 psi. Lastly, spars can be anodized, painted, powder coated, or left uncoated. Some masts are extruded in half sections and machine-welded together lengthwise.
There are other aluminum alloys that are better suited to welded hull construction or used for metal casting purposes, but 6061-T6, containing small amounts of silicon, magnesium, and other trace elements, delivers the strength, stiffness and lightness that’s vital when it comes to making spars.
The “T6” alloy is weldable, but doing so anneals and weakens the area that’s welded. This is one of the reasons why, when splicing two sections together, a doubler is added internally that overlaps the junction. Excess heat buildup during the plug welding process that joins the sections is kept to a minimum. Some manufacturers mechanically fasten the junction using machine screws or heavy duty pop rivets.
Unfortunately, aluminum isn’t quite the sequel to tomorrow’s Unobtainium . Aluminum, like steel alloys, show a proclivity to oxidize. But in the case of most steel alloys, oxidation is an ongoing process that only reaches completion when the object in question has become an unrecognizable pile of rust.

Bare aluminum, on the other hand, reveals a very different oxidation curve. A shiny new piece of aluminum develops a speckled, gray, oxidized coating that actually becomes a protective layer, preventing further oxidation. Ironically, this means that the ugliest looking mast in the marina, that non-anodized, unpainted one with the aesthetic appeal of dirty socks, is about as well protected from further deterioration as the spar on the gold-plater with the automotive finish. This is the reason why most commercial mariners restrain from painting the deck and topsides of their aluminum workboats.
The root cause of this aesthetic injustice is the way moisture, especially salt water, finds every microscopic void or coating imperfection and causes aluminum to oxidize around voids and spread beneath the paint layer. By the time blisters appear and paint begins to flake, the sub surface is covered with aluminum oxide and starting to pit.
There are several ways to tame the effect of chloride-rich seawater. But when it comes to a failing painted surface, thorough prep work is essential. Modern epoxy primers help hold corrosion at bay, and single and two-part urethane coatings seal the surface. Hard-anodized or powder coated spars are even better protected, but cost more and are more complicated to refinish when they finally fail.
GALVANIC CORROSION
Galvanic corrosion is aluminum’s second major nemesis, and it stems from an electrical interaction rather than oxidation. Metals are rated on a galvanic corrosion scale that places less reactive (more noble) metals at one end and more reactive (less noble) ones at the other end.
Platinum, beryllium and magnesium lean against one of the bookends of this scale. Magnesium, a plentiful element, is strong and light, 35 percent lighter than aluminum, but way too reactive in the marine environment. Platinum and gold sit at the opposite bookend of reactivity and are so inert that all other metals become anodic in their presence. The metals that lie in between these are relatively ranked according to their behavior in an electrolyte such as seawater.
When it comes to marine applications, there aren’t many platinum thru hulls, but silicon bronze is a pretty good compromise between cost and corrosion resistance. It’s rank on the galvanic scale is toward the more noble end and it behaves as a cathode to less noble metals like zinc, brass, and aluminum, which become anodes in the proximity of more noble metals.
Unfortunately, when dissimilar metals are in direct contact, all it takes is a little rain or morning dew to set up a temporary galvanic cell. Salt spray finds all the nooks and crannies on a sailboat and as the water evaporates it leaves behind crystalized sodium chloride (NaCl). Each raindrop, wave splash or drop of dew rehydrates the electrolyte. And as every galvanic cell demonstrates, wherever two or more dissimilar metals are immersed, a current flows and the less noble material (anode) corrodes causing electrons to flow toward the more noble metal (cathode). The net result is pitting and eventual destruction of the anode.
This prolonged, double-barrel assault on an aluminum spar is most noticeable in areas where dissimilar metals make contact.
There’s an old superstition about putting a couple of silver or copper coins under the mast step, just before stepping the spar. It may have been a good luck charm in the days of iron men and wooden masts. But today, placing a copper penny or silver eagle in a wet mast step completes a highly reactive galvanic cell and creates a corrosion experiment of the first order. The right answer is to do everything possible to separate dissimilar metals. Putting a Delrin strip or dielectric PTFE tape between the hardware and the mast wall really helps.
When installing larger stainless steel hardware on a mast, it’s easy to cut out a gasket from a sheet of 30 mil thick Teflon. Also be sure to use Tef-Gel or a similar dialecrtic grease or sealant on all screw threads.
MAST INSPECTION
Once the mast has been unstepped, positioned horizontally on horses and the headsail furling gear removed, it’s time to take a close look in all the nooks and crannies where things can go wrong. I prefer a bottom up approach and group the mast into four related subsets: base, column, spreaders, and masthead. If the mast is going to be painted, postpone this DIY inspection until all the rigging and hardware has been removed. In either case, scrutinize the spar, hardware and rigging attachment points, especially where high loads are focused.
It helps to have a good magnifying glass, a pick, knife and small scraper on hand to expose and inspect oxidized areas. Place a piece of contrasting color masking tape on each point of concern as you progress toward the masthead. Once the inspection is complete, use a digital camera or smartphone to document the more serious issues. These snapshots provide a record of the location and extent of all corrosion, deep pitting and any cracks emanating from fasteners or hardware. Also record all dents or other impact damage and any sign of ongoing abrasion. Serious damage can be caused by misled wire running rigging and the cycle loading wear linked to variations in tension. Naturally, all standing and running rigging should be thoroughly inspected at this time— a topic of a future article.
AT THE BASE
Keel-stepped masts aboard many cruisers and racers are hidden below the cabin sole and reside in a wet, corrosion prone, bilge ambiance. And it’s another reason why, when a mast is unstepped, the entire support structure, step and the heel fitting deserve a close look. Check for signs of corrosion and make sure the hardware that fastens the heel fitting to the grid or other transverse and fore-and-aft support is in good shape. This structure supports compression loads and also must respond to changes in backstay tension and side loading, not to mention the shock loads of a beat to windward in heavy seas. This is also the time to do what I call spar-oscopy. Take a compact LED flashlight and tape it to the end of a long, thin PVC tube or bamboo fishing pole that will be used to look at the mast interior.
This jury-rigged light on a pole, allows you see signs of internal corrosion and gives you a chance to locate abrasion points where halyards have been misled or are rubbing on hardware. A narrow spot beam will illuminate much of the inner wall of the mast, and if the running rigging has been replaced with thin messengers and the spreader “dog bones” (cross connecting supports) have been removed, you will have a clear sight line up the spar. This is a good time to sort out any halyard overlaps.
Riggers also look for an ailment called “elephant foot.” It’s a descriptive name for the partial crumpling of the spar near the base of the mast, It’s caused by over-compression and/or a wall section that is too thin. This wrinkling is usually just above the mast step, and it indicates a condition just shy of complete failure. It can be linked to prolonged ponding to windward with excessive backstay tension and overpressuring mast jacks. In some cases a new section can be spliced into the spar. By if it’s an older mast and other significant signs of deterioration are present, it may be time to opt for a new spar. Don’t bet the farm on an “it hasn’t failed yet” assumption; hire a skilled rigger to advise on the tough calls.
At first glance, the mechanical challenge linked to stripping hardware from a mast seems rather simple. All you need are a couple of screwdrivers and you’re ready to go. Unfortunately, the gods of galvanic corrosion have placed another obstacle in the sailor’s way.
The threads of those stainless steel screws attaching hardware to base plates or to the mast wall itself have become so corroded they are likely to be screwdriver-proof. Part of the blame goes to original hardware installers, who gave little attention to coating threads with an anti-seize compound and the effect it would have on future maintenance.

So after some years or decades, when it’s time to see what lies underneath the hardware, my first step is to clean all oxidation, paint and grime away from the screw slots and make sure that the chosen screwdriver fills the entire slot. A snug fit is the goal. Then, if a good counter clockwise twist fails to elicit any rotation, it’s time to add a wrench to the screw driver and deploy a good deal more torque.
If this also fails to loosen the bugger, I go to plan B before I ruin the screw slot. Step one is to use a pick to scrape away oxidation around the screw head perimeter. The next step is to douse the area with a penetrant such as PB Blaster, CRC’s Ultra Screwloose, Knocker Loose Plus, Gasoila Free-All or a similar product (see Inside Practical Sailor blog post, “More Boat Tips: Unsticking Stuck Nuts and Bolts”).
Before once again applying torque to the problem, I spend some time using a drift pin and a small ball-peen hammer to tap each chemically soaked fastener. Afterwards I add more penetrant around each screw head. Instead of immediately reverting to a brute force approach, which more often than not leads to a broken fastener or a damaged screw slot, I let the penetrant do its thing and return the next day with my portable impact driver and assortment of screw driver bits. The small Makita impact tool applies a pulsing torque. Combined with a little penetrant and a lot of patience, I’ve found this tool to be very effective on stubborn fasteners. Screw diameters of ¼ inch or less are not hard to snap so use pulsing torque is far better than more leverage and brute force.
If the screw slot is damaged it’s time to switch gears and be ready to drill out the head of the screw and pull the hardware off the remaining stud. A stud remover fitted to a socket wrench works better than vise grips when it comes to backing out a headless screw. But it requires a half-inch or more of the screw stem to be exposed.
The secret to drilling off the damaged head of a screw involves the use of a drill bit made for stainless steel. Place it in the chuck of a low-speed drill that delivers ample torque at slow speeds. Those using a dull bit and a high-speed drill are likely to work-harden the stainless steel screw head, making it even harder to drill. Applying cutting oil that both cools and lubricates a bit will make drilling more effective.
ALONG THE COLUMN
A sailboat mast is like a long electrical fuse: one bad spot and the show is over. Critical failures are usually linked to standing rigging failures and can occur at toggle or tang attachment points, on the spar itself or at spreader tips and roots. Upper shroud tang fittings, near the masthead, need a close look. Check clevis pin holes for elongation and Tball or stem ball cups for deformation.
Sight along the open spans of the spar, where no hardware is attached. It should be free of abrasion marks and signs of halyard shackle damage. It’s surprising how many painstakingly applied paint jobs are ruined by halyard slating cause by poorly set halyards. During this part of the inspection also check exit sheaves, winch bases/pads, mast steps, the bow light, radar bracket and other attached hardware.
The gooseneck fitting and boom vang points of attachment are highstress areas and prone to developing stress cracks. Just below this union, forces converge at the mast partners, the reinforced area where a keelstepped spar passes through the deck. Check here for stress-related damage as well as corrosion issues. If you find signs of extensive pitting or stress cracks, a cosmetic repair can be more harm than help. Have a local rigger with a good reputation take a close look at what you have uncovered.
The mainsail mast track should be straight and the slugs, slides or cars that run in or on them should slide freely. Take an extra slide or car and hand test the track, identifying any points where friction increases. Problems are often caused by burred or dented metal, oxidation in an internal track or misalignment at track joints. Most of these issues are easy to resolve while the spar is horizontal and access is optimized. In-mast or in-boom furling systems each have an inspection and maintenance routine outlined by the manufacturer. Maintaining optimum reliability revolves around following these guidelines. Care should be taken to avoid keeping paint and primer from hampering track function.
Search for causes of abrasion, eliminate the dings and dents from halyard shackles by solving lead problems. And be on the lookout for hairline cracks emanating from fasteners on the leading edge of the mast. Modern spar design accounts for backstay tensioning that induces bend in the mast to adust headsail shape. This bending results in an intentional tension increase on the spar’s leading edge, adding new stress to a column already in compression. Small cracks emanating from fasteners on the leading edge of the mast can be enlarged as the mast is intentionally bowed.
Every sailor who’s painted anything on their boat has plenty of tips to share. But when it comes to useful insider advice, pay more attention to the pros who have learned what works over many years. The good news is that although paint brand allegiance may vary, generic mast prep and painting techniques have a high degree of correlation.
When it comes to the first step in the prep process, every expert sings the same refrain. Remove the hardware if possible, especially if there’s any sign of blistering or paint failure around the edges. If there’s no sign of any corrosion at all, and the fasteners are likely to snap rather than release, carefully prep and tape around the hardware.
Sand, wire brush or sand/soda blast all areas where corrosion has pitted or left the surface covered with white aluminum oxide. Take a close look at the heel of the mast and the mast step itself. Both need to be free of corrosion and not damaged by metal loss or physical damage. The same goes for the area where spreaders, stays and shrouds attach. The masthead fitting also deserves close scrutiny. Inspect the aluminum around where the sheave axle(s) attach. A corroded aluminum masthead truck, with deterioration around the support for headstay or backstay toggles, can spell disaster. This corrosion inspection is a good time to catch pending problems.
In most cases, OEM painted spars hold up quite well, especially those that have been carefully prepped, epoxyprimed and LPU top coated. Eventually, weathering causes the gloss to disappear, but the paint retains excellent adhesive quality. If you’re facing such a challenge and there’s little or no sign of physical damage or corrosion around hardware, there’s nothing wrong with simply renewing the top coat.

In such cases, begin with a wash and/ dewax cleanup, sand with 220/320, remove dust, tape off hardware, solvent wipe and apply of two coats of the same (or similar type) topcoat, scuff-sand between coats.
However, if there are dings, scrapes or areas where corrosion has damaged the coating or areas where paint adhesion is failing, a decision must be made between spot repairs and complete mast redo. The latter involves removal of most or all of the hardware and stripping off every bit of the old paint. A spot repair approach is much less labor intensive, but if corrosion is rampant, spot repairing can be counterproductive.
During the prep process it’s essential to clean and degrease the surface before doing any sanding or other abrasive work. I prefer to use the solvent/cleaner of the paint manufacturer I’ve chosen. Clean cotton rags work best, and by meticulously wet wiping the surface you eliminate contaminants that can be forced into the substrate during sanding.
In the case of a repair and recoat effort, once the corrosion and flaking paint have been removed, feather in the adjacent painted mast surface with 60- 80 grit paper to achieve a toothy grip for the epoxy primer that follows. When doing a spot repair, this taper zone becomes an important test of one’s ability to feather an edge and hide the old to new paint junction. Seamless blending of the primer sets the stage for a successful, smooth transition spot repair. If, as you sand the boundary, the old paint continues to flake rather than allow you to feather the edge, It time to switch gears and consider removing all the paint.
An important step in painting aluminum is to get an epoxy primer on a freshly sanded and clean surface as soon as possible. When painting an entire spar, It helps if you can set up a way to hang the mast at waist level so it can be rotated in order to access all surfaces efficiently.

PRODUCT UPDATE
Interlux recommends doing the degrease wipe down with their 202 Solvent Wash prior to sanding. Then prime the spar using their InterProtect 2000E/2001E, thinned 15-20% with their brush or spray reducer. It’s a user friendly epoxy primer and easy to sand. Two coats makes the 60-80 grit sanding marks disappear. Both single-part Bright Sides and two part Perfection deliver a smooth glossy finish. The former is easier to apply and the latter is more durable and long lived.
Pettit offers a complete lineup of aluminum paint and prep products. Their approach kicks off with a solvent clean and a medium grit emery cloth sanding. When the residue has been removed, a thin coat of #6455 Primer should be applied. Two hours later, EZ Prime #6149 is applied and when it’s cured and sanded with 220 (repeat if necessary). Finish with two coats of Easypoxy.
Awl Grip recommends an initial cleaning with their surface cleaner T340 followed by a vigorous Scotchbrite scrubbing with Deoxidine and a thorough rinse to remove all residue. When dry prime with 30-Y-94 and within 3-6 hours, without sanding, apply 545 epoxy primer. Sand 220/320 and top coat with Awl Craft 2000.
If the spar was previously anodized precede the above with a 10-minute wash using a 33% solution of natrium hydroxide. Don’t let the solution dry on the spar. Immediately water-rinse and follow the prime and paint process above.
Spreader junctions are like a dangerous highway intersection, a point where competing forces interact and where there are no traffic lights to tame the flow. Rigging tension on the windward side of a sailboat cause compression loads to increase in the windward spreader(s) and decrease in the leeward spreader(s). Discontinuous standing rigging optimizes wire/rod diameter in each panel section, but it also complicates spreader tip hardware. All too often, spreader boots or a well-meaning taping effort, ends up looking like a response to an ankle injury. Even worse it creates a moisture-holding corrosion bath that enhances galvanic corrosion and oxidation. The goal is to avoid going overboard with padding and tape and making sure that water will not collect around spreader tip hardware.
Spreader bases are another realm of serious concern due to cycle loading, multidirectional forces and dissimilar metal contact. Swept back spreaders, especially those that eliminate the need for a backstay, cope with even greater loads. So when the rig is un-stepped, check how the spreader attachment was engineered. Was a doubler added to the mast wall and/ or were cutouts installed and hardware added to connect spreader pairs? In either case, corrosion in key load path areas can greatly decrease the spar’s ability to cope with the fluctuating loads. It’s no surprise that masts often break just above a set of spreaders.
AT THE MASTHEAD
Once launched, it’s hard to see what’s going on at the masthead. This means that when the spar is down it’s time to get a really close look at the mast truck and its associated fittings. Begin by disconnecting the standing rigging and checking the geometry of every hole that supports a clevis pin. The rule of thumb is: round is good, elliptical is bad. This goes for the tangs that connect upper shrouds to the spar as well as the holes in a welded aluminum masthead fitting. The loss of an upper shroud while beating to windward usually brings down the mast, so extra attention in this area is time well spent.
Carbon spar manufacturing mimics the engineering pioneered in the aerospace industry. They have become an essential component In the most competitive ranks of sailboat racing and caught on with cruising sailors who own lighter, more performance oriented sailboats.
Most spars are built on metal mandrels by carefully aligning layers of prepreg unidirectional and multi-axial carbon fiber from masthead to heel. Intermittently, a debulking process is used to squeeze the layers together, and after the laminate schedule has been carefully aligned, it’s placed in an autoclave. Here the epoxy prepreg in the carbon material becomes viscous and cures under controlled heat and air pressure. These materials are expensive, the labor is time-consuming and the quality control must be rigorous.

One of the major advantages of carbon mast building is the ability to engineer the layup to coincide with the load paths and stresses in the structure. Finite element analysis has helped identify how and where forces are transferred through the tube section. Weight is saved by only adding material where it is needed.
A cruising boat designer may opt for extra reinforcement that increases the safety factor by raising the breaking point of the material. Racing sailors have validated the performance uptick associated with carbon spars. Carbon/epoxy laminates do not suffer from corrosion but they are anything but immune to UV light. It’s one of the reasons a white primer and LPU topcoat is the sensible finish.
Minor impact damage and abrasion from poorly led running rigging is fairly straight forward to repair. But damage linked to sailing loads that cause major cracks in the laminate or interlayer delamination is another story altogether. In these cases, the spar builder or a composites shop engineer has some tough decisions to make. The big challenge is when a high-tech laminate bundle fails it’s very difficult to scarf in a new section that will handle all the loads in a manner that’s equivalent to, let alone, better than new. Some insurance companies put restrictions or higher premiums on coverage of carbon masts.

RELATED ARTICLES MORE FROM AUTHOR
Leave a reply cancel reply.
Log in to leave a comment
Latest Videos

The Great Loop – The Basics

Bottom Paint Showdown – Six Paints, One Winner!

Tartan 30 | Boat Review

Fuel Contamination? The Baltimore Francis Key Bridge Collapse
- Privacy Policy
- Do Not Sell My Personal Information
- Online Account Activation
- Privacy Manager

Autonomous Naval Pioneers: The U.S. Navy’s Unmanned Craft Conquers the Hormuz Passage
I n a strategic maritime maneuver, the U.S. Navy’s first drone boat, known as the L3 Harris Arabian Fox MAST-13, successfully sailed through the crucial Strait of Hormuz in 2023, marking a significant step forward in naval operations. The strait, a vital channel for the global energy supply, often witnesses tense encounters with Iranian forces, making the drone’s incident-free transit noteworthy.
Commander Timothy Hawkins, a Navy spokesman, confirmed the 13-meter drone, equipped with sensors and cameras, was closely monitored by Iran’s Revolutionary Guard. Still, it proceeded without confrontation. Accompanying the drone were two U.S. Coast Guard cutters, the USCGC Charles Moulthrope, and USCGC John Scheuerman, highlighting the U.S. military’s commitment to ensuring the freedom of navigation through this narrow passage that is a mere 33 kilometers wide at its narrowest point.
The drone’s operation is part of a larger initiative by the 5th Fleet’s Task, created to expand the use of unmanned systems in the region. This task force aims to bolster a fleet of roughly 100 unmanned drones, both sailing and submersible, to enhance maritime monitoring in collaboration with America’s allies. The MAST-13 drone’s video feeds can transmit real-time images back to shore and ships at sea, offering a strategic advantage in situational awareness.
The significance of this operation cannot be understated given the strategic nature of the Strait of Hormuz, through which approximately one-fifth of the world’s oil trade passes, connecting the Persian Gulf with the Gulf of Oman. The U.S. Navy’s presence in the Persian Gulf, especially through the Bahrain-based 5th Fleet, is crucial in maintaining open waterways for international trade and safeguarding American and allied interests.
Iran views the U.S. Navy’s presence as an affront, likening it to Iranian patrols in the Gulf of Mexico. However, Iran’s temporary seizure of several American drones being tested in the region, underscores the volatility and the critical need for persistent and vigilant surveillance, which unmanned systems like the MAST-13 can provide efficiently.
Despite their relatively recent deployment, unmanned surface vessels (USVs) have already proven to be game-changers in naval operations. These drones have challenged the traditional dynamics of naval warfare, offering a cost-effective method to pose significant threats to more expensive naval assets.
As we witness the evolving landscape of maritime security, the integration of unmanned systems into regular naval operations continues to advance. The U.S. Navy’s latest operation through the Strait of Hormuz with the MAST-13 is just a glimpse of the future, where drone boats will likely become an increasingly familiar sight in strategic waterways, enhancing surveillance capabilities while potentially deterring adversaries in some of the world’s most contested maritime domains.
Relevant articles:
– Why the Navy isn’t shooting down Houthi drones with lasers yet , defenseone.com
– Sea drones: What are they and how much do they cost? , bbc.com
– US Navy sails first drone through Mideast’s Strait of Hormuz , AP News, Apr 19, 2023
– Drone Boat Leading Navy Ships In The Strait Of Hormuz A Sign Of Things To Come , twz.com, Aug 9, 2023
![In a strategic maritime maneuver, the U.S. Navy’s first drone boat, known as the L3 Harris Arabian Fox MAST-13, successfully sailed through the crucial Strait of Hormuz in 2023, marking a significant step forward in naval operations. The strait, a vital channel for the global energy supply, often witnesses tense encounters with Iranian forces, making […]](https://img-s-msn-com.akamaized.net/tenant/amp/entityid/BB1lEh2H.img?w=768&h=512&m=6 "In a strategic maritime maneuver, the U.S. Navy’s first drone boat, known as the L3 Harris Arabian Fox MAST-13, successfully sailed through the crucial Strait of Hormuz in 2023, marking a significant step forward in naval operations. The strait, a vital channel for the global energy supply, often witnesses tense encounters with Iranian forces, making […]")
- Skip to Navigation
- Skip to Main Content
- Skip to Related Content
- Today's news
- Climate change
- My portfolio
- My watchlist
- Stock market
- Biden economy
- Personal finance
- Stocks: most actives
- Stocks: gainers
- Stocks: losers
- Trending tickers
- World indices
- US Treasury bonds
- Top mutual funds
- Highest open interest
- Highest implied volatility
- Currency converter
- Basic materials
- Communication services
- Consumer cyclical
- Consumer defensive
- Financial services
- Industrials
- Real estate
- Mutual funds
- Credit card rates
- Balance transfer credit cards
- Business credit cards
- Cash back credit cards
- Rewards credit cards
- Travel credit cards
- Checking accounts
- Online checking accounts
- High-yield savings accounts
- Money market accounts
- Personal loans
- Student loans
- Car insurance
- Home buying
- Options pit
- Investment ideas
- Research reports
- Fantasy football
- Pro Pick 'Em
- College Pick 'Em
- Fantasy baseball
- Fantasy hockey
- Fantasy basketball
- Download the app
- Daily Fantasy
- Scores and schedules
- GameChannel
- World Baseball Classic
- Premier League
- CONCACAF League
- Champions League
- College football
- Horse racing
- Newsletters
Entertainment
- How To Watch
- Fall allergies
- Health news
- Mental health
- Sexual health
- Family health
- So mini ways
- Style and beauty
- Unapologetically
- Buying guides
- Privacy Dashboard
- Scores/Schedules
- Wemby Watch
- Fantasy Basketball
- In-Season Tournament
- All-Star Game
- Power Rankings
- Fantasy Baseball
- World Series
- Free Agency
- Scores/Schedule
- Fantasy Football
- Fantasy Hockey
- UFC Schedule
- Yahoo Sports AM
- March Madness
- Caitlin Clark Scoring Record
- Daytona 500
- Leaderboard
- Masters Tournament
- Playoff and Bowl Games
- Tournament Schedule
- French Open
- Australian Open
- College Sports
- Fantasy Sports
- Sports Betting 101
- Bet Calculator
- Legalization Tracker
- Casino Games
- Beijing Games Home
- Beijing Medal Race
- Kentucky Derby
- Preakness Stakes
- Belmont Stakes
- Ball Don't Lie
- Yahoo Fantasy Football Show
- College Football Enquirer
- Baseball Bar-B-Cast
- Scheffler wins his 2nd Masters
- NBA playoff field is set
- 2024 WNBA Mock Draft
- Tiger's worst 72-hole score ever
- Best night in MMA history
Miuccia Prada Provides Viral Moment Christening Luna Rossa Prada Pirelli Sailboat
MILAN — No christening of the Luna Rossa Prada Pirelli boat would be complete without the viral moment provided by Miuccia Prada .
On Saturday in Cagliari, Italy, the designer and wife of Patrizio Bertelli, president of Luna Rossa Prada Pirelli , struck the boat’s bow with a bottle of Cantine Ferrari’s Maximum Blanc de Blancs sparkling wine to christen the AC75 foiling monohull — as is the tradition. The boat is set to compete in the 37th edition of the America’s Cup sailing race, taking place between Aug. 22 and Oct. 27 in Barcelona .
More from WWD
Marni's Francesco Risso Talks Working in a 'Cave,' Students' Limitlessness and Pratt Honor
EXCLUSIVE: Jake Gyllenhaal Sails the Luna Rossa for Prada's New Scent Campaign
Prada En Plein Air Takes on an English Garden at Selfridges Corner Shop
Prada donned a red coat with a contrasting dusty pink shirt, black pants and mary jane flats, and videos of her godmother duties were on a roll on social media over the weekend.
Decked in a metallic “Metal K”-colored livery the AC75 — the race-ready version of a prototype unveiled two years ago — glistened under the sun at the Luna Rossa Prada Pirelli dock in the Sardinian town.
It marks the 10th “Luna Rossa” America’s Cup hull unveiled 25 years after the first boat in 1999.
Built at the Persico Marine shipyard in Nembro, Italy, the sailboat, made of pre-preg carbon fiber, required 70,000 hours of work by 35 boat builders. It is equipped with a 25.6-meter mast with a soft wing comprising two twin mainsails and a headsail made of carbon and Dyneema.
In addition to Prada and Bertelli, the christening was attended by Marco Tronchetti Provera, executive vice president of Pirelli, the co-title sponsor of the team; Max Sirena, the longtime skipper and team director of Luna Rossa Prada Pirelli, and Agostino Randazzo, president of the Sicilian Sailing Circle represented by Luna Rossa Prada Pirelli.
In tandem with the ceremony, Luna Rossa Prada Pirelli revealed that Oakley is joining the team as its new technical performance partner.
“The boat we launched today is the 10th America’s Cup hull that we christen ‘Luna Rossa.’ This name, that has marked important milestones in my life, has also become an iconic name in sailing worldwide. It is a beautiful and radical boat that represents a step forward in terms of design and technology, born from an incredible collective effort,” Bertelli said.
“In these 25 years I have accomplished a goal that I had set for myself a long time ago: to create a team of extraordinary technicians and sailors capable of shaping the future of sport in our country and leaving a legacy for future generations. Now, with this new Luna Rossa, I also hope to achieve my sporting ambition, to win the America’s Cup,” he said.
The upcoming America’s Cup will mark Luna Rossa’s seventh challenge, but sixth race, as the team in 2015 withdrew from the competition over disagreements with the overturning of rules unanimously adopted throughout the previous year by the Oracle Team of the U.S., which was owned by Larry Ellison, and which lost the America’s Cup to the New Zealand team.
The Prada boat will represent Italy and the Sicilian Sailing Circle at the oldest trophy in the history of sports and the most prestigious in the sailing world, often referred to as the Formula 1 of the sea.
Louis Vuitton is again the title partner of the event and is once again organizing the Louis Vuitton Cup.
Five challengers in the Louis Vuitton Cup regattas — Ineos Britannia, Alinghi Red Bull Racing, Luna Rossa Prada Pirelli, NYYC American Magic and Orient Express Racing — will battle it out on the water to win the right to face off against defender Emirates Team New Zealand for the Louis Vuitton 37th America’s Cup Barcelona.
The Luna Rossa team was established in 1997 by Bertelli with the original name of “Prada Challenge for the America’s Cup 2000.” The team won the Louis Vuitton Cup in 2000, with a record of 38 victories over 49 races. It also competed in 2003 and in 2007, when it reached the Louis Vuitton Cup final.
Best of WWD
Celebrities at Coachella Through the Years
The Ubiquitors of Fall 2021 Social Life in New York City
Breaking Down the ‘Emily in Paris’ Fashion
Recommended Stories
2024 all-juice team: 10th annual edition hopes to be as successful as terez paylor's first.
When Paylor put together the very first All-Juice Team in 2015, 10 of those 22 players are expected to still be on NFL rosters in 2024. We can only hope this year's team honors Terez's memory with that kind of hit rate.
Cooper Flagg, AJ Dybantsa and Nolan Traore among standouts at Nike Hoop Summit
Yahoo Sports takes a look at six players who stood out at the Nike Hoop Summit and are worth keeping tabs on in the upcoming 2025 and 2026 NBA Drafts.
Mock Draft Monday with Daniel Jeremiah: Bears snag Odunze, Raiders grab a QB
It's another edition of 'Mock Draft Monday' on the pod and who better to have on then the face of NFL Network's draft coverage and a giant in the industry. Daniel Jeremiah joins Matt Harmon to discuss his mock draft methodology, what he's hearing about this year's draft class and shares his favorite five picks in his latest mock draft.
NBA playoffs: The season finale delivered, setting the stage for more drama and star power
Never in the league’s rich history was there a day like Sunday.
NASCAR: Chase Elliott snaps 42-race winless streak
The 2020 Cup Series champion hadn't won since Talladega in October of 2022.
2024 Masters payouts: How much did Scottie Scheffler earn for his win at Augusta National?
The Masters has a record $20 million purse this year.
Masters: Scottie Scheffler claims second green jacket in emphatic fashion
At 27, Scottie Scheffler joins of an exclusive club of two-time Masters winners.
Anthony Davis leaves Lakers season finale with back spasm, accuses Larry Nance Jr. of 'dangerous play'
Davis and head coach Darvin Ham are optimistic that Davis' latest injury won't sideline him for Tuesday's play-in game against the Pelicans.
Yankees pitcher Fritz Peterson, infamous for trading wives with a teammate, dies at 82
Former New York Yankees left-hander Fritz Peterson died at the age of 82. He is probably best known exchanging wives with teammate Mike Kekich in the 1970s.
UFC 300: 'We're probably gonna get sued' after Arman Tsarukyan appeared to punch fan during walkout
'We'll deal with that Monday,' Dana White said about Arman Tsarukyan appearing to punch a fan during his UFC 300 walkout.
UFC 303: Conor McGregor to finally return vs. Michael Chandler in June
Conor McGregor is set to enter the Octagon for the first time in three years.
Masters: Max Homa, fan favorite and finally a contender in a major
Max Homa is having the best major championship of his career, and the patrons at Augusta National are loving it.
Lakers, Grizzlies played an extra 66 seconds in third quarter after game clock was 'inaccurately set'
The Lakers would ultimately win the game over the Grizzlies by a score of 123-120.
Scottie Scheffler leading the Masters isn't the most exciting thing in his life right now
Scottie Scheffler holds the 54-hole lead at the Masters, but is ready to leave if his wife goes into labor.
2024 Masters final-round tee times: Scottie Scheffler holds lead over Collin Morikawa at Augusta National
Scottie Scheffler and Collin Morikawa will head out in the final group on Sunday at the Masters.
O.J. Simpson's estate to fight $33.5 million payout from 1997 wrongful death ruling
“It’s my hope that the Goldmans get zero, nothing.”
Wrexham secures promotion to EFL League One with 6–0 victory
Wrexham AFC clinched a promotion for the second consecutive season. With a 6–0 win over Forest Green, the Welsh club is moving up to EFL League One.
Braves' Spencer Strider to miss rest of 2024 season after undergoing elbow surgery
Strider made only two starts this season before suffering the injury.
NBA playoff picture: Nuggets' stunning loss to Spurs opens up No. 1 seed to Timberwolves, Thunder
The Nuggets suddenly need some help if they want the No. 1 seed.
2024 Masters third round tee times: Bryson DeChambeau, Max Homa set for final group on Moving Day
Bryson DeChambeau, Max Homa and Scottie Scheffler hold a three-way tie for the lead at the midway point of the Masters.
IMAGES
VIDEO
COMMENTS
To attach these steps, we used a stock rivet gun that cost about $30. If you use stainless rivets or aluminum rivets larger than 3/16″, youll need a compound-action gun thatll set you back a hundred and a half, unless you can rent or borrow one. Aluminum rivets go for 2 to 8. Stainless rivets cost 8 to 22.
Short answer: Mast steps on a sailboat Mast steps are devices installed on sailboats to aid in climbing the mast. They consist of small platforms or rungs attached to the mast, allowing sailors to ascend safely for maintenance or rigging purposes. These sturdy steps provide stability and ease of access while working aloft. 1) Introduction
Folding steps (top) reduce windage and are less likely to snag lines when folded. When figuring out spacing, measure a comfortable step height and decide if you want the steps staggered. Don Street. In the early '60s, my yawl Iolaire departed Grenada on a one-month sail to St. Thomas. The trip was a charter, and on board was a group of six ...
SKU: 85053 | Item ID: SCH 73-45. Special Order Only. 1-43 results of 43. 1. Fisheries Supply is your premier supplier of sailboat mast steps, tangs and exit plates from trusted brands. We offer a full range of quality mast hardware and fittings - including everything you need to set up a reefing system or running all your sails - so shop ...
Mast Steps: Mast Steps, or Mast Feet, are used on Deck or Keel to secure the base of the Mast. Mast Steps are usually bolted through the Deck, or into the Keel. Some Deck Steps incorporate a means of attaching Turning Blocks for Halyards and other Control lines. Some Keel Steps incorporate a means of attaching various Tie Rods or Deck Tie-down Turnbuckles, attaching to the Deck or Deck Collar ...
In essence, a mast step is a framework installed at the bottom end of a sailboat mast that rests atop or attaches to its deck. Functioning as both a base and pivot point for your sail 's central support system, it keeps everything correctly aligned while enabling controlled movement during cruising or racing. 2.
Sailboat Mast Steps: Climbing to the Top. Mast steps are handy additions to your mast, allowing easier access to perform maintenance or enjoy panoramic views. Here's how to use them safely. Using Mast Steps Safely. Always use proper safety equipment when climbing mast steps. Make sure they are securely attached to the mast and regularly inspect ...
Learn more at: https://www.PamWall.comVideo by Billy Black: https://www.billyblack.com
Mast Mate ( mastmate.com, from $280): Made from tough 2in-wide nylon webbing, the Mast Mate is about as simple as a mast climbing device could be. The webbing steps are 17in apart, and there's a grommet just below each step to which a plastic sail slide shackle is attached. There are four standard lengths, from 27ft to 50ft.
How is a mast stepped on a sailboat? A step-by-step guide. Stepping the mast on a sailboat is a fundamental process that marks the beginning of every sailing adventure. It involves raising and securing the mast into its proper position, allowing for the attachment of sails and rigging, ultimately enabling the boat to harness the power of wind ...
No rattling in wind at anchor or mooring. Each step individually tested at factory. Steps are positioned on opposite sides of the mast, with a recommended spacing of 14.75 Inches (375 mm) (2) More steps should be positioned opposite each other 47.25 Inches (1200 mm) down from the top of the mast for stable and safe working on sheaves, halyards ...
MARINE CITY Stainless Steel Polished Sailboat Teak Mast Steps with Anti-Skid Teak 12 x 5 Inches for Marines - Boats - Ships - Yachts. 4.8 out of 5 stars. 6. $21.20 $ 21. 20. FREE delivery Sat, Apr 20 on $35 of items shipped by Amazon. Or fastest delivery Wed, Apr 17 . Add to cart-Remove.
The "Mast Step" is a anufactured from a special combination of "nylon/glass fibre" which together with its design gives the step enormous strength. The save working load of the step is 140kg/310Lbs. The material is totally UV stabilized what makes the mast step UV resistant and prevents material degradation.
The folding mast step is manufactured from a special combination of Nylon/Glass fiber which together with its design gives the step enormous strength. With a 3% additive, it makes the mast step UV resistant and prevents material degradation. The steps weighs only 165grams each (weight is always a consideration for products up a mast), and when ...
The quality of Mast Mate and the Workbelt reflect that belief. All our mast step ladders and Tool Bag Workbelts are made in the U.S.A with quality materials and meticulous craftmanship. Whether you cruise, day sail or race, mast maintenance is a chore that cannot be overlooked. If it is, you will pay the price in time and money, or worse!
Walk the mast aft and drop the mast foot into the mast step on top of the deck, keeping the mast in center line of boat, insert the pivot bolt and locking nut. One crew member should pull on a line tied securely to the forestay while another pushes up on the mast and walks from the cockpit forward.
Hang all standing rigging. Ensure all turnbuckles and stays are new or have been inspected and serviced. Install spreaders and make/ seize spreader ends onto the wire. Install spreader boots. Test all light fixtures through the mast. Ensure mast butt/step has proper drain. Ensure mast butt/step has proper electrical access or wiring hole.
Mast Mate is an alternating-step flexible mast ladder made of 2 inch-wide nylon webbing. The sewn tensile strength of the webbing is 3,000 pounds. The distance between the alternating steps is 17 inches. The sail boat ladder steps are double reinforced with the same webbing. The steps are not sewn on to a main strap, but rather are formed by ...
Since 1961, RIG-RITE has engineered, manufactured and distributed Spars, Rigging and Hardware Systems for Sailboats. RIG-RITE stocks the largest variety of related Systems and Hardware available anywhere, Specializing in original replacement parts for Systems on yachts built the world over. Spars - Masts, Booms, Spreaders, Spinnaker Poles ...
One suggestion- At the location where you will be standing to work on your sail and sail cover, put a step on each side of the mast so your feet will be even. Also be sure that the distance between the steps is a comfortable distance and that you are not stretching to reach the next step either up or down. Edited: FWIW, my steps have been in ...
Short answer stepping a mast: Stepping a mast refers to the process of installing or raising a sailboat's mast. It involves carefully aligning and securing the mast on the boat's deck, while ensuring proper tension and stability. Various techniques and equipment can be used for this task, depending on the boat's design and size.
This wrinkling is usually just above the mast step, and it indicates a condition just shy of complete failure. It can be linked to prolonged ponding to windward with excessive backstay tension and overpressuring mast jacks. In some cases a new section can be spliced into the spar. ... A sailboat mast is like a long electrical fuse: one bad spot ...
CONTACT US. LFS Marine & Outdoor. 851 Coho Way. Bellingham, WA 98225. Web Site Sales & Support: 1-800-998-9508 +1-206-780-5670. Cage #: 5X466
In a strategic maritime maneuver, the U.S. Navy's first drone boat, known as the L3 Harris Arabian Fox MAST-13, successfully sailed through the crucial Strait of Hormuz in 2023, marking a ...
Sailing through space might sound like something out of science fiction, but the concept is no longer limited to books or the big screen. In April, a next-generation solar sail technology - known as the Advanced Composite Solar Sail System - will launch aboard Rocket Lab's Electron rocket from the company's Launch Complex 1 in Māhia ...
It is equipped with a 25.6-meter mast with a soft wing comprising two twin mainsails and a headsail made of carbon and Dyneema. The Luna Rossa Prada Pirelli AC75 sailboat competing in the 37th ...