J Class Yachts For Sale (Sail)
- Upcoming Events
- AMYA J CLASS History
- Stuff for Sale
- Construction Videos

Building a J Class Model
By john hanks iii.
Now you may be wondering what is involved in building a model of a J Class yacht. I will give you an idea of what is involved in getting your J model in the water.
To begin with, let me say that you will need to do some scratch building to get your J model completed, regardless which yacht you choose to model. The scratch building will involve the deck, the rig, and probably the hardware associated with the mast, boom and rigging. With that said, you will need to decide which yacht you would like to model. In the full size J Yachts there was a definite advantage associated with which hull was in the water, but with the models, it appears that any of the J designs will make a good fast sailing model, if it is built correctly. So your decision should be driven by your personal preference for a particular boat. Once you decide which yacht you would like to model you will need to either buy a fiberglass hull or get the drawings for your chosen hull. There are hull line drawings available in the proper scale for all of the J's as well as some deck plans. You can get line drawings from several of the maritime museums, such as the Mystic Seaport Museum.
The amount of time that you will spend on building your model will vary with your building ability, whether you start with a fiberglass hull and how much detail you want to put on your model. Should you decide to scratch build the entire model with a lot of detail, you should plan on spending about 500 to 550 hours building your model. If you begin with a fiberglass hull, subtract about 150 hours, if you do not want to detail your model, deduct about another 100 hours. The cost of materials will be about $800 to $900 if you decide to completely scratch build your model.
I will begin the actual building process with a plank-on-frame hull. You can skip these steps if you start with a fiberglass hull. The process for completing the remainder of the model will be the same from that point on.
To begin the building process, you will need to get your drawings ready by extending each frame to a “waterline” that is above the deck line on the drawing. This new “waterline” will be the part of the frame that rests on the building board. The new “waterline” gives you a flat plane so that all of the frames are referenced to the building board surface, while allowing the arc of the sheer at the deck line to maintain its shape. Your modified drawing should show the hull shape, the shape of the deck beams, and the building board surface.
You will begin the building process by building a building board. The easiest way that I have found to do this is to buy an 8 foot long 4”x6” and mount it at a convenient building height on 2”x4” legs. You will need to make sure that the 4”x6” plank is straight and true and that it will stay that way through out the building process, as this will determine the trueness of your model.
Mark a centerline on your building board and then mark all of the station locations on the centerline. You will then need to draw a line perpendicular to the centerline at each of the station locations. You will next attach small blocks (approximately 1-1/2 x 1-1/2 x ¾ inch) to the building board on the centerline and aligned with the perpendicular station lines. The blocks need to be placed so that the frames that will be glued to these blocks will be centered on the perpendiculars.
The next step will be to cut out the frames that will form the hull. For this step you will need to keep in mind the difference between the line drawings for a metal hull versus a wooden hull. The drawings for a metal hull show the frames to the outside of the plating and for a wooden hull, they are to the outside of the framing, not the hull planking. This will make a difference in your model, as all of the Js were metal boats, and if you draw your frames to the lines, your model will be oversized by the thickness of your planking.
I use 1/8 inch Luan plywood for the frames. The plywood comes in a 4’x8’ sheet and I can get all 28 to 30 frames from one sheet of plywood. The frame patterns are cut from your drawing, and each frame pattern is traced on the wood. With careful placement you should have no trouble getting all of the frames traced onto the plywood. You will need to draw the cutouts for the keel, inwales and king plank in the frame tracings. The centers of the framed are also cut out so that you end up with a ring of wood that is about ¾ inch from the outside to the inside of the frame.
When I cut my frames I do not try to cut on the line that I have drawn; I am not that good with the saw. I leave a little wood, about a 1/16 inch next to the line and sand the frame to the final shape. I find that this makes it much easier to control the accuracy of the frame shape. Once all of the frames are cut and notched for the keel and inwales, they are glued to the blocks on the building board. At this point you should be able to sight down the frames and get a good idea of the shape of your hull.
With the frames glued in place, you are now ready to install the keel and the inwales. I like to use ¼ inch birch plywood for the keel and 1/4x1/4 inch square for the inwales. The inwales can be cut from the same material that you will use for the planking. The hull framing is very limber at this point but it becomes very ridged once the keel and inwales are in place.
The hull is now ready for planking. I have used pine, bass, aspen, spruce and alder for planking. All work well. The availability and price of the material is what determines which material I use. When I built my first J some 30 years ago, clear pine in 8 foot lengths was plentiful and inexpensive. Since then, it has become hard to find and very expensive. As a result I have used other woods that were available, hence the bass, aspen, spruce and alder. The planking material is cut into strips that are about 5/32 inch thick and 3/8 inch wide. This is a nice working size, as the planks are limber enough to form to the hull without the need for spiling (tapering), wetting, or steaming them. You will start the planking at the first frame and end at the last. The 2 to 3 inches of hull that remain at the ends will be filled with solid wood blocks shaped to the dimensions of the hull. Begin planking your hull at the sheer and work to the keel. Each side of the hull will require about 50 to 60 planks. Remember that you will need to alternate sides of the hull as you plank so that you keep the stresses equal on both sides of the hull, thus preventing distortion in the hull.
You will need to change direction of the planking when you get to the bilge area of the hull. The planking will take on an increased twist towards the stern that will prevent the planks from laying fair. The planks will tell you when you have reached this point, usually about 15 to 20 planks up on the hull. To overcome this you will need to lay a plank in a straight line along the hull so that it lays flat between the areas where the existing planking meets the keel. This will leave a lens shaped gap of about 4 or 5 inches between this plank and the existing planking at the middle of the hull. Fill this area by planking from the new plank that you laid down to the existing planking. Once you have completed that step, then continue to plank the rest of the hull. When you have finished your planking, you are ready to attach the bow and stern blocks, shape them, and sand the entire hull to get it ready for fiber glassing.
I like to build the rudder next and fit it to the hull. I build the rudder as I would build an airplane control surface, with a leading edge spar, three ribs, and a trailing edge. The framework is then covered with 1/32 inch plywood. The square tube that accepts the 5/32 inch brass rod rudder shaft is installed in the leading edge as well as the pivot pin at the bottom of the rudder. The hull is drilled and the rudder log is installed and the rudder is fitted in place. Once the rudder is fitted and works well, the hull is fiber glassed using a single layer of 6 ounce cloth and three to four coats of resin. Each coat of resin is sanded before the next coat is applied. When the sanding is complete you will have a smooth and fair hull that will look great when it is painted. The hull is now ready to be removed form the building board. At this time, you should also have a stand built and ready to accept the hull.
Once the hull is off of the building board, it is time to seal the inside with epoxy and install the mechanical workings in the hull as well as install any reinforcements that are needed, such as at the chain plates, mast step, and sheet exits. From this point on, the building process is the same for the fiberglass hulls once you have the deck beams in place. This is also the time to lay out the hatch openings. When laying out the hatch openings you want to keep them as small as possible and still be able to do any work inside the hull that is necessary. Nothing is more frustrating than to find out that you cannot reach some part of your equipment once the deck is in place, so be sure that you can work on and remove and replace all of the fittings, winches, ballast, etc., through the hatch(s) that you have framed in your deck.
Building the deck is the next big step in getting your J ready to sail. There are several different ways to build your deck, and your decision on how much scale detail you want on your model will drive part of that process. If you want a slick deck with no scale detail, then a simple plywood deck will do. The 1/8 inch plywood will be more than adequate for the job and can be finished so that you have a very good looking wooden deck on your model.
Another option is to build a plank deck that represents the deck on the full size yacht. If this is your preference, then you begin by cutting the deck planking to the same dimensions as the hull planking. I cut my planks to a length of 15 inches so that I have scale 20 foot planks. To simulate the deck caulking, I use black construction paper glued between the planks. Once you have the planking cut, you will need to lay the king plank down the center of the deck and the water way planks down each side of the hull. All of the Js had the planking run parallel to the edge of the hull, so you will need to begin laying your deck from the edge of the hull, and work to the center. The paper between the planks helps the glue, thin CA, flow and form a good bond at the seam. From this point on you just continue your planking until the deck is completely covered. As you build your deck you will need to cut your planking at the hatches so you will have access to the inside of the hull when you have finished your planking.
When the deck planking is complete, you will sand the whole deck and get it ready for finishing. At this point, you should have a great looking model.
Again your decision on the amount of detail that you want on your model will determine your next step. If you opt for a scale appearance, by this time you will need to make the cabins, deckhouses, winches, cleats, and anything else that goes on the deck.
The hull is now ready for finishing. I use non-water-based, clear gloss, polyurethane on the deck, cabins, and spars and automotive acrylic enamel for the color on the hull. These make very nice durable finishes which should last many years on your model. I chose to use polyurethane because it does not yellow like varnish does as it ages. This is a personal choice driven by how you would like your deck to look as it ages.
At this point you will have to ballast your model. I have found that the easiest time to do this is after the model is painted and has the scale waterline in place. Place your model in a swimming pool or other suitable tank, and place the lead in the hull until the hull sits on the waterline that is painted on the hull. You will need about 60+ pounds of lead in a manageable form, about 5 pound pigs, for this exercise. Once the lead has been placed in the hull and the proper trim established, you will need to note where the lead is in the hull and the amount at each location. You can then remove the lead from the hull and using your notes, make molds for the ballast so that it fits into the hull cavities.
The next step is building your rig. The masts for the J models will be anywhere from 8 to 91/2 feet tall, depending on which boat you are building and how you lay out the sail plan. For support, the mast will need at least two sets of spreaders with accompanying side stays, and a diamond stay. I have used both aluminum and wood to make J masts. The last mast that I built was made from spruce and was 109 inches tall, with a tear drop cross section that measured about 1-1/4 x ¾ inches. The mast was tapered in its top 3 feet and had a bolt rope slot cut in it used to attach the main sail to the mast. The mast was made from two pieces of spruce that were glued together on the centerline with the grain in each piece set so that any warps canceled each other out. The result was a stiff spar that weighed about 1-1/2 pounds ready to step on the deck Extruded aluminum masts are also available in lengths up to 10 feet, from Ludwig Manufacturing. These masts have a bolt rope slot molded in them and are both light, about 1 pound for a 10 foot piece, and stiff.
The main boom and jib club were both made from spruce. The jib club was about 33 inches long and 1x1/2 inch in cross section and tapered to 1/2 x1/2 inch at both ends. The main boom was about 45 inches long and was about 1 inch from top to bottom with a scale cross section that resembled an old wine jug. These shapes were made for a model of Rainbow.
The gooseneck attachment was made for a piece of ¼ inch thick aluminum plate and secured in a slot cut into the base of the mast. The gooseneck and boom vang pivot on a single stainless-steel rod, (welding rod) about 3 inches long. The boom can be removed from the mast by simply pulling the pivot pin; then the gooseneck and vang are released. The sail can then be slid down out of the bolt-rope slot and rolled for storage.
This is a quick overview of the building process that is needed to build a model J boat.
Below is a list of most of the materials that were used.
2 – 1”x8”x8’ pine, aspen, bass or other suitable wood that can be cut into 5/32”x3/8” strips for hull and deck planking
1 – 4’x8’x18” plywood used for hull framing, 2 if you are using one for the deck
1 – 1’x4’x1/4” five ply birch plywood for the keel
1 – 1’x2’x1/32” plywood used for the rudder sheeting
1 – 1”x4”x8’ spruce for the mast and booms (optional if you are using an aluminum mast)
4 – ¼”x12”x.030” brass strap used for chain plates, mast, and boom fittings
1 – 1/8”x3’ stainless steel welding rod used for gooseneck pivot and spreader stubs in the mast
1 – 1’x6”x1/4” aluminum plate used for the gooseneck and vang fitting (use only if you are scratch building the fittings
1 – 5/32”x12” brass round tube used for spreader bases
1 – 3/16”x12” brass rod used for the rudder shaft
1 – 7/32”x12” brass round tube used for rudder log
1 – 3/16’x12’ square brass tube used for the rudder shaft socket in the rudder
60+ pounds of lead used for ballast
4 – 8oz bottles of thin CA used for planking the hull and deck as well as general construction
1 – 2oz bottle of medium CA for general construction
32oz of 30 minute or longer set epoxy used to seal the hull interior
1 – 10’x50” 6 oz fiberglass cloth used to cover the outside of the hull
2 – Quart cans of polyester resin with catalyst used with the fiberglass cloth
6 to 8 – 2” disposable brushes used to apply polyester resin
8 – Turnbuckles used for the side stays, boom vang and diamond stay
36 – 1-72x 1” stainless steel machine screws with nuts and washers used for various attachments
90’ – 60 pound test nylon coated stainless steel fishing leader with swages used for the standing rigging
8 – Single blocks used for back stay, winch arm, up haul and rudder control
1 – Spool of 40 to 60 pound test braided Dacron line for the sheets
12 – Bowsies for various rigging adjustments
Reference Information
Reference book: Enterprise to Endeavour by Ian Dear, ISBN 1-57409-091-7
This covers most of what you would need to build your J model. I did not mention the wood or brass that I used to make the scale detail, as most of it was obtained as scrap from a cabinet shop and salvage yard. Some additional things that you will need are a radio (at least 2 channels), a quarter scale servo for the rudder, and a sail winch, either arm or drum with about 3,000 inch ounces of pulling power. You would also need to order your sails from your favorite sail maker.
I hope that this answers most of your questions about what it takes to build a model of a J Class yacht. By the way the process described above applies to scratch building any R/C model sail boat, the only difference is the scale of the project. Good luck with your building project

AMYA J CLASS
1330 North Andrew Drive, Kuna, Idaho 83634, United States
Copyright © 2022 AMYA J CLASS - All Rights Reserved.
CPM Model Sailboats
J class rc sailboats, header content region, insert text, image or banner ads here, or just delete this text and leave this area blank.

1/25 (36") Scale America's Cup high performance model sailboat
5ft Replica of the 1962 Americas Cup 12 Meter
45" Scale Model of the Olympic Star Boat
J Class Boat-Shamrock V
1/16 (8'-10')Scale Replica of the 1930's America's Cup Class Yacht
RMG Sail Winches
High Performance sail control winches

- Create as many news links as you need. News links are simple bullet lists.
This is where you would add your text, images, or advertising banner
2023 J Boat Down the River Race Aug 25th Info CPM is now producing the Shamrock V Original Plug and mold by Dave Brawner and Ranger mold and plug by Gary Mueler
Shamrock V and Range Fiberglass hulls, Rudders, Mast fittings.
Current prices for the Shamrock V are as follows Hull - $625.00 Rudder w/Shoe - $175.00 Ballast (3 Piece) - $200.00
Current prices for the Ranger are as follows
Hull - $700.00 Rudder w/Shoe - $175.00
SHAMROCK V BUILD SITE
Fully Built Ready to sail Shamrock V J boat cost estimate.
Shipping is additional
Are you interested in building a J Boat?
Take a look the Shamrock V Build Web site for all aspects of building a J Boat
SHAMROCK V BUILD SITE
Build queue Deposit Policy
To be placed into the CPM Build Queue a min deposit of $100 is required. Due to the custom nature of building fiberglass hulls and components this deposit is NON refundable.
J Boat Video's
J BOAT Photos and Construction
2011 J-Boat National Championships - Mystic, CT
CPM's David Ramos 2013 J-Boat National Champion sailing the Shamrock V
CPM's David Ramos 2014 J-Boat National Champion sailing the Shamrock V
CPM's David Ramos 2016 J-Boat National Champion sailing the Shamrock V
CPM's David Ramos 2018 J-Boat National Champion sailing the Shamrock V
CPM's David Ramos 2020 J-Boat National Champion sailing the Shamrock V
CPM's David Ramos 2022 J-Boat National Champion sailing the Shamrock V

Copyright © 2021. Chesapeake Performance Models LLC. All Rights Reserved..
- Classifieds
- Remember Me Forgot Password?
- Boats Sailboats Build Log J-Class, Endeavour
- Electric Flight
- Advertising
- Our Sponsors
- Review Policies
- Terms of Service
- Privacy Policy
- Site History
- Mark Forums Read
- Member Search
- Upcoming Articles
- Do Not Sell My Data
- Manage Consent
- Back to Top
The World's Local Hobby Shop
Where traditional and digital modelling converge
- Shopping Cart

Welcome to the World's Local Hobby Shop
- Custom-Made Display Cases
- Client Display Cases
- Kits – Amati
- Kits – Artesania Latina
- Kits – Billings Boats
- Kits – Bluejacket
- Kits – Corel
- Kits – Jotika/Caldercraft
- Kits – Pocher
- Tools – My Favourite Tools
- Modeller’s Workshop Designs
- MW kits – 1:16 J-class
- MW Kits – Older AC Yachts
- MW Kits – Power Boats
- MW Kits – Tug Boats
- MW Kits – Sailing Yachts
- MW Kits – Small Fishing Boats
- MW Kits – half-hulls
- Modeller’s Workshop 3D prints
- 1:12 scale 3D printed parts
- 1:16 scale 3D printed parts
- Hull and Deck Planks
- King Plank Systems
- Service – Model Construction
- Traditional Gallery
- Pocher Builds
- Links and Instructions
Enter your search words here
Username or Email Address
Remember Me
Building a J-Class 1/16 scale model R/C sailboat!
As I prepare the build log for these models, here are a few notes about them.
John Hanks III, president of the scale model J-Class Association, has sent me some of these notes. Many thanks to his invaluable help as I research this subject and build up the digital designs for these frames.
From John Hanks’ build notes
Please note that these notes are not yet in any sort of logical order.
The keels are deepened by the 2″ allowed in the AMYA J Class rules as they will all be used for R/C sailing. You will also notice that the rudders are larger than scale to improve maneuverability. The Class Rules were designed to help overcome some of the stability loss that occurs when you scale a full size boat down to a model. The loss of stability happens with all boats that are scaled down to a model size with the smaller the model is compared to the full size version the greater the loss in stability.
Larry Ludwig is the supplier for most of the aluminum masts for the Js. his masts are extruded and come in 10′ sections with each 10′ piece weighing just 1 lb. As far as a source of wood goes I get most of my wood for planking, both deck and hull, and framing from the local home improvement store. I then cut it to the dimensions that I want. The 1/4″ keel material is from the local hobby shop and is 12″ x 48″ 5 ply birch that is used in model airplane construction. I get most of my exotic or fancy wood from a local cabinet shop as trash trimmings usually for free. I buy scrap brass by the pound from the local metal yard and then machine it to what I need. The small brass strap and rod that I use is from the local hobby shop. Dean is the only manufacturer that I know of who could supply ready made metal parts in the correct scale for the deck detail on the J models.
I have used all of the following woods for planking, both deck and hull, in the construction of my Js; pine, bass, alder, aspen, mahogany, spruce and poplar. The choice of the wood for each project was driven by the price and availability of what I wanted.
The fiberglass cloth, resin and disposable brushes were purchased at the local auto parts store. I have purchased lead at the local tire store as scrap wheel weights, shot from the sporting goods store and plumbers lead that I found in a local pawn shop. You could also try your local scrap yard.
The builder must understand that even with a hull kit there will be a certain amount of scratch building that will need to be done in order to complete a sailing model.
Track down a cpoy of Model Yachting #156, Summer 2009. It is an issue that features the J Class and there are several pieces that I wrote that address the AMYA J Class models from history to construction. It should answer most of your questions. I am in the process of doing the same for an upcoming issue of model yachting and I will update all of the pieces that that have been published previously.
There were 2 Endeavours. Endeavour raced against Rainbow in 34. She was a faster boat than Rainbow and Rainbow only won because Sopwith had a labor dispute with his crew shortly before he left England for the US and had to sail with an inexperienced crew as the original crew went on strike. The boat was not sailed to its potential so it lost to a slower but better sailed yacht.
Endeavour II was a completely new boat built by Sopwith to challenge for the 37 cup. Once the challenge was received Vanderbilt had Ranger built to defend the Cup. Endeavour II was a slightly larger yacht than Endeavour with changes to her lines. She was faster than Endeavour but could not compete with Ranger who won convincingly in 4 straight races.
Comments are closed.
Advertisement
©Copyright 2012 modellers-workshop

Welcome to the World of Model Yachting
Welcome aboard.
Canterbury J Class Model Yacht

A Brief History of the Canterbury J Class Model Yacht
Sailing at the Christchurch Model Yacht Club [CMYC] in 1996-1997 there was a small classic J Class model yacht named RANGER with a length of 1.2 metres and this was owned by Dave Heanly. This yacht was J1 which was eventually purchased from Dave and is now on display in the CMYC club rooms at Hagley Park.

A group of CMYC members decided the J Class yacht would be ideal for easy fully rigged transport and sailing in weedy conditions at Lake Victoria.
The hull of number J1 was purchased from Model Boats and the sail plan designed by Hugh Hobden. An approach was made to purchase more hulls. Euan Sargison negotiated and another 9 hulls were purchased and sold very quickly.
The J Class Squadron was formed 2 Sep 1997. Two more hulls appeared making the total at this time twelve.
More hulls were in demand and the place that originally sold the hulls advised that the mould had been lost. After investigating it was found that the original hulls supplied had been taken from a Timaru J Class yacht.
It was decided to make a Canterbury mould with adjustments. The hull was deepened by 16mm and the lead reduced by 16mm and the trim weight put inside the hull. The J Class squadron purchased the new mould with a loan from Peter Vincent and the loan was repaid from hull sales. Number J13 was the first hull
To promote the sailing class three trophies were donated by Peter Vincent.
More Canterbury J Class historical information can be found HERE

The basic philosophy was to have an easily sailed and economically built RC yacht’ based on a one design principles to provide good resale value, and with racing dependent more on the skipper rather than designer/builder skill.These objects have been attained and the Class has attracted many first time sailors, mostly from the retired ranks who share the common creed, “it sure beats gardening!”
The boat can be transported easily in the average car or station wagon fully rigged. Many boats have features of the original Canterbury J Class.
The “Wednesday Windlers” can muster fleets of 30 plus for their around-the-lake sailing on Lake Victoria. Why not visit the lake on a Wednesday? Members turn out, except in the most atrocious weather, and are pleased to “turn over the controls” to any interested spectator.

377 hulls [December 2022] have been purchased and they are to be found in all areas of New Zealand and as far afield as the USA, Australia, Canada, Germany and the UK. It is a one-design yacht and all hull shells, keels and trim weights are made from moulds officially approved by the Canterbury J Association with an identification number moulded into the hull.
There are rules that, prohibit exotic materials, define a fixed minimum weight, strictly control dimensions in the three sizes of sail rigs.
The yacht can be bought as a kit or in separate pieces and assembled as the budget allows. This also allows members handy at making small components to make many of the parts and keep the price down. All parts are available: hulls white polyester, keels, brass fittings, and computer-generated sails, winches and radio gear. If you cannot find the part you want we will find it or we can make it at reasonable costs.
There is also an active and increasing North Island fleet sailing out of the T auranga Radio Sailing Club Gilmour Lake Waihi , [links to external sites] , Palmerston North and Auckland
Frank Russell Design
R/c and model yacht design, plans, boats, sails..
I have been a designer of model and radio yachts since 1968. Boats been built from my plans now number in the hundreds both from both home and production builders. Many of my designs have won State and National Championships in Australia and overseas. New designs are added periodically and occasionally I do receive requests for specific designs. I also from time to time produce free plans.
Most of my older plans Pre 2000 will eventually be available as PDF files of the original large format drawing. The plans are located here:
A more complete list of my designs is here:
Plans are normally drawn on A4 and A3 format. Sections and appendages are normally drawn full size, 1:1. Some fin and bulb drawings are drawn to be printed in two halves and joined after printing. Arrangement drawings are 1:5 and sometimes 1:4.
Make sure when printing that the “Scaling” or “Fit to Page” option is turned off in your printer setup when you print. I also have the “Print Preview” turned on as well so I can check if the page size is correct. All drawings are in either A4 or A3 size paper.
Each drawing has a 100mm scale which will allow you to see if the drawings are the correct size.
The PDF drawings are usually emailed within a few hours of receiving your order from Paypal by email. DXF and DWG formats are available for most plans. Just ask and they also will be emailed.
Printed Paper Plans are avialable and are printed from the same plan as the PDF. Please ask before ordering. There is usually an additional postage charge for Printed Paper Plans.
LATEST PLANS:
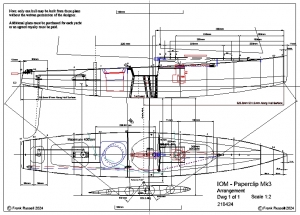
Paperclip Mk3 IOM 2024 The hard chine version of the Ellipsis and Equinox IOM’s. It is intended to be built “Tape and Glue” from 1mm plywood sheets. The PDF and DXF drawings for theses hull and deck panels are included as are the sections if you would like to build the hull over frames. The prototype built by Tony Goldsworthy seems to perform well.
PDF Plan emailed or Printed and posted on 6 A4 and A3 sheets
If you require another format: DXF, or DWG, 2D or 3D or printed paper plan, postage extra.
LOA: 938mm LWL: 915mm BOA: 190mm Disp: 5.1kg
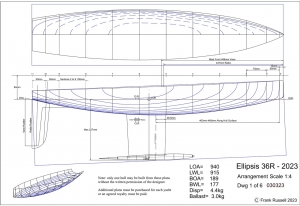
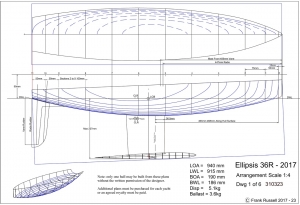
Ellipsis 36 2023 is a 36 inch restricted class designs based on the Ellipsis IOM design. The 36r design was a request from a UK skipper for a lighter version of the 2017 design for both Radio and vane sailing. This design shuld be more suitable for lighter wind smooth water venues than the 2017.
LOA: 938mm LWL: 915mm BOA: 189mm Disp: 4.4kg
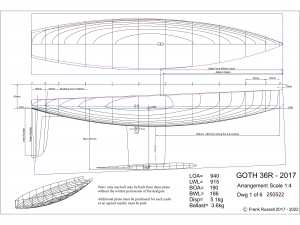
Goth 36 2017 is an 36 inch restricted class design based on the Goth IOM design. The original request came from John Fisher in 2013 who wanted a very light 36r for vane sailing. This design is the third design in the series, which has progressively become heavier and more successful.
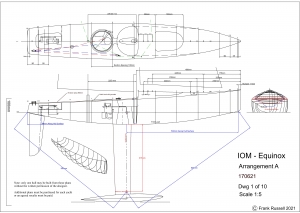
New Equinox IOM Plan : The Equinox is a variant of the Ellipsis… IOM. The basic design was produced initially as a 3D printed project that never eventuated for various reasons. Two prototypes were built including a 3D printed boat which was built by John Taylor in the UK. The design incorporates several features of some of the newer IOM shapes including a fuller higher bow profile and wider stern. The design is well balanced and well behaved like the Ellipsis and should be as easy to plank from wood.
Hulls an components for this design are now available. See IOM COMPONENTS Page.
After payment is made. I will email you the pdf file.
Please ask If you require another format: DXF, or DWG, 2D or 3D or printed paper plan, Postage extra.
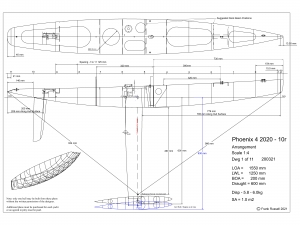
Phoenix 4 2020 10r Every new design presents a designer with options to consider and directions to go. After a ten year gap from the P3, all 10r’s had adopted the deep keel, light weight approach and although it did seem to work I after the P5 I though that the Phoenix 4 design although fast went in the wrong direction. I always have thought about what I should have done. So this is P4- 2020, with 2020 hindsight is the result.
LOA 1550mm LWL 1250mm BOA 200mm BWL 180mm, 4.2kg ballast on 600mm Draught and P1 to P3, Marblehead style sail plans on a flat deck.
She even drawn in the same software as the original.
After payment is made. I will email you the pdf file. Plan has A3, A4 sheets and a larger sheet with sections deasigned for laser cutting.
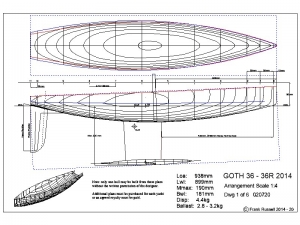
Goth 36 is an 36 inch restricted class design based on the Goth IOM design. The original request came from John Fisher in 2013 who wanted a very light 36r for vane sailing. this design is the second in the series, heavier and more successful. There is also a later 2017 version which will be published soon.
LOA: 938mm LWL: 899mm BOA: 190mm Disp: 4.4kg
If you require another format: DXF, or DWG, 2D or 3D or printed paper plan, just ask.
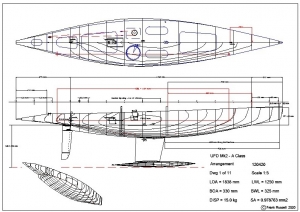
UFO Mk2 – A development of the successful UFO with a heavier displacement and larger sail plan. Improved aft sections with the chine removed.
LOA: 1838mmLWL: 1250mm Disp: 15kg SA: 0.978763 m2
PDF Plan emailed or Printed and posted on 12 A3 sheets
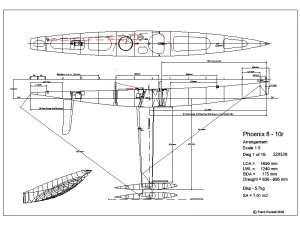
Phoenix 8 – 10r: The Phoenix MK 8 is a larger more powerful boat than the last three Phoenix Mks. The P8 is a return to the simple design, No chines, no raised fore deck and Marblehead rig profiles as used from P1 to P3. This allows simpler light weight construction and fully open soft decks and shared rigs if you have a Marblehead.
LOA: 1650 mm LWL: 1240mm, BOA: 170mm, Draught: 630 – 680mm, Disp 5.7kg, SA: 1.00 m2
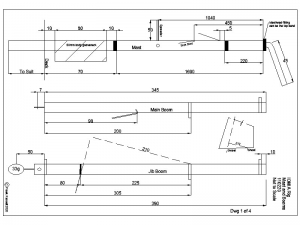
The Free updated IOM mast and boom schematic along with FRD IOM Setup Guide
FRD IOM Setup Guide Mast and Booms combined Feb 2020
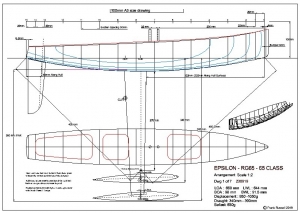
Epsilon RG65 – 65 2019: This design is based on the successful Ellipsis IOM concept, that of correct volume distribution rather than fashionable features with the emphasis on simplicity and efficiency.
Plans are PDF format or printed paper plan only. 3D hull and 2D bow and stern sections in DXF or DWG format are available on request.
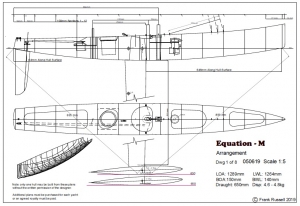
Equation Marblehead 2019: This design is based on the successful Ellipsis IOM concept, that of correct volume distribution rather than fashionable features with the emphasis on simplicity This design is the result of two Sailing Marblehead prototypes, The Ellipsis 1c and Ellipsis 2a.
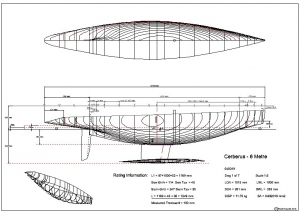
Cerberus – 6m Something more of a challenge from a designers and builder’s point of view. A class I have always admired. This is Cerberus, my first published Six Metre design. This is the result of several requests for a design in the class and also a desire on my part build a six Metre for fun sailing locally. There are a couple of boats that will be built in the UK to join the fleet there. This design is intended to excel in moderate winds and will outperform anything of similar size drought and displacement in Australian conditions. Plans are $30 pdf plans from my PLANS page with other formats available. This design may also be available for 3D printing at a later date.
LOA: 1515mm, LWL :1020mm, Displacement: 11.75kg, SA:0.682019m2

Model Range
The J Class model range consists of two J Class hulls, the Nottingham 48 and the Nottingham 60, each of which can be built to carry either bermuda rigs, gaff rigs and coming shortly a genoa rig. In addition I'm nearing the end of the development of the International Dragon, a little under 60 inches and designed from outset to carry a genoa rig. The Canterbury version of the 48 is still available for those who want to race abroad and I've also included on this website details of the Folkboat project.
The Nottingham 48 and the Nottingham 60 are supplied in "kit" form for the customer to build. The hulls are of very high quality and constructed using traditional fibreglass techniques with pigmented gelcoat to achieve the colour scheme choice of the customer. The kit includes the hull, rudder, ballast (for the 48), internal woodwork with stand, deck and hatches
The Canterbury J is only available in White as the hull will need to be filled and painted when the ballast is fitted however the ballast and woodwork are the same as the Nottingham. In a spirit of honesty I would have to declare that whilst this moulding is from a Canterbury Association approved mould the quality of the moulding is only fair compared with the high quality Nottingham mouldings. The quality is however less relevant as the hull will need to filled and painted anyway
The International Dragon is a new project. This model may become available as a kit but initially is available as a Ready to Run, with the customer only providing the radio. This model is built and engineered to the highest standards and will incorporate improved design features that are not generally found in model yachts...some day all models will be built this way!!
I'm introducing the Folkboat on this site on behalf of a chum, Charles Chambers. The hulls are laminated by ourselves and the model is available from Charles as a Ready to Run.
If you click on the arrow on the menu you will be able to open up more detail.
- Join Newsletter & Get 10% Off Your First Order
Join / Login
Endeavour – j class america’s cup 1934 – 1:35.

Out of stock
Notify me when item is back in stock.
- Fast Shipping
- Safe & secure
- Worldwide delivery
- Product Description
- Additional information
Endeavour J Class Yacht America’s Cup 1934 Model Ship Kit – Amati (AM1700/82)
The Endeavour J Class Yacht America’s Cup 1934 Model Ship Kit is manufactured by Amati ship model kits. Amati Model Ship Kits are faithful interpretations of the original vessel. All materials are of the finest available and plans and instructions are always excellent and easily followed. Amati has integrated computer design and the latest materials to produce high quality ship model kits.
History of the Endeavour J Class Yacht America’s Cup 1934
The Schooner Endeavour staked a claim on the America’s Cup, winning the first two races. The third regatta was bound to be the most exciting. Fate played an unkind trick to Sir Thomas Sopwith, who failed and thus couldn’t win the America’s Cup. Model Kit includes plank-on-bulkhead construction; laser cutted wooden deck and planking; brass and wooden fittings; photo etched brass details; cloth sails; plans and detailed instructions.
You may also like…

5,5 YACHT – International Class

DRAGON CLASS YACHT – International Class

RAINBOW – J Class America’s Cup 1934

DUTCH GOLDEN YACHT 1660
Join 18,543 other modelers to hear about specials, new products and modeling tips
- Become a Member
- Modeling Hub
- Model Ship Building
- Maritime History
- Affiliate Program
Information
- Terms & Conditions
- Privacy Policy
Copyright © 2023 Modelers Central. ABN: 31 114 830 732
- Claim 10% Off First Order
- Get 5% off ALL orders with a Membership
- Gift Vouchers
- Help & Advice
Modelers Central. 2023, All rights reserved.
- Claim 10% Off Your First Order
- Get 5% Off All Orders With A Membership
Get 10% off
Your first order.
10% off applies only to full-price items. By providing your email address, you agree to our Terms & Privacy Policy
10% off applies only to full-price items. By providing your email address & mobile number, you agree to our Terms & Privacy Policy and consent to receive marketing messages from Modelers Central at the addresses provided. You can unsubscribe at any time by replying STOP.
Lionheart, JH1
Original lines: Burgess/Stephens / Modified lines: Hoek Design & Naval Architects
Image Credit:
Image Credit:

Lionheart is the first modern replica J Class to be built in aluminium and was launched in July 2010. The original owner who commissioned JH1 was a repeat client of Andre Hoek who had then simply sought to build the fastest J Class yet.
Hoek developed their own VPP (velocity prediction program) software to analyse all the existing J Class designs before CFD and traditional tank testing with 6 metre long models. Hoek identified the J Class Ranger as outstanding from a family of seven Burgess and Stephens designs which were originally submitted to Harold Vanderbilt in 1936, and it was this design that was used for Lionheart.
The design showed exceptional promise as a very good all-rounder, fast on all points of sail in light, medium and heavy winds. Designed at 43.4m she was to be the longest on the waterline at the time.
In terms of deck and rig hardware, Lionheart fully utilised modern superyacht and grand prix race yacht technology where appropriate, significantly moving forwards J Class construction and specification using the most powerful winches and hydraulic systems available to optimise sail handling and trimming, keep all up weight down and to deal with the high rig loads.
Lionheart is the first J Class to have adopted a double cockpit layout with a private owners’ cockpit and deckhouse aft of the wheel and, forward of the wheel, a large guest cockpit leading to the main companionway and deckhouse. This allows the working area of the boat to be separated from the guests, improves communications between the afterguard and allows more of the working crew to work inside a cockpit rather than on the deck.
True to that original promise, Lionheart has been the standout performer on the race course since she was launched. From 2014 when they won in Menorca, Palma and Sardinia until 2017 when she won the seven boat J Class Superyacht Regatta and the J Class America’s Cup in Bermuda, followed by the inaugural J Class World Championship in Newport RI.
Then under the guidance of tactician Bouwe Bekking, the Lionheart project evolved to the highest level thanks to their desire to improve as a team. Each regatta saw Lionheart make comprehensive daily briefings and debriefings, they optimised their performance package and trained hard as a team. And over the years the owner became one of the most accomplished, competitive helms in the fleet. Bekking retained key core crew from the Brunel round the world race programme he skippered.
Lionheart has cruised extensively since 2017 and was expected to return to the race course in 2023 before their plans were put on hold.
Length at waterline
displacement
upwind sail area
spinnaker sail area

2013 Saint Barths Bucket
Lionheart 2nd
2013 Superyacht Cup Palma
2013 les voiles de saint-tropez.
Lionheart 3rd
2014 Menorca Maxi
Lionheart wins
2014 Superyacht Cup Palma
2014 maxi yacht rolex cup, 2015 j class falmouth regatta, 2015 rys bicentenary regatta cowes, 2016 maxi yacht rolex cup.
Lionheart wins on countback with Velsheda
2016 Les Voiles de Saint Tropez
2017 saint barths bucket, 2017 america’s cup superyacht regatta, bermuda, 2017 j class america’s cup regatta, 2017 j class world championships, newport.

This site uses cookies to enhance your experience. By continuing to browse the site, you consent to the use of cookies. View our Privacy Policy for more information.
IMAGES
VIDEO
COMMENTS
This is a quick overview of the building process that is needed to build a model J boat. Below is a list of most of the materials that were used. WOOD. 2 - 1"x8"x8' pine, aspen, bass or other suitable wood that can be cut into 5/32"x3/8" strips for hull and deck planking.
45" Scale Model of the Olympic Star Boat. View Page. J Class Boat-Shamrock V. 1/16 (8'-10')Scale Replica of the 1930's America's Cup Class Yacht ... The J Class models are 1/16th scale hulls of the J Class yachts that sailed for the America´s Cup from 1930 through 1937 as well as the yachts that were converted to the J Class and competed with ...
J Class - One Design Clubs 4 Members 70 Boats 150 The J class yachts are 1/16 scale versions of the original 1930's J-boats only, making it the largest of all the RC yachts. These classic yachts recreate the style of yachting's Golden Era, on a grand but affordable scale. Approx. 85-95" long. The largest class in the AMYA, the "J" boat Class ...
Amati ship model plans are faithful interpretations of the original vessel. Amati ship model plans and instructions are always excellent and easily followed. Amati has integrated computer design and the latest materials to produce high quality ship model plans. The J Class Yacht Endeavour Americas Cup Model Plans (1:80) by Amati Models.
J-Class, Endeavour. Here are a few pics as the build progresses. LOA is 97.375 inches, mast is 115.5 inches above deck. Jib boom, 36 in, Main boom, 49 in. Beams are 1/4 in Basswood, while those supporting the mast, jib and back stays, are 1/4 in Russian Baltic Birch plywood. Sheet line braces and mast step are 1/4 in and 3/8 in oak, epoxy ...
The J Class models are 1/16th scale hulls of the J Class yachts that sailed for the America's Cup from 1930 through 1937 as well as the yachts that were converted to the J Class and competed with the America's Cup yachts in club regattas. The models are the largest recognized class in the AMYA with hull lengths ranging from about 7 feet in ...
Feel free to contact me on [email protected] if you have any questions. You can also phone on 07969 538626 but I'm often out of the country and calling can be expensive.
Building a J-Class 1/16 scale model R/C sailboat! As I prepare the build log for these models, here are a few notes about them. John Hanks III, president of the scale model J-Class Association, has sent me some of these notes. Many thanks to his invaluable help as I research this subject and build up the digital designs for these frames.
Build Manuals and Information. This section contains the build manuals, Canterbury Rules and other information which will be of use in building and setting up your model. Click on the relevant document to open it up. There are two main purposes for publishing the build manuals on this web site. The first is to help those who have bought a kit ...
This should make a good starting point for tuning and you should ensure that there is sufficient room to adjust on all of the adjusters. Adjust the kicker or vang so that the end of the mainsail boom is able to move up and down about 10mm. The kicker changes the twist in the leech of the mainsail. Adjust the foot of the mainsail and jib so that ...
J Class Radio sailors. Public group. ·. 4.0K members. Join group. This group enjoys building, sailing and racing 1/16th scale models of Americas Cup J Class boats. Post building photos, events, results and questions...
The AMYA was established in 1970 as a not-for-profit organization dedicated to promoting racing, designing, building, and preservation of all model sailing yachts, and membership is open to all who are interested in these activities. Our quarterly magazine is the only publication devoted 100% to model yachting. It is a great benefit of AMYA ...
Sailing at the Christchurch Model Yacht Club [CMYC] in 1996-1997 there was a small classic J Class model yacht named RANGER with a length of 1.2 metres and this was owned by Dave Heanly. This yacht was J1 which was eventually purchased from Dave and is now on display in the CMYC club rooms at Hagley Park. Ranger J1.
J Class yacht Shamrock sailplan. LOA: 36.50m /119ft 9in · LWL: 26.7m/87ft 7in · Beam: 6.00m/19ft 8in · Disp: 166 tonnes. Original lines: Charles E Nicholson. Modified design: Dykstra Naval ...
I have been a designer of model and radio yachts since 1968. Boats been built from my plans now number in the hundreds both from both home and production builders. ... Ellipsis 36 2017 is a 36 inch restricted class designs based on the Ellipsis IOM design. The original request for 2017 came from John Fisher who wanted a very heavier 36r for ...
The J Class model range consists of two J Class hulls, the Nottingham 48 and the Nottingham 60, each of which can be built to carry either bermuda rigs, gaff rigs and coming shortly a genoa rig. In addition I'm nearing the end of the development of the International Dragon, a little under 60 inches and designed from outset to carry a genoa rig ...
The J Class. J Class yachts were originally built to the specifications of the Universal Rule. The J Class really represents the golden age of racing for the America's Cup in the 1930s when this Universal Rule was used as the determining measurement system. J Class yachts were originally built to the specifications of the Universal Rule. The ...
The J Class Association was founded in 2000 to protect the interests of the Class, present and future, and organises an annual calendar of racing for these magnificent yachts. 2024 Calendar. 19-22 June.
The Endeavour J Class Yacht America's Cup 1934 Model Ship Kit is manufactured by Amati ship model kits. Amati Model Ship Kits are faithful interpretations of the original vessel. All materials are of the finest available and plans and instructions are always excellent and easily followed. Amati has integrated computer design and the latest ...
Design: Charles E Nicholson. In 1929 Sir Thomas Lipton, who had reached worldwide fame through his tea business issued his fifth challenge for the America's Cup and commissioned Charles E. Nicholson, to design the first J-Class Yacht, Shamrock V, to the Universal Rule, signifying the birth of the J Class and the start of a new era in design evolution and racing.
Lionheart is the first modern replica J Class to be built in aluminium and was launched in July 2010. ... Lionheart has cruised extensively since 2017 and was expected to return to the race course in 2023 before their plans were put on hold. ... 2014 Maxi Yacht Rolex Cup. Lionheart wins. 2015 J Class Falmouth Regatta. Lionheart wins. 2015 RYS ...