- Free Quilt Block Patterns
- Free Paper Piecing Patterns
- Beginner Quilt Blocks
- Quilt Design Inspiration
- Quilt Sizes Recommendations
- Machine Applique (Invisible)
- Paper Piecing
- Machine Quilting 101
- Free Motion Quilting 101
- Quilt Binding
- Quilt Fabrics
- Quilting Tools/Supplies
- Best Sewing Machine
- Quilt Guilds
- Quilt Stores
- Show and Tell
- Quilt Patterns
- Sailboat Quilt Block Pattern

An Easy Sailboat Quilt Block Pattern
From our Free Quilt Block Patterns Library
This post contain s affiliate links for which I receive compensation.
Skill Level: Beginner
This Sailboat quilt block pattern combines cut patches with simple pieced units: connector or folded corners and quick pieced half square triangles.
If you would prefer, click here for another sailboat quilt block pattern .

General Instructions
If you need help printing this page, you'll find it here .
These abbreviations are used in the tutorial:
- SA - seam allowance
- RST - right sides together
- HST - half square triangle
SA are 1/4" and pressed to the darker fabric unless otherwise noted.
The newest quilt fabrics to tickle your fancy...
Click the images below to see the full collection. We share any commercial and/or free patterns that showcase them, too. (For inspiration, of course!)

Step 1: Cut the Sailboat patches
Sample Size: 6" finished / 6½" unfinished
The sample block has our Sailboat sailing during the daylight hours, but you could just as easily choose a night-time starry sky.
Choose fabrics with enough contrast so that the points on your half square triangles don't get lost.
I prefer patches for half square triangles (#4 and #5, noted with ** in the chart below) that are oversized by 1/4", sew the units and then cut down to perfection.
So for a #4 listed as 2-3/8"x2-3/8", I actually cut it at 2-5/8"x2-5/8".

Step 2: Assemble the units for your Sailboat
Half square triangles (hst).
Our Sailboat quilt block pattern needs 4 of these units. We'll use the quick pieced method to make them.
With a pencil draw a single diagonal line on the lighter of either the #4 or #5 squares. (If you are making a sailboat at night, it's possible that your sky fabric will be darker than your boat fabric.)
With right sides together (RST) layer a #4 and #5 together. Stitch a quarter inch away from it on both sides.

Cut the two pairs apart on the drawn line. Press with the SA toward the darker fabric.

If you cut your patches the exact size, confirm they measure the correct size from the chart below. Then trim away the dog ears—those little points sticking out at the corners.
If you cut oversized patches like I do, trim the HST down as indicated.
For our 6" sample, the HSTs are trimmed to 2" x 2".
After trimming, you have four perfect patches.

Sew these into two pairs of HSTs with the diagonal seam moving from upper right to lower left.

Stitch the pairs together, nesting the SA. This seam can be pressed to one side, open, or as I chose, twirled.
With RST, add a #6 to the left and right sides of this unit.

Connector or Folded Corners
Draw a diagonal line on the back of both #3 patches.
With RST, line up the edges of one #3 with the right side of #2. The line should bisect the corner of #2.
This time, stitch ON the line.

Position the second #3 on the left side of #2. Make sure the drawn lines both bisect the upper corners of #2 as you look at them. (see arrows)

Trim away the excess fabric between the stitching and the lower corner, leaving behind a quarter inch SA. Press to the dark.

Step 3: Assemble the Sailboat block
Arrange the units into rows.

Stitch the rows together.
Ahoy 'me-maties! Your Sailboat quilt block pattern is finished and ready to set sail!

What about a different quilt block?
For a list of all the 215+ quilt block patterns on this site, start here .
If you know the name of the block, shorten your search by using these links:
Click here if you're looking for blocks with at least some paper piecing .
Click here if you're looking for the basic building blocks of quilting , i.e., Flying Geese, half square triangles, quarter square triangles, etc., along with several techniques to make each.
And finally, use these links to find blocks in these finished sizes:
For even more blocks to make...

For you, are quilt block designs like potato chips...
...you can't have just one?!!
Check the amazing resources I rely on for all the quilt block designs you see on this website.
To see if they're worthy of a spot in YOUR quilting library, CLICK HERE .
This article was printed from Generations-Quilt-Patterns.com

Yummy fabrics to drool over
Click any image below to see the full collection and find pricing and ordering information.

S ite Admin
About Privacy Policy
FTC/Amazon Disclosure
Useful Pages
'How Many Blocks Do I Need' Chart
Standard Quilt Sizes Chart
Setting Triangles Chart
By Julie Baird
Copyright © 2008-2024 Generation Quilt Patterns, LLC
All Rights Reserved
Generations-quilt-patterns.com does not sell any personal information. (See Privacy Policy )
- Make a Quilt
- Quilting Techniques
- Very Easy Star Blocks
- Other Quilt Blocks
- Easy Quilt Patterns
Subscribe to the Quilt Blocks Digest newsletter for updates, special offers & exclusive content!
Sailboat quilt block pattern tutorial.
The 12 inch sailboat quilt block pattern can be used in a baby quilt or flip the HSTs to piece an underground railroad sailboat block. See how!

This block is easy to make. It uses a stitch and flip quilting method to turn squares and rectangles into a boat shape.
A variation of the sail boat quilt block has a storied history. It is told that it was used in quilts to help slaves along the Underground Railroad. (Fact or fiction? I don't know, but I'd like to think it's true.)
Maybe it served as a symbol of hope.
Reportedly, when US slaves saw this block in a quilt hanging on a clothes line they knew that a waterway was nearby or that a boat was available.
Both could whisk them away on the sometimes treacherous journey to freedom, usually Canada.
Danger lurked around almost every corner for both slaves and the people who assisted them on the path to freedom.
Just imagine what the person who saw this quilt block, seemingly so innocuous, must have felt. Yes, I would say hopeful.
Let's see how to make it.
Fabric and Block Measurements
Fabric A = sails (white)
Fabric B = sky (blue)
Fabric C = water (brownish grey)
Fabric D = boat (red)
Here are the unit cutting measurements to make an 8 inch and 12 inch sailboat block.
Simply choose your block size and follow the instructions below to make the block.

(Note: To increase photo size, on your keyboard hold 'Ctrl' and hit the + key.)
Block Layout
This is a 4 patch block and is laid out on a grid of 4 rows and 4 columns. The rectangles cover two rows and are attached to two separate rows of squares.
Finished block sizes that are evenly divisible by four - 8, 12, 16 inch finished block sizes - will be the easiest quilt block to make.

The 8 units that make up the block are
- 2 rectangles, vertical
- 4 half square triangles (aka HSTs)
- 2 triangles and 1 wedge
- 1 rectangle, horizontal
Sailboat Quilt Block Pattern Instructions
Step 1 Make HSTs
According to measurement chart above cut 2 squares from fabric A (white) and 2 squares fabric B (blue).
Make 4 half square triangles .
Press the seams open or towards the darker fabric.

Step 2a Make Boat
This step uses the stitch and flip method to make the boat shape.
According to measurement chart above...
Cut 2 squares from fabric B (blue) and cut 1 rectangle from fabric D (red).

Sew on the drawn line (or a thread or two away from it) to attach the squares to the rectangle. If you sew a thread or two away from the line, stitch on the side of the line closest to bottom corner of the square.

Place a 1/4 inch line of a ruler along the seam line and use a rotary cutter to cut away the bottom part of the triangle.
Repeat for the second end of the rectangle.

Flip remaining side of both squares down to reveal triangles. Finger press seams towards triangles.

Step 3 Layout Block
Near your sewing machine layout, as pictured below, the block in the grid format.
Step 4a Sew Top Half of Block Together
Without changing the orientation of the units sew the HSTs and rectangles of rows 1 and 2 together.
HSTs Row 1: With right sides together, place the half square triangle from row 1 column 3 on top of the half square triangle from row 1 column 2. Sew the units together using a 1/4 inch seam along the right side of the block units. Flip the 2nd HST open, right side up. Finger press the seam open.
HSTs Row 2: Repeat for the second set of half square triangles.

With right sides together place row 1 on top of row 2. The bottom of row 1 meets the top of row 2.
To get a perfectly aligned center match the points of the HSTs. Using a marker draw a line on the wrong side of the fabric where the points meet. Sew rows 1 and 2 together using a 1/4 inch seam, careful to stitch over the drawn line (even if it's not exactly 1/4 inch from the edge of the fabric). Usually, finger press the seam open.
To see the above done in step by step photos check out the pinwheel quilt block pattern tutorial .

Perfectly aligned center!
Take the sewn rows to the ironing board and press the seams (not pictured).
Use a starch alternative pressing solution if desired.

Step 4d Layout Block
Place the HSTs back in the block layout.

Step 5 Sew Rectangles to HSTs
Now sew the two side rectangles of the sailoat quilt block pattern to the HSTs.
With right sides together, place the left rectangle face down over the HSTS. Align edges along the long sides of both units. Sew together using a 1/4 inch seam
Repeat for the second side rectangle.
Finger press the seam toward the rectangles.

Step 6a Sew Row 4 to Row 3
With right sides together, place the bottom rectangle (water) face down over the boat rectangle unit of row 3.

Sew rows 4 and 3 together using a 1/4 inch seam. Finger press the seam toward the bottom rectangle (water).

Step 7 Sew Bottom of Block to Top of Block
With right sides together, place the bottom half of the block (boat and water rectangles face down over the top half of the block (side rectangles and HSTs).
Sew together using a 1/4 inch seam. Finger press the seam toward the boat rectangle.

Step 8 Block Completed
Beautiful! Once the maple leaf quilt block is sewn together, take it to the ironing board and give it a final press.

Here's the backside of the sailboat quilt block pattern. You can see how the seams are pressed. (Okay, I missed the mark on the seam between the row of the HSTs. I meant to press it open. If you do the same, just go with it - press the seam in the direction it wants to go.)

This completes the traditional sailboat quilt block pattern tutorial.
Underground Railroad Sailboat Quilt Block Pattern
To make an Underground Railroad sailboat quilt block pattern make a few changes.
The difference between the traditional sailboat quilt block and the Underground Railroad sailboat block is in the half square triangles that make up the sails and a portion of the sky.
In the traditional sailboat block there are four sails . These are made up of four half square triangles. One of the triangles of a HST represents the sky and the other represents a sail.
The triangles that represent the sky point upward to the left . The triangles that represent the sails point downward and to the right .
In the Underground Railroad sailboat quilt block there are three sails . Again, they are made up of half square triangles, but only three. What would be the fourth is a plain square .
The triangles that represent the sky point upward to the right . The triangles that represent the sails point downward to the left .
(Cut the plain square the same size as the trimmed half square triangle that you won't use. You can place this HST in your scrap pile and use it in another project.)
Now, see the Underground Railroad sailboat quilt block pattern.

When I was researching the Underground Railroad sailboat block I noticed that in all of the pictures that I saw (and I am sure I did not see all) the sky was done in a cream or white color. At the very least the sky was done in a very light color.
I did not see any commentary about this but my thinking is that it could represent a nighttime sky lit by the stars and moonlight.
Maybe this is due to the fact that travelers along the Underground Railroad did so mostly at night.
Another possibility is that it would be easier to see this color in a quilt hung outside at night.
Whichever version you choose to make have fun making the sailboat quilt block pattern.
You will receive an email asking you to confirm your consent to subscribe. You must click on the confirmation link contained in that email in order to be subscribed and receive emails.
Your email address is never shared. Unsubscribe any time.
Recent Tutorials
Courthouse Steps Quilt Block Pattern Tutorial
Oct 23, 22 02:11 PM
Churn Dash Quilt Block Pattern Tutorial - 6 Inch, 9 Inch and 12 Inch
Jul 18, 22 07:11 PM
4 Flying Geese At Once Oversized Instructions
Mar 19, 22 04:02 PM

Home | About | Contact | Newsletter | Privacy Policy | What's New!
By Wanda Epps , Copyright 2017 - 2023 Scrapish.com
scrapish.com.com does not sell any personal information.
- Search Please fill out this field.
- Give a Gift Subscription
- Manage Your Subscription
- Newsletters
- Sweepstakes
- Free Holiday Projects
Summer Sewalong: Sailboat Block
Join us for a nautical sewalong! Each week, we'll share how to make one block. This week, learn how to make a sailboat block. See all block patterns here.
American Patchwork & Quilting® magazine and AllPeopleQuilt.com have been the go-to resource for quilters to learn a new skill or simply sew something that brings pride and accomplishment. Our staff has over 70 years of quilting experience, and works with skilled editors, copy editors, quilt testers, and technical editors to ensure each pattern and article is accurate and up-to-date. We're passionate about quilting, and know that it's not just a hobby — it's a lifestyle. We strive to connect with other quilters and provide content that inspires them in their sewing space.
Make a cute sailboat block with our easy instructions.
Related Articles
Welcome to Quilt Street!

Sailboat Block
DIFFICULTY LEVEL ‣ BEGINNER
FINISHED BLOCK SIZE: 12″ x 12″
With only two fabrics and one easy piecing technique, you’ll find constructing this block to be nothing but smooth sailing!
Instructions:
SPECIAL INSTRUCTIONS:
Read through entire pattern before beginning project. Use
¼” seam allowances with fabric right sides together. Pressing arrows are included with diagrams. Basic quilt making supplies are assumed. Fabric requirements include extra yardage for shrinkage and insurance. If working with directional prints or if you want a little room for insurance, you may want to begin with larger pieces than what we call for.
HST = half-square triangle
Fabric A: (1) 10″ x 25″ piece light fabric
Fabric B: (1) 10″ x 25″ piece dark fabric
ADDITIONAL SUPPLIES:
Marking pencil
From Fabric A, cut:
• (1) 9″ x 9″ square
• (3) 5″ x 5″ squares
From Fabric B, cut:
• (1) 9″ x 9″ square
Block Assembly:
Referring to Diagram 1, draw a line on wrong side of Fabric A 9″ square. Place over Fabric B 9″ square. Sew a ¼” seam allowance on each side of drawn line. Cut in half on drawn line and press to make (2) Large HST Units (you will use 1). Trim to 8½” square.

Referring to Diagram 2, draw a line on wrong side of (3) Fabric A 5″ squares. Place (1) Fabric A 5″ square over Fabric B 5″ square. Sew a ¼” seam allowance on each side of drawn line. Cut in half on drawn line and press make (2) Small HST Units. Trim to 4½”. Make 6 (you will use 5).

Paying attention to orientation, lay out (5) Small HST Units and (1) Large HST Unit as shown in Diagram 3. Sew into rows. Sew rows together to make Sailboat Block.

Change Location
Find awesome listings near you.
Pieced Sailboat Block – Free
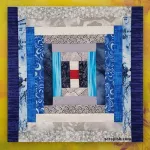
Sailboat Pieced Quilt Block Pattern – Digital Download – Size: Finished – 6” x 6” approximately – Unfinished – 6.5″ x 6.5″ approximately
- Description
- Reviews (0)
Sailboat Pieced Quilt Block Pattern – Digital Download – Size: Finished – 6” x 6” approximately – Unfinished – 6.5″ x 6.5″ approximately The digital file is a .pdf and includes cutting and sewing instructions as well as a color page to help you determine possible fabric choices.
Please Note: * This is for a digital file, no physical item will be mailed to you. * Colors may vary slightly due to monitor and printer variations. * Due to the nature of this product, all sales are considered final. * Instant Download * We do not accept returns, exchanges, or cancellations for any digital item purchased.
There are no reviews yet.
Your email address will not be published. Required fields are marked *
Your review *
Name *
Email *
Save my name, email, and website in this browser for the next time I comment.
Related products
HST Cheat Sheet

Pumpkin FPP – Free
Medallion Color Page – Freebie
IMAGES
VIDEO
COMMENTS
Step 1: Cut the Sailboat patches. Sailboat pattern. Sample Size: 6" finished / 6½" unfinished. Grid: 4x4. The sample block has our Sailboat sailing during the daylight hours, but you could just as easily choose a night-time starry sky. Choose fabrics with enough contrast so that the points on your half square triangles don't get lost.
Step 7 Sew Bottom of Block to Top of Block. With right sides together, place the bottom half of the block (boat and water rectangles face down over the top half of the block (side rectangles and HSTs). Sew together using a 1/4 inch seam. Finger press the seam toward the boat rectangle.
Our staff has over 70 years of quilting experience, and works with skilled editors, copy editors, quilt testers, and technical editors to ensure each pattern and article is accurate and up-to-date. We're passionate about quilting, and know that it's not just a hobby — it's a lifestyle.
Sew the 4 HST’s into a sailboat pattern and then sew the 3 1/2” x 6 1/2” (6 1/2” x 12 1/2”) rectangles on either side. Now all the rows are ready! Stitch them together and your block is done. Beware of this… the directional print strikes again (LOL)! At least it was an easy fix. Happy quilting!
Building the Quilt around one Quilt Block. My first step was to make the sailboat block. I used the blue waves fabric for the sea and the bird fabric for the sky and I added a pop of red for the bottom of the boat itself. Once the FPP block was finished I measured the size of the finished block. I think it was around 12″ plus the seam allowance.
Learn how to make a classic quilt pattern, the sailboat block. This fun and easy quilt pattern can be used in a quilt, wall hanging, pillow or other project...
Block Assembly: STEP 1. Referring to Diagram 1, draw a line on wrong side of Fabric A 9″ square. Place over Fabric B 9″ square. Sew a ¼” seam allowance on each side of drawn line. Cut in half on drawn line and press to make (2) Large HST Units (you will use 1). Trim to 8½” square. STEP 2.
Using the diagram below, place the 5″ yellow square and 5″ blue square together. Stitch a 1/4″ seam allowance all around the outside edge. Line up the ruler from corner to corner, making sure the edge of the ruler is on the block’s points. With a rotary cutter, cut diagonally in both directions. Press to one side.
Sailboat Pieced Quilt Block Pattern – Digital Download – Size: Finished – 6” x 6” approximately – Unfinished – 6.5″ x 6.5″ approximately. The digital file is a .pdf and includes cutting and sewing instructions as well as a color page to help you determine possible fabric choices. * This is for a digital file, no physical item ...