Raft: Vasagatan Walkthrough
The second story island is more of a story ship stuck in a lagoon. It's dark and dangerous, but there are plenty of notes and items to discover.
The Vasagatan is a derelict ship that Raft players will find after visiting the Radio Tower. The first story location is already ominous, but the Vasagatan is where Raft 's story really starts to get complicated.
Finding the Vasagatan is a simple matter of finding the four-digit code at the top of the Radio Tower and then plugging it into the receiver. At that point, the radar will show a second blue dot, and players can use their sail to head straight there. What they'll find is a large ship surrounded by rocks on all sides.
RELATED: Hidden Secrets Many Still Haven’t Found In Raft

Preparations
The first thing players should do is ready themselves for a dangerous mission. The Vasagatan is dark, and so players should build and wear a head lamp (the blueprints for this item are in the Radio Tower). In fact, they may need two depending on how long their exploration lasts. Players should also keep in mind that the head lamp will constantly lose durability as long as it's in a worn item slot. A large backpack can also help by letting players take fewer trips.
Another thing players will need is a metal spear or two. The ship is full of large, aggressive rats called lurkers , and they're hard to avoid. The way lurkers attack is by lunging forward, so the best way to fight them is to dodge back, run up to stab them, dodge back, and repeat.
Exploration efforts can also take some time, so players may want to bring along food and water . However, both fruit drinks and cooked food appear in crates on the ship, so players shouldn't have to pack much.
Finally, the lagoon surrounding the Vasagatan is full of valuable items like clay and sand and especially metal scrap. Before exploring the ship, players should harvest as much as they can from the reefs and rocks below. There's even a mechanical part on the rocks that will come in handy later.
The Lower Deck
The way into the Vasagatan is through the back, which is the side of the ship players should be approaching from. Simply anchor the raft just outside the rocks and swim across to the landing area .
Players will find themselves in a dark engine room full of scrap metal. A circuit breaker on the right will turn on a single overhead light and highlight the first note players can pick up, but to see anything else a head lamp is necessary. This room also contains a crowbar, a special item that doesn't take up an inventory slot and allows players to pry open the door that leads further into the ship. Sadly, the crowbar (and other special items) are one-use only. Players can see which special items they currently have in their notebook.
Past the door is a hallway, and the first door in the hallway leads to the crew quarters. Here players will find a locker that asks for a bolt cutter. This is also where the first lurker is hiding, so have the spear ready .
The second door is a stairwell, but it's locked and needs a blue key. The third door is a bathroom that contains a red key. The fourth door leads to a kitchen, and in the kitchen is the second note, a gas tank, and a crate.
Finally, the fifth door needs the red key to open and leads to a workshop. Here players will find one mechanical part, two projects that need several special items to complete, the third note, and a pair of bolt cutters. The bolt cutters will open the locker in the crew quarters, and inside the locker is the blue key and the fourth note. At this point, players may want to head back to drop off all the plastic and metal scrap they've collected .
The Guest Decks
The stairs open onto a recreation area, and to the left players can enter a bar with a mechanical part, a set of bullets, and a note. Behind the bar is a pool with another mechanical part at the bottom. There are also a set of stairs around the side that lead up to the third deck.
Back inside, players can explore a series of guest cabins. The first is mostly empty, the second has the sixth note, and the third has a safe that needs a four-digit code. The last door on this deck leads to a cargo area with a crate.
The third deck features a balcony in the back, a door locked with a keycard, and a foredeck area with another crate. There's also a cafeteria with a crate, a mechanical part, note seven, and the four-digit code for the safe. This safe contains note eight and a set of electrical wires. By this point, players should have enough mechanical parts to go back to the workshop and create a car jack .
The Upper Decks
While it's possible to skip some of the floors by climbing up the exterior, by this point all the doors to the interior are locked from the inside and so the internal staircases are the only ways up.
Players can reach the fourth deck by using a set of stairs in the balcony area. This deck has a recreation area with a dance floor, and on the dance floor is a keycard. Players can also use the car jack to move a heavy metal box and access a guest room that contains two crates and the ninth note. Using the keycard, players can access Olof's office and get the green key.
Another set of stairs leads to a small observation area with a crate and a door that needs the green key. This key opens Olof's personal quarters, which hold a crate, note ten, and a lighter.
The top floor is the bridge, but to open the door players will need to build a bomb . Luckily, they should have all the parts they need by this point, so simply go down to the workshop, build it, return to the bridge door, and then set it off. The bridge contains two crates, two very useful blueprints, and the final note which provides the code for the third story island.
Raft is available now on PC.
MORE: Haunted Chocolatier Should Not Give In to a Repetitive Gameplay Loop

- VisualEditor
- View history
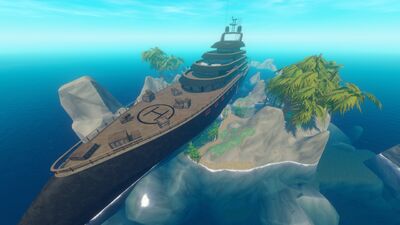
Vasagatan is an Environmental Element in Raft , which contains both the Blueprint: Engine and Blueprint: Steering Wheel , as well as loose Plastic , Scrap , and several Loot Boxes with supplies.
- 4 Unique Items
Summary [ | ]
The wreck is situated in a small lagoon, located by following the receiver coordinates found in the Radio Tower . Access to the interior of the ship is via the rear.
The interior is composed of many rooms, most containing supplies. In addition to regular supplies, the player will also find several unique items. The wreck also is home to several Lurkers . The player may also find many notes, which explain the story behind the ship and its wreckage in more detail.
The blueprints for the Engine and Steering Wheel are in the bridge at the top of the ship, access being provided by finding all the quest items. The bridge will also contain a set of Receiver coordinates to Balboa Island .
On top of the bridge, the player will find another Loot Box. In a single player game, it's hard to reach it but on PC the player can jump up easily by locking their game framerate to 30 FPS. In a multiplayer game, it's much easier to reach the Loot Box. One player just needs to jump on the other and then on the roof of the bridge.
As of Chapter 3 there are 11 notes.
Strategy [ | ]
Due to its size and layout nature, it can take a few in-game days to fully explore the wreck. It is recommended to bring supplies to explore the ship:
- Head Light - The interior of the ship is dark. Head Lights allows the player to see. At least two headlights are recommended, as one may not last long enough to complete exploration.
- Weapons - There are several Lurkers in the ship. They respawn frequently, on specific locations, while the player is exploring the ship.
- Water - Lots of food items can be found throughout the ship, and as of chapter 3, drinks are provided. But, it is still recommended for the player to bring their own.
- Food - Several crates found should contain food, but be sure to bring a small supply in case they are insufficient.
Guide [ | ]
- Go diving near the back of the ship to find a Mechanical Component .
- Then, enter the first floor on the back of the ship. In the first room you can find a switch on the wall to turn on the lights and a Crowbar to open the door to a corridor. Proceed through the corridor until you find the bathroom where you can find the Red Key . Follow the corridor to the kitchens where you can find the Gas Tank . Open the door at the end of the corridor with the Red Key and pick up the Bolt Cutter and a Mechanical Component .
- Go back to the first room in the corridor and open a locker with the Bolt Cutter in which you find the Blue Key . Use the Blue Key to unlock the stairs to the second floor.
- There, you can find Bullets and a Mechanical Component in the party room and one more Mechanical Component in the pool.
- Go up two more floors to the fourth floor to pick up a Key Card on the dance floor. Go back down to the third floor and use the Key Card to get into an office where you can find the Green Key . You can find a Mechanical Component and a Four Digit Code on the same floor.
- Find the stairs to the fifth floor and unlock the door with the Green Key . On the bed you can find a Lighter .
- Go back to the second floor, follow the corridor, enter cabin 3 and open the safe there with the Four Digit Code to get the Electrical Wires . In the last room of this corridor you can find one more Mechanical Component .
- Now, go back to the first floor to the very last room in the corridor and use five Mechanical Components on one table to build a Car Jack and build a Bomb on a second table with the Electrical Wires , Lighter , Gas Tank and Bullets .
- Use the Car Jack on the fourth floor to move the cabinet blocking the way to a room.
- Finally, go up to the sixth floor and place the bomb at the door. Get out of the way so the blast doesn't hurt you and then, enter the bridge. There, you can find two blueprints and the code for the next location Balboa Island .
Unique Items [ | ]
The unique items contained in the wreck are used to progress past locked doors and obstacles, eventually leading to the top.
Trivia [ | ]
- "Vasagatan" is the street name of Redbeet Interactive 's studio. It is named after a previous king, Gustav I of Sweden (Gustav Vasa), who was the reigning king in the mid 15th century. As such, the street would translate to "Vasa Street" in English.
- Vasa was also the name of a Swedish warship built between 1626 and 1628. The ship sank after sailing roughly 1,300 m (1,400 yd) into her maiden voyage.
History [ | ]
Gallery [ | ].
The note leading to Balboa.

Vasagatan from above.
- 1 Caravan Island
- 3 Balboa Island
- Escape from Tarkov
- Dreamlight Valley
- Baldurs Gate 3
- Entertainment
- Baldur’s Gate 3 Map
- Conan Exiles Map
- Cyberpunk 2077 Map
- Diablo 4 Map
- Elden Ring Map
- Escape from Tarkov Map
- Fallout 76 Map
- Genshin Impact Map
- Grounded Map
- Hogwarts Legacy Map
- Honkai Star Rail Map
- Hunt Showdown Map
- Lost Ark Map
- Medieval Dynasty Map
- New World Map
- Sons of the Forest Map
- Starfield Map
- Subnautica Map
- Tower of Fantasy Map
- The Cycle: Frontier Map
- The Forest Map
- V Rising Map
- Zelda: Tears of the Kingdom Map

Raft: Vasagatan Walkthrough – Everything you Need to Know About the Cruise Ship
In our guide to the survival game Raft we will show you how to reach Vasagatan and how to find all the treasures and information. For this, you have to complete some tasks on the 6 floors that we will guide you through step by step.
This is Vasagatan in Raft and this is how you solve the puzzles
To get to Vasagatan, Raft’s second story objective, you need the code found on the “People” note in room E-1 at the top of the radio tower. Vasagatan is not an island but a stranded cruise ship.
You should know this beforehand: On Vasagatan, not only a lot of loot awaits you, but also combative enemies who want to get at you. Before entering the ship, you should maximize your health, water, and food so that you don’t run out all at once in a fight. In order to be able to defend yourself against the enemies inside the ship and to survive the adventure, you should carry the following items and weapons with you:
But don’t forget to leave enough space in your inventory for new loot. If your inventory is too full during the adventure, you can always go back to your raft and put your loot there.
These are your tasks on the floors
You can complete some missions only after completing a task on another floor. Just follow our guide. We have an overview of the tasks per floor for you here:
- Eliminate Lurkers
- Find the bolt cutters
- Gather resources for the workbenches
- Open the locker
- Craft the items at the workbenches
- Gather resources for the workbenches on the 1st floor
- Open the captain’s quarters safe with the code from the 3rd floor
- Find the 4-digit code for the safe in the Captain’s Quarters on the 2nd floor
- Find the stairs to the 4th floor
- Find the green key using the keycard from the 4th floor
- Find the key card for the room on the 3rd floor
- Find the stairs to the 5th floor
- Find the box by the bed
- Blow up the door to the bridge
- Find blueprints and code for Balboa Island

RAFT: Vasagatan – The 1st Floor
Anchor your raft at the back of the ship and enter via it. Go through the door that says “Authorized Personnel only”. Follow the tunnel and pull the lever on your right that turns on a light above the table, which will give you a note. Gather the rest of the loot in this room and get the crowbar, which you can find on the table with the red lamp. You can now use this to break open the closed door, which is also labeled “Authorized Personnel only”.
kill lurkers
Go through the door into the hallway where you will hear noises behind another door on the left. Behind this door your first opponent on this ship is waiting, a giant rat known as “Lurker”. Now grab your spear or bow to finish them off.
How to defeat the Lurker: Once you have equipped your spear or bow, open the door and wait for the Lurker to jump at you. Then run forward and jab with the spear, or shoot an arrow at him. Walk back and wait for him to try to jump you again and repeat this method until the lurker is finished.
find bolt cutters
In the room where you defeated the lurker, to the left of the front door is a red locker with a padlock that you can open with bolt cutters. which you will get now.
Back in the hallway, you notice that the next door leads to the stairs, but you need a blue key to open it. Therefore, first of all, go further until you see a bathroom on the right side, in which you will find a red key and scrap metal. When you exit the bathroom keep right and keep following the hallway to a dead end with two doors, one of which requires the red key. But go through the other door first.
Now you are in the kitchen where you will find another note and a gas canister which you collect. Now you can open the door that requires the red key and go inside the room. Run across the room to the other side where you will find the bolt cutter and another note.
There are also two workbenches in the left end of the room for which you need the following items:

On a shelf, in an open closet, you can find one of the mechanical parts already in this room. Collect it and any other loot you need.
Open Locker
Go back to the room where you killed the lurker. Here you can now go to the red locker with the lock and break it open with the bolt cutters. In the locker you will find the blue key to the stairs and another note.
RAFT: Vasagatan: The 2nd floor
Go through the hallway to the door that you need to open with the blue key to get to the stairs and open them with the blue key you just got. The stairs now let you get to the upper floors of the ship, where you will now also face Lurker in open areas, best have your bow or spear ready.
Head up the stairs to the second floor where you will find yourself in a room with pool tables but also hear the sounds of lurkers located here. Turn left toward a door with a green exit sign hanging above it, showing a person, a down arrow, and a door. Go through the door into the bar behind it. On the bar counter you will find the ball and another note that you collect.

Go down the hall to the room marked “1” where you will find plastic in the bathroom. Leave this and turn left. Go to the end of the hallway where you turn left again. You should now see a half-open door with a Lucky Cat stature. Unfortunately, you can’t pick up the statue, so you go to the room marked “2”.
In room “2” you will find another piece of plastic in the bathroom, as well as a cassette that is on the desk and contains a note.
Exit the room and turn left where you will find the captain’s cabin numbered “3”. Inside you will encounter a lurker that you must defeat. You will also find a safe that you can open with a four-digit code that you only have to find on the 3rd floor. Now exit the room and turn left to the door at the end of the hallway.
This is the last room on the second floor where you’ll find some crates, plastic, junk, some food in a cooler, as well as the fourth mechanical part. Then go back to the stairs that took you to the second floor.

RAFT: Vasagatan: The 3rd floor
Go back to the stairs that took you to the second floor. Next to it is the staircase that will take you to the third floor. There are already aggressive Lurkers waiting for you here, so grab your chosen weapon and defeat them.
Once you’ve killed all the lurkers, open both doors with green exit signs, but you don’t have to go out through them. Now follow the hallway that is behind the stairs. On the left is a door that will also take you outside. On the right is a room for which you need a key card first. So go down the hall into the dining room, on whose serving tables you will find a box of food. To the left of that you’ll find a supply cupboard, in front of which you’ll find the fifth and final mechanical piece on the floor.
Now turn to the round table in the room where you will find a piece of plastic, the four-digit code (opens the safe in the captain’s quarters) and a note.
Now open the exit door on the opposite side of the room and go through it outside to the helipad where you will find various loot. Gather what you need and go back into the room and leave it. Follow the hallway and go left, then left again and you will find the stairs that lead to the fourth floor.
RAFT: Vasagatan: The 4th floor
Again, you will be greeted by lurkers, which you must kill again. Then go back to the stairs and look to the right. There you will see a room that has a raised dance platform where you will find a key card. On a serving table, on the left side, you can also grab a piece of scrap metal.

You have here again several exit doors that you can open. Take a look to see if there’s anything outside and then go back inside, back to the stairs.
Face the stairs and take the left hallway where you will see a door blocked by a black fridge. To move this you need a jack, which you have to find first.
RAFT: Vasgatan: Back to the 3rd floor
Go back to the third floor and have your gun ready as lurkers can respawn. Eliminate all the lurkers and go to the door that you can only open with the keycard. Open it and go into the office-like room. On a desk you will find a green key that you collect.
Now go back to the stairs that lead to the fourth floor and go up them. Turn left at the top and follow the hallway. Turn left again and you have found the stairs to the fifth floor.
RAFT: Vasagatan: The 5th floor
Climb the stairs to the fifth floor and turn left where you will find a crate with supplies. On the opposite side of the crate is a door that can be opened with the green key. Open this up and have your weapon ready as there is a lurker in this room that you will take out. In this room there are again doors that take you outside.
If you were outside, go back inside and head towards the bookshelves you’ll pass and end up in front of a bed. There is a lighter and a cassette on the bed, and a box on the floor next to it. Collect everything and go back to the second floor.

RAFT: Vasagatan: Back to the 2nd floor
Back on the second floor, go to the captain’s quarters and take out the lurker if it respawned. You can use the code you got from the third floor to open the safe. Inside you will find electrical wires and another note.
Once you’ve collected everything, it’s time to return to the first floor.
RAFT: Vasagatan: Back to the 1st floor
When you reach the first floor, go into the room where the two workbenches are. Now that you have all the resources you need, you can go to the left workbench to make a bomb and the right workbench to make a jack.
Once you’ve made everything, go back to the fourth floor, where the fridge is blocking the door. Watch out for respawned lurkers as you head there
RAFT: Vasagatan: Back to the 4th floor
When you get to the fridge, you can now use the jack to push it aside and open the door.
In this room you’ll see a desk with a note on it and a box of supplies underneath it. Once you’ve looted everything, head left into the bathroom where you’ll find a box of food. Exit the room and go around left, then left again and take the stairs that lead to the bridge on the sixth floor.
RAFT: Vasagatan: The 6th floor
When you reach the sixth floor, place the bomb on the bridge door and go down the stairs to avoid being hit unnecessarily by the explosion.

Once you’ve blasted the door, go inside the bridge where you’ll find exit doors on either side that you can open. If you are outside, now go back inside and go to the ship controls. Here you will find the blueprint for a steering wheel, the blueprint for an engine, and a note with the code for Balboa Island . In the room you will also find a food box, a supply box, and other loot.
Once you have collected the last note, you will receive the “Vasagatan Historian” achievement.

RAFT: Vasagatan: Final Tips
- Before you leave Vasagatan, you can once again hunt and kill the respawned lurkers to collect raw meat.
- In the water at Vasagatan you will find 6x mechanical parts, as well as copper and algae. Redesign your raft using the newly acquired blueprints.
Would you like to join our community and discuss Raft? Then join our new Discord server , we look forward to seeing you!
- X (Twitter)
Sascha Asendorf is the co-founder of Guided.news and has been running online magazines in the gaming sector since 2013. Starting with a strong focus on survival games, Sascha now deals a lot with role-playing games and is an expert on survival and RPG titles like Conan Exiles, Baldurs Gate 3 & Cyberpunk 2077.
Related Posts

Dragon’s Dogma 2: “The Sorcerer’s Appraisal” [Quest Guide]

Dragon’s Dogma 2: How to Increase Your Weight Capacity

Dragon’s Dogma 2: The Arisen’s Shadow [Quest Guide]

Dragon’s Dogma 2: “A Beggar’s Tale” [Quest Guide]

Dragon’s Dogma 2: Expert Tips for a Smooth Start in the RPG

Enshrouded: How to Get Sparks
Type above and press Enter to search. Press Esc to cancel.
Ad Blocker Enabled!
Our website is made possible by displaying online advertisements to our visitors. Please support us by disabling your Ad Blocker.
Support our work:

Gerrard World
Hints and Tips on the World

Raft: Vasagatan Guide
Click to share...
Vasagatan is the second storyline location in Raft. It can be reached by finding the radio frequency on the Radio Station (the first location) and programming the receiver with that code. Follow the receiver until you reach this abandoned cruise ship…
Vasagatan is a cruise ship which was provisioned badly for a quick getaway from the flooding of the Earth’s continents. The crew have left numerous messages talking about the circumstances under which they left port, and the problems that they faced with food shortages, disease, and rat infestations. All the crew appear to have passed away and the ship is abandoned on a small island.
To explore the ship you should first of all provision yourself with a little food, a lot of water, a headlamp, and a couple of spears to kill the Lurkers. The ship is a maze of locked doors and obstacles to pass. The map below shows the location of each item and what is needed to pass through each door. You should get yourself to the aft of the ship to begin with, at sea-level behind the pool. There is an open door here which gives you access to the hold.
Vasagatan contains a number of objects which you will need to collect to make your way to the control room at the top. Here you will find the blueprints for the Engine and the Steering Wheel, which are important devices to make your raft manoeuvrable enough to reach the next location, Balboa Island. You will also find the radio frequency for Balboa which you can follow.
As well as the necessary components, you will find 13 notes or tapes scattered around the ship. You can view these in your scrapbook.
Share this Image On Your Site
More raft articles….
- Walkthrough
IGN's Raft complete strategy guide and walkthrough will lead you through every step of Raft from the title screen to the final credits, including every collectible location, boss strategy and more.
Walkthrough Sections
Up next: chapter one, top guide sections.
- Beginner Guide: Tips and Tricks for Getting Started
- Puzzle Solutions
- How-To Guides

Was this guide helpful?
In this guide.

- Skip to main content
- Skip to header right navigation
- Skip to site footer

Video Game News, Lists & Guides
Raft: How To Reach Balboa Island | Engine Crafting Guide
Rev up your engines.
What You Need | Requirements
Getting to balboa island.
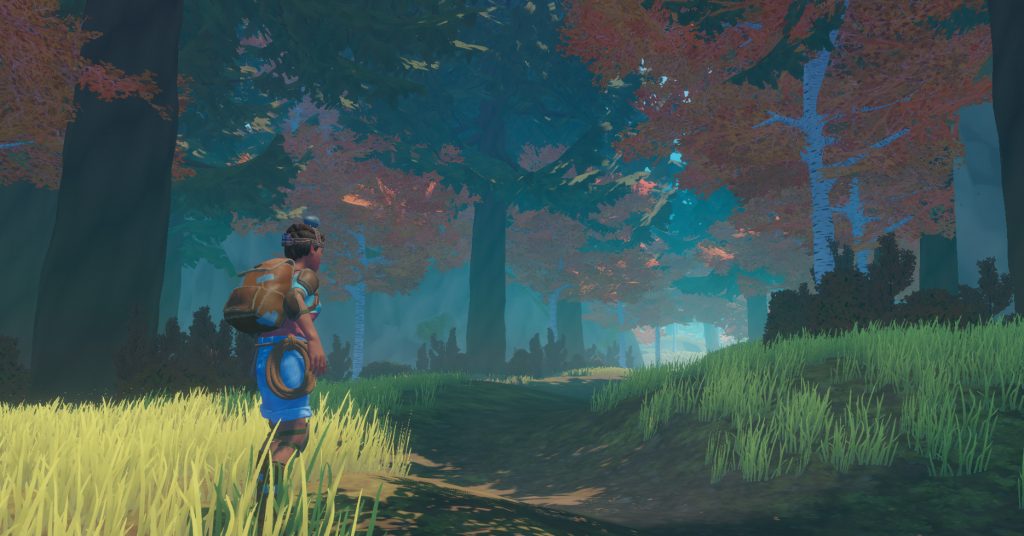
The third story location of Raft is Balboa Island . Once you’ve breached the wheelhouse of the Vasagatan shipwreck, you’ll finally be able to reach this important location. Balboa Island is a large area that’s packed with solid ground to explore — a very different change of pace from your tiny lifeboat. Reaching Balboa Island is a special case. You can’t get there until you build engines . Only engines can propel your raft and push against the current.
Below, we’ll explain how to navigate to Balboa Island with step-by-step instructions. What you’ll need to craft, and easy mistakes you’ll want to avoid.
More Raft guides:
10 Items You NEED To Survive | How To Stop Shark Attacks | Unlockable Characters | How To Get Metal Ingots | How To Get Scrap Cubes | How To Get Titanium | Reaching The Radio Tower | Opening The Vasagatan Bridge | How To Use Cheats | Best Cooking Pot & Juicer Recipes
Before attempting to reach Balboa Island , the third story location, you’ll need to complete the following tasks.
- Build the Receiver & Antenna x3 blueprints. Reach Radio Tower .
- Get coordinates for the Vasagatan Yacht at the top of the Radio Tower .
- Blow open the wheelhouse of the Vasagatan . Acquire Balboa Island coordinates.
On the Vasagatan, you’ll also need to collect the blueprints for Engine and Steering Wheel . Once you complete these steps, you’ll be able to reach Balboa Island .
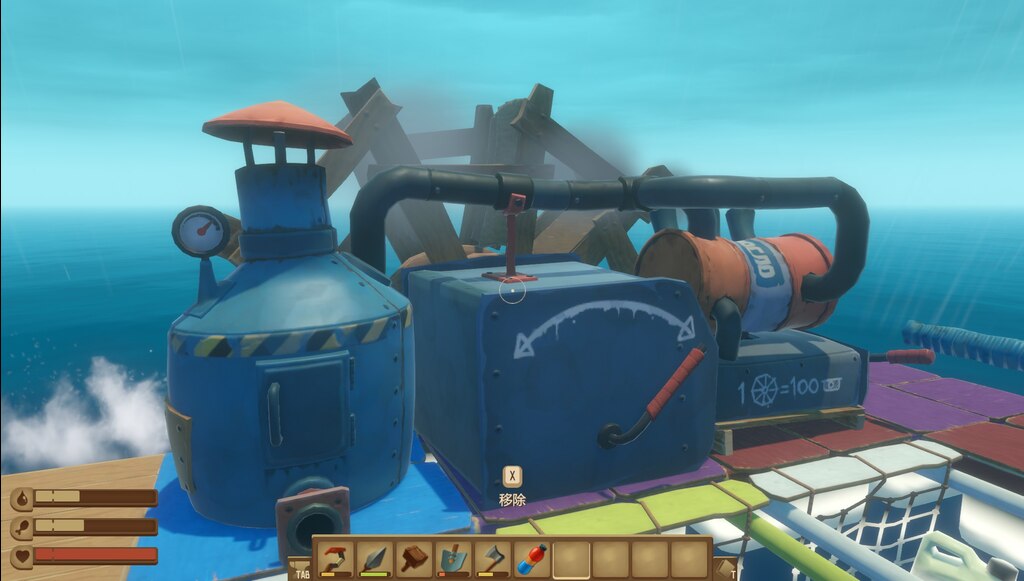
Balboa Island is a large island located against the current / wind — the only way to reach it is with the Engine . The Engine and Steering Wheel blueprints are located on the Vasagatan Yacht wreck. Get the blueprints and use coordinates in the receiver to see where you need to sail.
- Build x2 Engines and x1 Steering Wheel .
- Make sure the engines are on the BACK of your raft, and the Receiver is facing FORWARD .
- Input coordinates to Balboa Island (4-digit code) into the Receiver . The island will appear as a blue blip.
- Navigate against the wind to Balboa Island.
Each engine can push 100 Foundation squares — if your raft is extremely large, it may need more engines. You can use a maximum of x6 engines at the same time. Also, make sure all the engines are pushing the same direction . Engines also need fuel . Later you’ll be able to craft efficient fuel sources, but at this stage you can use planks as fuel . Stock up all your engines and steer toward that blue marker.
- Engine Requirements : x5 Metal Ingot, x5 Rope, x1 Circuit Board, x20 Planks
- Sailing Wheel Requirements : x10 Scrap, x4 Metal Ingot, x4 Rope, x2 Bolt, x2 Hinge
The hardest materials to acquire are Metal Ingots and Circuit Boards . Metal Ingots are smelted from Metal Ore, found underwater near large islands. Circuit Boards also require the Smelter. Place Seaweed inside the Smelter and cook to create Vine Goo — you’ll find Seaweed on the ocean floor, which is much easier to access near any island. Research Vine Goo and you’ll see everything you need to make Circuit Boards.
About Kevin Thielenhaus

Raft Chapter 1 Walkthrough Guide: All Notes & Blueprints
Table of Contents Show
Radio Tower Walkthrough
Radio tower (notes/blueprints), vasagatan walkthrough, vasagatan (notes/blueprints), balboa walkthrough, balboa (notes/blueprints).
Raft Chapter 1 : Radio Tower, Vasagatan and Balboa Island.
Raft Chapter 1 Walkthrough Guide: All Notes & Blueprints
To begin the story, you need to craft a Receiver, 3 Antennas and a Battery [ how to craft and use the Receiver ]. The moment you turn your receiver on, you’ll receive a note with coordinates (4 numbers), enter them and follow the blue square that appears on the receiver’s radar.
Every note and quest item will go in your journal, that way you can’t lose them even if you die. Your journal can be found on the right of your toolbar, key to open it can be changed in the settings.
Also you can check all Raft Guides !
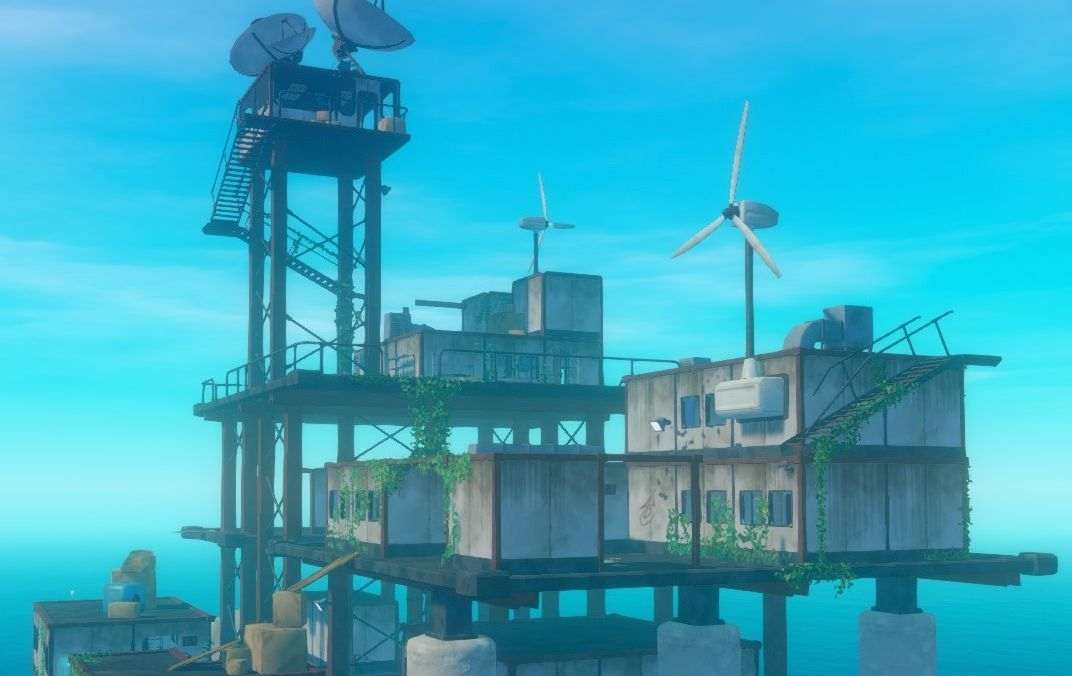
After following the blue square, you should find a Radio Tower.
Anchor your raft next to it and start the climb!
There are 5 notes to find in this building, including 4 optionals; and 2 blueprints (Head Light and Recycler).
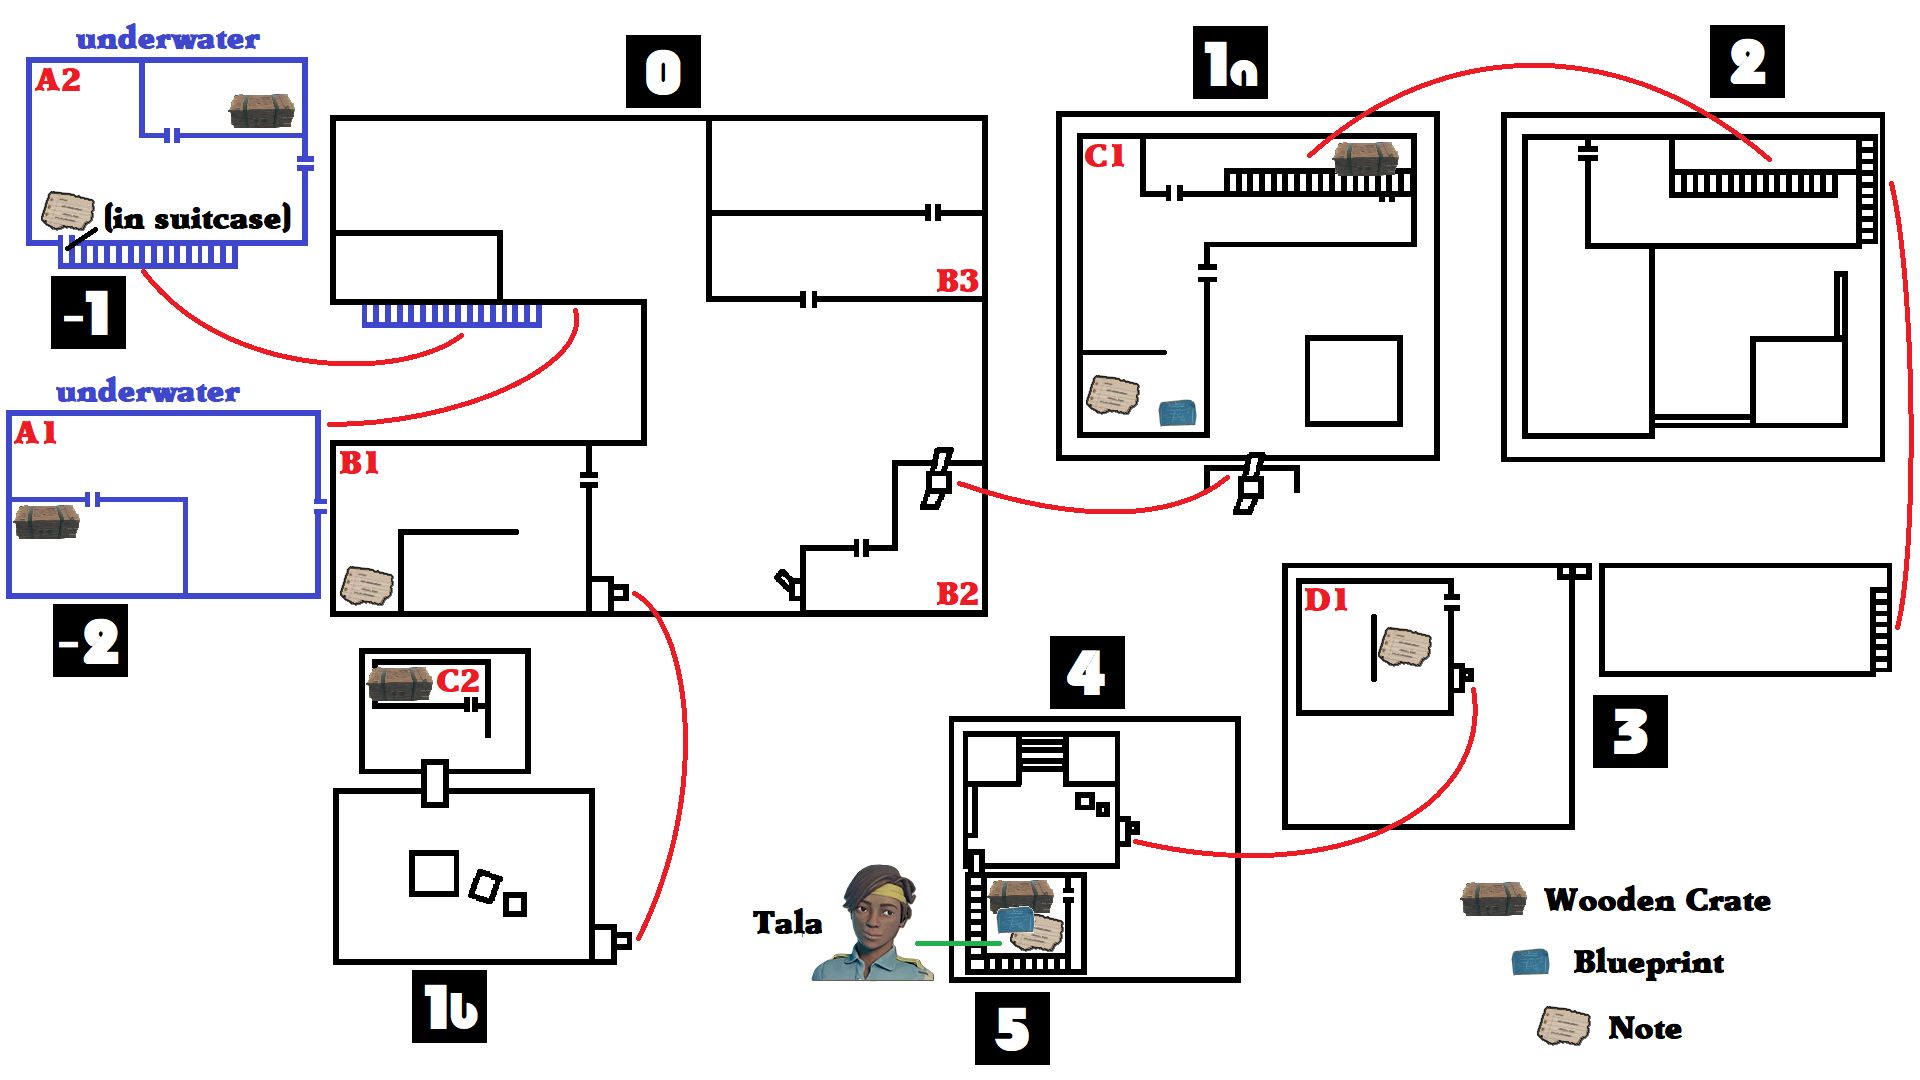
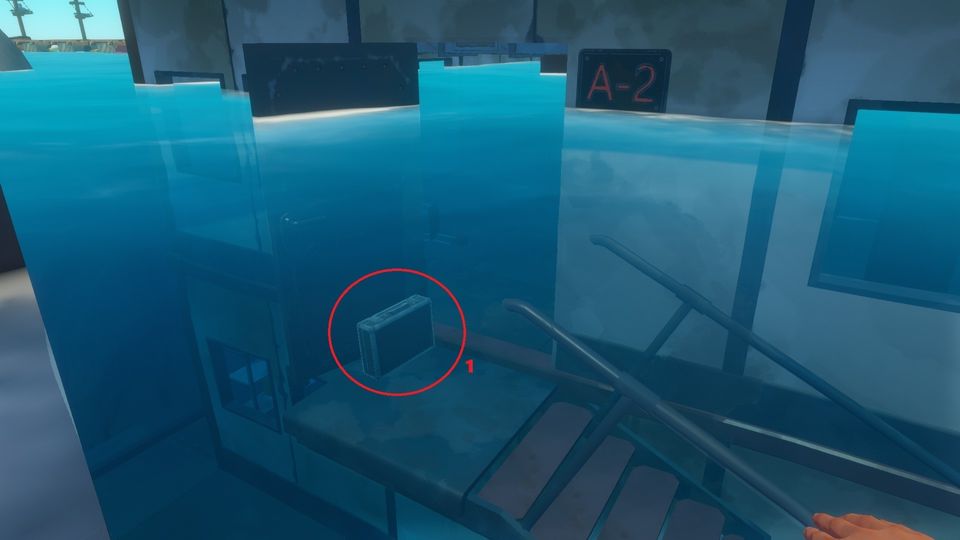
The 1st note is underwater, in a suitcase, next to the door of the building A-2 =>[DECEMBER 12th: We stopped for the night…] – Page 3
The 2nd note is on the lowest floor, in the building marked B-1, on the left of the red telephone. =>[JANUARY: It’s been weeks.] – Page 3
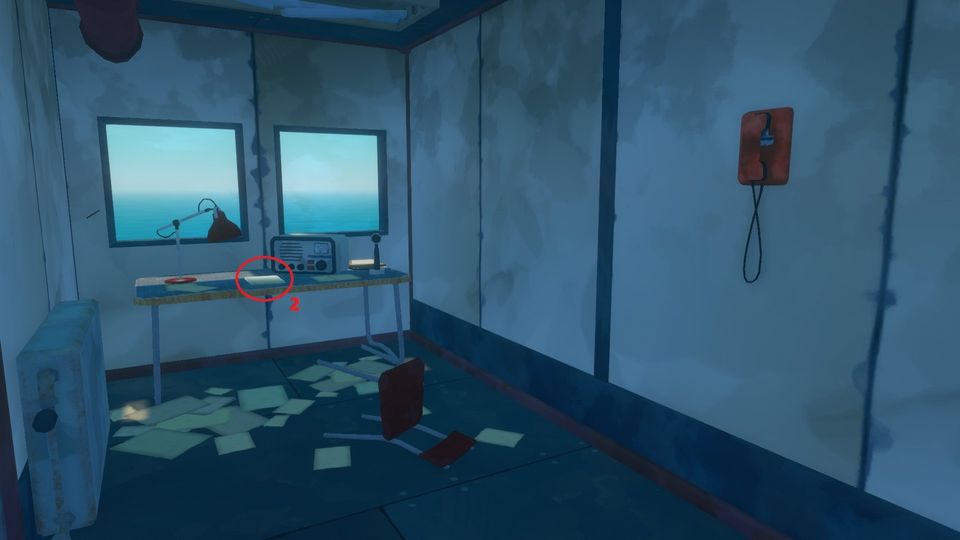
The 3rd note is on the next floor, in the building marked C-1, on the left when you enter, on a wall, the note has “TRACE” written on it. =>[OWL’S RADIO NOTES: 22 Dec -Distress call…] – Page 4 The 1st blueprint (Head Light) is just next to this note.
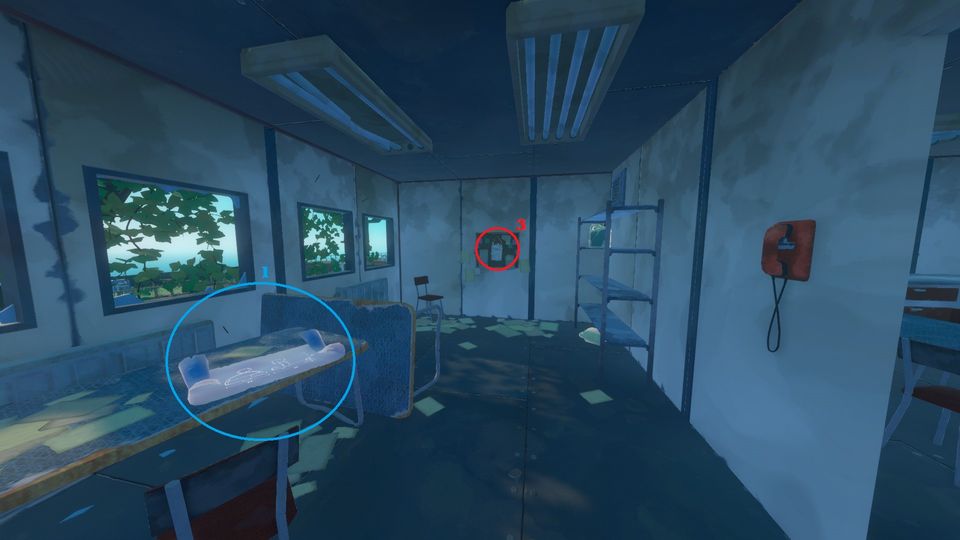
The 4th note is on the second to last floor, in the building marked D-1, just in front of you when you enter. it’s a post-it with “people?” written on it. =>[Errm… FEBRUARY(?) We’ve picked up a lot of signals.] – Page 4
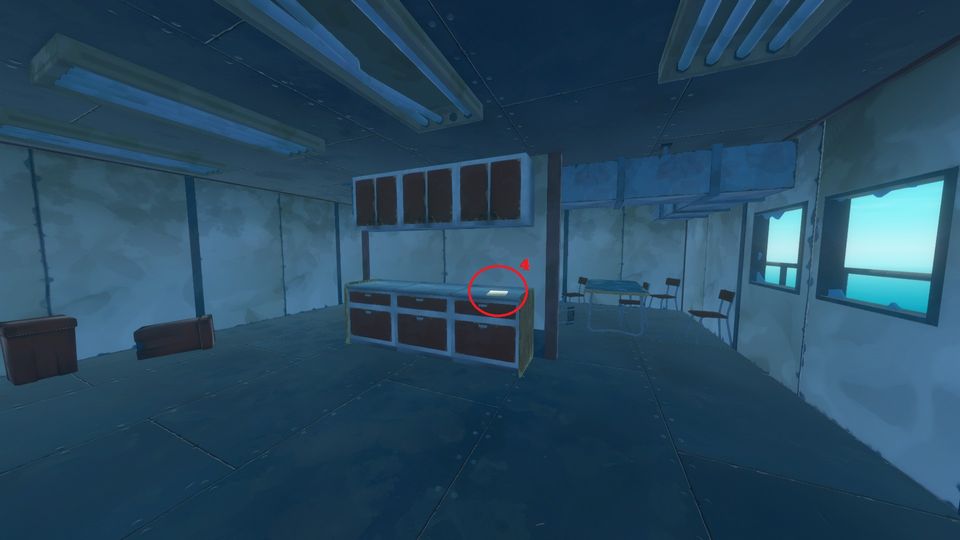
The 5th note is on the top floor, in the building, on the white board. it’s a post-it with “people?” written on it. =>[People? #….] – Page 5 The 2nd blueprint (Recycler) is just next to this note. You will also find a new unlockable character there: Talia
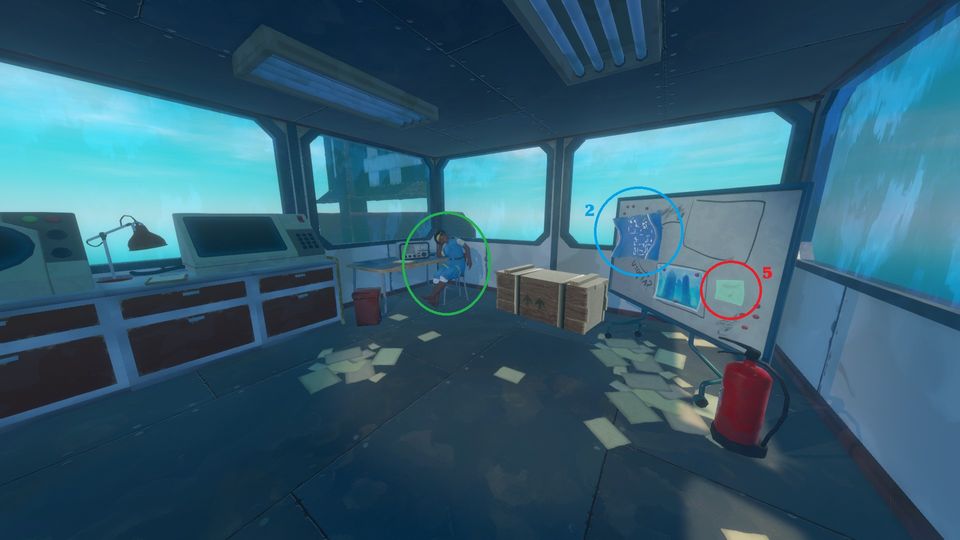
The only document you need is the post-it which will give you the next coordinates to follow.
Reaching the white board will give you the achievement [ Is there a Utopia? ].
If you get all the documents, you’ll get the achievement [ Radio Tower Historian ].
The inside of the boat is very dark, so use the blueprint you’ve found in the Radio Station to craft several headlights (it took me 2 headlights to explore everything). I’ve made a map to help you find your way and understand better my explanations.
- There are 11 notes .
- There are 2 blueprints to find, one for the Engine and one for the Steering Wheel, they are next to the post-it with the coordinates for the next story place in the last room you explore (the bridge).
The boat has many locked doors. To progress, you will have to find many items that unlock places to find other items that unlock other places… It’s kind of a treasure hunt.
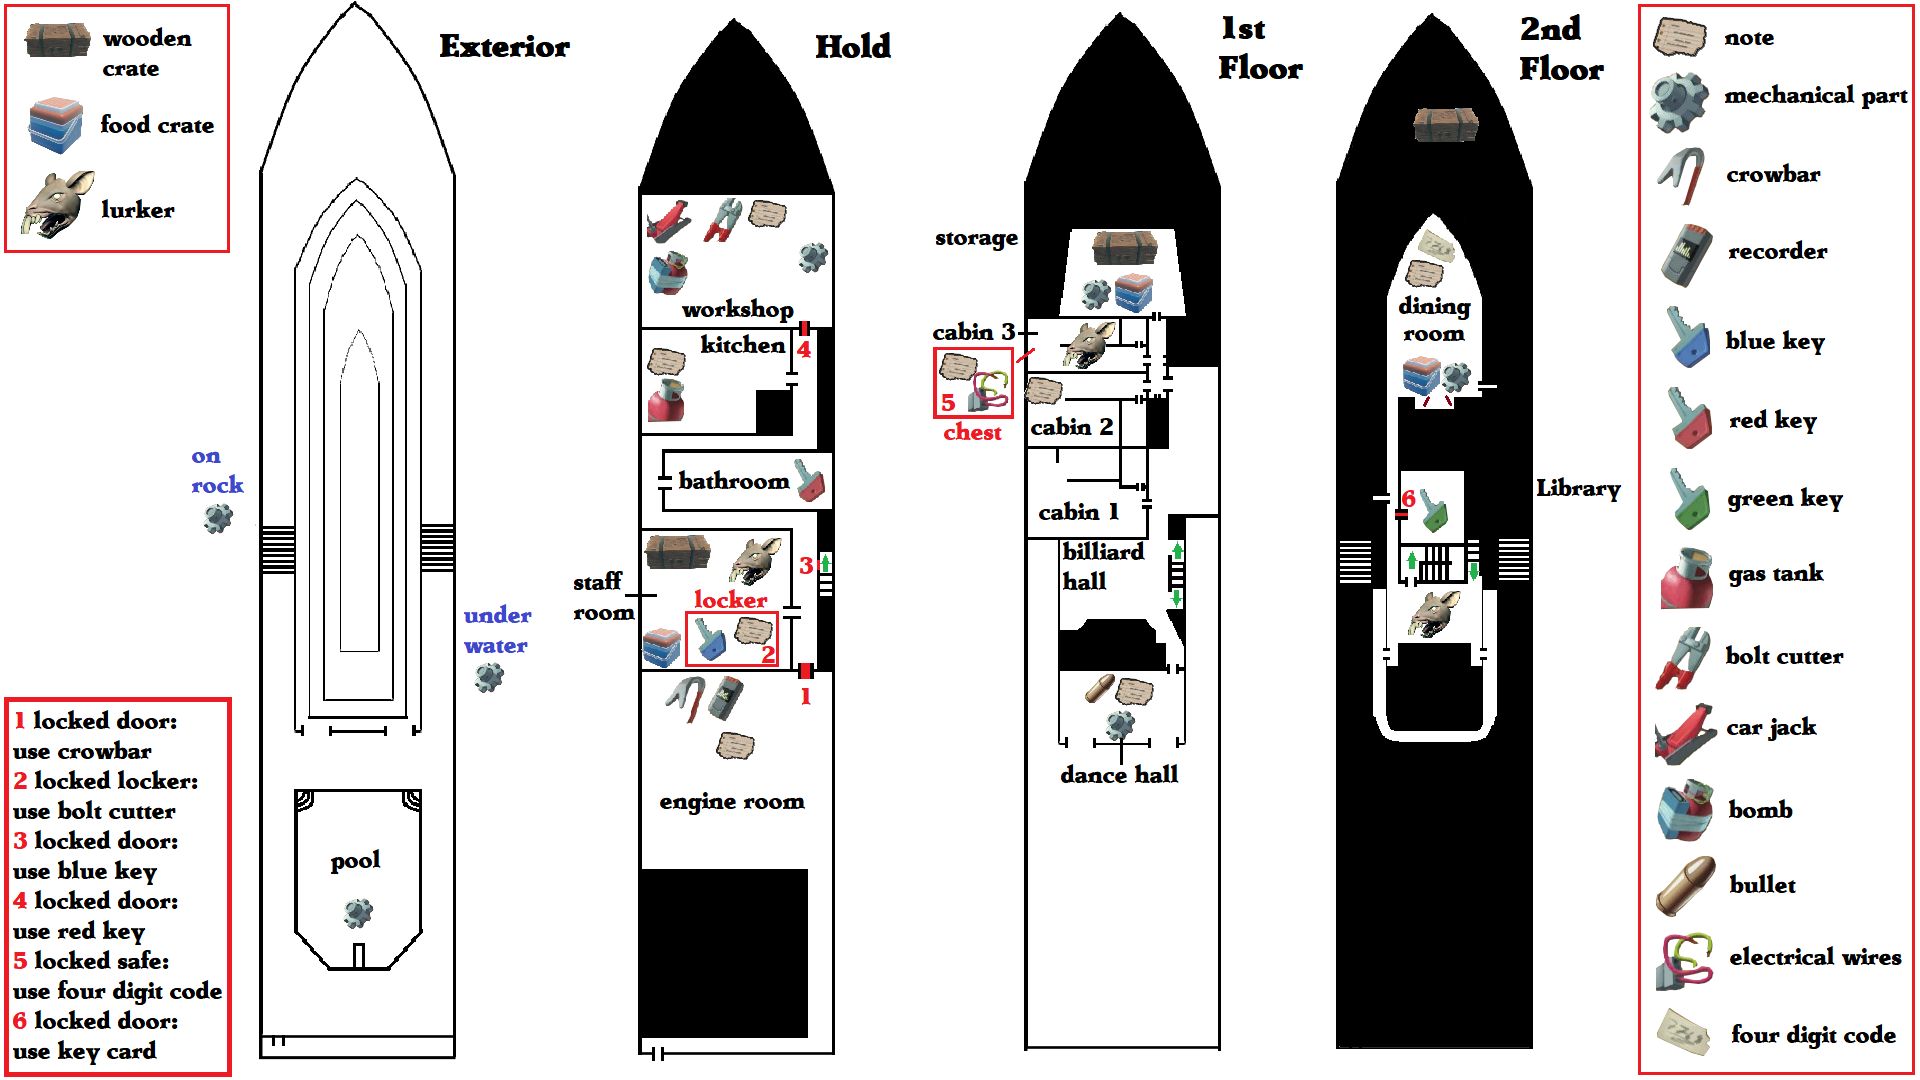
Exterior: => Get 1 [Mechanical Part] in the swimming pool (on the yacht) => Go at the back of the yacht to enter the Hold.
Hold: => First room, the Engine Room. You can use the lever on the wall to turn some lights on in the yacht but it’s not necessary. There’s a [Note] on a table and a [Crowbar] + a [Recorder] on another table (you’ll pick both up at the same time). Use the [Crowbar] to open the next door. => Ignore the 1st door (on your left) and the 2nd door (on your right). Enter the 3rd door (on your right), the Bathroom, to get a [Red Key]. => Continue down the corridor until you find a 4th door (on your left), the Kitchen. Inside you’ll find a [Gas Tank] and 1 [Note]. => Reach the last door which you can open with the [Red Key] to enter the Workshop. Collect the [Mechanical Part] on a shelf, the [Bolt Cutter] and a [Note] on a table, then go back to the 1st door in the corridor. => Open the 1st door in the corridor to enter the Staff Room, careful there’s a Lurker there. Open the locked locker with the [Bolt Cutter] to find a [Note] and a [Blue Key]. => Open the 2nd door in the corridor with the [Blue Key] to show the stairs, Take them to reach the 1st Floor.
1st Floor: => Go on your left to reach the Dance Hall where you will find a [Bullet], a [Note] and a [Mechanical Part]. => Go back to the stairs, climb them to reach the 2nd Floor. Careful there’s a Lurker there. Ignore this floor for now and go straight to the 3rd Floor (careful for another Lurker).
3rd Floor: => Get the [Key Card] on the Stage, then go back down to the 2nd Floor. Careful for the Lurker, it will be back.
2nd Floor: => Reach the 1st door in the corridor (on your right) which you can open with the [Key Card] to enter the Library. You’ll find a [Green Key] there, take it. => Continue down the corridor to the Dining Room, you’ll find a [Four Digit Code] and a [Note] on a table; and a [Mechanical Part] against a door. Then go back to the stairs and climb up to the 4th Floor.
4th Floor: => Open the only door with the [Green Key], careful for the Lurker there. Take the [Note] and the [Lighter] on the bed, on the other side of the huge bookshelf. Then go back down all the way to the 1st Floor. (as usual, the Lurker will be back at the 2nd Floor, so careful)
1st Floor: => After exiting the stairs, go on your right until you reach Cabin 2 (there will be a big 2 next to the door), take the [Note] there. => Continue down the corridor until you reach the Captain’s Quarters (with a big 3 next to the door). Careful, there’s a Lurker waiting on the other side of the door. Enter the cabin and open the locked chest with the [Four Digit Code], inside there’s 1 [Note] and some [Electrical Wires]. => After exiting the cabin, look on your left for a door at the end of the corridor, enter the Storage Room where you will find your last [Mechanical Part]. Then go back to the last room in the Hold: the Workshop.
Hold: => Craft the [Car Jack] and the [Bomb] on the two tables. Then go back up to the 3rd Floor (remember, a Lurker will be back on the 2nd Floor and 3rd Floor…)
3rd Floor: => Find the open door blocked by some fridge, use your [Car Jack] to move it out of the way. Inside the room, you will find a [Note]. Go back to the stairs and climb them up until you reach a locked door.
5th Floor: => Use a [Bomb] to open the locked door, go down the stairs a little to not get hit by the explosion. => You will find 2 [Blueprints] on the left of the room and 1 [Note] on the Steering Wheel. The note on the Steering Wheel is necessary to go to the next story place.
Reaching the last room of the boat will give you the achievement [Bootleg Fireworks!]
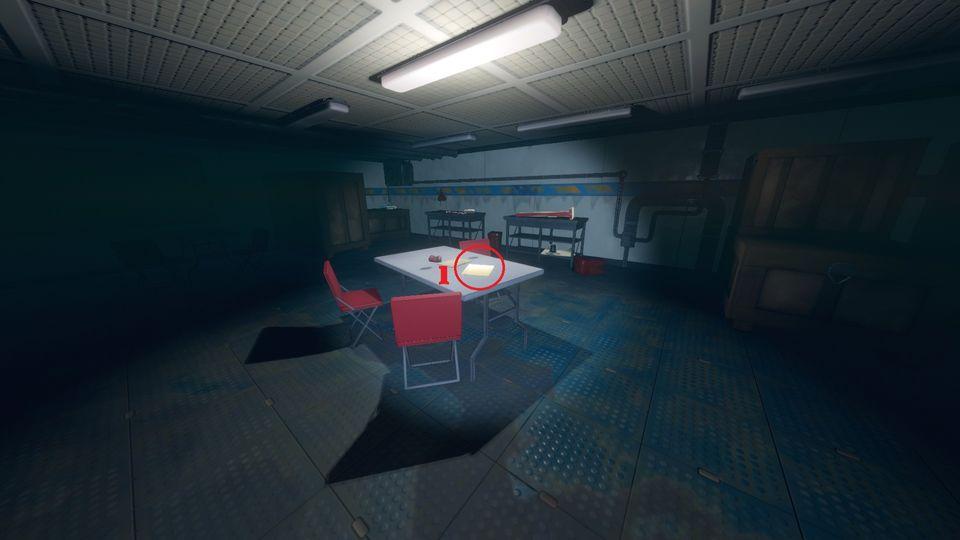
The 1st note is in the boat’s hold, in the engine room, on a table. =>[ I heard from the captain we’re heading…] – Page 7
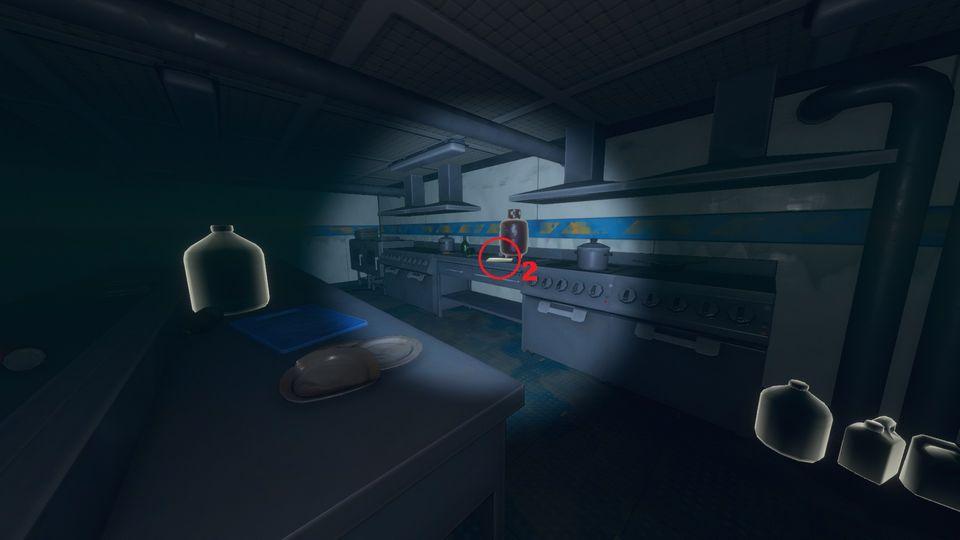
The 2nd note is in the boat’s hold, in the kitchen, on a counter. =>[Ruben, The yacht is ill prepared for this journey.] – Page 7
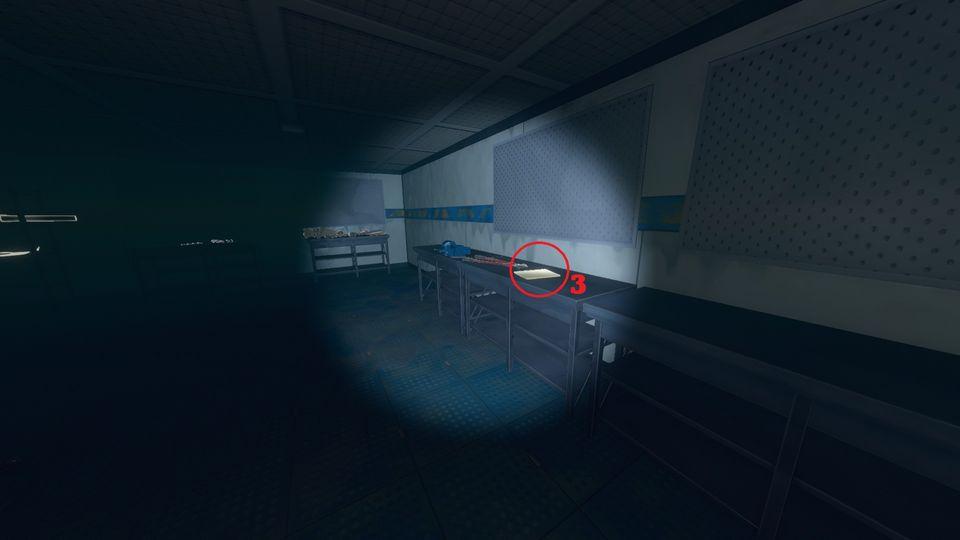
The 3rd note is in the boat’s hold, in the last room at the end of the corridor, the workshop, on a table. =>[ I saw a large rat last night…] – Page 7
The 4th note is in the boat’s hold, in the first room in the corridor, the staff room. It’s inside a locked locker, you need to get a bolt cutter in a room at the end of the hold to open this locker. =>[TRAVEL LOG OLOF The captain keeps complaining about my route.] – Page 9
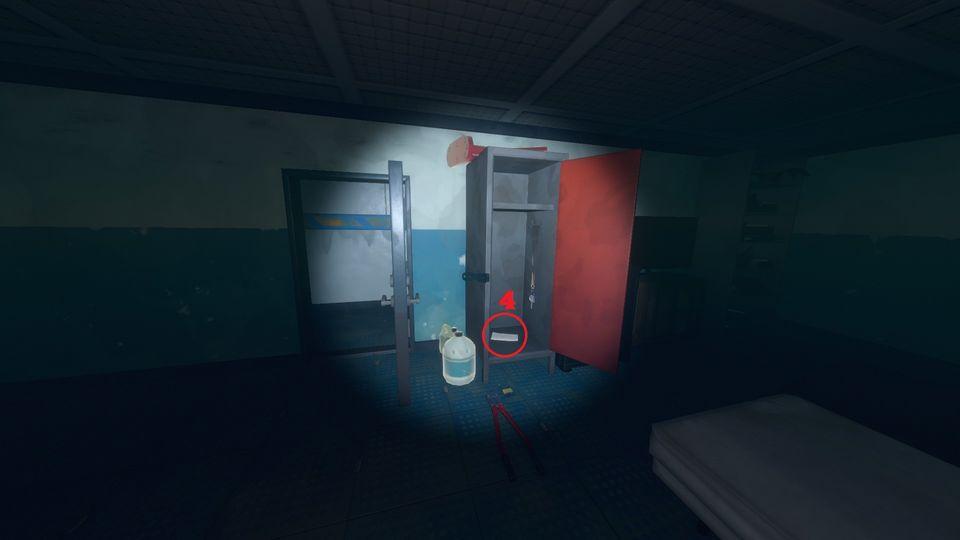
The 5th note is on the 1st Floor, in the Dance Hall, next to where you find the bullet. =>[TRAVEL LOG OLOF As I’ve suspected the crew is completely incompetent.] – Page 9
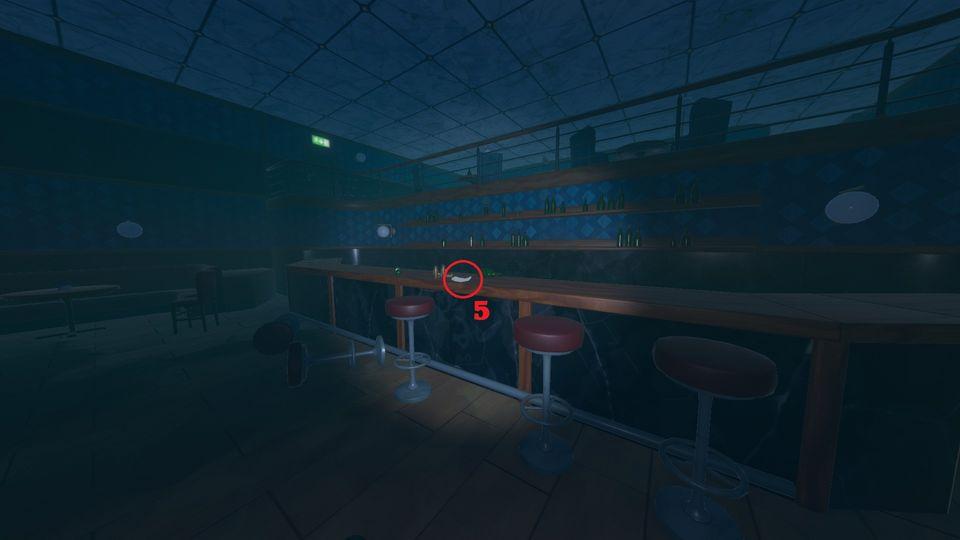
The 6th note is on the 2nd Floor, in the dining room, on a table next to the Four Digit Code. =>[TRAVEL LOG OLOF These ‘lurkers’ have potential.] – Page 10
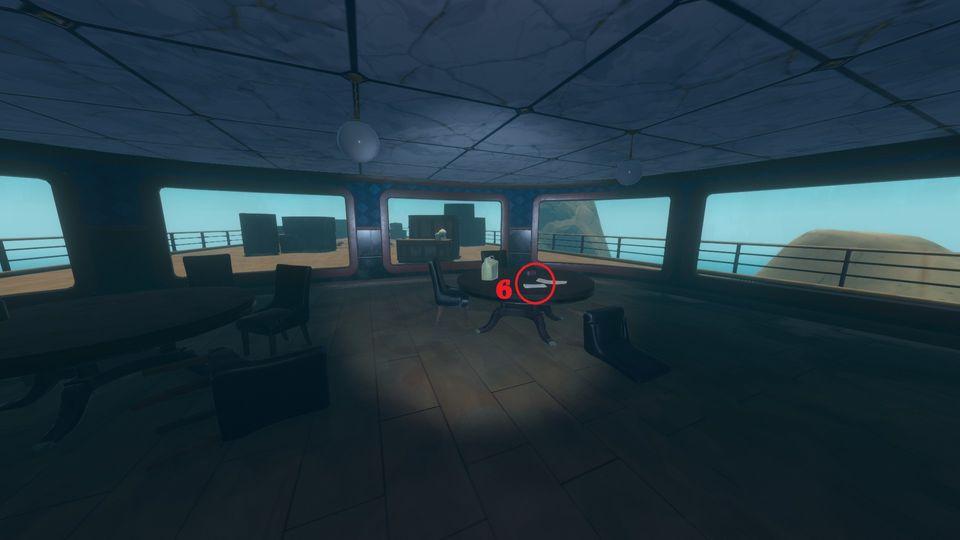
The 7th note is on the 4th Floor, on the bed with the lighter, behind the huge bookshelf. =>[(Transcribed) [The ship’s hull grinding against solid rock]] – Page 12
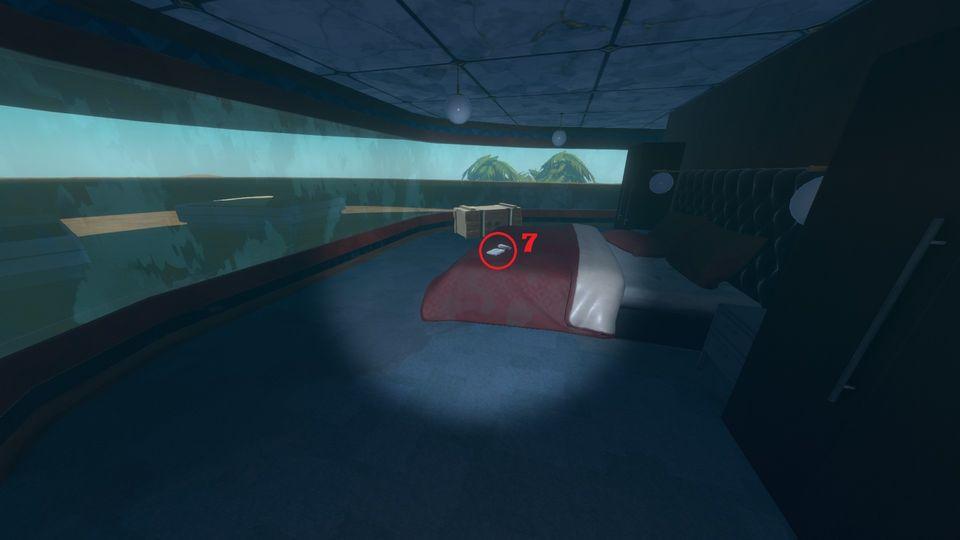
The 8th note is on the 1st Floor, on a desk in Cabin 2 (it has a big 2 next to the door). =>[(Transcribed) (Hanne) – “But what does that mean? You can’t just fire them.] – Page 11
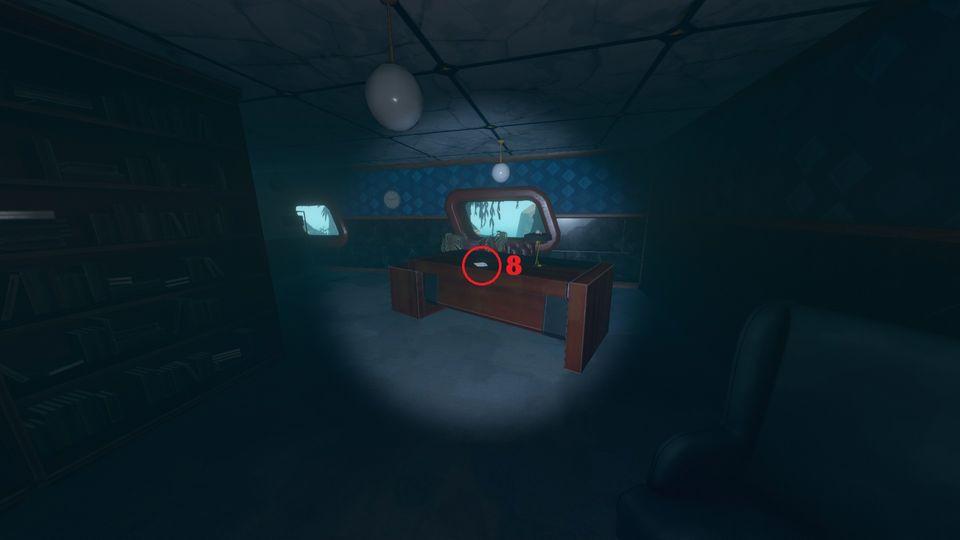
The 9th note is on the 1st Floor, in the locked chest inside Cabin 3 (it has a big 3 next to the door). You can open the chest with the Four Digit Code you found on Floor 2. =>[(Transcribed) (Captain) – “Knocking” “Wilksirom, it’s urgent. There’s mist now.] – Page 11
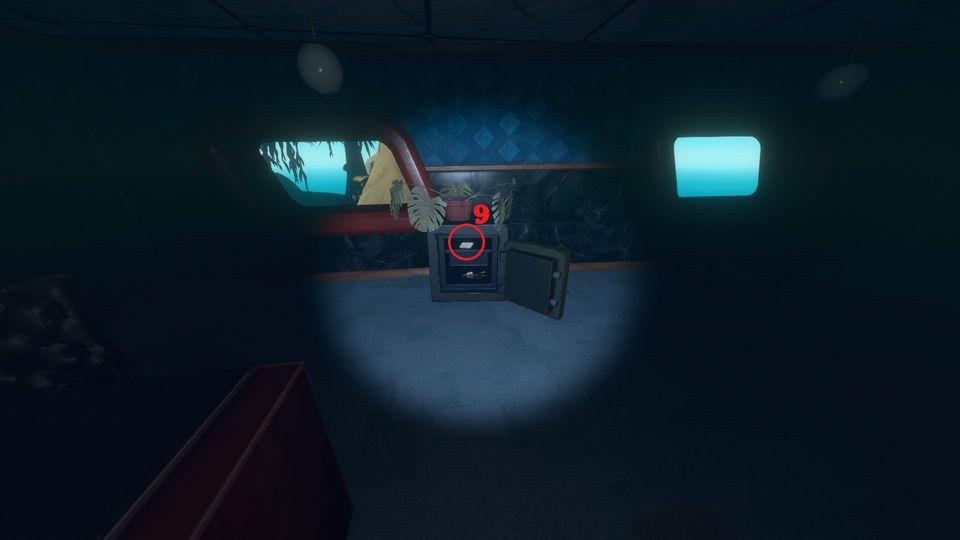
The 10th document is on the 3rd Floor, on a desk, in a room blocked by a fridge. To remove the fridge, you need to craft a car jack in the boat’s hold by combining 5 mechanical parts scattered around the boat. =>[CITIES IN THE BLUE calling the cost of the project’s realization…] – Page 8
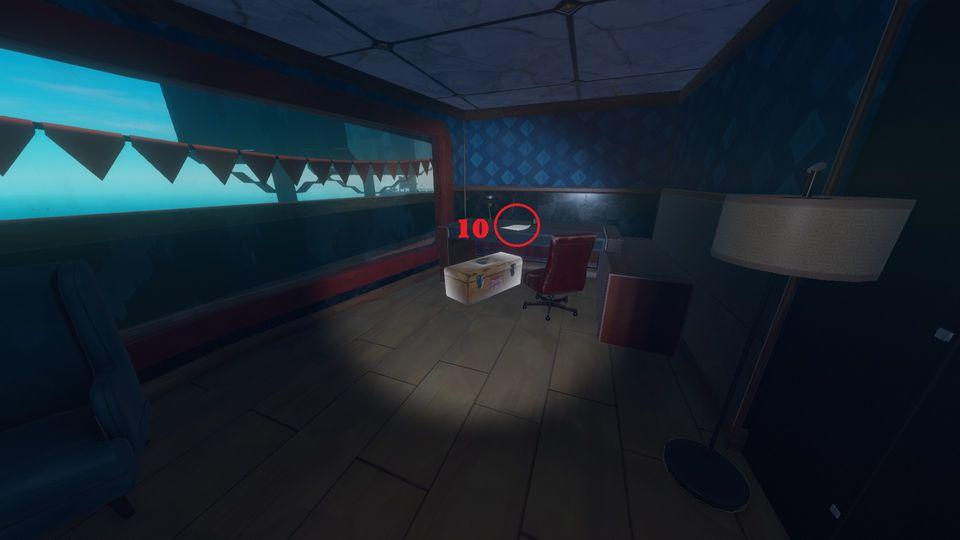
The 11th note is on the last floor, on the steering wheel. The room is blocked by a locked door: to open it you need to craft a bomb in the boat’s hold by combining 1 electrical wires (locked Chest, 3rd Cabin, 1st Floor), 1 lighter (on a bed, 4th Floor), 1 gas tank (on a kitchen counter, Kitchen, Boat Hold) and 1 bullet (on a bar counter, Dance Hall, 1st Floor). =>[Balboa ?! #….] – Page 12
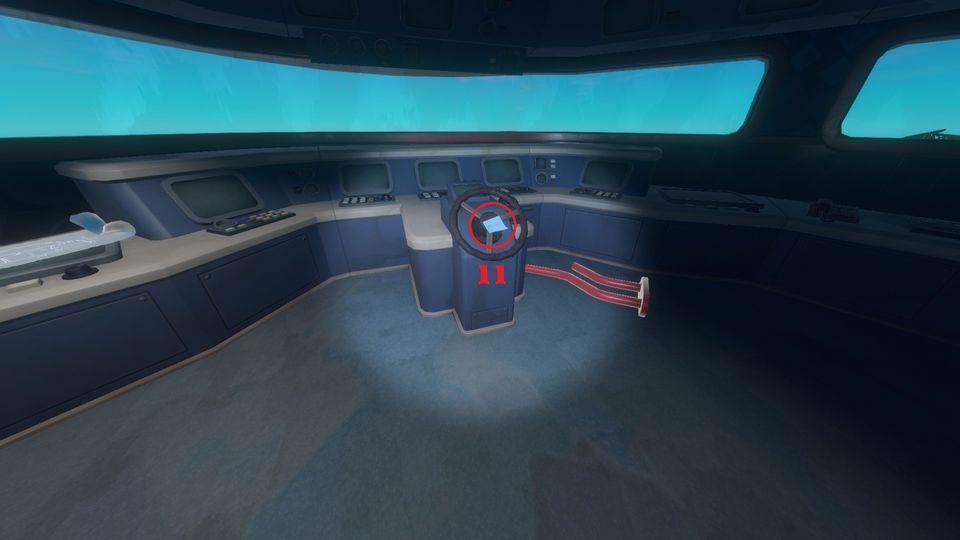
The 2 blueprints (Steering Wheel and Engine) are on the last floor of Vasagatan. The room is blocked by a locked door: to open it you need to craft a bomb in the boat’s hold by combining 1 electrical wires (locked Chest, 3rd Cabin, 1st Floor), 1 lighter (on a bed, 4th Floor), 1 gas tank (on a kitchen counter, Kitchen, Boat Hold) and 1 bullet (on a bar counter, Dance Hall, 1st Floor).
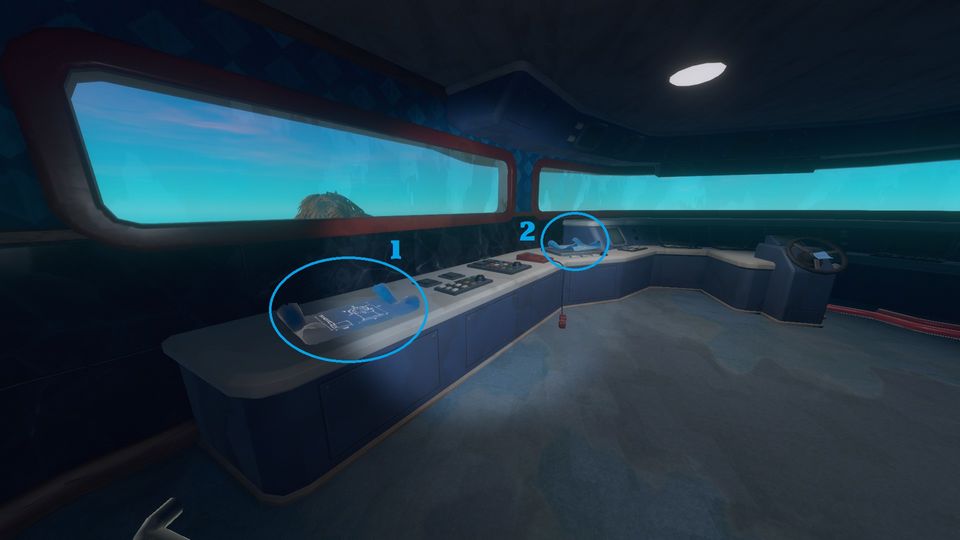
Balboa Island is supposed to be against the wind, so use the blueprints you’ve found in the boat to craft some Engines and a Steering Wheel, that will allow you to reach your destination faster. Don’t worry about fuel for now, you can use wood instead to power the engines. Remember that you need 1 Engine for 100 Foundation blocks.
- There are 13 documents .
- There are 4 blueprints to find, one for the Machete, one for the Fuel Tank, one for the Pipe and one for the Biofuel Refiner.
This time, to get the next coordinates you need to activate each Radio Station (there are 3 marked 2, 4 and 6), there’s a big lever in each to turn it on.
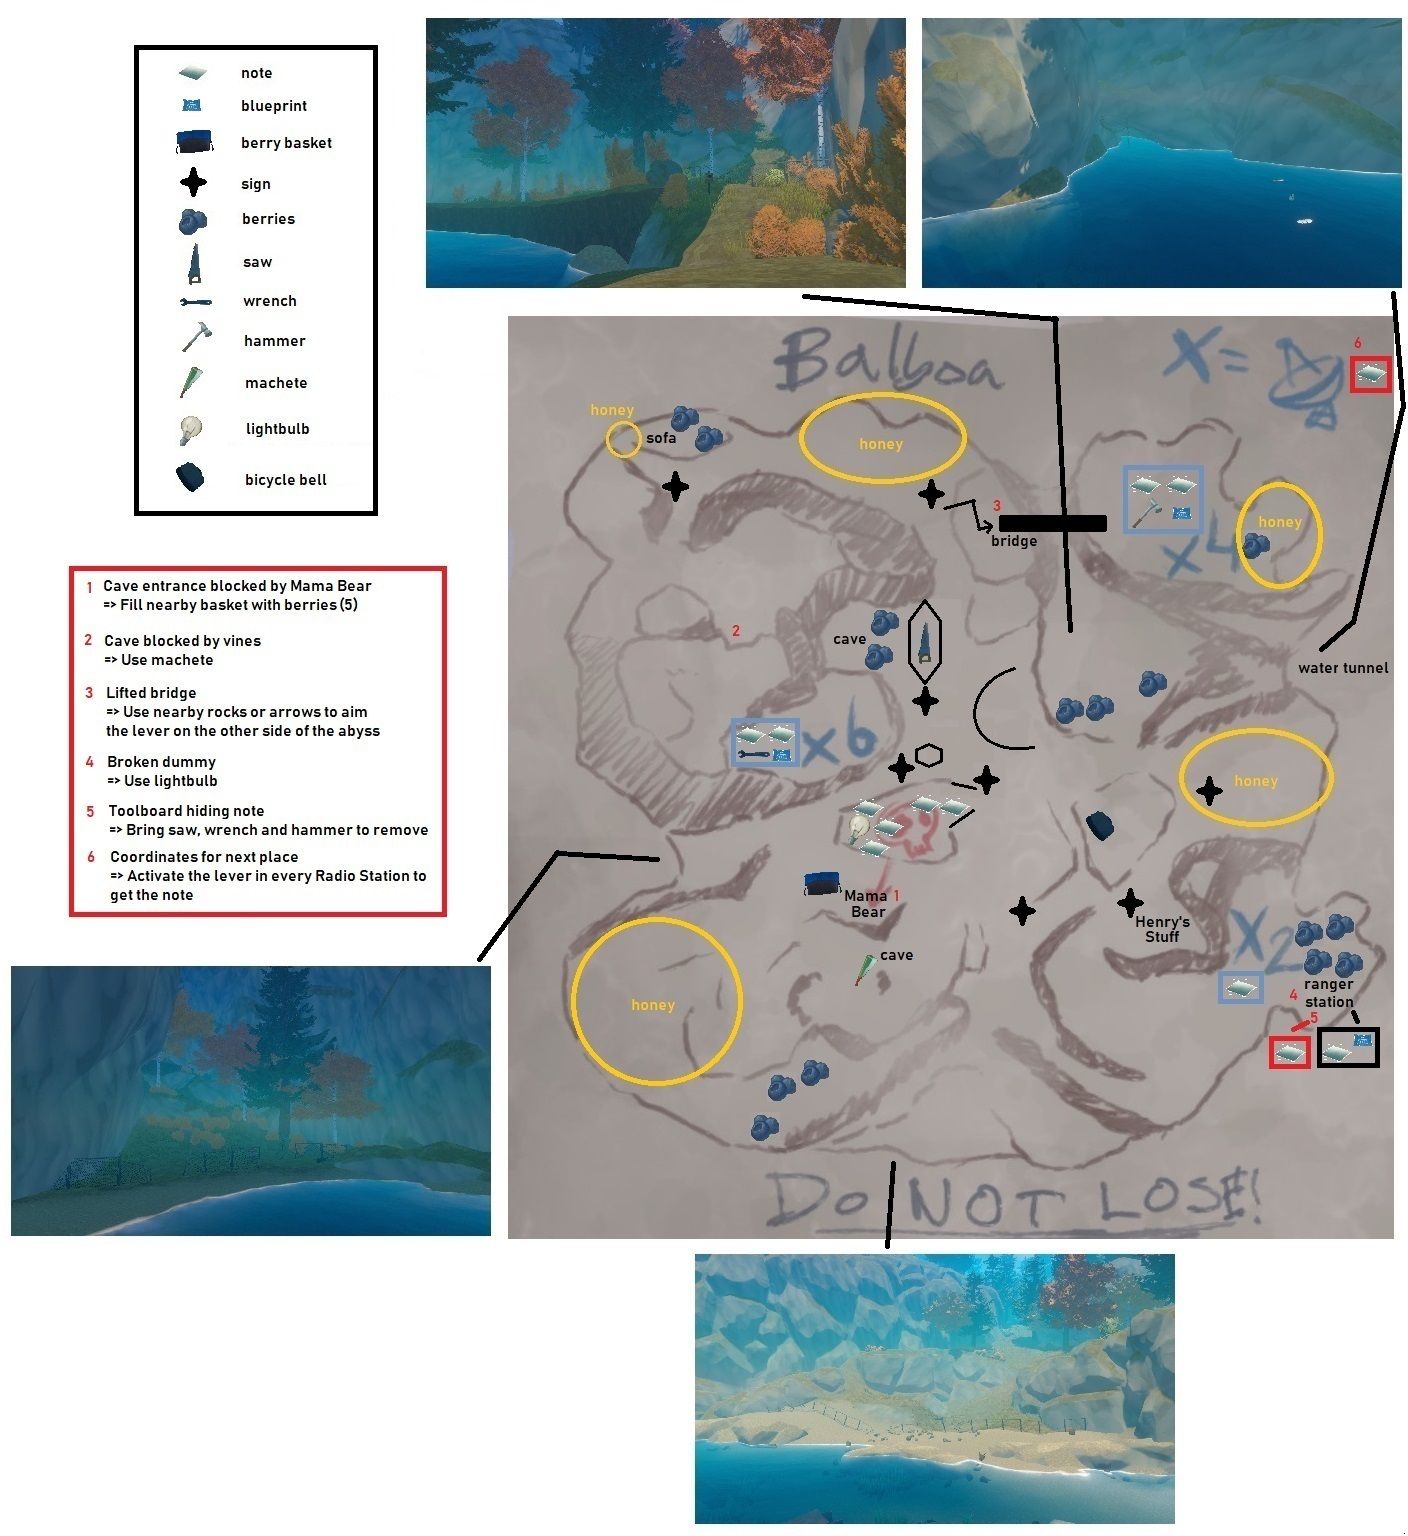
Arriving at the Island : There are 4 ways to enter the island and 3 starting points. A beach west, a beach south and a water path north ( that will also be your starting point if you enter through the water tunnel east ).
Center Island => Pick up at least 5 [Berries] around the island, there are many to be found. => Use the [Berries] on the [Basket] near Mama Bear’s cave to distract her ( the huge sleeping bear in the middle of the island ). => Now that Mama Bear is distracted, go inside the cave and pick up the crate, there’s the [Machete] in it! => Don’t forget to check out the big hill facing Mama Bear’s cave, there are 5 [Notes] on it and the [Lightbulb] . => There’s a hill on the left when climbing towards Radio 6 and 4. There’s a locker on it with [Bruno’s Saw] inside.
Radio 6 => Follow the signs until you reach a tunnel blocked by vines. Use your [Machete] on them to free the way. Radio 6 is on the other side of the tunnel. => There’s [Bruno’s Wrench] in the entrance of the Radio Station, on the left, on a counter. => There are 2 [Notes] inside the Radio Station. Both on a desk, but not the same. => There’s also a [Blueprint] next to a [Note] , on a desk. => Don’t forget to switch the lever at the end of the room! If it’s the 3rd lever you activate, 1 being in each Radio Station, you will receive a [Note] with the coordinates for the next story place).
Radio 4 => Follow the signs until you reach a precipice. Other the other side you can see a raised bridge with a lever next to it. Shoot the lever with an arrow to lower the bridge (you should be able to hit it with a stone, but it’s really hard). => There’s a [Blueprint] on your left, on the wall when you enter the Radio Station. => There are 2 [Notes] , one next to the [Blueprint] on the wall, on the left when you enter. And one on a stool next to a bookcase. => There’s [Bruno’s Hammer] on a shelf next to the big screen. => Don’t forget to switch the lever at the entrance, on the left when you enter! (If it’s the 3rd lever you activate, 1 being in each Radio Station, you will receive a [Note] with the coordinates for the next story place).
Radio 2 => Follow the signs until you reach a path filled with some kind of yellow liquid. Jump on the crates to reach the other end. Careful the crates sink when you touch them, so hurry. => There’s 1 [Note] in an open locker. => Don’t forget to switch the lever at the entrance, on the right when you enter! (If it’s the 3rd lever you activate, 1 being in each Radio Station, you will receive a [Note] with the coordinates for the next story place).
Ranger Station => Follow the signs for Radio Station 2, it’s just next to it. When you reach a path filled with some kind of yellow liquid. Jump on the crates to reach the other end. Careful the crates sink when you touch them, so hurry. => There’s a dummy at the entrance, you can give it the [Lightbulb] you found on the big hill facing Mama Bear’s cave. => There’s a [Blueprint] on the table, on the left when you enter. => There’s a [Note] in a small room at the back, on a mattress. => There’s a board with tools on it, on the wall, on the right when you enter. Use the 3 tools on it to make it fall and reveal another [Note] ( [Bruno’s Saw] was on a hill, on the left when climbing towards Radio 6 and 4; [Bruno’s Wrench] was in Radio 6; and [Bruno’s Hammer] was in Radio 4).
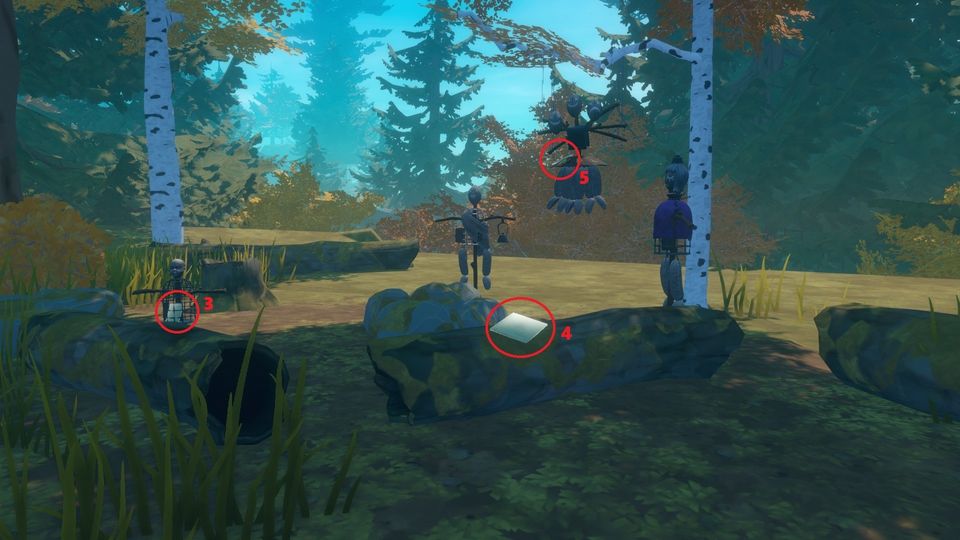
The 1st and 2nd documents are on the path that climbs a hill. The said hill is facing Mama Bear’s cave. =>[IT’S DONE…] – Page 17 =>[FATHER HAS A NEW…] – Page 17
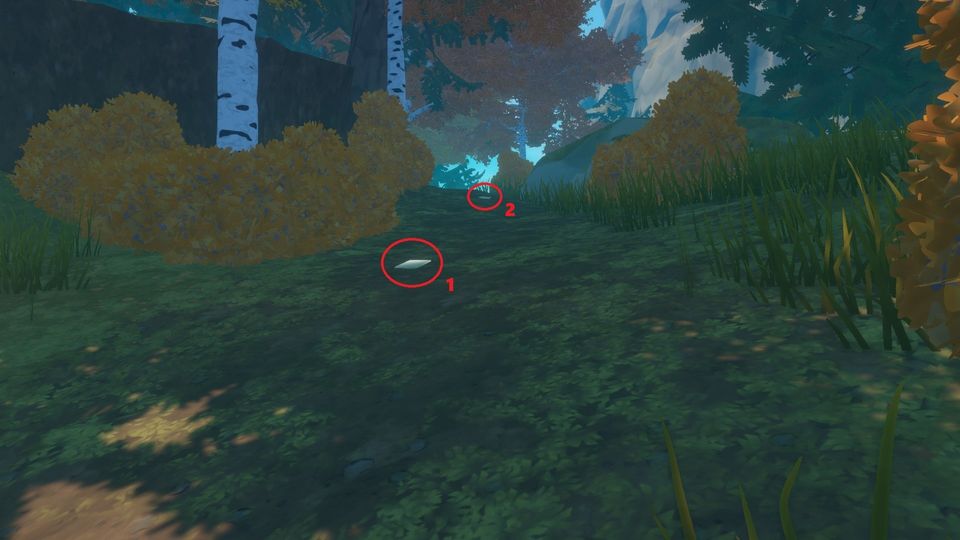
The 3rd , 4th and 5th documents are at the top of the hill where you found the first and second documents. There’s one on a tree stump laying on the ground, one inside a mannequin and one on a hanged mannequin. =>[FATHER HAS TO MAKE…] – Page 17 =>[NOT ENOUGH BOAT…] – Page 18 =>[THE GUILTY LAY RESTLESS…] – Page 18
The 6th document is inside Radio 6, on a desk. =>[7th Entry…] – Page 17
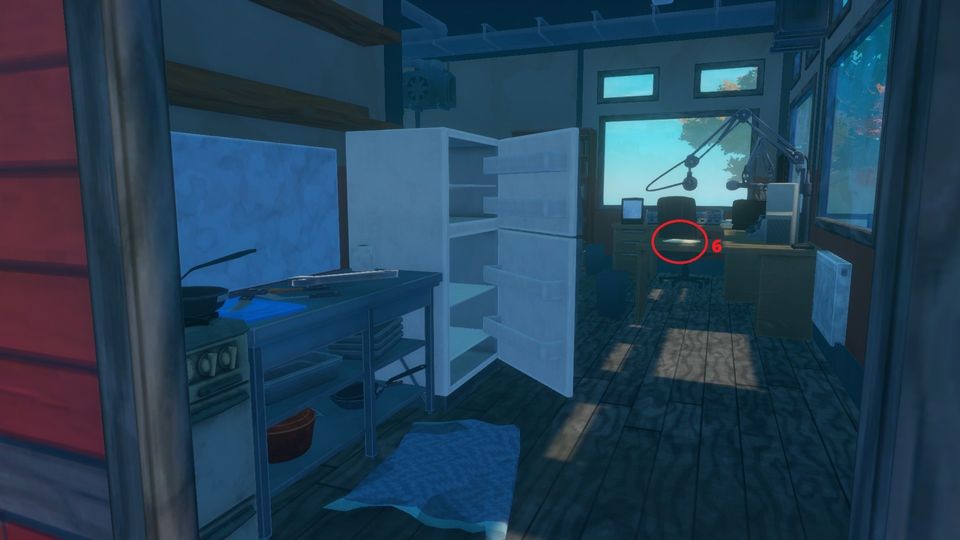
The 7th document is also inside Radio 6, on another desk. =>[FATHER MADE HIS MIND…] – Page 15
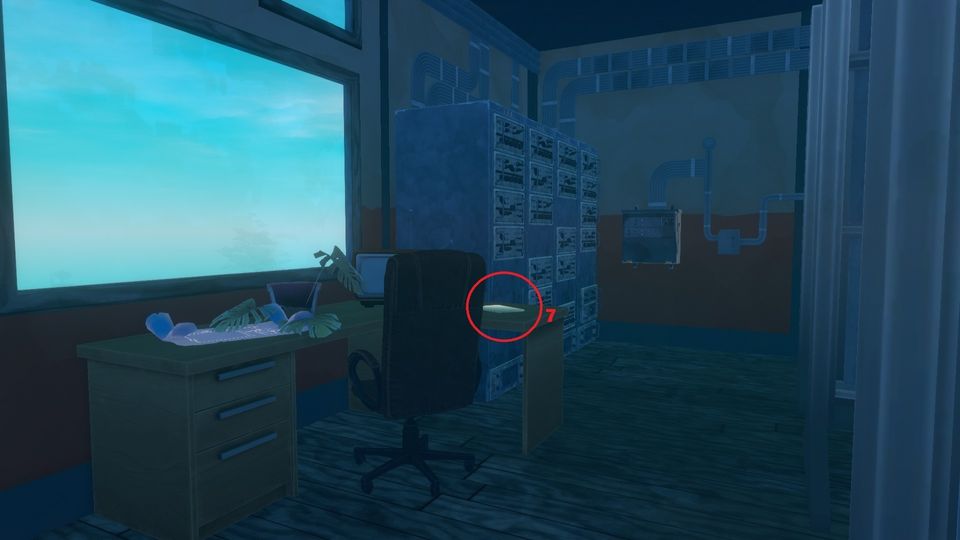
The 8th document is inside Radio 4, it’s a map between a lever and a blueprint, on a wall. =>[Map : DO NOT LOSE!] – Page 18
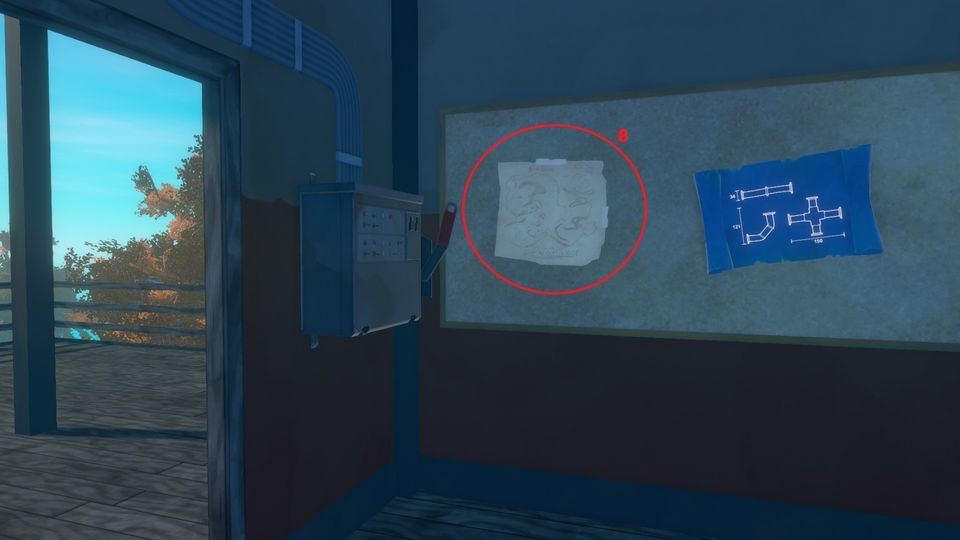
The 9th document is also inside Radio 4, on a stool between a bookcase and a desk. =>[4th Entry…] – Page 16
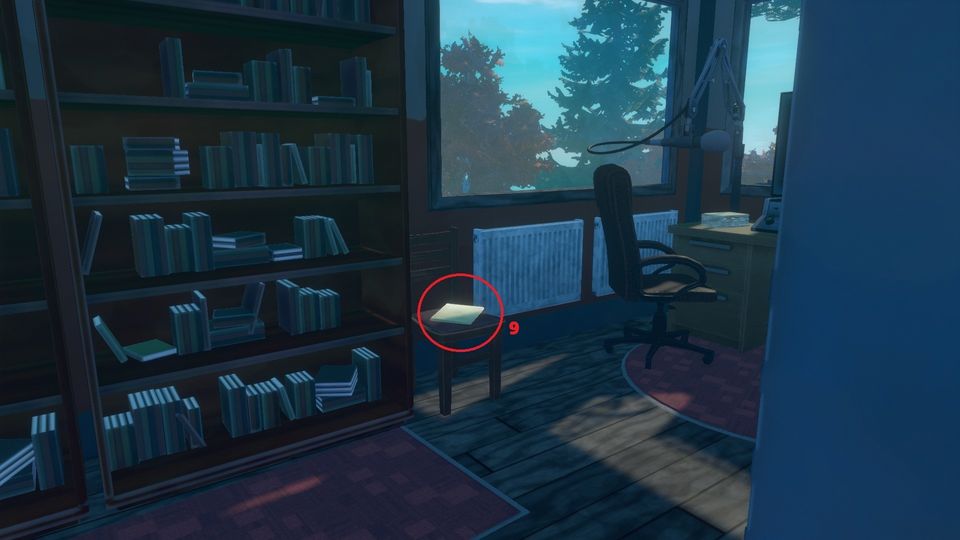
The 10th document is inside Radio 2, inside an open locker next to a desk. =>[1st Entry…] – Page 15
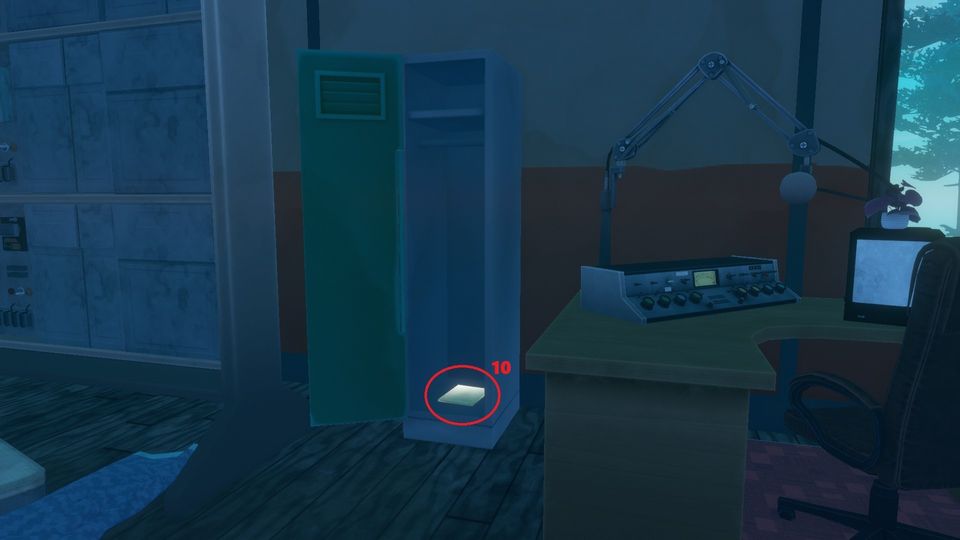
The 11th document is inside the Ranger Station, in a dark room, on a mattress. =>[SCHEDULE…] – Page 15
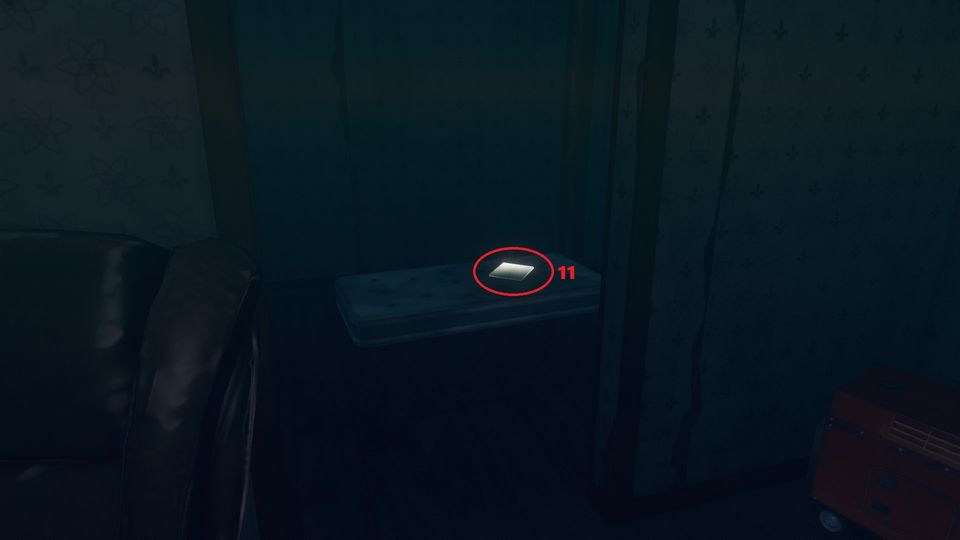
The 12th document is also inside the Ranger Station, hidden behind a toolboard. You need to bring 3 tools to this toolboard to reveal the note ( wrench is in Radio 6, hammer in Radio 4 and saw on a hill next to the path (on the left when climbing the path) leading to Radio 6 and 4 ). =>[Picture : MERRY CHRISTMAS…] – Page 16
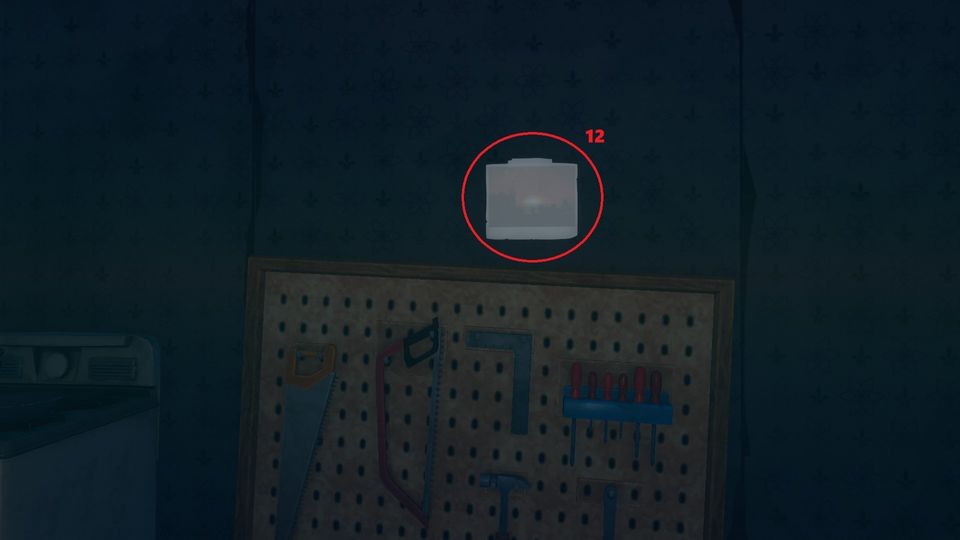
The 13th document will be revealed when you have activated all 3 Radio Station, the coordinates will appear on the screens inside each Radio Station and the corresponding note will automatically be added in your journal.
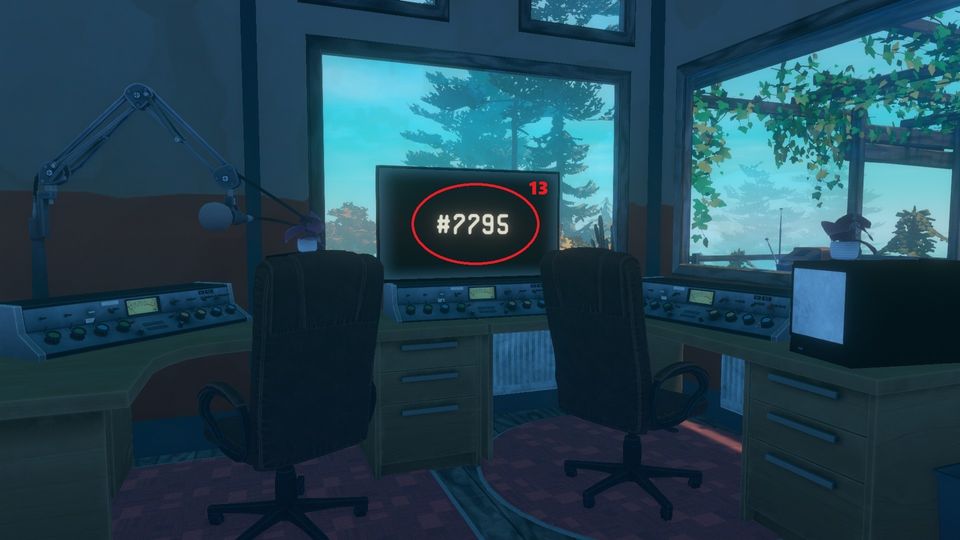
Remember that you discover the blueprint the moment you pick it up, so you can throw it away after that. You’ll just have to finish the research in the research table without the blueprint.
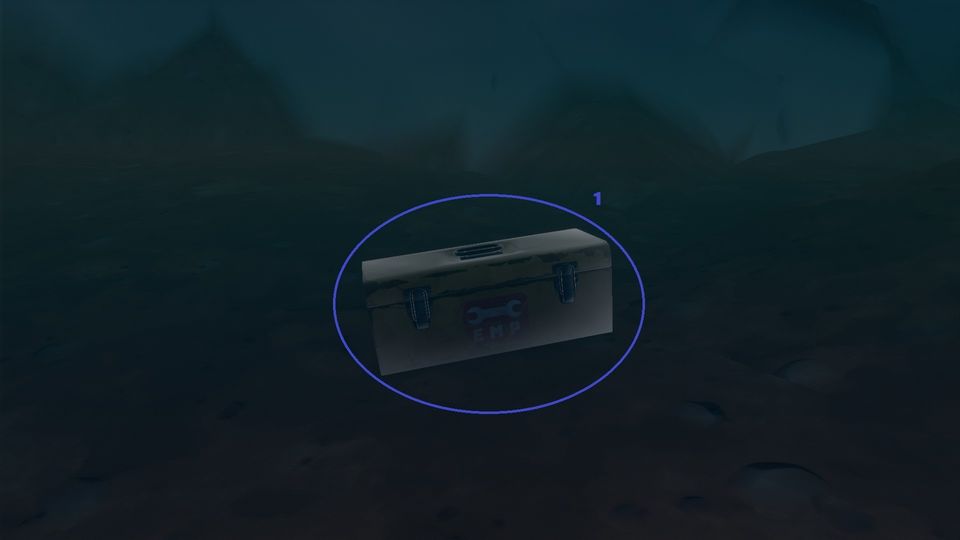
- The 1st one (Machete) is in Mama Bear’s cave, in a crate with EMP written on it.
- The 2nd one (Fuel Tank) is in Radio 6, on a desk.
- The 3rd one (Pipe) is in Radio 4, on a wall.
- The 4th one (Biofuel Refiner) is in the Ranger Station (next to Radio 2), on a table.
Leave a Comment Cancel reply
Follow Polygon online:
- Follow Polygon on Facebook
- Follow Polygon on Youtube
- Follow Polygon on Instagram
Site search
- What to Watch
- What to Play
- PlayStation
- All Entertainment
- Dragon’s Dogma 2
- FF7 Rebirth
- Zelda: Tears of the Kingdom
- Baldur’s Gate 3
- Buyer’s Guides
- Galaxy Brains
- All Podcasts
Filed under:
- Raft guides
Raft Temperance story island walkthrough
Snowmobile around Temperance and cleanse the island
Share this story
- Share this on Facebook
- Share this on Reddit
- Share All sharing options
Share All sharing options for: Raft Temperance story island walkthrough
/cdn.vox-cdn.com/uploads/chorus_image/image/71009364/ss_7e366c948ed3847f33693cebd23aaaf6458cbf46.0.jpg)
Temperance, the seventh story island in Raft , is an icy island inhabited by polar bears. Snowmobile around the island to find an observatory, an igloo village, and a research facility. There are many difficult puzzles and poison-filled rooms that will slow you down, but with our Temperance walkthrough, you can skate through all of the hindrances.
Observe the constellations to open the locker
Make your way to Temperance’s observatory. As you walk towards the entrance, the icy floor will collapse underneath you. Swim through the frozen cavern and defeat the anglers until you reach the ladder to climb into the observatory. After entering, find the constellation notes scattered on each floor.
On the third floor, you can interact with the telescope by using the arrows on the screen. Look for the constellations from the notes that you picked up earlier, and count the number of stars in each constellation. The number of stars corresponds to their respective number in the locker code. The constellation order (Bird, Poison-Puffer, Hook, Raft) can be found in your journal.
If you’re having trouble, input the code 5 - 9 - 6 - 4 into the locker to open it, and collect the Selene Key and Advanced Anchor Blueprint from the locker.
Collect electrical wires from radio towers
:no_upscale()/cdn.vox-cdn.com/uploads/chorus_asset/file/23646852/moZKXrd.jpeg)
Exit the observatory and proceed to the right. Follow the trail of radio towers, and collect the electrical wires until you arrive at the igloo village. Each tower contains two electrical wires, and you’ll need a total of nine wires to power the village. Use the snowmobiles to quickly travel to and from radio towers, but watch out for polar bears that hang around the radio towers and snowmobile stations. You’ll have a total of eight when you arrive, so collect two more at the radio tower just outside of the town. After you collect nine electrical wires, return to the igloo village to restore power to the town.
Light up the town
:no_upscale()/cdn.vox-cdn.com/uploads/chorus_asset/file/23646855/C6B7E6Y.png)
Supply electricity to the igloo village by connecting the generator to each igloo with the electrical wires. Use the image above for guidance. After opening the door to the central building, collect the blowtorch on the upper floor.
Collect control rods in Laboratory 2
:no_upscale()/cdn.vox-cdn.com/uploads/chorus_asset/file/23646860/JDEByBy.jpeg)
Head towards the Selene Research Facility, which has green light emitting out of the top of the building. Melt the frozen keyhole with the blowtorch and open the entrance using the Selene Key. Arriving at the main console will reveal that you need three control rods to progress.
Put on a hazmat suit and quickly head into Laboratory 2. There will be elements on the wall and computers throughout the lab. Find which atomic numbers you must memorize by looking at the computer screens. Be wary of how long your hazmat suit will last by looking at the indicator on the bottom of your screen. If your hazmat suit is running low, return to the central room and equip a new hazmat suit. Swiftly input the atomic numbers into their respective computers before the timer runs out to open the next door.
If you wish to open the gate quickly, here are the elements and their corresponding atomic numbers
Collect the control rod in the corridor, and proceed to find another hazmat suit. In this next room, you’ll have to spin a valve to unlock the next door, but roaches will spawn as the valve is being turned. Defeat the roaches and finish spinning the valve to collect the next control rod.
Redirecting lasers
To enter Laboratory 1, turn on the wall-mounted laser, and adjust the mirror until the laser is placed onto the door’s power source. The door will unlock to reveal a hallway with another hazmat suit. Equip the suit and enter the laboratory to find another laser puzzle.
Power up the laser and rotate the mirrors around the room to reach the door’s power source. Utilize the mounted mirrors to direct the laser towards the other side of the room. Use the image below as guidance if you’re having trouble.
:no_upscale()/cdn.vox-cdn.com/uploads/chorus_asset/file/23646863/tVAqkSN.png)
Collect the control rod in the next room and move forward to return to the Control Room. Place the control rods into their slots and pull the lever at the main console. Pick up the Reactor Key and unlock the Reactor Room.
Turn the wheels to purify the Reactor Room
Wear the hazmat suit and enter the Reactor Room. Similar to the last valve room, you’ll have to spin three on the reactor to unlock the door as roaches spawn around the room. Eliminate the roaches as you turn the valves to cleanse the Reactor Room.
Move forward through the unlocked door to find the Utopia Code and the Electric Smelter Blueprint . Interact with the computer on the side of the room to unlock Shogo , the last playable character in Raft . Return to your raft and head off to the last story island, Utopia .
The next level of puzzles.
Take a break from your day by playing a puzzle or two! We’ve got SpellTower, Typeshift, crosswords, and more.
Sign up for the newsletter Patch Notes
A weekly roundup of the best things from Polygon
Just one more thing!
Please check your email to find a confirmation email, and follow the steps to confirm your humanity.
Oops. Something went wrong. Please enter a valid email and try again.
All riftstone locations in Dragon’s Dogma 2
Pokémon Go ‘Glimmers of Gratitude’ Shiny Shaymin Masterwork Research guide

Unsure if Star Wars Jedi: Survivor is worth $70? How about $29.99?
Dragon’s Dogma 2’s first patch lets you start a new game without deleting your save first

What to know about the MonsterVerse before Godzilla x Kong: The New Empire

- Dragon’s Dogma 2 guides, walkthroughs, and explainers
All Sphinx riddles and solutions in Dragon’s Dogma 2
Raft: Caravan Town Walkthrough
From gathering battery charger or zipline parts to unlocking the Mayor's Chest, here's a complete guide to Caravan Town in Raft.
Quick Links
How to kill the bird, finding the battery charger parts, how to make the zipline tool, getting the mayor's chest key.
Caravan Town, a shoddy attempt to rebuild civilization using old trailers and, ahem, caravans to line the cliff sides. It's the first time you've seen a desert so far in Raft , but that doesn't mean it's completely devoid of life. Patrolled by a rock-throwing bird, this area is densely packed with resources and story information — if you can get your bearings in the ramshackle town.
RELATED: Raft: All Juicer Recipes
The White Screecher , once locked on to you, won't stop chucking rocks your way. You have a decision to make even before you step off the raft — do you put up with the constant harassment, or do you dispatch the bird menace?
Let's be honest, you don't want to be jumping from caravan to caravan, solving environmental puzzles, and looting to your heart's content with a hyper-aggressive flying demon after you. You're going to need to get rid of the screecher, and to do that, you're going to need a bow.
To craft a bow, you'll need:
And some arrows:
Each instance of crafting arrows adds six to your inventory, so it may be the case that you need to do this multiple times. The screecher has 100 hit points , and with each stone arrow you craft dealing ten points of damage, it doesn't take a maths whizz to figure out that you'll need to land ten arrows to down the bird.
It will fly away from you to pick up a rock, then fly towards you and drop the rock where you're standing. The strategy here is simple: as the bird flies towards you in a straight line, let loose with your arrows, once you hear the stone drop, quickly run in any direction. Rinse and repeat, and you're free to explore the island uncontested.
Now that the unpleasantness is over with, it's time to push on with your vague objectives. Entering the town via the docks is the way to go here. Looking around the dock area you should notice a building signposted Port Office. I nside, you'll find a battery charger part .
Make your way up the path through the caravans until you reach a blue and white striped caravan with a ladder to its side. Climb this ladder and you'll find the second battery charger part on top.
Make your way further up the makeshift path and you'll come to a marketplace . You'll notice the signs of the merchants trying to sell their wares, although this seems long abandoned. Climb onto the market caravans , and you'll see a ladder leading up to a flat part of the rock, the last battery charger part is up there.
All of these caravans have drawers and cupboards you can open and search through. It may be your preference to do this as you progress through the story, or come back once you've completed the island to hoover up anything that isn't nailed to the floor.
Next, you have to collect parts in order to create a tool, to use the various zip lines that streak the sky. From the market, find the red and blue caravan and you'll notice there is a water pump behind it. Take a second to use the pump , and you'll notice it shoots water out in the general direction of the pipe below it.
The puzzle here is to adjust the angle of the nozzle of the pipe below, so it catches the water. Do this for the pipes below also , so whenever you activate the water pump it will fill the well at the bottom .
Once the well is sufficiently filled, you'll be able to grab the zipline tool part .
There is a bridge with some pieces missing to your right, near the building with the red flag. Head across this bridge and down , you'll notice a bicycle with a hose attached.
For this next area, you're going to be using the makeshift oxygen supply to swim deeper than you've ever been before , so get ready. If you have the flippers item researched, it might be worth taking the time to craft a pair now.
Follow the hose from the surface, it will take you to several containers, each of which has a pocket of air, so you can get your breath. Once you've reoriented yourself and filled your lungs, go back down and keep following the line .
There are several poisonous puffer fish in this area, you can take them out with your bow of melee weapons, but it is safer to just swim close enough so they being to inflate. Once they reach critical mass, they will explode. Bait, then swim away to safety.
The last container you find will house a zipline part, the infirmary key , and a blueprint for the metal detector.
Head back up to the broken bridge , this time crossing the whole way and coming to what looks like a red water tank propped up on four legs. This is a very unconventional-looking rocket, and it's going to be your job to set it off. To do this you'll need some explosive powder , obtainable by drying out some explosive goo in your smelter (you can loot explosive goo from the puffer fish in the previous section).
The rocket explodes shortly after taking flight. Jump down towards the debris below, where the last zipline part will be attached to a doll that was riding the rocket before its demise.
Head back to the building with the red flag; you'll be able to craft yourself a zipline tool and obtain the blueprints should you wish to craft more. Simply equip the zipline tool in one of the slots below your inventory, and you're good to go.
Once you have the zipline tool equipped, you're able to traverse the island using the many ziplines positioned atop the buildings. Take the one from the red flag building to the caravan marked as the infirmary . Inside you'll find a multitude of healing salves and the key to the Mayor's chest .
Back up to the red flag building again, but this time you'll want to take the zipline towards the caravan with the rather large MAYOR sign above it. Once inside you're able to place the battery charger parts you've found to obtain the battery charger blueprint, and also unlock the chest in the corner. Inside the chest are the blueprints for the engine controls and also the coordinates for Tangaroa .
It doesn't matter much to your progression, but make sure you pick up the rather spiffing top hat from the Mayor's table. Equip it using the slots below your inventory and take pride in knowing you're about 50% more swanky than you were before.
Once you have the coordinates for Tangaroa, you're free to leave the island and continue your journey. This place — while frustrating to navigate at times — is densely packed with resources, so it is worth taking some time to rummage through all the cupboards and drawers to pick up anything you may have missed.
Caravan Town is also a good place to capture chickens if keeping livestock is something you're planning on doing. They are a good source of feathers, eggs, and meat if you find yourself without food.
NEXT: Raft: How To Get Trash Cubes
- Walkthroughs
- The romance club
- Website advertising
All materials on showgamer.com are protected by copyright. Partial copying is permitted with an open (for search engines) link. ShowGamer (2015)
- ShowGamer.com /
- Walkthroughs /
Walkthrough Raft - game guide
Walkthrough Raft
Radio station.
To start the story, you need to make a receiver, 3 antennas and a battery.¹ When you turn on the receiver, an entry with coordinates will appear in your book, hammer them into the receiver and follow the blue mark on the radar.
Following the blue marker, you should find a radio station. Moor near the station and climb onto it.
- The first is under water, in a suitcase, near the door of room A-2.
- The second note is on the lowest floor, in room B-1, to the left of the red telephone.
- The third is on the second floor, in room C-1, to the left of the entrance, on the wall, it says "TRACE".
- The fourth entry is in the highest room, on the whiteboard. Does it have people written on it?
- The fifth is in the same room as the fourth, to her left, on the table.
The only important entry is on the board, on it are the coordinates of the next location.
At the top of the station, near the board, there is a blueprint for a headlamp.
When you reach the whiteboard, you will receive the [Is there a Utopia?] achievement.
If you pick up all the notes, you will get the [Radio Tower Historian] achievement.
Vasagatan [Yacht]
There are 13 notes on the location.
There are many locked doors on the yacht. To advance further, you will need to find tools, key cards, make a bomb. It's kind of a quest.
Walkthrough
One Mechanical Part is in the water, either to the left of the yacht or to the right.
Another Mechanical Part is on the yacht, in the pool.
The entrance to the Hold is located on the back of the yacht.
First on the way is a room with an engine. You can use the lever to turn on some of the lights on the yacht, but this is optional. On one table there is a note, on the other table there is a Crowbar and a Voice Recorder. Use the pry bar to open the next door.
Go past the first two doors. Go into the third room, this is the toilet, pick up the Red Key here.
Then enter the fourth room, this is the kitchen. There is a Gas Tank and 2 notes here.
Using the red key, open the door to the workshop. Grab the Mechanical Part here, it's on the shelf, and the Bolt Cutter on the table. Then return to the first door in the hallway.
Open the first door in the corridor to enter the staff room; watch out, there's a rat in here. Take the note on the table and use the bolt cutter to open the locker to find another note and the Blue Key.
Use the blue key to open the second door in the hallway to accessup to the stairs, climb it to the 1st floor.
Go left, there is a dance floor. There is a bar in the dance floor, there is a note on the bar counter, and there is a bottle, you can get a Bullet from it; there is a Mechanical Part on the dance floor.
Go up the stairs to the 3rd floor. Be careful, you may encounter rats along the way.
Pick up the key card on the stage and return to the 2nd floor. Be careful, along the way you will meet a rat.
Open the library with the keycard. Here you will find the Green Key.
Proceed further into the dining room. Here, on the table, there will be a 4-digit Code, and a Mechanical Part behind the counter. Then go up the stairs to the 4th floor.
Open the only door with the green key, be careful, there is a rat. Pick up the note on the table and the Lighter on the bed, it's behind the bookcase.
Then return to the 1st floor. As usual, a rat will be waiting for you along the way.
Go right to the cabins and enter the third room. Be careful, a rat will be waiting for you outside the door. Using the code, open the safe, it will contain 2 notes and Wires.
Exit the cabin and enter the warehouse, it is at the end of the corridor. The last Mechanical Part is in stock. Then return to the workshop in the hold.
Craft a Jack and a Bomb on different slavestables. Then go up to the 3rd floor. As always... along the way you will encounter rats...
Find an open door blocked by some kind of refrigerator, use the jack to move the refrigerator away. There is a note inside the room. Then go up the stairs to the 5th floor.
Blow up the locked door with a bomb, go down a bit so as not to take damage from the explosion.
In the room you will find 2 blueprints and 3 notes: the blueprints are to the left of the steering wheel; one note is on the helm, and the other two are to the right of the helm. A note on the steering wheel is needed to open the next story location.
- The first note is in the hold, on the table, in the room with the engine.
- The second one is on the same floor, in the staff room, on the table.
- The third is in the same room as the second, but in a locked cabinet. To open the locker you will need a bolt cutter, it is at the very end of the hold.
- The fourth and fifth notes are in the hold, in the kitchen, on different tables.
- The sixth note is on the deck, in the bar.
- The seventh and eighth entries are in the safe in the last cabin on the first floor. To open the safe, you need a four-digit code, the code is located on the second floor, in the dining room.
- The ninth note is on the table, in the cabin on the third floor. The entrance to the cabin is blocked by a heavy object, so get rid of it, pon?? will achieve a jack.
- The tenth is on the fourth floor, on the table.
- The last three notes are in the wheelhouse, scattered across the control panel. The door to the captain's cabin must be blown up with a bomb.
Entering the captain's cabin will unlock the [Bootleg Fireworks!] achievement.
Balboa (Balboa Island)
Balboa Island cannot be found by drifting; to swim to it, you have to deviate from the course. Use the blueprints found on the yacht and make a motor with a rudder, they will allow you to reach your destination faster. To refuel the engine, you will need a tree. Remember, for full speed you need 1 engine for every 100 foundation slabs. If you have, for example, 189 foundations, use 2 engines.
There are 13 notes and 4 drawings on the location. Drawing of a machete, fuel tank, pipe and biofuel processor.
Having activated all 4 radio towers, the coordinates of the next plot location will be displayed on the monitors. To activate the radio tower: switch the lever, it is located somewhere in the tower room.
Arriving on the island: There are 4 ways to get to the island and 3 points from where you can climb it. Through the beach in the south, in the west and from the northeast (There is a gorge in the north, and there is a water tunnel in the east, they lead to the island).
Center of the island:
Pick up at least 5 berries on the island, there are a lot of them.
- The first and second notes lie on tr??pinque leading up the hill. This hill is opposite the bear cave.
- The third, fourth and fifth notes are on the very hill, along the way where the first and second notes are located. One lies on a log, another is in a cage, and the last lies on a dangling scarecrow.
- The sixth and seventh notes are on two different tables on the 6th radio tower.
- The eighth note is hanging on the board near the lever on the 4th radio tower.
- The ninth note is on a chair near the bookshelf on the 4th radio tower.
- The tenth note is located on the 2nd radio tower, inside the locker opposite the desktop.
- The eleventh note lies on the mattress in the forester's house.
- The twelfth note is hanging behind the instrument panel in the forester's cabin. To get a note, you need to hang 3 tools on the panel. The saw can be found on the way between the 6th and 4th radio towers, on the left on the hill, it will be in the closet, it will say "shh, bear stash!". The wrench is in the 6th radio tower. The hammer is located in the 4th radio tower.
- The thirteenth note will be opened after activating all 3 radio towers, these are the coordinates, they will be displayed on the monitors on each radio tower. The note will automatically be added to your journal.
You don't have to drag the blueprint onto the raft, you can pick it up and throw it back. Anyway, in the desktop you will have the opportunity to study the drawing.
- Drawing??achete is located in the bear's cave, in a box labeled "EMP".
- The blueprint for the Biofuel Tank is on the table, on the 6th radio tower.
- A drawing of the Pipe hangs on the wall, on the 4th radio tower.
- The blueprint for the Biofuel Processor is located near the 2nd radio tower, in the forester's house, on the table.
The city under the dome
So first things first.
We sail to the city. We see that all the upper doors are closed.
But the lower gateway is open.
We enter it. (The screen is made after the passage!) Your doors will be closed) Open the door. We go and see a sign with pointers.
We need a "Cafeteria" room
Let's go to her.
We find her.
There will be 1 note inside.(1)
Also in the room nearby is a part from the generator, we pick it up.
We leave into the corridor through the same room.
We see behind the bars another part of the generator.
Turn left to pick it up.
We go to the end of the corridor, all the way to another grate, then turn right.
We go along the corridor, on the way we will meet the "rat" and find this detail.
After following the signs we head to the "Storage area", "Generator", "Plantation".
Inside we take the 3rd part of the generator.
Not far signs "Generator" and "Crane controls".
We go to them and you will see a ladder upward.
We see the generator, insert the found parts.
Everything, the generator is started, and light appeared in this room.
There is a crane control panel nearby. (Control is madeoh, not very convenient, you need to press separately "E" on each key to move or raise the block)
We need to make a passage to the Yellow Arrow. (according to the story)
The lines on the containers indicate the aisles.
Containers are only halfway up.
those. we pick up a nearby container and move it to an empty place.
We make it so that along the lines we have a passage to the Yellow or Red Arrow.
The red arrow indicates the passage to the "secret room".
Going into which we will be given an achievement.
Be sure to take Titanium ore and other amenities.
We make a passage to the Yellow Arrow.
Above the door says "Surface access"
We go along the corridor. (On the way we meet a rat)
We go into the room.
We select a note (2) and a drawing of a water pipe. (Red arrow)
We go up the stairs, we will be offered to open the hatch. (Green arrow)
We open it and as it turned out there is water in this room, and it floods the room in which we were. True, it is strange that then we will not be able to climb into this room.
It makes no sense to swim back, because for some reason the door closed there ?!.
To get out we swim to the Yellow Arrow.
We swim to the end of the corridor, rest against the door, open it.
PS: Look at the ceiling, there are air pockets in some places.
We see pointers to "Storage area".
We sail to the same room with containers.
Room "Plantation"
Now from-for the water we can go up there.
Red arrow - note(3)
Yellow - further down the story
White - The door leading to where we have already been. The "Loading bay" sign leads us back to the gateway.
We follow the sign "Plantation"
We go up the stairs.
We see the same room from the trailer.
Electricity will not kill you immediately and on the spot. It also deals damage over time like the goo on the First chapter island. Verified. "Elevator", "Surface Access" - follow these signs.
We turn right.
We see the first email. shield. It requires 3 Duct Tape.
One lies nearby, and a note (4) is nearby.
Nearby there is a room with 2 more duct tapes.
We pick them up, return to email. shield, apply tape.
We go into the open room.
Red arrow - to the output "Surface access"
Yellow - el. the shield responsible for the door shown by the green arrow.
For the shield you will also need 3 adhesive tapes.
We will collect them later.
And let's get back here.
Therefore, we follow the red arrow - Surface access.
This exit leads us to the city.
For the first time we will face the Robots.
They are destroyed for a short time, 4 arrows.
4 hits with a machete.
BUT this will need to be done, because after disabling them from the head, we take the Key Card for Tangaroa.
PS: After some time they come to life again, they can be disabled again and get a card.
It is needed to open doors and enter buildings.
Does the dome have 4 doors??ri leading outside.
*There is a note at the exit near one of the doors.(5)
*In the square near the statue (6)
You can go open all 4, run to the raft and throw off all the loot found.
Replenish stocks.
After all, we will continue to explore the buildings, and we will need a lot of space in the inventory.
We explore the city every building.
The whole point of research: the search for duct tape and coins "tokens"
There is an achievement with tokens. All you need is 30 of them. Then these can be spent in the machine.
Loot houses, apartments, rooms. Take a machete. Come in handy.
In total, you will need 12 adhesive tapes. (Including the ones we found in the basement.)
We collect, we return.
We open the room "ELEVATOR". Then follow the signs to go further. (Loading bay leads back to the gateway)
We find the elevator, we see that we are on the -4th floor.
We rise to 0. we open the doors to the city.
We go to 8. There are a lot of tokens in this building. We leave to the balcony, we rise to the floor above. We go into the building. Then through the roof window.
On the zipline we go to the neighboring building, we go in the window.
We go up a few floors, exit through the broken window and go along the zipline to the Main building.
We climb the stairs, we go in. Elevator
We rise to "2". We see the doors, the Note (7) and the drawing "Large storage" and the Combination lock.
We select the drawing "Electric Watermaker"
This note will tell you the code.
Just a hint??ka if you want to write the code yourself.
If you don't feel like guessing and just enter the code
There is a dump of the head.
We get an achievement.
Let's get into it.
* Drawing "Water tank"
*Collect the last 2 notes.
1 lies on the control panel.
2 in the form of a sticker glued
Get the record collection achievement
Congratulations, you have completed the Second chapter.
Varuna Point
So, wait for the update.
Prepare your gear for moving underwater.
Enter the found coordinates.
On the way, do not forget to study all the new items added to the game (there is a drafting table for this).
We swim up to the cherished point.
From afar you can see 2 skyscrapers sticking out of the water, in the middle of the ocean.
You can climb one (there is a construction crane on it) by scaffolding and bird nests.
Let me clarify one point. There is an achievement at the location, I'm sure it's buggy.
You need to find all the caches if you see the "G" symbol on the wall. MEANS SOMEWHERE NEAR THE STUDY.
We rise to the floor above, and on the excavator we find the first note.
On the excavator and scaffolding we climb even higher until we find a ladder. We climb it and see the control booth (open the door and they will require the key of the crane from you) and the cable on which you can slide on the zipline. We do nothing. We rise even higher, go along the only path and pick up the box, the first drawing and the second note.
Climbing even higher are you on??dete 2 more boxes.
Now we dive under water in the same building. We study in order, from top to bottom. We swim to the 1st upper floor. Pay attention to jellyfish. in the light of a spotlight, they sail away from the light in different directions, at this moment you have to swim. There is no need to worry about oxygen, there are plenty of air pockets (either look in the ceiling or bubbles come from the floor, swim up to them and voila), but fins are needed.
Second note. We swim straight to the end along the corridor. Door to the right (red arrow on the screen). The far door, there will be an inconvenient enemy and a part for the spotlight. Float up in the air pockets, there are also boxes and some loot.
Now we swim to the green arrow. In the near left room.
We swim, there will be an evil fish again.
Red arrow - Spotlight detail
Blue arrow - some loot.
We return to the first note, we swim to the right into the elevator shaft.
Up and we find ourselves in a place where there is a lot of oxygen =)
We study, look into each room, we find 3 more Parts for the spotlight. But we only need 4. Most importantly, look into the room indicated in the screenshot. (As soon as you exit the bodice shaft)
There will be a note that is required for the achievement. Naturally there will be not a benevolent small fish.
As soon as the spotlight has been repaired, a new path will open for you in the transition between buildings.
But before these studiesride these ruins near the jellyfish, there is a box and a hidden construction helmet (note that it may not be taken if the inventory is full).
we swim, and we have only one way. Complicated by the fact that there are many traps and scattered boards with nails that cause damage to the character. So be careful. In general, the location is simple, since the player is led by the handle, it is difficult to turn the wrong way.
We go until we find the "key to the vault", a note, and the drawing "Improved headlamp". Then we climb the adjacent boxes above and find a wall with the symbol "G" in one of the rooms. Us there (who would doubt). We jump in and find a drawing with a hint on the wall near the door.
We open the doors, we go out. Be careful here you are in for a surprise.
We dive, there are bubbles nearby, we collect some oxygen. We swim right along the passage to the gate. Which will break our "boss".
A small recommendation. If there are no fins and an oxygen tank, then it is better to return to the raft and make 2 sets. It will be much easier for you to deal with it.
I played on normal difficulty with leg armor. And it deals quite a bit of damage.
The whole difficulty is in moving on water and oxygen.
Congratulations, you defeated the boss and got the achievement for it.
We swim further, rise, explore the ruins.
we find the drawing "Wind turbine" and "crane key" (for our construction crane).
Is the background shining for you here?Right in the eyes, go into the light and rest against the stepladder, climb it.
There will be a pipe nearby, we go into it (if you climb onto it, you can see another short pipe in the neighborhood, there will be a box with loot in it).
We pass further, rest against the door and find ourselves in the upper passage (in the very place where the spotlight was turned on and the jellyfish were dispersed). Nothing else holds us here, we run to the crane. We insert the key, pull the lever. We dropped the load on the 2nd building and we can go on a zipline. We go down into this hole in the roof. Until we find a room with a note - the coordinates of the next island, the "Improved Battery" drawing. In parallel, we get an achievement for the records.
We set new coordinates and sail. Craft yourself some armor and a headlamp. To protect against bears. At night, you will come in handy because the island is large and you will spend a lot of time exploring it.
So, we get to the winter location.
The location is huge. But snowmobiles are kindly scattered here, which are not very convenient to manage. They even glide through the snow, but they are quite fast.
You will pay attention to the towers scattered throughout the island. For now, you don’t need to go / go to them (but if along the way, you can pick up cables from them. They do not occupy your inventory, but are shown in a notebook). Looking for a location with many domes Here we will loot the first tower and find the first note (green arrow).
On red??, bunker. With poisonous gas, we are not going there yet.
We make a detour on the towers, explore the island. Pick up the cables
There are 8 radio towers in total. 16 cables.
We return to the location with domes, and conduct electricity in turn.
In the course of conducting electricity, loot each house, there are few resources in them, tokens for a vending machine (they lie in the most unexpected places). One of the houses will be a "first-aid post". This is where the next note will be.
A few healing ointments.
We carry electricity to the main building.
We feel that we are great and we go into it.
On the ground floor there are crates, loot, and vending machines.
We rise to the second.
We pick up the drawing of the "Improved Biofuel Purifier" and the burner or "blowtorch".
Pick up tokens (I found 4)
And we're leaving.
In the course of our research, we find this building:
We go to him =) A note hangs on the iron gate, We take it.
We pass and find ourselves in the building.
In it we find 4 notes - hints.
2 story entries.
Several tokens for the machine.
And here is such an unusual control panel.
Nearby there will be a safe with a combination lock.
To him, we need to guess the password from the prompts.
Constellation posters on the walls will help you solve the puzzle.
If anyone is too lazy to guess.
We open the safe.
It contains: "the key to Sellena", Tokens, and a drawing.
We go further to the building on the mountain. Let's go to thecompanies.
For the panel on the right, we needed a blowtorch, after we melted the ice, we use the key. The gates open. We go down and study what is required of us. We take the record.
Of all the doors, only one is available to us. Next to it is a cabinet with chemicals. protection.
We put on a suit and go down ....
We solve the riddle with chemical elements.
The gateway opens. You can follow him without a suit.
We take the first control rod. and move on down the corridor.
You will find a cabinet with chemical protection and opposite it is a door behind which there will be a staircase down.
We put on uniforms and descend.
We turn the valve, but carefully there is an ambush.
We go to the right of the valve, we rise.
We find the 2nd control rod.
We follow. room. Turn on the lasers with the lever on the wall (green oval). Adjust the angle (blue oval). Until we break the panel on the door)
Next, we put on a chem. protection and go to the next laboratory.
That principle. lever, laser, rotate mirrors.
Here I will leave you to solve the problem, you need to do something yourself (:
Open the door, take the last rod and note.
We return to the beginning, insert the rods. Lever arm. Failure, a manual start is required (who would doubt it). The key to the reactor appears on the panel. (Door on the right)
Well, it must be so.
All valves must be activated again. It's strange, of coursebut oh well.
Keep in mind that spiders respawn all the time. Until you close the valves.
Don't forget chemical protection.
We are doing heroic work.
The gateway opens. Eeeee...
Let's free the dude.
We take the drawing.
The last note, with the coordinates.
By the way, there is another achievement that you can get. If you are careful not to do so.
You need......
Drown snowmobile
Congratulations, we have passed another island!)
To be continued...
More interesting articles

Capcom is interested in gamers' opinions.
Technology puts FPS on the backburner.

Stalker meets The Sims.

We'll have to fight aggressive robots.

Fans have nothing to worry about.
fiz tudo e o final foi pessimo..
Only numbers should be part of the codes


IMAGES
VIDEO
COMMENTS
Pick up the green key from the desk. Back up you go, now to the fifth floor. There is a door that requires the green key. This area is a rather large bedroom, and if you head towards the window there is a bed with a lighter you'll need to acquire. All the way back down to the bowels of the vessel again with you.
Boarding the Vasagatan and the First Floor. Anchor your Raft near the rear of the Vasagatan. Go to the rear of the ship and walk through a door that says "Authorized Personnel Only." Head down the tunnel and pull the lever on the right wall to turn a light on above a table.
Raft Yacht Guide.In this video I wanted create a walkthrough for the yacht/cruise ship.This is the second area of the story called Vasagatan. I wanted to cov...
Bring a cogwheel from the 1st puzzle. This time you need to make both scales reach the 3rd level. => Use the stairs on the right to put your cog on the scale then go on the other side to add bags to the other scale. => Bag order: add 5, add 1, remove 5, add 4, remove 1, add 2, remove 4, add 3, remove 2.
Raft: Vasagatan Walkthrough. The second story island is more of a story ship stuck in a lagoon. It's dark and dangerous, but there are plenty of notes and items to discover. The Vasagatan is a ...
Vasagatan is an Environmental Element in Raft, which contains both the Blueprint: Engine and Blueprint: Steering Wheel, as well as loose Plastic, Scrap, and several Loot Boxes with supplies. The wreck is situated in a small lagoon, located by following the receiver coordinates found in the Radio Tower. Access to the interior of the ship is via the rear. The interior is composed of many rooms ...
Raft: Vasagatan Walkthrough - Everything you Need to Know About the Cruise Ship. ... Sascha now deals a lot with role-playing games and is an expert on survival and RPG titles like Conan Exiles, Baldurs Gate 3 & Cyberpunk 2077. Related Posts. Dragon's Dogma 2: Expert Tips for a Smooth Start in the RPG. March 23, 2024 9 Mins Read.
Vasagatan is the second storyline location in Raft. It can be reached by finding the radio frequency on the Radio Station (the first location) and programming the receiver with that code. Follow the receiver until you reach this abandoned cruise ship…. Vasagatan is a cruise ship which was provisioned badly for a quick getaway from the ...
Let's play RAFT! In this episode of 'How To Raft', we play update 10 and explore the yacht and find all the notes, items, and chest placements.We hope you li...
We find a Cruise Ship in Raft. Throughout this episode we do a walkthrough on Vasagatan and how to clear the boat. This is an entire walkthrough of Raft in t...
Raft Cruise Ship (Yacht) Walkthrough Guide. Exterior: => Get 1 [Mechanical Part] in the swimming pool (on the yacht) => Go at the back of the yacht to enter the Hold. Hold: => First room, the Engine Room. You can use the lever on the wall to turn some lights on in the yacht but it's not necessary. There's a [Note] on a table and a [Crowbar ...
How To Reach The Vasagatan. The Vasagatan is the second story location you can reach after completing The Radio Tower. At the top of the Radio Tower, you'll find a white board with new ...
In this Raft Walkthrough and Story Guide, we'll tell you how to progress the story, find new islands, and unlock new objects for your Raft! Raft Walkthrough and Story Guide - Getting Started With the Story. Your journey will begin on a small 2x2 Raft with a Plastic Hook and not much else. You're going to have to get the basics of the game down first -- check out our Starter Guide to get a ...
IGN's Raft complete strategy guide and walkthrough will lead you through every step of Raft from the title screen to the final credits, including every collectible location, boss strategy and more.
Balboa Island — it's big, you will get lost, and it's full of bears. The story mission that takes place in Raft after Vasatagan sees you exploring a much more vertical landscape than you'll be used to, in an effort to restore power to the relay stations dotted across the area.. RELATED: Raft: Pro Tips For Getting Started Less of a maze than the beached yacht you just visited, Balboa Island ...
Build the Receiver & Antenna x3 blueprints. Reach Radio Tower. Get coordinates for the Vasagatan Yacht at the top of the Radio Tower. Blow open the wheelhouse of the Vasagatan. Acquire Balboa ...
Take some time to cut down and collect everything. The room to the immediate left contains two pieces of tape, while the room on the right has the last piece. Once all three pieces are in your inventory, head through the next door and use the tape on the device attached to the wall.
Use triangle wood foundations to make the point/bow of the ship (and I placed engines and anchor to help visuals) Use Wood Roof along the edges of the boat. The game will automatically do the bow of the ship as triangles and inverted triangles when using the roof build. Add the half pole structures for flooring.
Raft Chapter 1: Radio Tower, Vasagatan and Balboa Island.. Raft Chapter 1 Walkthrough Guide: All Notes & Blueprints. To begin the story, you need to craft a Receiver, 3 Antennas and a Battery [how to craft and use the Receiver].The moment you turn your receiver on, you'll receive a note with coordinates (4 numbers), enter them and follow the blue square that appears on the receiver's radar.
Fill up the water tank. Once the water pump has power, water will flow to three rotating pipe puzzles. Rotate each circle to align the pipes with the input and output on the outside rings. Repeat ...
Observe the constellations to open the locker. Make your way to Temperance's observatory. As you walk towards the entrance, the icy floor will collapse underneath you. Swim through the frozen ...
Caravan Town, a shoddy attempt to rebuild civilization using old trailers and, ahem, caravans to line the cliff sides.It's the first time you've seen a desert so far in Raft, but that doesn't mean it's completely devoid of life.Patrolled by a rock-throwing bird, this area is densely packed with resources and story information — if you can get your bearings in the ramshackle town.
One Mechanical Part is in the water, either to the left of the yacht or to the right. Another Mechanical Part is on the yacht, in the pool. The entrance to the Hold is located on the back of the yacht. Hold: First on the way is a room with an engine. You can use the lever to turn on some of the lights on the yacht, but this is optional.