
- Lines & Rigging
- Sailboat Standing Rigging

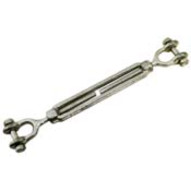
Turnbuckles

Hayn Marine Eye Toggle to Eye Toggle Turnbuckle 1" Pin 1" Jaw

Hayn Marine Eye Toggle to Eye Toggle Tubular Turnbuckle 1.0" Jaw 1.0" Pin

Hayn Marine Eye Toggle to Eye Toggle Tubular Turnbuckle 7/8" Jaw 7/8" Pin

Hayn Marine Eye to Swage Turnbuckle 16mm Wire 1.0" Eye

Hayn Marine Eye to Swage Turnbuckle 5/8"Wire 1.0" Eye

Hayn Marine Eye Toggle to Swage Turnbuckle 16mm Wire 1" Jaw

Hayn Marine Eye Toggle to Swage Turnbuckle 5/8" Wire 1" Jaw

Hayn Marine Eye Toggle to Swage Turnbuckle 14mm Wire 1" Jaw

Hayn Marine Eye Toggle to Swage Turnbuckle 9/16" Wire 1" Jaw

Hayn Marine Eye to Swage Tubular Turnbuckle 16mm Wire 1.0" Eye

Hayn Marine Eye to Swage Tubular Turnbuckle 5/8"Wire 1.0" Eye

Hayn Marine Eye Toggle to Eye Toggle Turnbuckle 7/8" Pin 7/8" Jaw

Hayn Marine Eye to Swage Tubular Turnbuckle 9/16"Wire 1.0" Eye

Hayn Marine Eye Toggle to Swage Turnbuckle 14mm Wire 7/8" Jaw

Hayn Marine Eye Toggle to Swage Turnbuckle 9/16" Wire 7/8" Jaw

Hayn Marine Left Hand Eye Toggle & Body Turnbuckle 1" Jaw 1" Pin

Gibb Open Body Turnbuckle Toggle/Toggle with 7/8 Pin

Gibb Open Body Turnbuckle with Fork & Toggle 7/8 Pin

Hayn Marine Left Hand Eye Toggle & Body Turnbuckle 7/8" Jaw 7/8" Pin

Gibb Open Body Turnbuckle 14mm & 9/16" Swage/Toggle 7/8" Pin
- Store Locator
- Sailing Gear & Navigation
- Sail Rigging
Wire Rigging & Turnbuckles
- Turnbuckles
- Wire Rope Clamps
- Standing Rigging
10 Products
Manufacturer.
- Apex Tool Group
- C.S. Johnson
Sail Rigging: Turnbuckles
JavaScript seems to be disabled in your browser. For the best experience on our site, be sure to turn on Javascript in your browser.
- My Wish List
- Compare Products
- Create an Account
INTRODUCING RONSTAN ORBIT WINCHES™
- Eye End Turnbuckles 7 items
- Toggle End Calibrated Turnbuckles 3 items
- Toggle End Turnbuckles 8 items
- Turnbuckle Handles 2 items
- Remove This Item
Need some advice?
Official Sponsors of the Australian Sailing Team

- Shop Products ▼
- Order Status
- Shipping Return
- Request Quote
- Rigging & Marine
Turnbuckles
RIGGING SUPPLY YOU CAN DEPEND ON
US Rigging Carries Turnbuckle Wire Tensioners & Cable Tensioners
If you are looking for a turnbuckle you have come to the right place. Our turnbuckles are tough and designed for superior cable termination applications. US Rigging offers a carefully selected variety of Cable Tensioners with various end configurations, including Eye & Eye tensioners, Hook & Eye tensioners, and Jaw & Jaw tensioners. Both standard Stainless Steel Turnbuckles and Galvanized Stainless Steel Turnbuckles are super tough and excellent for outdoor applications.
What Are Turnbuckles Used For?
Turnbuckles may be referred to as Wire Tensioners, Cable Tensioners, or Cable Tighteners. These pieces of hardware are engineered to absorb slack and apply tension to a rigging system without twisting the cables or wires. When Turnbuckles is used in cable termination and tensioning, the Turnbuckle itself will twist rather than the cable or wire.
Turnbuckle Applications And Features:
- Applying Tension To A Rigging Setup
- Taking Up Slack In A Rigging Assembly
- Preventing Wires, Cables, And Lines From Twisting
What Are The Different Styles Of Cable Tensioners?
Turnbuckles/Cable Tensioners are classified by how they attach to assemblies at each end. Turnbuckles have two ends and can be configured with different connectors on each end. For example, a Turnbuckle that has a Hook Connector on one end and an Eye Connector on the other end would be classified as a Hook/Eye Turnbuckle. A Jaw/Jaw Turnbuckle has a Jaw Connector on both ends of the tensioner.
US Rigging Offers 3 Styles Of Turnbuckles:
Eye/Eye Turnbuckles These are tensioners with eyes that connect to other components of a rigging system on both sides of the hardware. Eye connectors add extra security and won’t detach from a rigging system accidentally. Because of this added security, they can be difficult to use in coordination with thimbles.
- Highly Secure Connections
- Won’t Detach From Systems Unintentionally
Jaw/Jaw Turnbuckles With jaws on each end, these turnbuckles include removable pins on each jaw. Jaws work easily with thimbles and are more secure than hook connectors. Like eyes, jaws prevent turnbuckles from becoming detached unintentionally.
- Secure Connections
- Work Easily With Thimbles
Hook/Eye Turnbuckles These turnbuckles have a hook on one end of the hardware and an eye on the opposite end. Hooks are less secure than jaws and eyes but are easily removable. These turnbuckles are ideal for applications where temporary connections are being applied and you want to remove tension more easily.
- Easily Removable
- Ideal For Temporary Connections
What Are The Benefits Of Stainless Steel Wire Tensioners?
Stainless Steel is an incredible material that is excellent for outdoor use, including applications where it may come into contact with salt water. Stainless Steel Is resistant to corrosion and rust. When you are using other components made with Stainless Steel, it is best to use Stainless Steel Turnbuckles to avoid unwanted chemical reactions.
Benefits Of Stainless Steel Turnbuckles:
- Resistant To Corrosion
- Great For Outdoor Use
- Can Come Into Contact With Saltwater
- Ideal For Use With Other Stainless Steel Components
What Are The Benefits Of Galvanized Steel Wire Tensioners?
Galvanized Steel is also great for many outdoor applications but it is not as resistant to corrosion as Stainless Steel. It is resistant to rust against freshwater, but not saltwater.
- Can Come Into Contact With Freshwater
What Turnbuckles Are Best For Heavy Loads?
Turnbuckles with longer thread diameters are the best for heavy loads. If you are working with heavy-duty loads, you will want to compare thread diameters when choosing which Cable Tensioner you are going to buy.
Who Is US Rigging?
US Rigging is a manufacturer and master distributor of climbing ropes, fall protection equipment, and industrial rigging equipment located in Santa Ana, California. This Orange County-based company is proud to provide American Made products with both safety and service in mind. US Rigging has a legacy lasting over 40 years and is known for operational excellence.
We offer a carefully selected array of turnbuckles for cable termination applications where you want to avoid twisting on your line. Browse our selection and choose between Wire Tensioners with a variety of end configurations. Our turnbuckles are available in stainless steel or galvanized steel according to your needs.
US Rigging is committed to excellence in service and providing our customers with the best rigging products on the market.
There are no products listed under this category.
FREQUENTLY ASKED QUESTIONS
- standing rigging
- rope and line
- cams, cleats and clutches
- head sail gear
- roller furling
- main sail control
- mast hardware
- eye straps and pad eyes
- fairleads and bulls eyes
- anchor and docking
- miscellaneous hardware
- Alexander Roberts
- My Wishlist
- Customer Service
- Order Tracking
- Your Account
- Store Policies & Info
- Privacy Policy
- Helpful Links
- Payment Methods
Shopping Cart: 0 Items
No products in the cart.
Sailing Ellidah is supported by our readers. Buying through our links may earn us an affiliate commission at no extra cost to you.
The Standing Rigging On A Sailboat Explained
The standing rigging on a sailboat is a system of stainless steel wires that holds the mast upright and supports the spars.
In this guide, I’ll explain the basics of a sailboat’s hardware and rigging, how it works, and why it is a fundamental and vital part of the vessel. We’ll look at the different parts of the rig, where they are located, and their function.
We will also peek at a couple of different types of rigs and their variations to determine their differences. In the end, I will explain some additional terms and answer some practical questions I often get asked.
But first off, it is essential to understand what standing rigging is and its purpose on a sailboat.
The purpose of the standing rigging
Like I said in the beginning, the standing rigging on a sailboat is a system of stainless steel wires that holds the mast upright and supports the spars. When sailing, the rig helps transfer wind forces from the sails to the boat’s structure. This is critical for maintaining the stability and performance of the vessel.
The rig can also consist of other materials, such as synthetic lines or steel rods, yet its purpose is the same. But more on that later.
Since the rig supports the mast, you’ll need to ensure that it is always in appropriate condition before taking your boat out to sea. Let me give you an example from a recent experience.
Dismasting horrors
I had a company inspect the entire rig on my sailboat while preparing for an Atlantic crossing. The rigger didn’t find any issues, but I decided to replace the rig anyway because of its unknown age. I wanted to do the job myself so I could learn how it is done correctly.
Not long after, we left Gibraltar and sailed through rough weather for eight days before arriving in Las Palmas. We were safe and sound and didn’t experience any issues. Unfortunately, several other boats arriving before us had suffered rig failures. They lost their masts and sails—a sorrowful sight but also a reminder of how vital the rigging is on a sailboat.
The most common types of rigging on a sailboat
The most commonly used rig type on modern sailing boats is the fore-and-aft Bermuda Sloop rig with one mast and just one headsail. Closely follows the Cutter rig and the Ketch rig. They all have a relatively simple rigging layout. Still, there are several variations and differences in how they are set up.
A sloop has a single mast, and the Ketch has one main mast and an additional shorter mizzen mast further aft. A Cutter rig is similar to the Bermuda Sloop with an additional cutter forestay, allowing it to fly two overlapping headsails.
You can learn more about the differences and the different types of sails they use in this guide. For now, we’ll focus on the Bermuda rig.
The difference between standing rigging and running rigging
Sometimes things can get confusing as some of our nautical terms are used for multiple items depending on the context. Let me clarify just briefly:
The rig or rigging on a sailboat is a common term for two parts:
- The standing rigging consists of wires supporting the mast on a sailboat and reinforcing the spars from the force of the sails when sailing.
- The running rigging consists of the halyards, sheets, and lines we use to hoist, lower, operate, and control the sails on a sailboat.
Check out my guide on running rigging here !
The difference between a fractional and a masthead rig
A Bermuda rig is split into two groups. The Masthead rig and the Fractional rig.
The Masthead rig has a forestay running from the bow to the top of the mast, and the spreaders point 90 degrees to the sides. A boat with a masthead rig typically carries a bigger overlapping headsail ( Genoa) and a smaller mainsail. Very typical on the Sloop, Ketch, and Cutter rigs.
A Fractional rig has forestays running from the bow to 1/4 – 1/8 from the top of the mast, and the spreaders are swept backward. A boat with a fractional rig also has the mast farther forward than a masthead rig, a bigger mainsail, and a smaller headsail, usually a Jib. Very typical on more performance-oriented sailboats.
There are exceptions in regards to the type of headsail, though. Many performance cruisers use a Genoa instead of a Jib , making the difference smaller.
Some people also fit an inner forestay, or a babystay, to allow flying a smaller staysail.
Explaining the parts and hardware of the standing rigging
The rigging on a sailing vessel relies on stays and shrouds in addition to many hardware parts to secure the mast properly. And we also have nautical terms for each of them. Since a system relies on every aspect of it to be in equally good condition, we want to familiarize ourselves with each part and understand its function.
Forestay and Backstay
The forestay is a wire that runs from the bow to the top of the mast. Some boats, like the Cutter rig, can have several additional inner forestays in different configurations.
The backstay is the wire that runs from the back of the boat to the top of the mast. Backstays have a tensioner, often hydraulic, to increase the tension when sailing upwind. Some rigs, like the Cutter, have running backstays and sometimes checkstays or runners, to support the rig.
The primary purpose of the forestay and backstay is to prevent the mast from moving fore and aft. The tensioner on the backstay also allows us to trim and tune the rig to get a better shape of the sails.
The shrouds are the wires or lines used on modern sailboats and yachts to support the mast from sideways motion.
There are usually four shrouds on each side of the vessel. They are connected to the side of the mast and run down to turnbuckles attached through toggles to the chainplates bolted on the deck.
- Cap shrouds run from the top of the mast to the deck, passing through the tips of the upper spreaders.
- Intermediate shrouds run from the lower part of the mast to the deck, passing through the lower set of spreaders.
- Lower shrouds are connected to the mast under the first spreader and run down to the deck – one fore and one aft on each side of the boat.
This configuration is called continuous rigging. We won’t go into the discontinuous rigging used on bigger boats in this guide, but if you are interested, you can read more about it here .
Shroud materials
Shrouds are usually made of 1 x 19 stainless steel wire. These wires are strong and relatively easy to install but are prone to stretch and corrosion to a certain degree. Another option is using stainless steel rods.
Rod rigging
Rod rigging has a stretch coefficient lower than wire but is more expensive and can be intricate to install. Alternatively, synthetic rigging is becoming more popular as it weighs less than wire and rods.
Synthetic rigging
Fibers like Dyneema and other aramids are lightweight and provide ultra-high tensile strength. However, they are expensive and much more vulnerable to chafing and UV damage than other options. In my opinion, they are best suited for racing and regatta-oriented sailboats.
Wire rigging
I recommend sticking to the classic 316-graded stainless steel wire rigging for cruising sailboats. It is also the most reasonable of the options. If you find yourself in trouble far from home, you are more likely to find replacement wire than another complex rigging type.
Relevant terms on sailboat rigging and hardware
The spreaders are the fins or wings that space the shrouds away from the mast. Most sailboats have at least one set, but some also have two or three. Once a vessel has more than three pairs of spreaders, we are probably talking about a big sailing yacht.
A turnbuckle is the fitting that connects the shrouds to the toggle and chainplate on the deck. These are adjustable, allowing you to tension the rig.
A chainplate is a metal plate bolted to a strong point on the deck or side of the hull. It is usually reinforced with a backing plate underneath to withstand the tension from the shrouds.
The term mast head should be distinct from the term masthead rigging. Out of context, the mast head is the top of the mast.
A toggle is a hardware fitting to connect the turnbuckles on the shrouds and the chainplate.
How tight should the standing rigging be?
It is essential to periodically check the tension of the standing rigging and make adjustments to ensure it is appropriately set. If the rig is too loose, it allows the mast to sway excessively, making the boat perform poorly.
You also risk applying a snatch load during a tack or a gybe which can damage the rig. On the other hand, if the standing rigging is too tight, it can strain the rig and the hull and lead to structural failure.
The standing rigging should be tightened enough to prevent the mast from bending sideways under any point of sail. If you can move the mast by pulling the cap shrouds by hand, the rigging is too loose and should be tensioned. Once the cap shrouds are tightened, follow up with the intermediates and finish with the lower shrouds. It is critical to tension the rig evenly on both sides.
The next you want to do is to take the boat out for a trip. Ensure that the mast isn’t bending over to the leeward side when you are sailing. A little movement in the leeward shrouds is normal, but they shouldn’t swing around. If the mast bends to the leeward side under load, the windward shrouds need to be tightened. Check the shrouds while sailing on both starboard and port tack.
Once the mast is in a column at any point of sail, your rigging should be tight and ready for action.
If you feel uncomfortable adjusting your rig, get a professional rigger to inspect and reset it.
How often should the standing rigging be replaced on a sailboat?
I asked the rigger who produced my new rig for Ellidah about how long I could expect my new rig to last, and he replied with the following:
The standing rigging should be replaced after 10 – 15 years, depending on how hard and often the boat has sailed. If it is well maintained and the vessel has sailed conservatively, it will probably last more than 20 years. However, corrosion or cracked strands indicate that the rig or parts are due for replacement regardless of age.
If you plan on doing extended offshore sailing and don’t know the age of your rig, I recommend replacing it even if it looks fine. This can be done without removing the mast from the boat while it is still in the water.
How much does it cost to replace the standing rigging?
The cost of replacing the standing rigging will vary greatly depending on the size of your boat and the location you get the job done. For my 41 feet sloop, I did most of the installation myself and paid approximately $4700 for the entire rig replacement.
Can Dyneema be used for standing rigging?
Dyneema is a durable synthetic fiber that can be used for standing rigging. Its low weight, and high tensile strength makes it especially popular amongst racers. Many cruisers also carry Dyneema onboard as spare parts for failing rigging.
How long does dyneema standing rigging last?
Dyneema rigging can outlast wire rigging if it doesn’t chafe on anything sharp. There are reports of Dyneema rigging lasting as long as 15 years, but manufacturers like Colligo claim their PVC shrink-wrapped lines should last 8 to 10 years. You can read more here .
Final words
Congratulations! By now, you should have a much better understanding of standing rigging on a sailboat. We’ve covered its purpose and its importance for performance and safety. While many types of rigs and variations exist, the hardware and concepts are often similar. Now it’s time to put your newfound knowledge into practice and set sail!
Or, if you’re not ready just yet, I recommend heading over to my following guide to learn more about running rigging on a sailboat.
Sharing is caring!
Skipper, Electrician and ROV Pilot
Robin is the founder and owner of Sailing Ellidah and has been living on his sailboat since 2019. He is currently on a journey to sail around the world and is passionate about writing his story and helpful content to inspire others who share his interest in sailing.
Very well written. Common sense layout with just enough photos and sketches. I enjoyed reading this article.
Thank you for the kind words.
Leave a Reply Cancel reply
Your email address will not be published. Required fields are marked *
Best Sellers in Sailing Rigging Turnbuckles

- Amazon Newsletter
- About Amazon
- Accessibility
- Sustainability
- Press Center
- Investor Relations
- Amazon Devices
- Amazon Science
- Start Selling with Amazon
- Sell apps on Amazon
- Supply to Amazon
- Protect & Build Your Brand
- Become an Affiliate
- Become a Delivery Driver
- Start a Package Delivery Business
- Advertise Your Products
- Self-Publish with Us
- Host an Amazon Hub
- › See More Ways to Make Money
- Amazon Visa
- Amazon Store Card
- Amazon Secured Card
- Amazon Business Card
- Shop with Points
- Credit Card Marketplace
- Reload Your Balance
- Amazon Currency Converter
- Your Account
- Your Orders
- Shipping Rates & Policies
- Amazon Prime
- Returns & Replacements
- Manage Your Content and Devices
- Recalls and Product Safety Alerts
- Conditions of Use
- Privacy Notice
- Your Ads Privacy Choices
How to Adjust a Turnbuckle
")
The concept of how to properly adjust a turnbuckle seems to sometimes elude most people. This is understandable as I didn’t used to spend my days thinking about tightening cables, like I do now. So let’s take a moment to discuss how this is done properly.
There are generally three different styles of turnbuckles. Yes, there are a few more styles, however these concepts should give you the gist for any turnbuckle.

First things first, always make sure that you start by taking out the cotter pins and removing any old tape. Generally, to tighten or loosen turnbuckles it is the reverse of what you have learned your whole life, “righty-tighty, lefty-loosey” is now “lefty-tighty, righty-loosey”.
OPEN BODY TURNBUCKLES: The open body style turnbuckle is the most common style in today’s sailboat market and will require either an adjustable wrench and a spike (a ‘beefy’ screw driver should do), or a second adjustable wrench. If you have a turnbuckle that has a swage stud at the top end, then look closely and locate the wrench flat which will be either machined or pressed into the stud by the manufacturer.
NOTE: S ome boats today still have the old, Closed Body/Tubular Style , stainless steel bottles screw type turnbuckle (these should be replaced ASAP with chrome-bronze bodies). To adjust this type of turnbuckle you can use either and appropriately sized Ice Pick or C Sherman Johnson’s purpose made tool (click link and scroll to bottom of page) to stick in the small hole located in the middle of the body. Vise grips or channel locks are not the answer here.
DOUBLE JAWED TURNBUCKLES: You may also have a double jawed turnbuckle which accepts an eye fitting attached to the end of the stay. In this situation it is important to keep the upper jaw/eye end from spinning by using either a spike or screwdriver. Also, please note: these turnbuckles are often installed upside down and not consistently. So figuring out which way is tight and which way is loose can be a doozie and may vary from stay to stay. It may be worth the extra time to make sure they are all configured in the same fashion, matching up with the aforementioned tightening/loosening method (“lefty-tighty, righty-loosey”).
MECHANICAL STUDS AND ROD STUDS : It is also possible that your rigging utilizes a mechanical stud at the top end of the turnbuckle. This is a similar product to that used for open body rod turnbuckles, and the same directions should be followed. Be careful in this situation as the mechanical stud will have two wrench flats, one is to tighten the cap of the mechanical stud (this is NOT the one to use and may cause the fitting to become undone!) and one is to hold the stud in place while turning the turnbuckle body. This wrench flat will sometimes be less noticeable, but if you look closely you will be able to determine which ‘flat’ holds the stud and not the cap.
")
TURNBUCKLES THAT UTILIZE RIGGING SCREWS (ROD AND WIRE): Next we have the rigging screw style turnbuckle, typically provided by Navtec . This looks like an open body turnbuckle, but in reverse. Instead of one body and two studs, there are two bodies and one stud. This is another typical turnbuckle found on rod rigged boats and you should follow these same guidelines here as well. Again, care must be taken to ensure that the upper end of the turnbuckle does not spin. In this case it is the upper body portion that will need to be either held in place by an adjustable wrench or a spike. Then use another wrench to turn the rigging screw by using the wrench flats on the screw.
")
COQUILLE OR STEM BALL TURNBUCKLES: You have probably noticed by now that I keep making the point of always holding the upper end of the turnbuckle in place, be it a stud, jaw, or body. Well, that is because in most situations the bottom of the turnbuckle is kept from spinning by the way it is pinned to the chainplate . EXCEPT, when the chainplate isn’t conventional. Beneteau and Jeaneau are notorious for these types of chainplates. They use what is called a coquille style chainplate, that means essentially, that the connection of the turnbuckle at the deck is a ball and socket type (which means it can spin freely). Here you need to either have three hands and arms, perform a bit’ of a magic trick or grab a friend. Both the top and bottom screws will try to spin in this case, so you will need to hold both upper and lower studs by their wrench flats. I like to go for the “magic trick” method myself, by using large vise grips to grip the lower stud. I will then place my knee near it (as I am in the crouched position) so that the vise grips become wedged up against me as they begin to spin. Then, I will go about holding the upper stud with an adjustable wrench and turning the body with my spike as usual. This maneuver can be a bit tricky, but with a little body contortion and the right tools, it can be done. OR…… simply grab a friend and have them help you ;-0)
")
When you are done make sure you line up the cotter pin holes in the studs so that the turnbuckle can be pinned. If cotter pins aren’t present then there should be locking nuts of some sort. A turnbuckle ALWAYS needs to be secured so that it cannot become undone.
TIP: No matter what type of turnbuckle you are adjusting make sure the wire, rod or whatever type of stay material you may have, does NOT turn, or is in any way able to become distorted. This can lead to shroud failure!
Remember, if in doubt you can always ask……
Similar Posts
Wave on – vor .
Watch Team Telefonica get hit by huge waves from a-beam, YIKES! ……… [youtube http://www.youtube.com/watch?v=UrKQgJykdO4&w=560&h=315]
Views from Aloft
Ahhh a beautiful day to begin the Spring. Aloft in Maryland’s Capital, with a great view of the Chesapeake Bay, the U.S. Naval Academy and downtown Annapolis. Today makes me look forward to some spring sailing, a good steady moderate breeze with flat water. Just how we like it on the bay. Today’s trip was for a mast and…
Chain Plate Service Anyone?
YIKES! [youtube http://www.youtube.com/watch?v=7iKRiBShhlQ&w=420&h=315] If it inspired you to consider your chainplates then read here for more information on chainplate service and inspection. ~T.R.C.
Yachting Anyone?
There are big rigs and then there are big rigs! Perini Navi and Ron Holland deliver once again in typical fashion. This incredible yacht, “Felicita West”, cuts no corners. Check out the video that showcases some of the vessels highlights. As well as the refit and massive mast stepping project undertaken by Seahawke Rigging along with…
Christmas at Sea!
Apparently this was the first time in quite a while that the Volvo Ocean Race crews have had to spend their Dec.24 and 25 on the water. Leg 2 came to a close on Monday with with first place overall, Team Telefonica taking the victory at an almost photo finish over second place overall, Team Camper….
The Annapolis Spring Boat Show Lives On!
Well folks, apparently the last one was such a success that they’re doing it again. U.S. Yacht Shows proudly presents, the second annual Annapolis Spring Sailboat Show 2013. The event will be held in Annapolis’ historical downtown, City Dock. The Annapolis Fall boat show, has helped to build the town’s reputation for hosting the largest boat show in the…
Leave a Reply Cancel reply
Your email address will not be published. Required fields are marked *
Save my name, email, and website in this browser for the next time I comment.
10 Comments
- Pingback: Single Sideband Insulators for Backstays – The Rigging Company
The top thread on my turnbuckle doesn’t move when I turn….only the bottom one moves. It seems to be fused. Is there any fix for this or does it need replacement?
You can try a torch, propane or MAP gas, either one. Heat it up … A LOT! Then try and turn. If this doesn’t work, soak it in penetrating oil: PB Blaster, AeroKroil, or even WD40. Let that soak overnight and then try one more time. If still nothing, you might be out of luck and need to look at replacing things.
IF you do get it to turn and notice some metal flakes, bronze or stainless coming out, it will also likely validate replacement.
Hope that helps.
For a 32 foot Catalina sailboat. When is the amount of bury an issue. Or asked another way how little adjustment is OK. Thanks,
Hi, All the way closed is a problem because that’s all there is, no more tensioning is available. All the way open is only a problem if they cannot be pinned/ secured. You always need enough thread bury to get the cotter pin in at the least. Another way to think of it, or in the case of the closed body, you are looking to have at least enough threads engaged to fill the entire threaded section of the body (top and bottom) to be save.
‘Hope that helps.
- Pingback: 101 Tips for Preparing Your Boat for Spring
- Pingback: 101 Tips for Preparing Your Boat for Spring | Rawhide
Remember to keep the upper and lower turnbuckle studs screwed in the same distance…
A great point…..! If unpinning the turnbuckle, definitely take the time to ensure the turnbuckle is balanced. Thanks for taking the time =)
very informative article, i have already save it, we will test our turnbuckle with your methods, thanks a lot!
Username or Email Address
Remember Me
Lost your password?
Review Cart
No products in the cart.
- Privacy Overview
- Strictly Necessary Cookies
This website uses cookies so that we can provide you with the best user experience possible. Cookie information is stored in your browser and performs functions such as recognising you when you return to our website and helping our team to understand which sections of the website you find most interesting and useful.
Strictly Necessary Cookie should be enabled at all times so that we can save your preferences for cookie settings.
If you disable this cookie, we will not be able to save your preferences. This means that every time you visit this website you will need to enable or disable cookies again.
- BOAT OF THE YEAR
- Newsletters
- Sailboat Reviews
- Boating Safety
- Sailing Totem
- Charter Resources
- Destinations
- Galley Recipes
- Living Aboard
- Sails and Rigging
- Maintenance
- Best Marine Electronics & Technology
Sailboat Rigging Tips from a Pro
- By David Bond
- Updated: May 12, 2021
Clive Strickett is a rugged guy, so it takes strong arms to winch him aloft to the masthead. But that’s exactly where you want him: eyeball to halyard sheave, looking for problems. He’s a veteran rigger with a keen eye and a background in ocean racing on the competitive Maxi circuit. On the island of Lanzarote, where I first encountered Strickett, he has a reputation for detail.
We were on the dock at Marina Lanzarote in a fresh breeze of about 20 knots. It was sunny and warm, the sort of weather you’d expect when you’re about 400 nautical miles off the coast of Morocco. These Canary Islands, of which Lanzarote is the farthest north, are a staging area for boats embarking on a trans-Atlantic crossing.
Strickett had just been lowered to the deck of a Bavaria 41 by the boat’s skipper after checking the spreaders, and was now shaking his head. Problems. There are always problems. This time it was mismatched metals. “It’s rare to find a boat that has nothing wrong with it,” he said.
Never mind the Atlantic—the first leg of the trip from the United Kingdom and Europe to the Canaries can be brutal on gear. And that’s before the 3,800-nautical-mile downwind crossing to the Caribbean. It’s wise to have a guy like Strickett check your rig before you leave. “I’ve been doing this for a few years now,” he said. “I might see a problem that the owner missed. They weren’t looking for it, or weren’t looking where they should have been.
“You never know what’s going to happen on boats. Even on new boats,” he continued. “A friend of mine had a new catamaran, a big one, with a carbon-fiber mast. One of the genoa clutches ripped right off the mast. Brand new boat, right from the factory. We had to get the OK from the factory in France to make a repair. We fixed it, and he crossed the Atlantic.”
Minor rig problems compound quickly under pressure. Strong winds funneling through these volcanic islands can mimic trade-wind sailing, but that doesn’t mean that every boat is ready for the crossing. According to Strickett, safety lies in the details, and he points out where to look for potential problems in your rig. Here’s what Strickett is looking for as he inspects a spar, from top to bottom.
Masthead: “Be sure the sheave axles are secure. Sometimes the holes elongate or even crack. And then halyards can get mixed up. One boat that came through here from Tenerife was using the wrong halyard. They were using the spinnaker halyard instead of the genoa halyard. When I went up to look at it, the sheave box was completely gone; the rivets were all loose. The holes had elongated because the halyard was at the wrong angle. They didn’t even realize it. It’s tough to see what’s happening aloft when you’re on deck.”
Working down the mast on a fractional rig, there might be additional sheave boxes fitted for internal halyards. “Make sure all the rivets are tight. Anything fitted with bolts or rivets should be double-checked.”
Spreaders: “Inspect the spreader tips; make sure they’re OK and there’s no corrosion. Whenever you get stainless steel and aluminum together, there’s corrosion. One fleet of charter boats here had put 8 mm stainless bolts into the aluminum spreaders with no protection. Now the spreaders are corroding—the holes get bigger and bigger. But not only that, the spreader was already weakened by putting big holes in it to begin with.”
Shrouds: Broken or damaged wire rigging is the most common problem. “Most cruising boats use 1-by-19 stainless wire. Inside, one strand can let go, then another. When you get up to four broken strands, the wire gets weaker and weaker, and eventually fails. If you’re underway and that happens, then you have a big problem.”
You also don’t want extra weight aloft. “Some people use Dyform, or compacted wire, which uses triangular-shaped strands around a core. If you compare a 10 mm Dyform wire to a 10 mm 1-by-19 wire, the Dyform is stronger. I once changed a 12 mm 1-by-19 wire to a 10 mm Dyform wire. It’s the same strength, but I saved some weight aloft.
“You can’t take anything for granted,” he continued. “There was a boat getting ready to head to the Mediterranean from here, which is a long slog to windward. He was all ready to go. Just as an afterthought, the owner had me look over the rig. Good thing. I found some broken wires in the forestay. The whole mast could have come down. So have a close inspection just to make sure there are no broken wires, and that the terminals don’t have any cracks in them.”
Boom: “Once again, closely inspect the rivets. Loose padeyes on the boom get looser and can easily rip right out. The same goes for the gooseneck fittings. Check every bolt, every rivet for the slightest elongation of the holes or any loose rivets. I can’t emphasize that enough. The padeye is usually secured to the boom with 5 mm Monel rivets, but those can pull loose after a sharp pull like a jibe. They can get yanked right out of the boom. Then what? As insurance, I usually remove the 5 mm rivets and replace them with 6.3 mm rivets, which are the largest you can use. If you’ve had a big jibe and the boom hits a V1 (lower shroud), it might break or bend the boom. We fix booms at our engineering shop. They’ll straighten it, put a patch on, weld it and then paint it. That makes it strong enough. New booms delivered to Lanzarote come from France, and the delivery fee alone can cost up to $3,500.”
Read More: Check your Boat’s Rig
Turnbuckles: “Some people don’t like to tape turnbuckles; they like to see what’s going on with them. Fair enough. I wouldn’t tape it all the way closed though. Just a little tape around the split pins so that they don’t grab a sail or your ankle. On one boat that I inspected, the guy had taped up the whole thing. When we untaped it, it was all manky, which means pretty disgusting. The dirt will always get in somehow. If it’s all taped up like that, you can’t oil or lubricate it. I tell people: Now and then, service your turnbuckles. Take some turns off the turnbuckle. Make sure it’s clean and then put a little Teflon gel on it, or some MolyKote grease. Then tighten it back up.
“When you haven’t done it for some years,” he added, “they seize up and you can’t undo them. Especially a small turnbuckle. They’re chrome-plated over bronze, and when you put a big spanner in there and turn it, it’ll snap. And what you don’t want is for a wire to snap when it’s under load. It’s just preventive maintenance. Do it every six months. It takes only a couple of hours.”
Headsail Furlers: “On some ProFurl furlers, there are four black bolts that go into the furler: two that hold the cage on and two that hold the plate. On the older ones, the bolts are made of titanium, and they seize into the aluminum. I don’t know how many I have had to drill out. But you have to drill them out properly. If it’s a 6 mm bolt, first you drill straight down the middle of the hole with a 3 mm drill, then with a 4 mm, then a 5 mm, then a 5.5 mm. Hopefully it will come out with the heat and friction. ‘Easy-out’ [screw extractors] don’t work. These things are seized together. Even heat doesn’t work.”
Chain Plates: “I inspected one boat with the chain plates so loose, they were actually moving. You could see where they had scratched the paint around the hull. Down below, look carefully at the chain plates. Make sure there’s no cracking in the hull, no movement on the bolts. You can see where a bolt has bent a little, or if it’s been pulled up or down. You’ll see little scratch marks on the hull or the bulkhead.”
Mast Step: “There’s a fine balance between the shrouds being too tight and too loose. There was a good-size catamaran that left here and got into some rough seas, rolling around. The shrouds were too loose, and on one roll, the mast jumped right out of its mast step. It was just for a moment, but in that moment, the mast went overboard.”
With the inspection on the Bavaria completed, as we walked up the gangway toward the marina office, I had one last question: “If something breaks underway, can a rigger or a boatyard be held responsible?”
Strickett answered, “Sometimes. We have a basic form that says something like: ‘Rig checked. All found to be in good condition at the time of inspection.’ And I sign it. So as far as I’m concerned, everything was OK when I signed it. But if along the way, say it blows up to 40 knots and the crew still has their spinnaker up and the mast comes down, well, they might try to come back to us. So in my opinion, it boils down to this: If you’re not up to sailing the boat, then you shouldn’t be there. You just never know what’s going to happen.”
David Bond, a regular contributor to CW, is a writer, teacher and cruising sailor currently based in Germany.
- More: How To , print 2021 april , projects , rig , rigging
- More How To
3 Clutch Sails For Peak Performance
It’s time to rethink your ditch kit, 8 ways to prevent seasickness, how to de-winterize your diesel engine, “heirloom quality” hinckley for sale, for sale: 2019 leopard 43 pc.
- Digital Edition
- Customer Service
- Privacy Policy
- Terms of Use
- Email Newsletters
- Cruising World
- Florida Travel + Life
- Sailing World
- Salt Water Sportsman
- Sport Fishing
- Wakeboarding
Many products featured on this site were editorially chosen. Cruising World may receive financial compensation for products purchased through this site.
Copyright © 2024 Cruising World. A Bonnier LLC Company . All rights reserved. Reproduction in whole or in part without permission is prohibited.
Please verify you are a human
Access to this page has been denied because we believe you are using automation tools to browse the website.
This may happen as a result of the following:
- Javascript is disabled or blocked by an extension (ad blockers for example)
- Your browser does not support cookies
Please make sure that Javascript and cookies are enabled on your browser and that you are not blocking them from loading.
Reference ID: c98518eb-db18-11ee-b5db-8a26d2c28178
Powered by PerimeterX , Inc.
Service Locator
- Angler Endorsement
- Boat Towing Coverage
- Mechanical Breakdown
- Insurance Requirements in Mexico
- Agreed Hull Value
- Actual Cash Value
- Liability Only
- Insurance Payment Options
- Claims Information
- Towing Service Agreement
- Membership Plans
- Boat Show Tickets
- BoatUS Boats For Sale
- Membership Payment Options
- Consumer Affairs
- Boat Documentation Requirements
- Installation Instructions
- Shipping & Handling Information
- Contact Boat Lettering
- End User Agreement
- Frequently Asked Questions
- Vessel Documentation
- BoatUS Foundation
- Government Affairs
- Powercruisers
- Buying & Selling Advice
- Maintenance
- Tow Vehicles
- Make & Create
- Makeovers & Refitting
- Accessories
- Electronics
- Skills, Tips, Tools
- Spring Preparation
- Winterization
- Boaters’ Rights
- Environment & Clean Water
- Boat Safety
- Navigational Hazards
- Personal Safety
- Batteries & Onboard Power
- Motors, Engines, Propulsion
- Best Day on the Water
- Books & Movies
- Communication & Etiquette
- Contests & Sweepstakes
- Colleges & Tech Schools
- Food, Drink, Entertainment
- New To Boating
- Travel & Destinations
- Watersports
- Anchors & Anchoring
- Boat Handling
- ← Maintenance
Tuning A Sailboat Rig
Advertisement
If your sailboat seems slower, follow our how-to on tuning your rig for optimal performance.

Photo: Bigstock
Spring is a time of prepping your boat for the coming season. While powerboaters fine-tune their engines, sailors should consider fine-tuning their rigs. Doing it yourself may seem intimidating, but it shouldn't be. Anyone reasonably handy can do it in a few hours. The reward is easier and faster sailing throughout the coming season.
Let's start with the basics for new sailors. With a few exceptions, a sailboat mast is held up by a series of stainless-steel wires. But those wires also perform several other equally important functions. When a sailboat is at rest and there is no wind blowing, the stress on these wires is very light with almost all the load downward toward the keel. However, when the boat is sailing and heeled over in a fresh breeze, more stress is placed on the wires and they have to work harder to hold the mast upright and stop it from bending.
The wires that prevent the mast from moving from side to side are called shrouds, and the ones that prevent fore and aft movement are called stays. The larger and taller the mast, the greater the load, and the number of shrouds and stays required. On a typical cruiser, say up to about 35 feet, there will generally be one forestay, one backstay, and two shrouds on each side.
To get the best performance from your boat and sails, the rigging needs to be set up correctly — often called "tuning the rig." The rig should be tuned with the boat in the water on a day with little to no wind. You'll also want to be away from wakes and other boats that can rock your boat. To start, the turnbuckles for the stays and shrouds should be hand-tight only. This is sufficient to hold up the rig but places no strain on anything — yet. Lay on your back on the boat's foredeck and sight up the front of the mast. It should be perfectly straight with no bends or kinks. Next, tighten the lower shrouds — these are the ones that do not go all the way to the top of the mast and often attach to the mast at the base of the crosstrees (the two horizontal spars at the upper ends of the topmasts).
You'll need a large screwdriver to rotate the turnbuckle, and a wrench to hold the shroud fitting and prevent it turning as you tighten. Give a couple of complete turns on either side. Have a helper release the main halyard and keep a little tension while you pull down the end that normally attaches to the mainsail until it just touches the top of the toerail adjacent to the chain plate. Have your helper cleat off the halyard, then swing the halyard over the boom and check the measurement on the other side. They should be the same. If not, adjust the turnbuckles until they the measurement is equal on port and starboard.

Adjusting and tuning a sailboat rig will often bring benefits such as easier handling and better performance.
Next do the same for the cap shrouds, these are the ones that go to the top of the mast, but note that due to the length of the shrouds, it is easy to bend the mast to either port or starboard. With the shrouds adjusted, sight up the mast one more time to ensure that it is still straight.
Next comes the fore and aft adjustment, which is made with the backstay and forestay. Masts should be plumb or lie back slightly. It should never rake forward. A good starting point is to tighten up the forestay and backstay a little over hand-tight. Use the main halyard as a plumb bob. Cleat off the halyard so the free end is just clear of the top of the boom and let it hang. If the shackle on the end of the halyard hits the mast, the mast is likely too far forward, so slacken off the forestay and tighten the backstay. Adjust a little at a time until the end of the halyard hangs free — 4 or 5 inches is a good starting point.
You'll need to install cotter pins into the turnbuckles to prevent them loosening over time, but before doing that, take the boat for a sail when the wind is blowing about 10 knots and see how everything works. With the boat on a beam reach, note the tightness of the windward shrouds. If they appear slack, they will need to be adjusted up. If the boat is hard on the tiller or wheel and tries to turn into wind, the mast has too much aft rake, so you'll want to slacken the backstay and tighten up on the forestay a little. If the bow wants to turn away from the wind, the mast is too far forward, so you'll need to move the mast back a little.
If you are at all unsure about tackling this task, play it safe and smart — seek out the services of a qualified rigger who has access to rig tension gauges and other specialized tools.
Related Articles
The truth about ceramic coatings for boats.
Our editor investigates the marketing claims of consumer-grade ceramic coatings.
Fine-Tune Your Side Scan Fishfinder
Take your side-scanning fishfinder off auto mode, and you’ll be spotting your prey from afar in no time
DIY Boat Foam Decking
Closed-cell foam flooring helps make boating more comfortable. Here’s how to install it on your vessel
Click to explore related articles
Contributing Editor, BoatUS Magazine
A marine surveyor and holder of RYA Yachtmaster Ocean certification, BoatUS Magazine contributing editor Mark Corke is one of our DIY gurus, creating easy-to-follow how-to articles and videos. Mark has built five boats himself (both power and sail), has been an experienced editor at several top boating magazines (including former associate editor of BoatUS Magazine), worked for the BBC, written four DIY books, skippered two round-the-world yachts, and holds the Guinness World Record for the fastest there-and-back crossing of the English Channel — in a kayak! He and his wife have a Grand Banks 32.
BoatUS Magazine Is A Benefit Of BoatUS Membership
Membership Benefits Include:
Subscription to the print version of BoatUS Magazine
4% back on purchases from West Marine stores or online at WestMarine.com
Discounts on fuel, transient slips, repairs and more at over 1,200 businesses
Deals on cruises, charters, car rentals, hotel stays and more…
All for only $25/year!
We use cookies to enhance your visit to our website and to improve your experience. By continuing to use our website, you’re agreeing to our cookie policy.
Sailboat Turnbuckles
Open body turnbuckle, jaw to swage, classic, traditional design. forged silicon bronze body with t-316 stainless ends., email us for quote on open body turnbuckles, tubular turnbuckle, jaw to swage – check nut locking, our most popular life line turnbuckle. check nut locking. t-316 stainless., email us for quote on tubular turnbuckles jaw to swage, tubular slotted turnbuckle, jaw to swage – positive locking rings, unique design features a slot with wraparound rings which fit through a cross-hole in terminal for secure locking. t-316 stainless., email us for quote on tubular slotted turnbuckles, deck toggle turnbuckle, this “t” bolt style fitting is used on decks or bulkheads. toggle nut style also available to match old style. t-316 stainless., email us for quote on deck toggle turnbuckles, “smooth line” turnbuckle, closed thread, very popular architectural turnbuckle also great for life lines. no exposed threads. cable termination is hidden inside of body and rotates on threaded cap. for details see page 4 of architectural section. t-316 stainless., email us for quote on smooth line turnbuckles, adjuster turnbuckle, stamped, strap design turnbuckle with knurled nut for adjustment. t-316 stainless/bronze construction., email us for quote on adjuster turnbuckles, eye to swage – check nut locking, used where an eye is required for attachment instead of a jaw- check nut locking. t-316 stainless., email us for quote on tubular turnbuckles eye to swage, high quality every time., recent projects.
Links to additional photos:
Environmental Center
Loop the Lake Parks & Recreation
Bicycle Shop
Construction Company
Custom Assemblies
Quick Links
Cable Measuring Guide
Inventory Management
Markets Served
Sling Fabrication Equipment
Wire Rope Sizes
- CALL NOW FOR TECHNICAL SUPPORT (800) 874-7455
- About the Company
- Dedication to CS Johnson Jr.
- Instructions
- Product Specifications
- Project Gallery
- Marine Catalog
- Architectural Catalog
- Find A Dealer
No products in the cart.
Marine hardware
For over 60 years, we’ve been the leader in marine hardware throughout the globe.
Architectural hardware
You’ll find our cable railing fittings used around the world – from the Houston Astrodome to the U.S. Military.
a legacy of quality & service SINCE 1958
A legacy of quality & service.
You’ll find what you need for your next rigging or cable railing project at C. Sherman Johnson Company, and it’s made in the USA!

cs johnson catalogs
Please check out our architectural and marine catalogs as a flip book, PDF, or order one via US Mail. Inside these catalogs you will find stainless steel hardware and fittings for cable rails and cable railing systems for commercial or residential applications. Johnson has been designing, developing, and manufacturing load rated turnbuckles and rigging hardware for marine, sailing, industrial, military, theme park, medical, and architectural uses since 1958.
a family tradition since 1958
C. Sherman Johnson Company Incorporated was founded in 1958 by Curtiss S. Johnson Jr (1925 – 2005). Mr. Johnson’s love of sailing inspired him to design and manufacture stainless steel turnbuckles, fittings, and marine accessories for the pleasure marine market.
We’ve always been a family-owned business, and that tradition continues today as sons Burt and Curt III, and grandsons Sam and Max build the company together.
IMAGES
VIDEO
COMMENTS
Sailboat Gibb and Navtec turnbuckles. Wide selection of sailboat rigging terminals and parts. Best prices and technical support at Vela Sailing Store. WE SHIP WORLDWIDE: More Info. Toggle menu. FREE SHIPPING* US Continental (min order $98) International (min order $750)
Sailboat rigging turnbuckles and rigging screws used for standing rigging, life lines, architectual, and industrial use made from forged bronze, chrome bronze, and stainless steel are available from Rigging Only. Checkout View Cart (0) (508) 992-0434. Toggle navigation. Shop All . standing rigging;
Trust West Marine for quality rigging hardware. Sailboat turnbuckles and stay adjusters are adjustable terminals located at the base of a sailboat's forestay, backstay or shrouds. They enable you to adjust the length and change the tension of the stays or shrouds. Turnbuckles can have an open- or a closed-body design.
Mfg# 26-406. LFS# JOH26406. $49.89. ONLINE ONLY. Galvanized Jaw and turnbuckle. SKU: 38636. Mfr: Apex Tool Group. Mfg# 6250505. Find your standing rigging Turnbuckles to keep your sail boat's rigging in top shape and ready to take you on your next adventure out on the water.
Work Boat Safety Rail Systems; Furlers. Jib Furlers. Small Boat Drum Furlers; Gennaker Furlers. Furler & Top Swivel; Accessories; Continuous Line Furlers; ... Rigging Hardware; Turnbuckles & Handles; RF1473-05 Handle Kit for 5/16" Threaded Turnbuckle Bodies. Handle kit, suits 5/16" Type 10 threaded turnbuckle body combinations.
Johnson turnbuckles are designed and manufactured in the USA with quality materials and are built to last in the harsh marine environment. Johnson rigging offers a full line of tubular turnbuckles, along with terminals, toggles, plates, backstay/inner forestay turnbuckles, pins and rings - everything you need to rig and tune your boat safely ...
Discover a comprehensive selection of sailboat rigging ranging from specialty wire rope and terminals to swaging tools and rigging pins. Whether replacing worn running rigging lines or updating aging standing rigging wires, we provide everything required - from turnbuckles and toggles to swagers and crimpers - as part of a complete rigging ...
Hayn rigging has been setting the standard for quality stainless steel rigging hardware for over 60 years. Hayn Hi-Mod compression fittings and Hayn turnbuckles are manufactured using skilled craftsman and quality materials, while still remaining price competitive. Whether you need jaw to jaw turnbuckles, rigging pins, swage forks or studs ...
Aug 14, 2015. It's one of the most important features on a sailboat, but many owners put standing rigging at the back of their minds when it comes time to do their pre-season safety checks. A prudent sailor should inspect his or her standing rig at least once each season and should know when the time comes to replace most or all of it.
Spars, Rigging, and Hardware for Sailboats. Rig-Rite, Inc. Phone: (001) 401-739-1140 -- FAX: (001) 401-739-1149 www.RigRite.com: Turnbuckles : Turnbuckles, or Rigging Screws, are primarily used to adjust and tension Standing Rigging. Produced in a wide variety of configurations and sizes, the more common ones are listed below. ...
Sailboat and yacht standing rigging of the highest quality, swage and mechanical terminals, rigging supplies and cable. Checkout View Cart (0) (508) 992-0434. Toggle navigation. ... turnbuckles. backstay adjusters, hydraulic and manual. adjusters. toggles. inner forestay. running backstays. chain plates. tangs. clevis, quick pins and accessories.
Turnbuckles may be referred to as Wire Tensioners, Cable Tensioners, or Cable Tighteners. These pieces of hardware are engineered to absorb slack and apply tension to a rigging system without twisting the cables or wires. When Turnbuckles is used in cable termination and tensioning, the Turnbuckle itself will twist rather than the cable or wire.
There are 2 styles of toggle attachment; hot forged T and eye terminal with permanently fixed clevis (eye toggles) Typically used on standing rigging on sailboats and yachts. Turnbuckle bodies are chrome over bronze. There is a limited supply of polished bronze bodies, please call. Order by thread diameter and clevis pin diameter. Jaw width ...
The rig or rigging on a sailboat is a common term for two parts: The standing rigging consists of wires supporting the mast on a sailboat and reinforcing the spars from the force of the sails when sailing. The running rigging consists of the halyards, sheets, and lines we use to hoist, lower, operate, and control the sails on a sailboat.
Best Sellers in Sailing Rigging Turnbuckles #1. ... 3/4 x 12" Turnbuckle Hook Eye Galvanized Steel 3000 LBS Marine Boat Shade Sail. 1 offer from $51.50 #31. Turnbuckl H/H 1/4x7-3/4. 6 offers from $10.70 #32. Marine Boat Toggle & Toggle Stainless Steel Pipe TURNBUCKLE 8MM.
1" Stainless Steel Fed Spec Thimble. $74.99. Compare. 1 - 24 of 128 Items. Load More. Shop the best selection of Standing Rigging from West Marine. Visit for products, prices, deals and more!
OPEN BODY TURNBUCKLES: The open body style turnbuckle is the most common style in today's sailboat market and will require either an adjustable wrench and a spike (a 'beefy' screw driver should do), or a second adjustable wrench. If you have a turnbuckle that has a swage stud at the top end, then look closely and locate the wrench flat ...
But you have to drill them out properly. If it's a 6 mm bolt, first you drill straight down the middle of the hole with a 3 mm drill, then with a 4 mm, then a 5 mm, then a 5.5 mm. Hopefully it will come out with the heat and friction. 'Easy-out' [screw extractors] don't work. These things are seized together.
Do-it-yourselfers can take advantage of West Marine's complete selection of standing rigging hardware. In addition to 1 x 19 wire, you will find a complete selection of wire terminals to accommodate most applications. Examples include turnbuckles, toggles and a variety of swage fittings. West Marine also offers a complete selection of ...
21 results. If you're looking for Alexander Roberts rigging hardware, Fisheries Supply has you covered. We've got all the stainless steel fixed toggles, aircraft type forks, marine eyes, swage studs and Alexander Roberts turnbuckles you need to get your rigging job done right. Shop today and save, or to see our complete line of Alexander ...
The rig should be tuned with the boat in the water on a day with little to no wind. You'll also want to be away from wakes and other boats that can rock your boat. To start, the turnbuckles for the stays and shrouds should be hand-tight only. This is sufficient to hold up the rig but places no strain on anything — yet.
Closed Thread. Very popular architectural turnbuckle also great for life lines. No exposed threads. Cable termination is hidden inside of body and rotates on threaded cap. For details see page 4 of architectural section. T-316 stainless.
a family tradition since 1958. C. Sherman Johnson Company Incorporated was founded in 1958 by Curtiss S. Johnson Jr (1925 - 2005). Mr. Johnson's love of sailing inspired him to design and manufacture stainless steel turnbuckles, fittings, and marine accessories for the pleasure marine market. We've always been a family-owned business, and ...