- THE PRINCESS PASSPORT
- Email Newsletter
- Yacht Walkthroughs
- Destinations
- Electronics
- Best Marine Electronics & Technology
- Boating Safety

From the Yachting Archives: How to Build a Sharpie Sailboat
- By Edwin S. Parker
- Updated: July 21, 2014
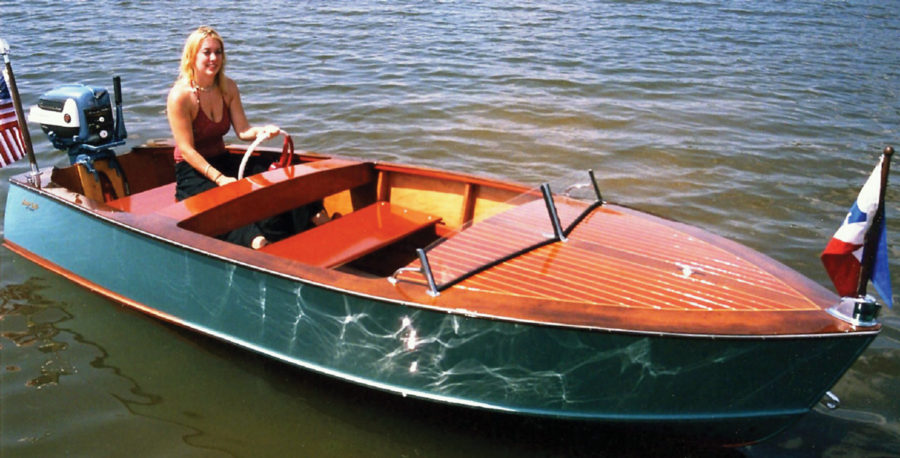
Editor’s note: The plans for a sharpie sailboat, as outlined in the December 1930 and January 1931 issues of Yachting, look to us like a great project to teach the grandkids about boatbuilding! Some materials, costs, and methods have progressed since the time of writing, so instead of asking your plumber to cut pipe to just the right length and thread it, you may now be able to go down to Home Depot to find the bolt in question. Marine plywood may also be a good alternative to the wood listed.
Unfortunately, we are not all rich, and we can’t all build Cup defenders. But that is no reason for building a tub or staying ashore. There is always a way to beat the game, and the way to heath the boat game is to build a sharpie. You can do it for under forty dollars.
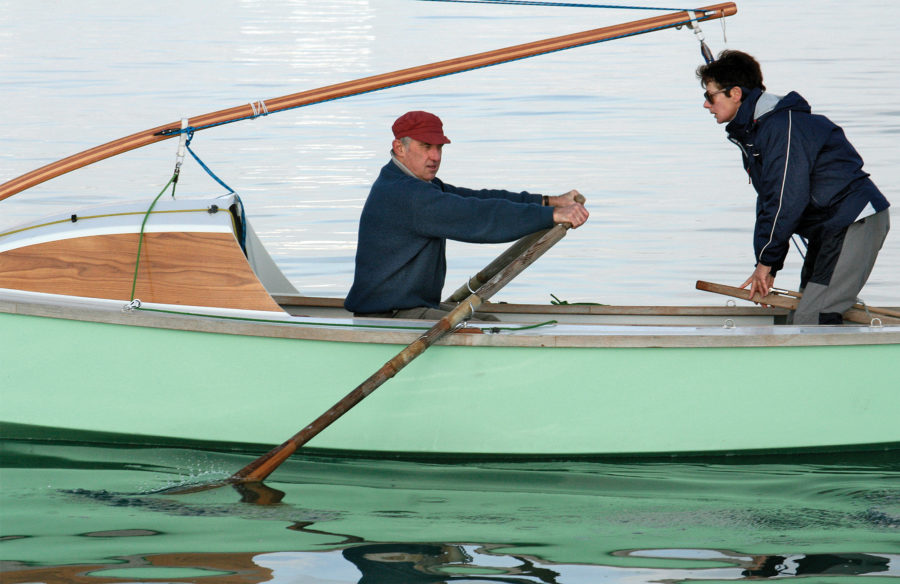
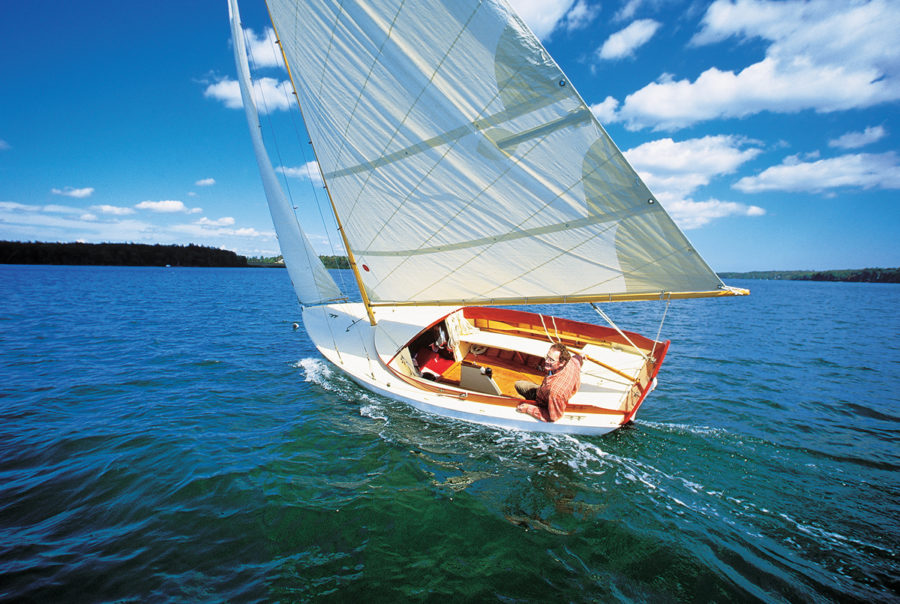
A sharpie represents the most boat for the money. It is graceful, fast, and a joy to sail. It is also eminently seaworthy and stiff. Minnow , fifteen feet over all, makes just over five knots under one reef and a strong wind. I have driven her with all sail in the same wind but I was too busy to do any timing – a considerably larger boat could not catch us.
A sharpie is easy to build. In general, the process is to bend two side boards around moulds, fasten them to stem and stern, screw in a chine batten, plank her crosswise, saw out the centerboard slot, and proceed with the finish (Detail J). If the pieces are carefully made, the process is really very simple. There is nothing that involves experience in boat building or special skill with tools. There are no pieces that go into place with difficulty or won’t stay put. I have built two of them single-handed with success.
Many times I have sailed among the big ships laid up in Oakland Estuary in my 18-footer, lying along the deck with one bare toe hooked carelessly over the tiller. With a gale it required at least two fingers – never more. She would come about like a top anywhere, any time. And one day we worked her up the Alameda Canal against a tide and sailed in San Leandro Bay when it blew in windows in “Frisco.” Add to this regular trips on Frisco Bay (it fairly blows your hair off there in summer) and a season on Monterey Bay, off Santa Cruz, and you have a fair idea of what an 18-footer will do.
I have built three sharpies, besides five smaller craft for fishing or hunting. At the age of nineteen I built the first one along the lines of a sketch my father had of a New Haven sharpie, eighteen feet long, dating from about 1880. The type was taken to the Carolinas from Connecticut by Mr. George C. Ives, and his son, Mr. John B. Ives, of Statesville, N.C., writes the following:
“Father had his sharpie built in 1875 at Fair Haven, Conn., by a famous builder. She was 36 feet long, having a fore and aft mutton leg sail with boom six to eight feet on the mast from the foot of the sail. This made the sail set like a board. This boat was tried out with the fastest boat then in the fleet and beat her. A club of gentlemen wanted to keep her at home and offered a bonus over cost, which father declined as he wanted the boat to pit against what North Carolina boatmen claimed for their clinker built boats which they considered superior.
“He brought two sharpies to North Carolina, and it was not many years till there was a big fleet of them in our waters. They built to 50 and 60 feet, the larger ones schooner rigged and decked, and this style is largely used now in the oyster dredging industry. The fishermen modified the style into deadrise skiffs, gaff sail and jib, and they carried sail like the wind and would almost go into the eye of it. The larger boats superseded the round bottom schooners in some industries, and would beat them in all weather at sea, but motor craft finally took their place.”
The design of a sharpie is a very particular affair. One was published around 1910 which brought down the scorn of my father. “Pumpkin seed,” he called it, for it was fat and flat, an it had a skeg, which would kill any real sharpie. In my first boat the side boards were sawed curved, starting from the bow. She rocked fore and aft too much and pounded in a chop. In the second one I started the curve farther aft, and it worked better, but they both dragged waves behind when going fast. When it came to Minnow I analyzed the design carefully, and I found that the best displacement curve came when the side boards were perfectly straight on both bottom and top, tapering, of course, from bow to stern. So I built her that way. She does not pound, drives to windward regardless of waves, and leaves the water nearly flat. Besides this, it makes building much simpler. So don’t let any wise friend persuade you to cut a curve on the bottom edge – you will get a perfect curve from the bending on the sides on the flare.
It is the experience of the author that textbooks tell you everything but how to get the monkey out of the box. It is the intent of this article to be brief, but comprehensive, covering all small points, even to nail sizes.
All the following directions are important. If you follow each step in its proper order, you will be surprised how quickly the boat will go together. But do not omit any steps or take any short cuts. Remember, a boat has a habit of leaking, even under the best of circumstances.
- cross-cut, rip, keyhole and hack saws
- spoke shave
- light plane
- brace and bits 1/4″ to 3/4″
- screw driver bit and countersink
- twist drills 1/8″, 5/32″, 3/16″
- plain screw driver
- square, metal shears
- three clamps with 2″ openings
LUMBER No list of pieces is given because one usually gets what is available. A few pieces are called for on the details, and if you don’t get enough lumber the first time, order again. Avoid spruce because it rots, and use regular 7/8″ boards, not thinner, to finish 13/16″. Never use tongue and groove boards below the water line. Planking should be 6″ wide.
HARDWARE Hardware should be galvanized. Use 6 penny or 7 penny nails generally, wire rather than cut, with a few 8 penny. Two gross screws 1.5″ No. 10. Get some scraps of heavy galvanized sheet iron from your plumber.
CAULKING Use regular stranded cotton caulking, or get balls of candle wicking from a hardware store. Cotton batting torn into strips will do in a pinch.
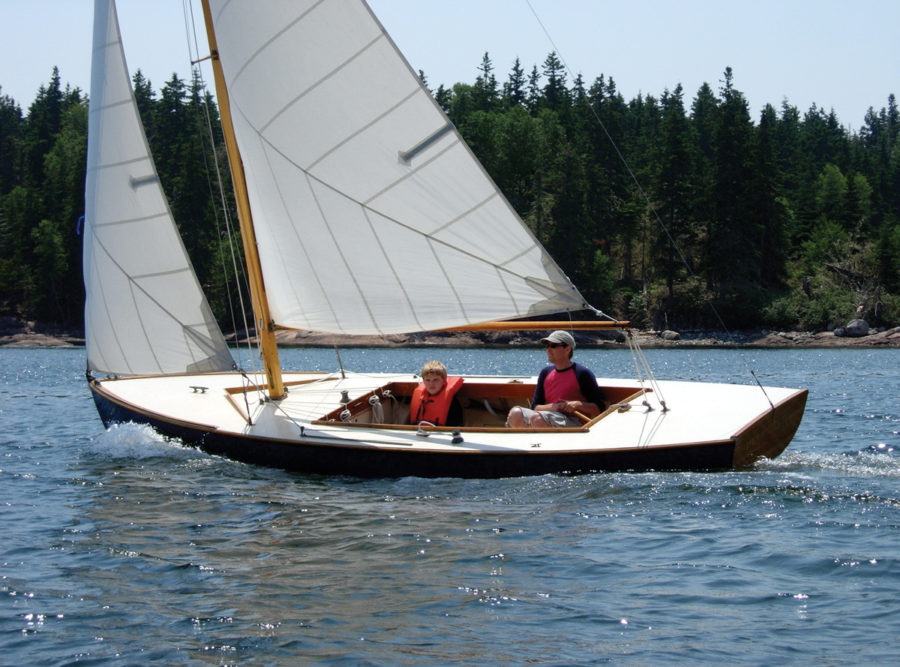
SIZE OF BOAT A 15-foot boat will hold two men and a boy. It sails best with three boys or two men. An 18-foot boat holds four men but sails best with three.
COSTS The materials for Minnow cost $45, with no attempt at economy, in 1929. A deck might add five dollars more. The 14-footer cost $20, in 1910. The 18-footer cost $35, in 1907. If you have $30, start work – you will raise the rest as you go along. Be careful of the dimes and quarters if cost is a problem. I have heard that in the Carolinas they used to build them for a dollar a foot plus materials. That, of course, could not be done now.
DIRECTIONS FOR WORK In order of procedure.
MAIN ASSEMBLY 1. Have your saws sharpened by an expert, and sharpen your other tools.
2. Study the plans carefully. Every word and line is on there for business. On the plans certain pieces are identified where they occur, by a number in a circle.
3. Get pieces out at mill, and order lumber (Detail A). You can chop the stem out of an oak piece but don’t do it unless the mill man wants to rob you. They should be able to saw it out.Get a full width side board if you can afford it; mine was redwood. Otherwise, two 12” boards joined carefully as shown (Detail E). Making tight may be a nuisance, but the joint will only be under water when sailing, and slop comes aboard then anyway.
4. Finish side boards complete but do not cut at stern (Details D & E). Saw out as shown, mark for ribs, bore 5/32” for each screw, and countersink. Be sure to make sides opposite hand. Screw ribs in place by the gauge so chine will fit. Use screw driver bit and brace.
5. Make transom, leaving a wide board at the bottom. Stem is presumably made at the mill. (See detail B.)
6. Make moulds of rough lumber (detail C).
7. Form the boat upside down (detail J). Nail boat side boards securely to the stern. Nail to mould No. 2 with two 10 penny nails each side not driven home. Take rope hitch on after ends of boards and cinch in. Nail in form No. 1. Cinch up by twisting rope and draw tight over transom. The battens on the inside of side boards to set transom will help a lot. Screw transom in place, screws into corner piece rather than in end grain of boards of transom. Have transom extended beyond bottom edge of side boards for bevel planking.
The sides will not bend evenly. Pull the boat true with a diagonal wire or rope. Use a string down center for truing.
8. Spring chine battens into place with clamps, and screw, beginning at one end and working towards other. Screws go from outside of side boards through, as with ribs. Chine will project beyond edge of board 2/3″ so both will bevel for plank. (Details F, J, and Q.)
9. Bevel edges of side boards and chine exactly to take plank. Work on both sides at once and use strip across for guide. Work down with drawknife and plane carefully. Boat is apt to leak here. Bevel the transom. Cut stem so last plank will lap onto it and finish at line of rabbet. (Details M and N.)
10. Begin at stern and lay three planks. (Details F and J.) Be sure to lay a thin stir of caulking on edges of side boards under planks. Nail plank to sides and screw to chine as shown. Cut plank long and leave trimming till later to be done all at once. Do not lay too close – you want a crack to caulk into.
11. Start keelson at middle of second plank, and let it go loose at bow at first or nail to end of stem lightly. Fit it at bow when half the planks are on (detail J).
12. Complete planking. Watch caulking carefully, and lay it between plank and keelson on each side of centerboard slot (detail F). Saw plank as close to sides as you can without marking sides, and plane true.
13. Mark centerboard slot and saw accurately with cross cut saw through from the bottom. Should be 1.75” wide to take post.
14. Turn boat right side up. Nail in spreaders to sides of ribs for open boat and 2×4 deck beams crowned for decked boat. Also seats. This holds the boat spread when the moulds are taken out, which is done now. (Details M & N.)
15. Centerboard box (detail G). Fit boards of box to keelson. They should be 1 1/8” thick, if possible but 7/8 can be used with care. It is almost impossible to drill for screw holes through from the bottom and run true into the boards of the box. It is better to drill both ways from the center, but the places must be accurately marked for the holes to meet. So drive some nails in the edges of the boards where the screws are to go, cut off the heads, and press down against the keelson. This will mark the holes, and you can bore the keelson from the inside through the plank, and into the edges of the boards. Use drill through bottom slightly smaller than shank of 4” brass screws, and a smaller hole in edges of boards to hold thread of screw.
16. Fit posts either end of slot, set in white lead, and nail into keelson with one eight penny. Clamp box to posts or nail lightly. Turn boat over and drive screws with brace and screw-driver bit. Be sure you have a thin strip of caulking between keelson and edges of box. Turn boat back, bolt box at bow with 1/4” bolts as there is no room to drive a screw (have holes already), and screw after ends to post, with 1.5” number 10 screws.
This completes the work on the rough hull. In the next issue of Yachting, directions and plans for completing the sharpie will be given in a second and final article ( continued on the next page) .
How to Build a Sharpie Part II The Most Boat for the Least Cost By EDWIN S. PARKER From the January 1931 issue of Yachting.
In the December 1930 issue of Yachting , the plans and directions for building a 15-foot Sharpie were given that carried the work as far as planking the bottom. In the present article the directions for work are continued from that point to completion. Reference is made here to some of the sketches in the first article and it will be necessary to have them at hand for reference in reading this installment.
STEPPING THE MAST (Details I & Q) For open boat, build small decking in two layers, top running lengthwise, and lower running across to prevent splitting. Saw mast hole with keyhole saw. Nail this decking securely in place with eight-penny nails. But the strain on the mast is so great that it will spread sides. So later, when the bumpers are on, bend a 3-in wide strip of galvanised sheet metal, as heavy as you can handle, across and around the bumpers, screwing it with two screws each side — 2-in screws preferably—holes drilled in metal and wood. Put some extra screws through sides into bumpers just abaft this. The step is as detailed.
For the decked boat, put 2 by 10 boards across and fur up for crown of deck (Details N & P).
17. DECKING Use 2 by 4 spreaders as already mentioned, crowned as much as you want. The crown is for appearance only. Nail the coaming to this, with the 1 by 6 planking left over, and set in the other deck beams made of 7/8-inch stock, crowned likewise. The coaming supports the adjacent deck. Do not set the edge too high or it will cut one’s knees- two inches will stop all the water necessary.
Use narrow matched boards for the deck -old flooring would be good. Another way is to have 7/8-inch boards ripped to 1.5-inch strips and bent to the curve of the boat, laying edge pieces first and working inwards, nailing together edgewise and into deck beams as well.
Paint deck a sloppy coat, lay canvas and tack to outside of side boards so that the bumper will conceal the edge of canvas. Paint canvas a sloppy coat at once. Use 8-ounce canvas if you can afford it, or anything lighter, down to unbleached sheeting.
18. BUMPERS (Details M, N & P) In the open boat this strip strengthens the edge materially. In any case, it turns a lot of water on a rough day and takes the knocks when landing. Use the hard pine battens No. 2. Taper off the forward ends to about 3/4 of an inch on the inside. In the open boat, clamp in place and screw 8 inches o.c. from the inside of the side boards, as with ribs. In the decked boat, screw through bumper from outside into side boards, countersinking deeply. In either case, bind at bow and stem with galvanized iron to prevent spreading. Make patterns of heavy paper for cutting metal. Drill for nails in metal, and clinch nails where they go through boards.
19. CENTERBOARD (Detail K) Make either way, as shown. The board can be pinned through the case for the hinge, as is usually done, but it is very convenient in a small boat to be able to get the board out from the top. The method of hinging shown has proved a good one, and keeps the pivot low. Have a hole in the box aft to take a pin to hold board down when sailing. Make removable cover to go on when board is down (Detail K).
20. RUDDER This is of the balance type. A very small area forward of the post will balance a large area abaft it. Set post by trial if necessary. The detail shown is very cheap and very strong. Either type of socket is good, as shown (Details H & P). The pipe is better for the decked boat, while the built-up one will serve for the open boat, and is less expensive by perhaps a dollar. But have all the seams accessible in case the soft cloth between the pieces of wood does not make tight. This cloth can be slopped with paint when laying. To cut the hole for the post, use a gouge if you have no extension bit, and, in any case, cut through each piece as you lay it and set post in place when screwing down each piece to get hole true.
For the rudder post (Detail H) get a couple of feet or so of galvanized 1-inch genuine wrought iron pipe from the plumber’s scrap pile, hacksaw it down the middle, working from sides alternately to keep cut true. Cut down perhaps a foot. This is easy. Do not try to flatten it out cold, as it will split. Have the blacksmith heat and spread and drill for the 1/4-inch bolts. This should cost about 25 cents. Now set the rudder and bolts in place and, with this assembled, place the socket in the boat and mark the position of the bolt which holds the shaft from dropping out, and also place where the tee shall come for the tiller. Take to the plumber, who will cut the pipe, put a long thread on it, screw on a tee which has a larger opening horizontally than vertically – they come standard if you can find them – and with this tee lined up with the rudder so that the tiller will be true, drill a 1/8-inch hole clear through tee and shaft. Through this run a wire to prevent tee from rotating on shaft.
21. SPARS (Detail L) Choose a clear, straight 4 by 6 to cut mast from, preferably western fir. Have mill cut to 3 by 3 and 2 by 2 (Detail A). Mark mast as in diagram… do not taper straight. Tack in brads at taper points, and spring the batten to get true curve. Saw to tapered square, working from both sides alternately to keep the lines, sawing perhaps 6 inches at a time on each side. Have the saw sharp. Where saw breaks out at edge, finish with plane – do no try to hew out, as the grain will tear in and leave a hollow in the mast. But work into a perfect squared stick. Make the octagon gauge, as shown. By twisting this as you go towards the small end you get a true octagon on the mast. cut to this line with drawknife and finish with plane. This will give a true octagon. If this is well done, the work of rounding off is negligible.
Bore hole 5/8 of an inch fore and aft at the head for halyard and work it out with knife so that rope will pass through easily.
Make boom similarly. Jaws of hard wood. The boom tapers very sightly at after end, and flattens out at forward end to take jaws. Make long in case sail stretches. (See detail L).
22. SAILS (Details R, S & T) Do not be afraid to make your sails. You cannot equal those of a professional, of course; but what of it? Use 30-inch drilling, lap edges one inch and see down both free edges on a seeing mating, using number 30 thread and a long stitch and tight tension. Pin pieces together about one foot apart to be sure pieces pull alike. Lay the sail out with string on a large surface. Cut the sail to this pattern, selvage on the leach or rear edge, allowing hem at bias edges. Curve the edges you cut (at mast and boom) an inch or two out, especially on the edge next to the mast. Not too much, though, as the sail will bag. Hem bias edges, but leave selvage as is.
Have at hand a piece of 1/4-inch manila rope long enough to go around the edges of sail, with some to spare. Hang it out of doors for a month or more. Sew this to edges of sail with sail twine or knitting cotton, well waxed and double, with a sail needle or any heavy needle, the needle going under one strand of the top each stitch. This is the only tricky part of the process. If the rope is not tight enough, or rather, longer than the edge, the edge will flop curiously. If it is shorter than the edge, the sail will bag. To get even tension, lay sail out and stretch sail and rope together. Catch rope to sail every foot or so, and as you sew the rope on, come out even at each catching. The luff (at the mast) and the foot will be easy, but you may have to do the leach over again, as I did.
Sew on reef points of one-inch tape, 12 inches long, at each seam and two between. Make cover for sail so sun will not rot it.
23. CAULKING In making a boat tight, plan for a good seam and fill it with caulking. The planks may be too close in some cases. Make a hard wood wedge and drive it all along the seam to open the seam slightly. Take the caulking, preferably stranded cotton, and drive it into the seam with the wedge or a putty knife, or at the ends of the seams, with a screw driver. Fill the seams evenly and fairly tight.
DO NOT drive caulking in seam at edges of bottom, between planking and side boards, that is, against mailings. The caulking will swell and pop off the planks. The caulking laid when planking should be sufficient. If leaks develop, fill with plenty of copper bottom paint.
Making tight is not easy. The bottom seldom gives trouble, but at the rudder socket and stern, and at all unexpected places, leaks show up and cause trouble. Make tight with caulking as far as possible. Then use white lead inside and out in corners, drying the boat before applying. A coat of paint does wonders, too, but all this should be done after the caulking is completed.
24. PAINTING Paint inside, thinning for first coat.
Paint bottom with brown copper paint direct on the wood, giving two or three coats. Green looks better, but does not stay on as well.
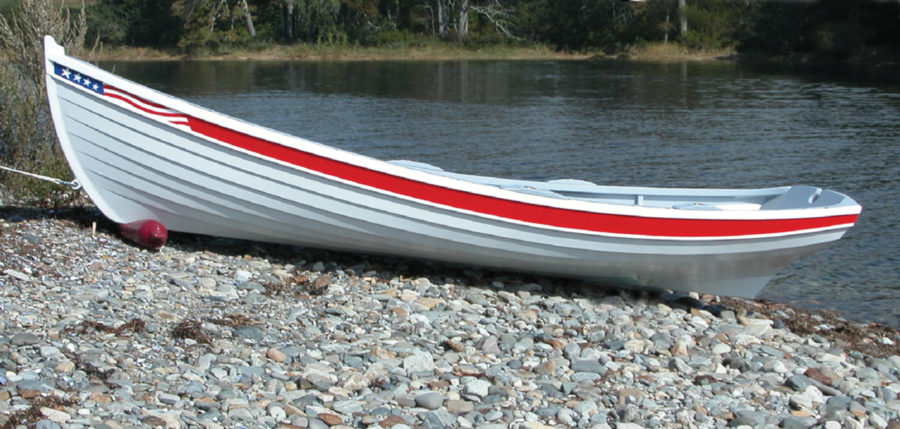
Paint some kind of a design on the sail (Details R & S), using one-third or one-quarter oil and the rest turpentine. Outline design in black about one-half inch wide. Two are shown, but the possibilitics are endless.
25. MODIFYING THE DESIGN It would be doubtful policy to modify the design of the hull. From Mr. Ives’ letter, it would seem that I have developed the design somewhat along the same lines us the fishermen did, namely, toward a dead rise skiff. The older sharpie had a long overhang aft, but actual analysis of the design does not favor this, and Minnow keeps going right into a sea, as the others did not. Do not put on a skeg, or change the rudder, for it is a joy to sail with the balanced rudder. The centerboard, however, may be moved forward or aft, at will, to suit any sail plan you may prefer.
Personally, I like the two masts on an 18-foot boat, though I never could bring myself to move the boom up the mast and reef along the mast as the old sharpies did. On my 18-footer I had a gaff sail forward, but the gaff was a nuisance. Do not have any stays on the mast – there is a tradition to the effect that the spring of the mast helps the speed.
A sloop rig should be good for the larger boats, but whatever rig is used, be sure the center of the total sail area comes over the center of the area of the centerboard.
If a boat larger than 18 feet is to be built, increase the depth of the side boards as well as merelY lengthening them, as shown, so there will be more freeboard aft.
26. GENERAL POINTS It is well to have the boat decked – you can tip without taking water over the lee rail. A cover on the centerboard box is worth having. as water shoots up in a chop. For a small boat, though, the open model is very handy for rowing.
When sailing before the wind pull up the centerboard. One trial will show you why.
Do not use ballast and try to carry more sail- you lose thereby.
My father’s plan of 1880 is said to have steered with an oar. This should help in a race but I found it a nuisance.
Ready to get building? Click here for a printer-friendly PDF of all the instructions and diagrams. Then write to Yachting to share your experience!
Yachting would like to thank reader Fred Ganley for remembering this article and calling it to our attention. Happy building, Fred!
- More: Classic Yachts , How To , Sailboats , Seamanship
- More Yachts
New Flagship for Bering Yachts: The B165
Power catamaran popularity rising, “energy observer” zero-emission boat showcases sustainability, princess yachts’ y95: a flagship flybridge, for sale: sunseeker predator 68, for sale: cl yachts clb 72, 10 yachts under $500,000 you can have today.
- Digital Edition
- Customer Service
- Privacy Policy
- Email Newsletters
- Cruising World
- Sailing World
- Salt Water Sportsman
- Sport Fishing
- Wakeboarding
Building, restoration, and repair with epoxy

Building a wood/epoxy Sharpie, Phase I
By Captain James R. Watson
When I was building my first boat, my dad used to drive me nuts as he sat in his rocking chair considering “how to proceed.” I wanted to see the chips fly. Now, after many of my own projects, I realize the wisdom of studying the sequence of events from the beginning of a building project to the end. Building projects are a lot like a child’s dot-to-dot puzzle. There is often a best order to the steps that can save time and money, improve quality, and most effectively utilize your shop space. So often I have foolishly rushed to build the easy and rewarding components only to have them take valuable room and leave me late in the project to struggle with time consuming keels and rudders.
With my most recent project of building a 29′ sharpie with wood and epoxy, I’ve tried to think carefully about my order of building. I built the frames and daggerboard and case first because they take little room, not the main shop space (in my case, half a garage that requires winter heating). I built the daggerboard and its ballast component before the daggerboard case because then the case can be built to fit the board. I also finished interior surfaces before closing them off, installed components while there was still easy access, precoated and sanded parts on a bench rather than waiting until they were in place.
With any project, it helps to think carefully at the outset about the entire building process so that you can be more efficient. Make every step a clear step forward (without two steps back) to the next dot in project completion. I’ll share some tips with you, as well as a few of the nonconventional approaches I am taking in building the sharpie.
Select the design
Ever since I was a kid, I have wanted to build a sharpie. These relatively narrow, flat-bottomed skiffs evolved in the 19th century. They’re pretty boats and have often been praised as offering the most performance for the least investment. I liked their virtues of shoal draft and good sailing characteristics with a speed potential. Sharpies can make good pocket cruisers that can be trailered easily and open up many new cruising grounds. They’re also relatively simple to build. The first step in any successful boatbuilding project is selecting a design. As I’ve written before, too many folks want to be designers, but after all the hard work end up with a fundamental design error that dooms the entire effort. Sharpies have evolved over 150 years and the designs of Howard I. Chapelle and others are well proven. I wasn’t about to design my own. I bought plans for several similar designs before selecting this Howard I. Chapelle’s DANDY, a development of Commodore Monroe’s popular EGRET. The boat is 29′ length overall, with a 7’6″ beam and an 8″ draft (Figure 1).
I planned several variations, however, the most important being a ballasted daggerboard, molded composite chines, and a high performance rig.
Choose quality wood
For many applications, several choices of wood are possible. Be sure you understand the physical properties of the species you select. You will also need to consider cost and availability. Here are some of my thoughts on the choices for the sharpie project.
I chose Douglas fir for the stringers (including chines, clamps, keelsons, frame and bulkhead perimeters, etc.) because of its cost and availability in the Midwest. I bought 20′ clear vertical grain (VG) Douglas fir for about $3.70 a board foot. Another good choice for stringers is Sitka spruce. It is lighter than fir but the cost is about double. (Prices will vary, but the comparative prices between species stay about the same). Cedar is too soft for these components. Stems, daggerboard, daggerboard case ends, rudder
I selected Honduras mahogany for stems, false stems, daggerboard, daggerboard case ends and rudder. Mahogany’s attributes are strength, dimensional stability, and durability. Bulkheads, daggerboard case, and planking
I chose marine-grade Okoume plywood for all bulkheads, the daggerboard case, and planking. Where 1/4″ thickness is used, I prefer 5 ply over 3 ply because it is stiffer. I recently saw a large catamaran built with mahogany plywood and WEST SYSTEM® epoxy that has spent her life in the tropics and there was no checking and no moisture damage, a credit to the builder and the construction materials. Another option would be marine grade fir plywood. I’ve built several boats of this material which are now 25 years old and still going strong. However, marine grade fir plywood has a tendency to check which even covering with glass may not contain.
Many wonder if AC grade plywood will work for boat building. It will, but the voids and knots will be a source of problems and should be filled with epoxy. I’ve found AC grade plywood ends up costing so much more in time and epoxy to repair to bring it up to speed that it is not a good choice.
Fabricate stock before storing When I unloaded my lumber, I already knew member sizes and shapes. So I ripped all stringers to width and shape (chine stringers are trapezoids) before storing. All the longer pieces would require was scarfing to length later. Then I carefully stacked the lumber in order of use, placing 3/4″ x 3/4″ sticks spaced at about 6′ intervals between layers. Pre-finish whenever possible.
Whenever possible, I prefinish parts and surfaces. It is much easier, neater and quicker to sand and coat parts on a bench or when there is good access. Crawling around inside the hull with a sander and roller is difficult and time consuming, and the quality suffers. Typically, because the interior will be finished clear, I apply one coat of WEST SYSTEM 105/207, sand it, and give it another coat. I don’t apply the second coat where I know there will be a joint (temporary fasteners used during dry run fitting and trimming help identify the areas). I can avoid having to sand there before applying epoxy for bonding.
Building frames
I build my frames on a mold table on which I laid out the body plan when lofting, taking care to mark the waterline and centerline. I use heavy, clear plastic on the table to keep the adhesive off and to let me see my lines. I produce all stringer notches and limber holes at this stage. Then I fasten components together in a dry run, using drywall screws.
Use removable fasteners
I then glue the components together on the loft table, using the screws for clamping pressure after coating them with Stoner™ thermoset mold release E497 for easy removal. I check the assembly with the lines on the table to make sure nothing has moved. After the epoxy has cured, I remove the drywall screws and counterbore all holes with a countersink. Then I bond in plugs made on the drill press with a plug cutter, using the same species of wood. When the epoxy has cured, I trim the plugs with a flush-cutting saw (Figure 2). Why not use permanent fasteners? Exposed endgrain that fastener holes expose is a common source of moisture related problems. Moisture can travel down the fastener via condensation. With everything bonded rigidly, nonferrous fasteners are redundant. They are also expensive (for example, #8 x 1″ are 50 cents each). With plugged holes, all is permanently sealed. However, some high stress situations may require fasteners. These are set in wet epoxy while being installed to improve cross grain strength.
Radius the edges
All edges (except where planking and stringers join) are rounded with a router. I use a 3/8″ radius double flute bit. Corners are vulnerable to damage and are sharp when you bump them. Radius edges coat more easily and leave an uninterrupted coating which accelerated weather testing in the laboratory as well as my firsthand experience with many boats have shown to hold up much better.
Coat and sand
I then coated all surfaces with two coats of WEST SYSTEM 105 Resin/207 Special Coating Hardener. I decided that on most of the interior, this would be my finish. No varnish. Most of the boat interior will not see the light of day and those areas that will see only indirect light. Two even thin coats with no runs or sags is clear and glossy and will hold up great in this application. I also lightly sand any surfaces that will be varnished (with either a satin or a water-based satin varnish), so it won’t have to be done later. This includes the visible interior of the cabin.
Making the daggerboard
One of my design modifications was the centerboard. Sharpies usually carry a drop type of board that is hinged on an axle. Some sharpies have two (tandem) boards, some leeboards. I modified the traditional designs to use a ballasted daggerboard. I chose a daggerboard because the clean exit from the hull and the aspect ratio make it more efficient. Its small slot size reduces lost hull displacement. A daggerboard also takes up less room in the cabin.
I chose a NACA 0010 foil section for the board. I built the daggerboard and ballast component before the case so I could build the case to fit the board. It’s hard to modify a NACA foil section, but you can easily modify the case for a precise fit.
Basically, I followed the procedures outlined in the Gougeon Publication 000-448 How to Build Centerboards and Rudders . However, I modified this method by ripping the strips to specific widths dictated by the template. This saved material and minimized machining. I also sawed a 1/2″ deep slot in the ends of each strip into which thin 1/8″ plywood would fit snugly. Thus, I was able to align the laminate during the gluing operation (Figure 3).
Adding ballast
The daggerboard has lead ballast on the end. I wanted to be able to hoist the board completely, so I needed the lead to be the same foil shape as the board (rather than a bulb shape). The ballast weighs 200 pounds.
I used the “lost foam” process to produce the ballast. I first needed a foam plug the same shape as the board. I glued foil section plywood templates to each end of an oversized block of blue insulation foam. I then wrapped thin piano wire around two wooden dowels and connected the wire with alligator clips to my truck battery. I pulled the hot wire taut and dragged it across the templates, cutting the foam to the exact foil shape in about 30 seconds. I added some peaks to the top of the ballast to key into the board (Figure 4). Then I placed the foam in an oversized hole dug in the yard and filled around the foam with Portland cement, allowing it to cure for a week. I had some buddies come over to melt the lead and do the pour. We built a wood fire, added charcoal, and supercharged it with my shop vac. We melted miscellaneous lead scraps and wheel weights in an iron pot cum crucible. (I was also using bread pans to mold 25 ingots at 35 pounds each for internal ballast.) The foam plug vaporized as we ladled the liquid lead (over 600°F) into the mold. It bubbled, hissed and gurgled for a few minutes, and half an hour later we were digging it out of the ground. Light taps with hammers cracked off the Portland cement, revealing the accurate casting.
Using hardware bonding techniques, I drilled holes in top of the lead ballast, and then bonded in 3/8″ stainless steel threaded rod (Figure 5). We know that you can get about 1,000 lb. per inch of bury into wood as well as lead, so my 12 threaded rods with 2 to 3 inches of bury was overkill. I prefit the ballast to the board (Figure 6), before bonding the two with epoxy thickened with 406 Colloidal Silica Filler.
Making the daggerboard case
Once the daggerboard was completed, I built the daggerboard case wide enough to allow for clearance. My unique approach to constructing the case allowed me to complete all treatment to the interior before closing the case. Of course, once the case is closed, access is severely limited. I bonded the Okoume daggerboard case ends to one plywood side producing a 1″ radius interior fillet. For abrasion resistance, I then applied a layer of 6 oz fiberglass. I also glassed the remaining side that was not yet attached. Next, I applied a thick 1/32″ coat of 425 Copper Additive. I used copper additive for several reasons. First, it is very hard and takes abrasion well—abrasion from potential rubbing from the daggerboard over the years. Also, the copper additive has some antifouling potential so it may aid in preventing marine growth. From experience and testing, we know that it will at least make the surface easier to clean. Once all of the interior surfaces were cured and sanded smooth, I bonded the adjoining side. Then, as with the frames, I prefinished the daggerboard case exterior with WEST SYSTEM 105/207.
Assembling strongback, frames and stringers
At this point, I decided I was ready to commit the shop to assembling the whole boat. Jig construction and frame setup were straightforward. The strongback was a simple 2″ x 4″ ladderlike structure that assured accurate frame placement. I installed the 8″ wide scarfed-to-length keelson first. Then I could use it as a sort of long bench on which to scarf the 6 other stringers (2 clamps and 4 chines) to length.
Installing the daggerboard case
I installed the daggerboard case before any planking or stringers. That way, I didn’t have to duck or negotiate around them. I cut the keelson with a slot that duplicates the daggerboard foil shape. A method for aligning the case that works well is to fasten the case to the keelson with lag screws at each end of the case. The holes through the keelson are made oversize and oblong athwartship. This allows precise alignment and marking in the dry run and when bonding permanently.
Building and prefinishing other parts
Next, I fit the scarfed-to-length chine stringers only. Then, while I still had good access, I produced the bunk and cockpit sole. These horizontal elements are otherwise difficult to fit after the installation of side panels. After fitting, I coated these plywood parts with epoxy and set them aside. Then I installed the chine stringers (Figure 7).
Applying the bottom
The flat bottom of the sharpie is easy to work on and with a subtle rocker is easily bent into position despite the 3/4″ panel thickness. I fit and scarfed together all panels at an 8:1 bevel. I glued them down in one operation, cleaning off all excess adhesive prior to curing (Figure 7). (I will later modify the bottom to a slight 3/4″ arc with lead ballast slabs molded in amidships.) I again used drywall screws sprayed with release for temporary fasteners and then bunged the holes.
Installing the side planking
I never thought I’d put butt blocks in a boat after the poor results with a MICRO project where the butt block areas showed flat spots. This was probably due to the short wide shape of the boat so that the tight, fair curve was interrupted with the localized reinforcement of the flat butt block. On the other hand, some of my oldest projects with butt blocks, including the trimaran ATOM with its long subtle shapes, have looked just fine. (See Epoxyworks 7, Spring 1996 for some comparisons of butt blocks and scarfs.)
So why butt blocks on this boat? The sharpie hull resembles the long shapes of the trimaran more than the short beamy shape with which I’ve had difficulties. I’m building this boat by myself. A complete panel all scarfed together would weigh on the order of 90 pounds. Even if it weighed half that, at 3′ by 30′ it is unwieldy. With wet adhesive on all the contact points, accurate placement would be futile. An alternative would be to scarf in place, but it would be very difficult to align scarfs. Thus, the butt block.
First, I fit all the planking panels, overlapping the adjoining edge slightly. Then I marked this so the edges matched perfectly. At the same time, I marked all stringers and frames. I also prefit all butt blocks. They are plywood, 30% thicker than the planking, placed between the stringers with the face grain running parallel to the planking. After fitting, I removed all panels and coated them with WEST SYSTEM 105/207, sanded and applied a second coat. I didn’t coat the areas where the stringers and frames joined so they would not require sanding before bonding. After one panel was joined to the hull, I screwed and glued the butt block down. The second panel was then simply put in place and similarly glued and screwed to the butt block. Again, I used drywall screws for clamping.
One of the negative aspects of the butt block is the exposed endgrain of the butting panels. To solve this, I used a disc grinder to dish out a generous scoop of material centered over the butt, about 8 times the depth in each direction. Then I bonded in multiple layers of successively smaller strips of biaxial fiberglass to fill the joint and faired it smooth.
Building composite chine reinforcement
My approach to building and installing the chines deviates from traditional plywood construction. Not only did I reinforce the chine with composites, but I also premolded them. The chine is the corner that is formed where the sides and bottom of a boat join. Large buildups of wooden materials for reinforcement at corners (especially chines) are susceptible to dimensional changes that lead to cracking and then moisture ingress. Replacing the wooden chine buildup with a composite reinforcement resolves this situation. Composite chine construction methods have been used successfully for many years. I first used them on a plywood Searunner™ trimaran. Now 25 years old, its chines are perfect, a testimony to the soundness of the concept.
In the sharpie, two trapezoidal shaped stringers run along the chine, one on the side and one on bottom, about 4″ from the planking joint. They form a trough along the interior of the joint into which biaxial fiberglass cloth reinforcement can be laminated. The chine exterior is rounded and covered with several layers of 16 oz fiberglass cloth. As well as eliminating moisture problems, this rounded chine offers hydrodynamic benefits by reducing the drag-causing eddies created around sharp corners as a boat sails.
With the boat upside-down, laminating multiple layers of fiberglass with epoxy overhead poses obvious problems. One option is to roll the hull over, but this is no easy task with an awkward 700 lb hull that may not be as rigid as desired and can stress the glue joints or other components. Instead, I decided to produce the inner chine reinforcement in sections on a mold and install the cured composite parts overhead.
Molding the composite parts
Initially, I had planned to make a mold for the parts using PVC pipe with tangent flats made of blue insulation foam taped in position at the angle of the side and bottom chine joint. However, to get the perfect compound curve, I decided to use the hull as the mold. First, I shaped the radius on the chine exterior, filling and fairing where the sides and bottom joined. Then I marked the stringer and frame locations and covered the area with 6-mil polyethylene to provide a release medium. I had to make the composite reinforcements in 5 sections so that I could install them under the frames (Figure 8). Once they were in place in the boat, I would join them into one continuous piece.
A chine can be subjected to more force than the hull panels, so adequate buildup of the chine reinforcement is important. My laminate was built up from 7 layers of 8″ wide, 15 oz. biaxial/mat fiberglass tape to about 1/4″ thickness. I used one layer at the extreme edge of the tangent and staggered the tape to produce 7 layers at the apex. I tapered the ends of each section. After they are fit in the boat, the sections will be joined together by adding layers of biaxial tape and epoxy. I released the boat from the strongback and raised it so I could get underneath and install the composite sections at a comfortable working height. I installed the sections between each of the frames and the chine stringers in a layer of epoxy thickened with 406 Filler. After all of the composite sections were installed, I reinforced the exterior of the chine with 3 layers of 15 oz. biaxial tape.
Fiberglassing the bottom
The bottom of the hull gets one layer of 6 oz fiberglass cloth for abrasion resistance. To strike the boottop and waterline, I followed the method described by Larry Pardey in Details of Classic Boat Construction. While he doesn’t like epoxy much, I could adapt his procedure to trim the top edge of the fiberglass for my “cut in line”. I applied the cloth down over the chines past the designed waterline about 4″ to 6″ and cut the fiberglass straight and clean with a circular, razor-bladed fabric cutter. The edge that now exists is an excellent “cut” edge for painting.
To apply the fiberglass, I used the dry method described in our manuals. I added 503 Gray Pigment to the last of the coats to fill the weave. I’ve had good success with this approach and the pigmented bottom gives the craft look of continuity.
I glassed the topsides with a layer of 4 oz. fiberglass cloth to the cut line and pigmented it with 501 White Pigment to serve as a sort of primer. The boat was finally ready to leave the shop. Now I can dedicate that space to building the freestanding composite spars.
Be sure to read my follow up article, Building a Wood/Epoxy Sharpie, Phase II .

March / April Issue No. 297 Preview Now
Sailboats - Cruising
Sharpie 24 hampton flattie.
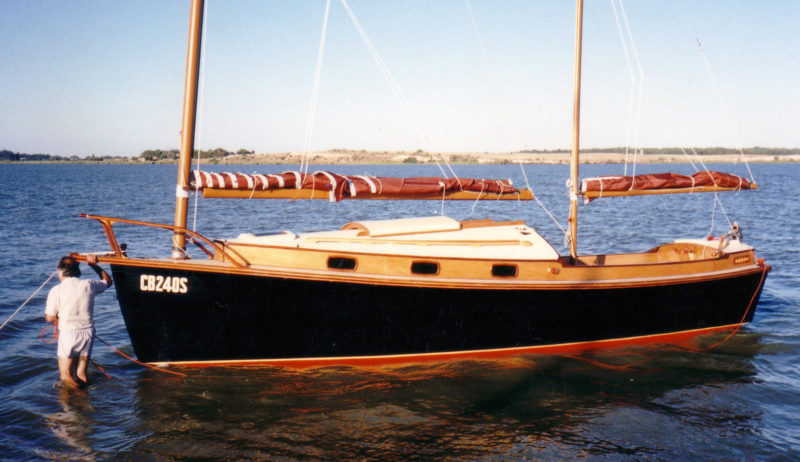
24′ Chesapeake Bay Hampton FlattieL.O.A.: 24′ 2″L.W.L.: 22′ 8″Beam: 7′ 9″ Draft: 2′ ½″/3′ 9″Sail Area: 263 sq ftWeight: 2,500# (approx)Proportionately, this is the largest sharpie type known, and shows the maximum beam ratio successfully used in the sharpie type. Hence, this is a ‘big little boat,’ and will make an excellent, safe and comfortable pocket cruiser. She has a different character than the other sharpies, being a gaff-rigged sloop, and her large skeg gives her a deeper draft than even the largest 'true' sharpies.While this model is not as fast or weatherly in comparison to some of the more extreme types, she is easier and less critical to handle, making her an all-around excellent family cruiser.Also known as the ‘Hampton Flattie,’ this type was very popular on the Chesapeake Bay throughout the last quarter of the 19th century, and varied in size from 16 to 30 feet in length, according to Kundhart, who wrote about the type in Forest and Stream and Small Yachts. Chapelle, in his research, found a hulk near Elliot on the Chesapeake in 1940-41, and made plans from it [Fig. 112 in American Small Sailing Craft]. These craft were used for oystering and crabbing until at least 1910, and lend themselves well as small yachts. The original working models had a small cuddy forward, which I simply expanded aft to create a pocket cruiser. They were called ‘handscrapers’ as they dredged oysters using small manual winches. I have explained the theories and development of the hull shape in Chapter One of THE SHARPIE BOOK.This is an excellent first boat to build by someone who is ready for a mid-sized project and wants a pocket cruiser that is capable of coastal cruising and crossing to the Bahamas in settled weather. The flatties are excellent, balanced, good-performing boats on all points of sail. This one will be a comfort and a joy to behold.
Design Specifications
email: [email protected]
snailmail: PO Box 651429, Vero Beach, FL 32965

ACCESS TO EXPERIENCE
Subscribe today.
Publishing dynamic editorial content on boat design construction, and repair for more than 40 years.
1 YEAR SUBSCRIPTION (6 ISSUES)
Print $39.95, digital $28.00, print+digital $42.95, from plans & kits.

CCSF25.5 center console, deep v
Workstar 17

Kymi River Solo 16
From the community.

19’ Bartender
We are selling our 19′ Bartender that was hand made by my wife’s father.

1985 HD-750 Mahogany Sloop
24.5′ “SOUVENIR”.
Herreshoff 12 For Sale
Well maintained. Sailed regularly. Winter storage in Salem, MA. $25,000.

Herreshoff NY-30 class 1905
43.5′ Herreshoff NY-30 class (1905). 43′6″ LOA, 30′ draft, framing: white oak.
April 2009 Spring has sprung and we're getting some stuff done.

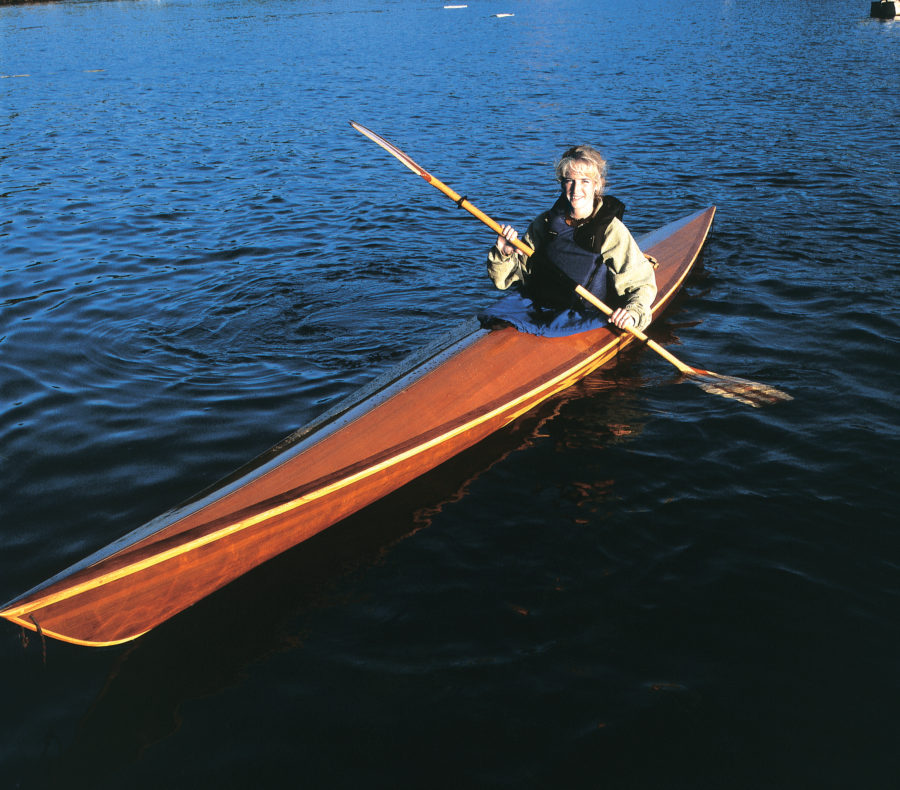
Rune Eurenius with a balance brace in his white Hunter Photo: Kristina Hansson
Canoes & Paddling
- Frågor och svar
News & Launchings
- Latest news
- News archive
- Canoe Yawl 400
Sharpie 600
- Publications
- Talks & classes
- Building a kayak
- Website/GDPR
Latest updated Monday, February 5, 2024, 155 comments
Images | Particulars | More about | Background and history

Plans, Sharpie 600 - 310 EUR Purchase
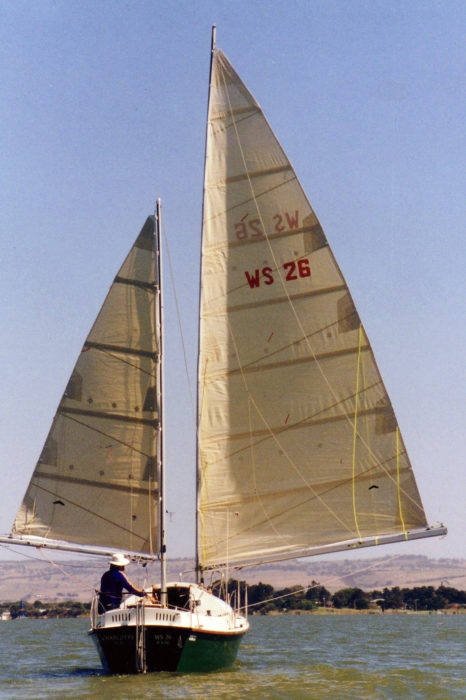
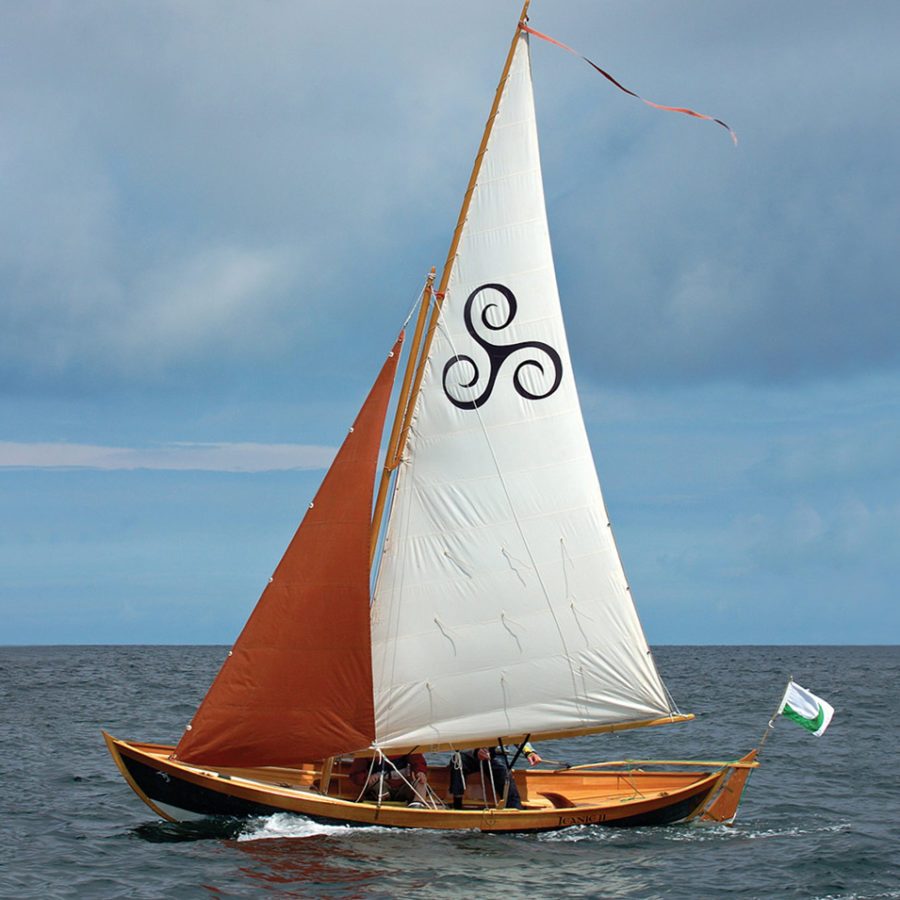
Sharpie 600 is designed as a daysailer and weekender, a use most boats are put to, regardless of their design purpose.
The design brief for Sharpie 600 goes like this:
- Daysailor for many: Roomy cockpit (< 200 cm) Comfortable under sail and in a harbor. Everything within reach without passengers being in the way. No boom above the cockpit (with the lug rig). Flexing masts reduce heeling in a gust (also the lug). Easily lowered masts in a tabernacle (gaff rig).
- Weekender/Cruiser for two: Comfortable for one, acceptable for two. Provisions for basic cooking. Room for a portable toilet. Usable in bad weather. Some kind of heating for use in early spring or late fall.
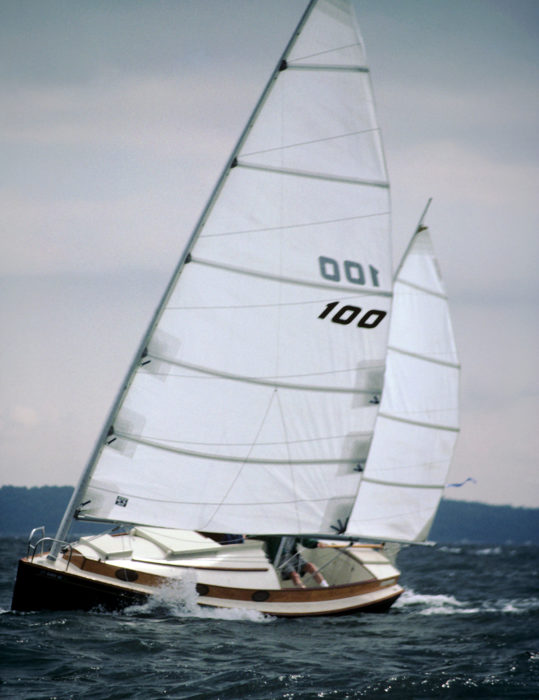
- Fast: Fast enough to cover considerable distances in a day. Lots of sail (SA/d=21) for ghosting along in a breeze without having to resort to an outboard motor or oars.
- Safe: Self-righting after a knockdown. The lug rig reefs without affecting sail balance. Ability to beat away from a lee shore in a blow. If possible unsinkable (with built-in positive flotation).
- Small and handy: Should maneuver calmly and smartly under sail, motor or oars. Short, narrow and light (d/l=159) - easily handled on and off a trailer. Low moorage fees - if applicable. Draft not more than 25 cm, allowing sailing on to the beach and drying out upright on the sturdy flat bottom. The rudder and centerboard should lift without damage if you hit bottom.
- Pretty: Pretty in a traditional way, under sail and on the beach. To maneuver calmly and smartly under sail, motor or oars.
- Low maintenance: Modern wood. Epoxy/glass-sheathed plywood. No permanent installations: electricity, plumbing, motor etc. If fitted with a motor, an outboard is recommended, preferably in a well (but a few Sharpies have been fitted with a small inboard motor under a bridge deck). Easy trailering.
- Easy to handle: All conceivable maneuvering on land or in water should be possible for a competent single-hander. With the gaff rig, the mast in a tabernacle should be easily lowered for passing under a bridge, while the lug rig masts are light enough to be handled manually.
- Easy to build: Designed for amateur construction, the Sharpie is built on 7 transverse and 2 longitudinal bulkheads, preassembled like a large jig-saw puzzle. To this, bottom-, planking- and deck panels, sheathed in epoxy/glass are glued.
The Sharpie 600 took the third prize in Classic Boat´s design competition in 1996.
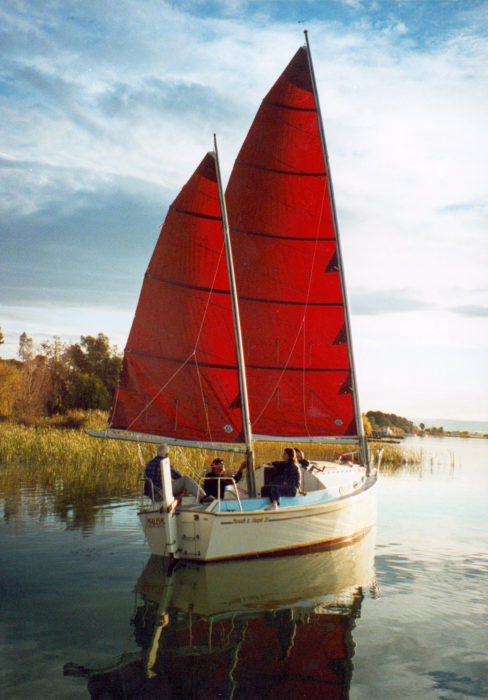
A pro built Sharpie in France .
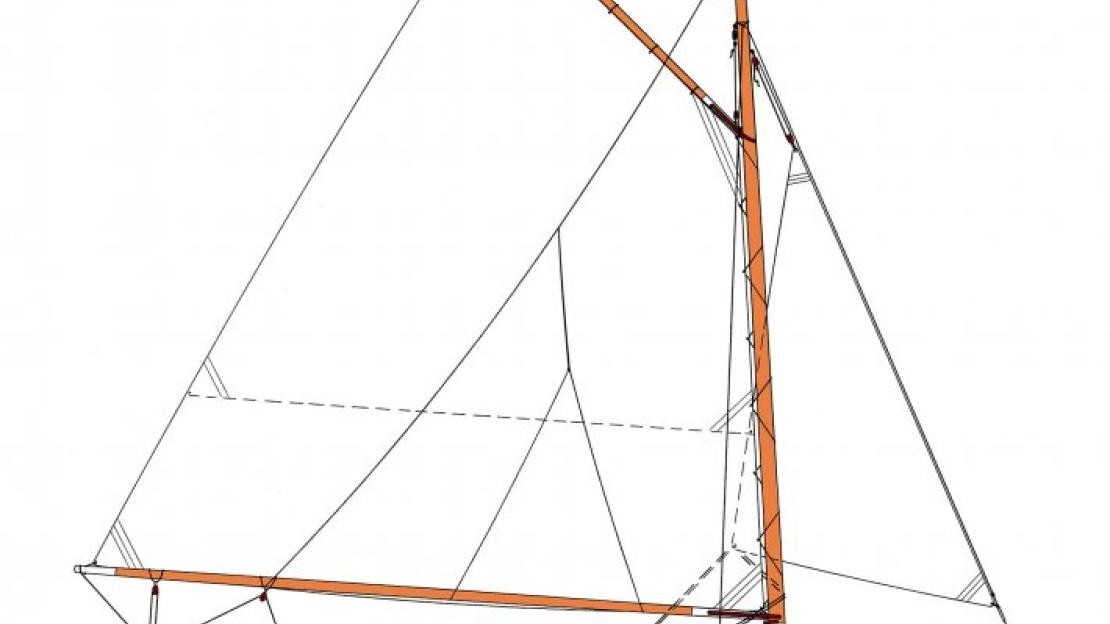
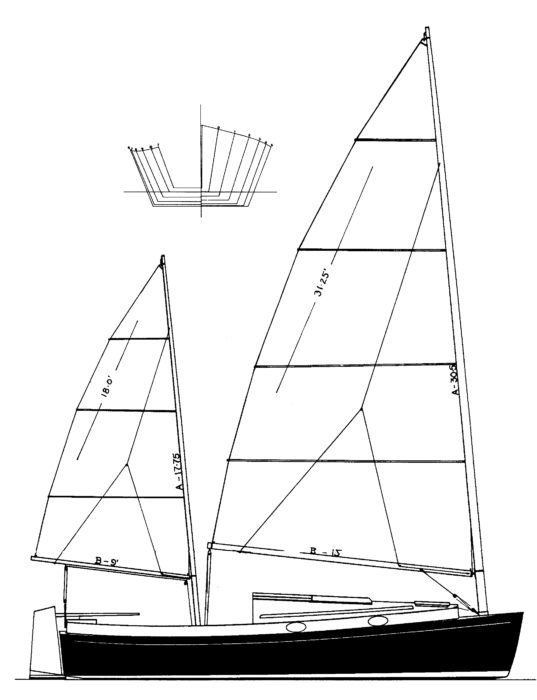
The plans show either the lug or the gaff rig and this must be specified when ordering. Both are a bit unusual today, but are excellent on small shallow-draft centerboard boats. They were very common earlier, being easily handled, simple to set up with a minimum of technical gadgets and comfortably sailed singlehandedly.
The gaff sloop

The mast of the gaffer sits in a tabernacle and can be lowered and raised in minutes to pass under a bridge. Since most sailors are used to one-mast boats it might seem less challenging than the lugger. The gaff is a way to increase the sail area on a shorter mast and thus reduce weight aloft (the same way full extended battens increase the area aloft on a modern competitive mainsail). A gaff mainsail can be lowered or reefed without pointing the craft into the wind (let go of the throat and peak halyards and the sail comes down regardless of the wind direction). The gaff rig is not as efficient close hauled as a modern rig but makes up for it reaching and running.

The lug rig was my first choice for the sharpie since I was very impressed with the performance of the lug rig on my canoe yawl a couple of years earlier. But many interested builders were not quite confident with such an archaic rig, and I got questions about an alternative. So I drew a gaff sloop. Now, after 15 years, the gaff rig counts for approx 2/3 of the shipped drawings. Many seem to choose the gaff for aesthetic reasons: it looks more ship-ish.

Particulars

The plan set consists of six sheets (A1 size = 23"x33") with all the information a builder with some experience (e.g. kayak or canoe building) would need to build the boat. Inexperienced builders may need to consult books in basic boatbuilding techniques.
Sheets are:
- Construction details
- Sections with a table of offsets
- Profile view
- Rigging, masts and sails
The boat is built with plywood – a simple and quick way to achieve strength and a smooth finish – double 12 mm sheets on the bottom, 12 mm on the sides and 9 mm on the deck and house. Wood strip construction is an alternative – though it will be more time-consuming.

The plywood sections and longitudinal bulkheads fit together like a large puzzle, creating a super-stable 3D grid, joined by epoxy fillets. The image above shows the lug version. The ballast is lead sheet glued/screwed to the floor (a thrifty builder without access to a commercial lead-casting foundry perhaps could do the job himself, using old lead tire weights or scrap lead, a charcoal fire and a simple mold – a particle board with wooden battens – but check the environmental policies in your area!).
Note: The gaff and lug version are on different plans. Please specify which you want when ordering.

No building manual is included. For more information on building techniques, please consult one of the books on boat building listed in literature .
More on the Sharpie 600
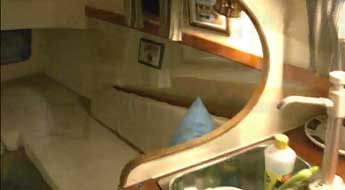
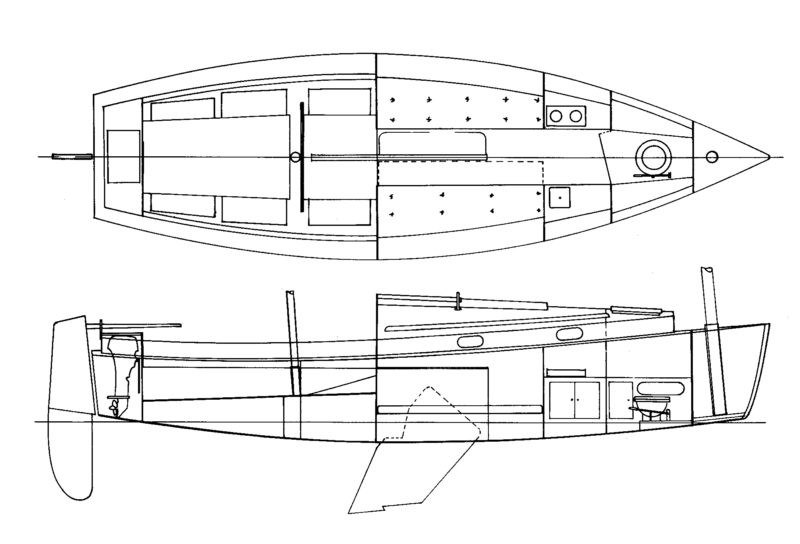
I frequently get questions about the off-center board, positioned 30 cm to the right of the centerline. It means that the centerboard trunk that usually transforms the cabin of shallow-draft cruisers into two narrow and not very usable spaces is now out of the way, hidden behind the longitudinal bulkhead. The Sharpie 600 is surprisingly roomy.

"But won´t she sail better on one tack?" In practice, you must be a very good sailor to be able to notice any difference. In the good old days, the centerboard was often placed through the planking beside the keel as boat builders did not like cutting holes in the backbone. Thus, my Sharpie follows a respected tradition, although the offset is slightly more than the older custom.
The suggested interior layout is simple and easily maintained, without any installations (electricity, plumbing etc.): a portable toilet can be stored under the cockpit seat or under a hinged seat. The recommended water system is two 25 l jerrycans under the lifting galley countertop – one for fresh water and one to collect the waste water – that are reasonably easy to lift out and fill/empty. An alternate solution is to have two cans for fresh water and to drain the 'gray water' waste through the centerboard trunk. A removable section of the transom can be a perfect place for an outboard motor, or you can arrange something a little more elaborate with a motor well in the aft left corner of the cockpit. Lighting can be LED lamps with dry cells, or LED lamps run on a house battery under the cockpit (in which case a four-stroke outboard motor with an alternator would be best suited)

The photos below (from Audun Bull in Norway and his S/Y Kuling ) show the surprising space that can be achieved in a tiny pocket cruiser when the centerboard is hidden behind the pantry counter.
If someone wants to put sailmarks on the sails of their Sharpie, here are a couple of suggestions. They are available as downloads on the resource page . The color can be adjusted to suit the color scheme of the hull.
The gaff version:

The lug version:

Sharpie 600 – background and history
The Sharpie 600 started as a private project - an idea for a very simple, hassle-free, inexpensive and convenient way for me to spend time at sea. When the design was nearing completion in 1996, the UK magazine Classic Boat launched a design competition with almost the same specifications as those I had set for myself. I submitted my design in the competition and was happy to see that the Sharpie 600 was honored with a third place award.
Sharpie 600 was honored with a third place award in Classic Boat's design contest 1996
Perhaps a centerboard and a mizzen placed off-center were hard to take for English traditionalists. One of the judges commented:
"Björn Thomasson's flat-bottomed 'weekender-for-two' appealed to me for its charming simplicity. At a personal level, I am not entirely comfortable with the asymetry of the off-center board and mizzen. Hang the rudder in a slot to allow for a central mizzen and centre the board and this little lug-rigged cat yawl complete with two-berth cabin, head and galley, would be just right fo a drying mooring. The high aspect ratio lug rig certainly suits the little boat. Allowing for my personal prejudices, I gave it a third place."
Perhaps if I had put the centerboard in the middle (compromising the livable room in the cabin) and centered the mizzen mast (complicating the construction with a non-lifting rudder in a slot, or a link system between the rudder and tiller) I might even have won! They are tricky, those Englishmen ;-)
By the time the competition ended I had discovered that kayaks were an even more efficient way of spending time at sea, so the prototype was built by Wermlandia Båtproduktion and exhibited at the Stockholm Boat Fair, where she attracted a lot of interest from sailors, journalists and boatbuilders.
To date (Summer 2021) 51 sets of plans have been shipped, but I am still waiting to start building my own Sharpie 600. There have been a lot of kayak projects in those years.
Design & Illustration
- Grafisk form
- Produktdesign
- Bokillustrationer
- Reklamillustrationer
- Webbillustrationer
- Smått och gott
- Ännu småttigare

Bank account: Sparbanken Skåne 8313-9,74116978-3 Org: SE490507465601 BIC: SWEDSESS IBAN: SE57 8000 0831 3907 4116 9783
- Row boat plans
- Sailboat plans
- Power boat plans
- John's Sharpie
John's Sharpie by Chesapeake Light Craft
A lightweight, fast-sailing sharpie.
URL: http://www.clcboats.com/shop/boats/boat-plans/sailboat-plans/johns-sharpie-wooden-sail-boat-plans.html
Description:
There is certainly no other boat that offers the performance under sail and ease of construction of a sharpie. Developed in southern New England as workboats, their speed, shallow draft, easy handling, and quick construction caused sharpies to quickly spread along the Atlantic Coast.
There have been sharpie designs for homebuilders almost as long as there have been sharpies. John's Sharpie is similar in proportion to the sharpies used around New Haven, Connecticut for oyster tonging in the 19th century. Rendered in modern materials, this 21st century sharpie is fast, light, easy to handle, and easy to build. Renditions of John's Sharpie have been built from CLC kits and plans all over the world, from the 15th floor of an apartment building in South Korea to Coniston Water in the UK.
"It is a tribute to John Harris's successful combination of the various design requirements that none of us felt anything but total satisfaction with the basic overall concept, her sailing performance or elegant appearance on the water," said Water Craft magazine while sailing the Sharpie around Coniston Water. Read the entire review.
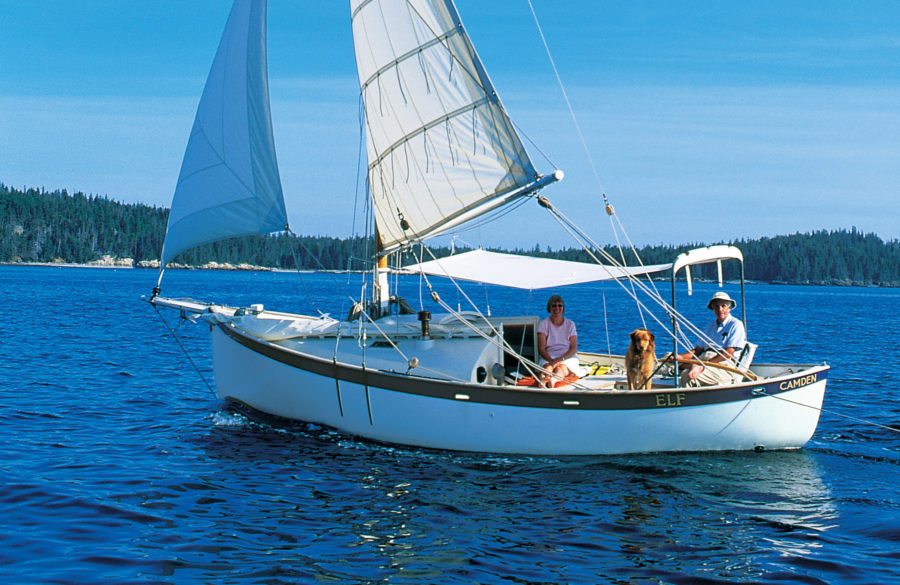
John C. Harris, CLC's CEO and a lifelong sharpie fan, designed the Sharpie for his own use on the Chesapeake Bay. Light weight and clean lines yield a boat capable of high average speeds, dinghy-like handling, and great pointing ability. The unstayed cat-ketch rig is efficient and beautiful, and without a jib there are no sheets to handle when tacking: just put the helm over and you're done. Extremely low wetted surface and a big rig means the Sharpie will whisper along in the lightest of air. Tie in a reef when whitecaps appear if you want to stay reclined inside the cockpit, or hike out on the comfortable side decks if you feel like exploiting the Sharpie 's heavy air speed.
The Sharpie uses a daggerboard to get to windward. It's more efficient than a centerboard, takes up less space, and is easier to build. With the board raised and the rudder kicked up, it's easy to sail the sharpie onto the beach or pull it above the high tide line. With the board halfway up the boat will still point well, allowing you to sail in the shallowest water.
The interior is laid out for leisurely daysailing or overnight camp-cruising. The separate cockpits encourage relaxed sprawling, and are easy to cover with boom tents while camping. Ideal crew is 2-4 adults.
While John's Sharpie is a bigger project than our other small boats, woodworking hobbyists will find construction fast and straightforward. Construction time seems to average about 180 hours. No frames or strongbacks are required; the hull is of 9mm okoume bent around permanent bulkheads, then stitched and glued like a big kayak. The tapered masts are solid spruce or cedar.
Interviewed about this 1996 design in May 2011 on the blog 70.8%, John Harris had this to say about the Sharpie :
"I designed that boat to win the traditional boat race at MASCF. Its beguiling good looks were meant to look right on the St. Michael's waterfront, but conceal the speed and handling of a racing dinghy. I was 23, and it was a good 23-year-old's boat. I like that it's hard to find an angle from which the proportions don't look good. It's got razor-sharp handling upwind and down. Unfortunately, you get the bad with the good - John's Sharpie is wicked fast but also a little cranky. It was a good design lesson, including that two tall masts weigh twice as much as one tall mast. I'm not the only skipper to have capsized one. Many builders soon shipped a pair of sandbags either side of the daggerboard trunk to settle her down."
Boats about same size as John's Sharpie
Questions? Suggestions? Contact us at: [email protected]
Small Boats Annual 2007
The Norwalk Islands 26
Fast, shoal-draft, and self-righting
From Issue Small Boats Annual 2007
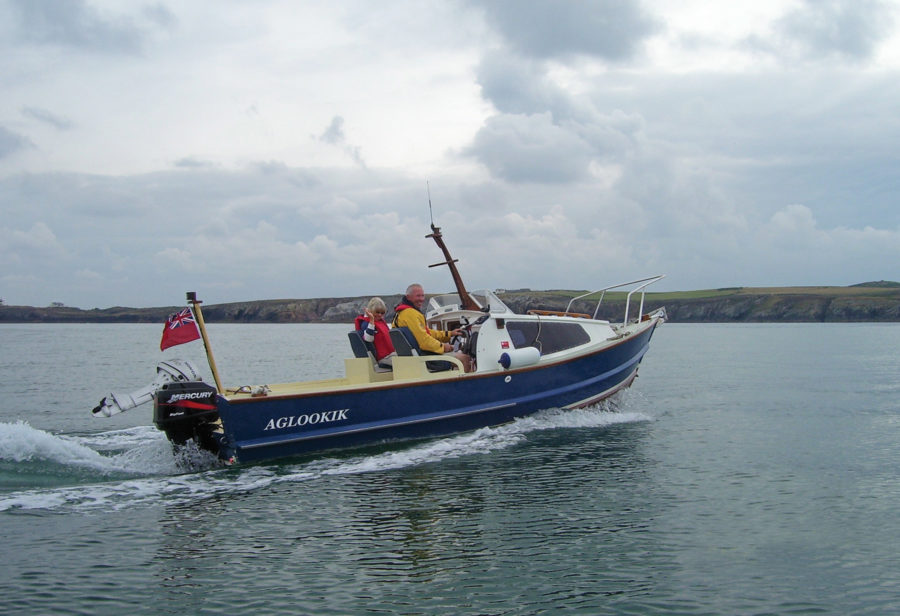
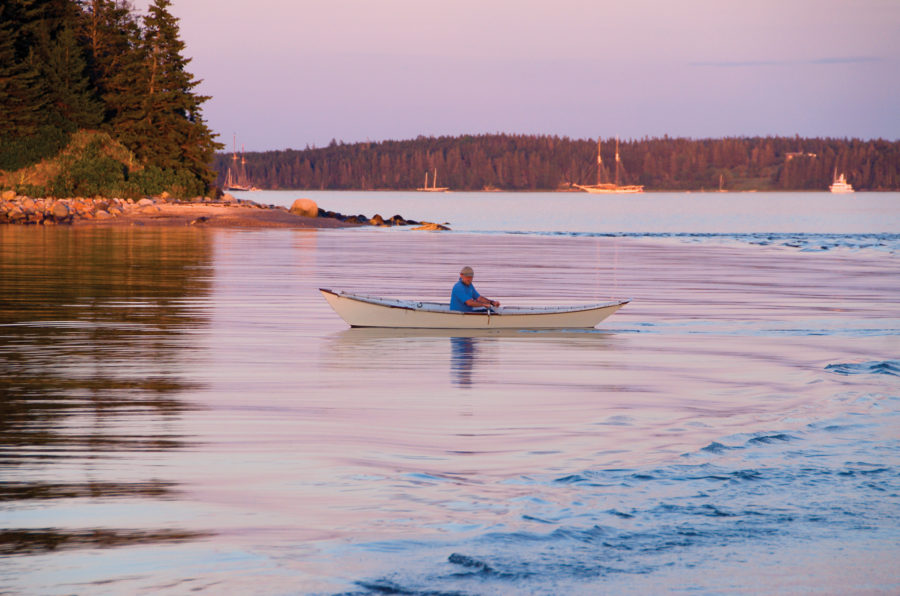
H ere’s a flat-bottomed sharpie ketch that we can build in the backyard. This shoal-draft boat will sail on the morning dew, right itself after a knockdown, and leave most deep-keel cruisers in its wake.

The sheet-plywood Norwalk Islands Sharpie (above and opposite) can easily be built in the backyard, yet it outperforms more expensive yachts. Its simple cat-ketch rig needs no standing rigging (wire shrouds and stays that support the masts). The outboard-motor lifts into its own house when idle—no ugly mounting bracket, no hydrodynamic drag.
More than two decades back down the road, I visited with designer Bruce Kirby at his Rowayton, Connecticut, office. A crackerjack sailor, he was best known for his design work for the Canadian AMERICA’s Cup challenger and for having created the Laser, a sophisticated 14′ singlehander that revolutionized sailboat marketing in the 1970s.
I found the talented designer of high-tech sailboats hunched over the drawings for a simple sharpie that was to become the Norwalk Islands 26. He was excited about the design—with, history now suggests, ample justification. The easily built ketch sails fast on all points, offers reasonable cruising accommodations, and can handle rough water.
Sailing wing-’n-wing off the wind—no need for a spinnaker here.
Kirby drew a handy cat-ketch rig to power the NIS 26—no labor-intensive overlapping headsails or tiny, impotent mainsails here. Full-length battens support considerable roach, that is, curve to the leech (trailing edge) of each sail. This allows more sail to be carried on spars of a given length, and it provides a more efficient sail shape. As an additional benefit, these sails are quiet. They don’t flog wildly when luffing. But we need to pay attention, as fully battened sails won’t telegraph word of improper trim in the immediate manner of unsupported sailcloth.
This is a controllable rig. We can fuss with the tension and taper of the battens to alter sail shape. We can back the mizzen to stop the boat or put it into a slip. A word of caution: unless we actively control fully battened sails, they tend to keep sailing. Simply releasing the sheets won’t quickly stop the boat. We should remember this as we approach the dock, lest we come to rest in the parking lot.
The original NIS 26 rig measured 302 sq ft. After sailing the prototype, the designer increased the area to 340 sq ft. He also has changed from aluminum masts to sticks made from carbon fiber. The greater heeling effect of the larger sails seems to be offset by the lighter weight and greater flexibility in the upper portions of the tapered, thin-wall masts. In strong winds the masts bend, thus relieving tension on the upper leeches.
With a draft of only 10″, the Norwalk Islands 26 can sail through marshes.
Robert Ayliffe, who sails and sells Norwalk Islands Sharpies from his base in Australia, recently devised a nifty tabernacle that makes raising and lowering the sharpie’s masts a casual singlehanded operation. The boats now will get underway quickly from their trailers, and we’ll have ready access to bridge-blocked water. Given a 10″-deep stream no wider than your driveway, we can sneak our NIS 26 into it…to hide from a hurricane or simply to get away from the crowd. Plans for the NIS 26 describe both a two-berth interior and a “sleeps-four” production-boat layout that carries a double V-berth forward and two quarter berths in the main cabin. The centerboard trunk is tall, which allows it to house the required board. (A sharpie will not go well to windward without a centerboard of substantial area.) Much of this trunk resides innocuously below the sole of the self-bailing cockpit. The aftermost berths in both accommodation plans offer sumptuous seating in the main cabin, and we’ll make good use of the exposed portion of the trunk by hanging a dropleaf table from it.
Both plans show “enclosed” heads, but you should understand that we won’t find anything resembling true privacy aboard a 26′ sailboat.
Bring the boat right up to almost any shore.
The outboard motor, which provides auxiliary power, resides out of sight in its own house way aft. When not in use, the engine lifts vertically. We’ll not need to worry about dragging the propeller around the bay while we’re sailing, and we’ll have fewer concerns about corrosion of expensive machinery when we’re at the mooring.
All of this seems fine…but how, you might ask, can a sailboat that has no deep keel and that floats in only 10″ of water right itself? Here are some design rules to follow if you want a shoal-draft sharpie to pop up reliably from knockdowns and inversions: Draw the combined hull-house structure rather tall (say, at least 4′ for a 26′ boat). Keep the width on deck to an acceptable minimum so that the boat won’t become stable in an upside-down position. For the same reason, a strongly crowned housetop and/or deck will help (acting as a “round bottom” when the boat is inverted and providing plenty of volume where it’s needed). Concentrate structural weight low— make the bottom brutally heavy, as it will provide secure ballast as well as protection during hard groundings. To keep the center of gravity low, spread well-secured inside ballast in the bilge (do not pile it up against the centerboard trunk). Build the cockpit small, and be certain that it is self-bailing. Locate hatches near, or on, the boat’s centerline. Make the rig low and light. Last, be certain that everything is strong and tight. Yes, extremely shoaldraft boats really can right themselves without violating any laws of physics.
The brilliant performance of EXIT 12, designer Bruce Kirby’s prototype NIS 26 (right), surprised Long Island Sound sailors during the 1980s.
Not all sailors will like the appearance of a boat designed to the above parameters, but Kirby has a good eye. On the NIS 26, a strong sheerline and dark hull sides lessen the visual impact of substantial freeboard. Low house sides and extreme crown (athwartships curvature) to its top reduce the apparent height of the house. In all, this ketch has a seamanlike look about it.
So, there you have it, a fast and easy-to-build cruiser that will take us to shallow coves that lie just out back of nowhere.
Bruce Kirby’s drawings reflect the startling simplicity of the NIS 26, but this flat-bottomed sharpie has been well proven in tough conditions around the globe.
Is there a boat you’d like to know more about? Have you built one that you think other Small Boats Magazine readers would enjoy? Please email us!
Share this article
Join The Conversation
We welcome your comments about this article. If you’d like to include a photo or a video with your comment, please email the file or link.
Comments (5)
I have a friend who built one early on and he enjoyed the boat for several years until moving forced sale of the boat. I’m forwarding this email to him as I suspect he still has fond memories of his NIS. Is there any more information available as he is now suffering from Parkinson’s? Thanks, Paul
Hi Paul, I’m one of the moderators for a Norwalk Islands Sharpies group on Facebook. Members of the group are mainly builders and owners of these wonderful craft plus a number of people who are just keen admirers. You and your friend would be most welcome to join. I also have quite a lot of information, photos, etc. as well as details of who owns which boats. Feel free to email me at [email protected] if you have any queries. Cheers, Pete
I had one (26) and my only comment is have a sail on one before you commit.
They are not as straightforward as some other boats. Bruce Kirby’s name is always mentioned but anyone who has raced a Laser will understand what it is like to hit the bottom mark in a strong wind. They are tippy. So are the NIS. They bob around and caper at times. You need to be well ahead of them in a bit of wind mentally. Not as simple as a sloop-rigged yawl for instance. Just saying. They are also a big boat. You need to be pretty athletic at times. I was younger then too. I think the B and B yachts equivalent with a bit of chine would be something to look at. Will probably get shouted at here but that was my experience.
Looking backward at the experience I reckon the 23 would be a better experience.
I am not trying to stir up trouble, just reporting.
I thank you for featuring my Boat in your article on NIS 26, the green one RO140S. I did not have the pleasure of building Little Jimmy, I have owned the boat now for seven year in that time I have renamed and repainted in black.
THE PEARL is the new name it’s a great boat for me because I am a novice to sailing and I can single hand sail her with no problem. As you see you they are a great vessel for shallow waters can pull up on any beach and just step off. I find The Norwalk Island Sharpie’s are an eye-catching craft and mine turns head where ever I sail and comes with onlookers, asking a lot of questions. Due to the COVID-19 restriction I haven’t been able to sail for a while. I’ll try and get the boat in the next Wooden Boat Festival in Hobart Tasmania.
The top picture was taken at Matilda Bay Perth Western Australia.
Kind Regards,
Colin Wright
Hi Colin – I’m thinking about buying one of these boats. How have you found it’s stability in the open ocean? How would it handle coastal sailing on the Aus East Coast for example?
Leave a Reply Cancel reply
Your email address will not be published. Required fields are marked *
Stay On Course
More From This Issue
From the 2007 Small Boats Annual - Already a monumental success in 1950, Chris-Craft thought to use up their mountain of mahogany scrap by cutting kits for handsome plywood power…
The Ness Yawl
From the 2007 Small Boats Annual - Few boats developed from a traditional working boat are as adaptable to small boat sailing as a Ness Yawl, and few are as…
From the 2007 Small Boats Annual - Paul Gartside's plans for modest-sized cruising boats inspired by the Falmouth cutters of his native England should all come with one of those…
The Tolman Skiff
From the 2007 Small Boats Annual - Renn Tolman designed his eponymous skiff as a workhorse for rugged Alaskan environs. The boat has proven to be adaptable to a wide…
From the 2007 Small Boats Annual - RASCAL sped across the riffled waters of Long Island Sound. Her mahogany foredeck glowed from the depths of its varnish, and her stainless-steel…
From the 2007 Small Boats Annual - With his Stir Ven design, a 22' LOA center- boarder, François Vivier took first place in the “neo-traditional” category of a 1997 design…
The West Pointer 18
From the 2007 Small Boats Annual - Six River Marine based this tough and shapely skiff on a highly regarded workboat designed and built by Alton Wallace. Chip Miller gave…

From the 2007 Small Boats Annual - Skylark was designed by Paul Gartside for day-sailing in the sporty estuary and ocean waters off the Oregon coast. With a 14' length…
From the 2007 Small Boats Annual - Conceived in the early 1980s by Ken Bassett, Onion River Boat Works, and massaged into her final form by Phil Bolger, BLACKBIRD embodies…
From the 2007 Small Boats Annual - PETITELISA is a synthesis of Gilles Montaubin’s long experience with sail-and-oar boats. Unlike many boats of this type, she is not reminiscent of…

From the 2007 Small Boats Annual - People are always drawn to the warmth and the visual texture of a varnished wood kayak, but the beauty of a plywood kayak…
The Flatfish
From the 2007 Small Boats Annual - Every sailor has his own vision of the perfect daysailer. For many, this ideal boat is based on the Herreshoff 12 1⁄2, Nathanael…
The Boothbay Harbor One-Design
From the 2007 Small Boats Annual - The Boothbay Harbor One-Design, a short-ended Burgess, moved to mid-coast Maine and hired Geerd daysailer with a long waterline, is a particularly handsome…
The Christmas Wherry
From the 2007 Small Boats Annual - The Christmas Wherry possesses two characteristics that should be critically important to anyone looking for a small boat to use in open waters.…
The Gloucester Light Dory
From the 2007 Small Boats Annual - In the early 1980s, I bought Phil Bolger’s plans for the 15′ 6″ LOA Gloucester Light Dory. I was living in an apartment…
Endeavour 17
From the 2007 Small Boats Annual - The Steve Killing–designed Endeavour 17, a kayak built of cedar strip planks and fiberglass, combines beauty, fast lines, load-carrying capacity, and relatively easy…
The Lake Oswego Boat
From the 2007 Small Boats Annual - Few joys in life are simpler than a morning row. Oars over the shoulder, hollow footsteps along a wood-decked float, the boat quivering…

From the 2007 Small Boats Annual - Harry Bryan, a boatbuilder and designer from New Brunswick, Canada, designed the Fiddlehead, a 10 1⁄2' double-paddle canoe, in 1992 after his sister-in-law…

The Macomber 15
From the 2007 Small Boats Annual - You can walk across the Westport River in southern Massachusetts at low tide. It's a mile or so across in some places, but…

The Sailing Skiff 15
From the 2007 Small Boats Annual - All youngsters might begin their waterborne adventures in flat-bottomed rowing/sailing skiffs. Easy to build, but difficult to design properly, these honest little boats…
The WindSprite 26
From the 2007 Small Boats Annual - Frank Pedersen designed a light-displacement planing hull, and WINDSPRITE's abilities as a performance daysailer have been anything but a disappointment to him. With…

The Annapolis Wherry
From the 2007 Small Boats Annual - Faster than a typical skiff, yet more stable than a recreational shell, the light (65 lbs) Annapolis Wherry from Chesapeake Light Craft offers…
The Ben Garveys
From the 2007 Small Boats Annual - Boats don’t always need to have pointy forward ends. Here we have two easily built, square-ended workhorses that will handle all sorts of…

From the 2007 Small Boats Annual - The sheet-plywood Norwalk Islands Sharpie can easily be built in the backyard, yet it outperforms more expensive yachts. Its simple cat-ketch rig needs…
More Small Boats Annual 2007
Subscribe today.
Become a subscriber today and you’ll recieve a new issue every month plus unlimited access to our full archive of backlogged issues.
Already a subscriber? Sign In
Subscribe For Full Access
Flipbooks are available to paid subscribers only. Subscribe now or log in for access.
Boat Plans | Books | CD's | Downloads
- $ 0.00 0 items

Catalogue Of Sharpie Designs
$ 30.00
Description
- Reviews (0)
The Sharpie Catalogue includes 30 sailing sharpie designs and 3 power sharpies. Construction is plywood/epoxy/fabric of the simplest kind. These vessels are intended to be built by amateurs in the garage or back yard. Most are flat-bottomed; a few are V- or arc-bottomed; all sailboats are centerboarders. The larger sharpies can be built in steel or aluminum. Virtually all the sharpie designs are adaptions of traditional American working craft. Sharpies are fast and surprisingly weatherly, and terrific fun to sail. Because they are relatively narrow and light, even large sharpies can be trailored more easily than any other hull type. Only the largest sharpies can be comfortably lived in–but they make great camp boats and weekend cruisers for the whole family. Construction methods are described in THE SHARPIE BOOK by Reuel B. Parker. The book includes a history of sharpies and traditional construction methods. This Catalogue includes inserts of new sharpie designs at no additional cost, like our MAXI-TRAILERABLE CRUISING SHARPIES. .
There are no reviews yet.
Only logged in customers who have purchased this product may leave a review.
Related products
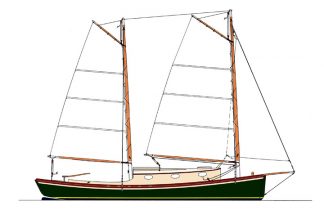
Sharpie Egret 31.5 Version II
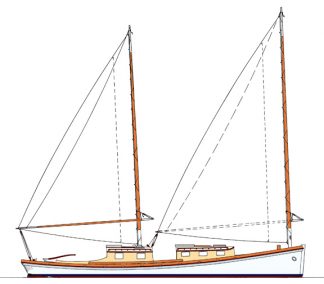
Sharpie 46 – New Haven
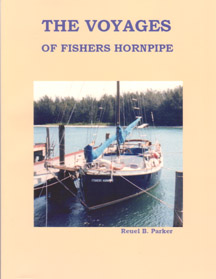
The Voyages Of Fishers Hornpipe
- THE MAYOR OF JOE’S SOUND, BAHAMAS
- THE PILOT SCHOONER 40C
- THOMAS CLAPHAM AND THE ROSLYN YAWL
- THE QUICK-MOLDED TERRAPINS
- IBIS — THE DREAM SURVIVES
We have 18 designs for sharpies & dories on this page - all for easy construction.
ORDER THE DRAKE 11'SHARPIE PLANS
ORDER THE DRAKE 13' SHARPIE PLANS
ORDER THE DRAKE 18' SHARPIE PLANS
ORDER THE ACORN 11'6" GARVIE PLANS
ORDER THE 17' 6" KINGFISHER GARVIE PLANS
ORDER THE 11'6" EIDER DUCK PUNT PLANS
ORDER THE 15' 'V' BOTTOMED RUDDY DUCK PUNT PLANS
ORDER THE 15' 3" SHELDUCK DUCK PUNT PLANS
ORDER THE 10' GRAND BANKS DORY PLANS
ORDER THE 12' 10" SIGNET DORY PLANS
ORDER THE 14' EXE DORY PLANS
ORDER THE 18' EXE DORY PLANS
ORDER TH E 16' CAMBRIDGE PUNT PLANS
ORDER THE 20' CAMBRIDGE PUNT PLANS
ORDER THE 24' CAMBRIDGE PUNT PLANS
ORDER THE 18' SIMPLE ESTATE PUNT PLANS
ORDER THE 15' 9" DRIFT BOAT PLANS
How to Build a Wood Sailboat

Introduction: How to Build a Wood Sailboat

I've been wanting to combine my two favorite hobbies - woodworking and sailing for a long time, so I thought I'd build a boat. It's got classic lines and looks so dazzling in the sunshine that people constantly stop me at the boat ramp to ask me about it. There's something unbelievably rewarding about building something like this from scratch. This is definitely a boat that is much better built than bought . Here's how I did it.
The boat takes about 100 hours to build. I did it over 3 months, working a little bit just about every day and full days when my schedule permitted.
It will take about $1,000 in total to build if you buy everything at full retail cost (not including tools you might need to buy), but you can spread that across the length of the project. For example, you only need to buy one $30 sheet of plywood at a time, take it home, draw out the parts (loft) that fit on just that sheet and cut them out. That will take a couple of hours right there. Some boating supply stores (chandleries) might let you setup an account which might give you a discount if you tell them you're building a boat.
All of the skills needed to build a sailboat can be learned slowly, one step at a time. For example, if you've never fiber-glassed plywood before, just practice on a small piece first to get your confidence up. This was my first boat build, so I did a lot of learn as you go . Not only am I going to show you the right way to successfully build your own sailboat, but I'm going to share with you the mistakes I made along the way to hopefully save you from repeating them.
The end result will be a very attractive little 8 foot long pram, that is easily made out of 4x8 sheets of plywood that is light enough to put in the back of a small pickup truck or roll down to the local lake on the optional dolly. Anything longer would require you to either make a scarf joint (which is a bit tricky) or buy longer sheets of plywood (which is considerably more expensive).
What you will need:
Boat building plans
8 panels of 1/4" oak plywood 4'x8'
Pencil, Sharpie, ruler, tape measure, yard stick, etc.
Long flexible straight edge
Box of 1" brad nails
2 gallons of epoxy resin
1 gallon of epoxy hardener - SLOW
1 quart silica thickener
5 quarts wood flour thickener
1" masking tape
Japanese pull-saw
Table saw (helps, but optional)
Round-over router bit
Flush trim router bit
Palm/random orbital sander
220 sanding discs
Combination square
Drill bit set
Drill bit extension
Basic hand tools
Small diameter wire or zip ties
Wire cutter
12 C-clamps - 3"
Mixing cups, mixing sticks, rubber/nitrile gloves
16' x 60" of 6oz fiberglass cloth
2" plastic spreader
Gallon of waterproof glue
Glue roller
Silicone bronze screws
Stainless steel fasteners
Small blocks
Gudgeon & pintle - dinghy size
Patience - large
Elbow grease - large
For more detailed explanations on each step and more specific info/reviews on the materials and parts used, check out my boat build blog: www.Midnight-Maker.com
Step 1: Cutting Out the Parts...

First, you'll need boat building plans. I purchased some very nice ones from a popular boat building website because I had a specific style in mind to build, a "pram". It's a Norwegian design with lots of buoyancy in the bow and building a pointy boat is a little more difficult. There are a bunch of free boat building plans (search "dinghy") online. Also, I wanted my boat parts to fit in a standard (read cheap) 4'x8' sheet of plywood. It also had to be light enough for me to load/unload/move myself. This boat weighs in at about 70 pounds. When on the custom dolly I built, it's very easy to move from the parking lot to the lake.
Next, you'll need to draw out the parts of the boat full-sized onto the plywood (lofting). I actually did this step on hardboard/masonite because I wanted to make templates of all the parts in case I ever wanted to build another one.
This step requires you to be very meticulous. Carefully transfer the measurements (offsets). They may or may not look correct because it's very non-intuitive to look at curved boat parts that are laying flat. Some parts actually bend the opposite way you think they should. To make the curves, I nailed a bunch of 1" brads into the panel and used a long, flexible straight edge (yard stick, etc.) bent to follow the curve, then I traced the curve with pencil/Sharpie. Once I removed the brads, I had perfectly smooth curves. Keep in mind that with the side panels that are symmetrical to both sides of the boat, only draw out one version and cut two stacked sheets at a time. This ensures the boat will not be lop-sided. Make sure to immobilize the two sheets together with screws outside of the boat parts or use double-sided tape/clamps, etc. to keep the parts registered properly.
Using a Japanese pull-saw allows you to control the cuts very carefully and it can follow the graceful curves. They cut on the pull stroke which means they're very easy to control. Make sure you leave a bit of your cut line, meaning cut just outside the line. This allows you a bit of a safety margin and you can always sand to the line to sweeten it up. This is where the elbow grease really kicks in. It takes hours to cut out the hull panels by hand, but it's worth it. I tried cutting the first part out with the jigsaw and it wandered all over the place and quickly cut inside the line before I knew it. Also, a jig saw blade can lean to one side which could mean two panels might not be the exact same shape. Using hand tools is a classic way to do woodworking and is a very gratifying process. With hand tools, things happen slow enough for you to be in total control, whereas power tools can quickly do unexpected damage. With the understanding that you're building a classic boat, using hand tools wherever possible is part of the philosophy.
The plans I bought were in metric and called for 6mm (1/4") and 9mm (3/8") plywood, but I wanted to make everything out of 1/4" plywood so the thicker parts in the plans were glued together with two layers of 1/4" (so at 1/2" they were a bit thicker than designed). I actually liked this because it made the boat feel sturdier and of course it was cheaper that way. The trade-off was that the boat would be a bit heavier.
For any of the parts that need to be doubled-up/laminated (e.g. the transoms), now is a good time to do that. Make sure you use "waterproof" glue instead of "weatherproof" glue like I did...
Spread a thin layer of glue over one of the "bad" sides (plywood usually has a good side and a bad side, glue bad sides together so good sides show on both outside faces), making sure it's completely covered (I used a special glue roller), then carefully place the other half on top. Align all of the edges together, then clamp them in place. Now put heavy things carefully on top to press the parts together. The glue should be dry in about 6 hours.
NOTE: It's considerably easier and safer to do any woodworking processes to the parts before you assemble the boat. This way, you can safely clamp pieces to the work bench and cut out handle holes, etc. Since my boat is a "lapstrake" design, I had to route a rabbet (groove located on the edge) carefully on the bottom edge of each side panel. This creates a shoulder for the parts to sit on, positively locating them while you're stitching the panels together. Likewise, the grab handles in the transoms are much easier to cut out before putting the boat together.
Also keep in mind that any mistake will be considerably more painful the further you are along in the build. For example, if I biff cutting out the grab handle holes while they're just loose pieces rather than when they're a permanent part of the boat, it's much easier to recover - just make another transom. If you had to patch a hole in the boat, it would be difficult and possibly never look perfect. No pressure...
Step 2: Assembling the Hull...

Once you have the bottom and sides cut out, you can start to "stitch and glue" the hull together. This is a technique used usually for smaller boats to be able to pull the hull form together without the need to build a frame or mold (which can take almost as long and as much wood as the boat itself).
I built a gauge stick to make sure my holes were perfectly spaced at 4" at 1/2" in from the plywood edge. It was 1" wide so either edge was the required 1/2" from the centerline. I worked my way down one side of each of each mated seam and drilled all those holes at once while the panels could lay flat on the bench. Make sure to use a backer block to prevent tear out on the back side, even with such a small drill bit.
With one mating panel drilled with a 1/16" drill bit, hold the mating panel in it's relative position. I used some spare twine to wrangle my panels into the proper orientation as I was marking them. Make a pencil mark where the mating hole should be, remove the pre-drilled panel and drill the second set of holes 1/2" in from the edge. This makes sure there's enough strength to hold the boat together.
The first pass on the stitches is just to get the hull together structurally. You can always go back and make the stitches fancier/tighter and tweak the position of the panels.
The stitches go from the inside out. Cut 6" lengths of wire and bend them into long, narrow U's that are the width of the distance between the holes. Stick the ends through the holes and carefully twist the tails together on the outside of the hull, making sure not to damage the plywood. If you're using zip ties, then the holes you drill will need to be bigger and you'll have to start on the outside, go in, turn around, then back out, then "zip".
Make sure your panels' rabbet shoulders are resting securely on the mating panel and carefully tighten all the stitches. For my boat, once I had two panels stitched to the bottom panel on each side, it was time to attach the transoms (ends). Once all of the exterior parts are stitched together, you should have something that looks like a boat. It will be a little rickety at this stage, but that's okay.
NOTE: In the photos I took of my build, you'll notice that the transom doublers (reinforcers) aren't in place. That was because I was following the instruction manual, but I think that was a mistake, so I highly recommend laminating (gluing) the doublers to the transoms before you stitch the boat together.
Step 3: Reinforcing the Hull Joints...

Now that the hull is stitched together, flip it over upside down. You'll be surprised at how stiff it is, considering how difficult it was to wrangle all those panels into position. Be careful, there's lots of poky wire ends sticking out all over the place.
I used a technique called "tabbing", meaning I made small, structural tabs from thickened epoxy that fit between the stitches, then I removed the stitches and made one long, larger fillet to connect the hull panels together.
Make sure your panels are perfectly aligned and tightened. I used a nipper to lop off most of the tails so they wouldn't get in the way, but that left very sharp spikes.
Make sure your boat is square. Take diagonal measurements from corner to corner, make sure the boat parts are parallel to each other, etc. because if there's a twist in your boat, the next step will make it permanent, which will affect the boat's performance.
Now mix up a batch of epoxy and silica thickener according to the manufacturer's directions (meaning each type of epoxy has a different resin to hardener ratio) until it's between the consistency of thick ketchup, but runnier than peanut butter (make sure to mix the 2 parts of epoxy together first very well before adding a thickener). Too thick and it won't fill the void, too thin and it'll run down inside the boat. Both are bad. I used a small syringe to inject the mix into the V intersection between the panels and checked underneath/inside to see if there were any runs.
Once the epoxy has partially set, use a glove wet with denatured alcohol to smooth out the "tabs" so they fit inside the V groove and don't extend above the intersection between the panels. This will give you good practice for the seams that will show on the finished boat. Be careful of the wire spikes.
Repeat this process for every seam on the hull. Let it cure overnight.
Once the tabs have cured, carefully remove the stitches. If the wire seems to be epoxied permanently to the hull, heat the wire with a lighter. That will soften the epoxy enough to pull the wire out. Be careful not to scorch the boat (you don't want a Viking funeral). Now repeat the thickened epoxy process for each overlap, except this time each seam will need to be one long, smooth joint. Let it cure overnight. This goes a long way in making the boat hull structural.
Step 4: Fiberglassing the Hull...

Now that you've got a permanent hull shape, it's time to make it waterproof and rugged. Fiberglass and resin over plywood is a tried and true Do It Yourself boat building technique which makes it strong and light.
Mask off the bottom panel and roll out your fiberglass cloth. Smooth the cloth out very carefully so as not to snag or tweak the fibers' orientation. Mix up an unthickened batch of epoxy (it will be the consistency of syrup). Starting at the stern, pour a small puddle of epoxy and spread it out nice and thin. You should be able to squeeze most of the epoxy out of the cloth, leaving only saturated cloth with no dry spots (which will appear white) but the weave should still be showing (meaning no extra epoxy is pooling). You should easily be able to see the wood grain through the cloth now.
Let the epoxy partially cure and using a razor, slice the dry fiberglass cloth away on the taped seam. Then remove the masking tape. Let the epoxy cure overnight.
Flip the hull over and mix up a batch of epoxy that is the consistency of peanut butter. I masked off the joint, but this step is optional, but keep in mind that it will be visible if you plan on finishing the interior bright (varnished wood). It's not as critical if you're painting the interior. With a plastic spreader, carefully make a large radius transition (fillet) between the bottom panel and the first side panel (garboard). Remove the masking tape when the epoxy mixture is partially cured and carefully scrape/wipe any unwanted mixture. It's much easier to remove now than having to sand it all off later. At this point, it's also a good time to fillet the transoms to the sides using 3/4" radius tabs between stitches and 1" finished fillets after you've removed the stitches. Let the fillets cure overnight.
Now, repeat the entire fiberglassing process on the inside. Except instead of just doing the bottom panel, make sure both the bottom and the garboard are fiberglassed. This is basically the waterline of the boat. The fillet should allow the fiberglass cloth to smoothly make the bend between boards. Remove the excess cloth when partially cured and let sit overnight. Some people fiberglass up onto the transom at this stage which will make the boat stronger, but that means you have to have already filleted the transoms to the bottom.
Step 5: Installing Interior Parts...

The bulkheads get stitched in place just like the panels. They will make the already stiff (and much heavier boat) completely structurally sound and push/pull the sides into their final shape. Then make 3/4" "tab" fillets between the stitches to lock them in place, remove the stitches and make long, smooth 1" fillets. The smaller fillets will get covered by the larger fillets. I used two different modified plastic spreaders to do this step. Each spreader was cut with a box knife and filed/sanded into its final shape.
While you're doing the previous steps, if you're in a time crunch, go ahead and build the daggerboard trunk. It's made of numerous parts that are pre-coated with a couple layers of unthickened epoxy, then glued together with silica-thickened epoxy. This makes it strong and waterproof as it will be below the waterline so must be completely waterproof.
The daggerboard trunk is the most important part of the boat, especially if you're making a sailboat version (this boat can easily just be used as a rowboat). Not only does it support the center seat (thwart), but it has to transfer all of the force from the sail to the water and if you run the boat aground, it takes all the shock loading from the daggerboard.
The daggerboard gets filleted into place like everything else. Make sure it's perfectly on the centerline of the boat as that will affect its sailing characteristics.
Next, let's make the daggerboard slot in the center thwart. I set up a straight edge with a spiral upcutting router bit. Make sure to enlarge the slots at the end of the center thwart so that it can fit around the fillets of the center bulkhead. Now is the time to ease the edges of the center thwart because you'll be sitting on it a lot, so it needs to be comfortable. Because it's so thin, I only routed the top edge of the center thwart that shows and just hand sanded the edge underneath (it's very problematic to use a round-over bit on the second side of a thin board). Paint all of the thwarts with three coats of unthickened epoxy, especially the undersides. Once the woodworking is done, the thwart can be epoxied into place with peanut butter (or you can jump to cutting the daggerboard slot in the bottom of the hull). Make sure the thwart fits snugly in place. Drop dollops of peanut butter on the top edges of the center bulkhead and daggerboard case and spread it out evenly (make sure none gets inside the slot to interfere with the daggerboard). Firmly seat the thwart (pun intended) into the goop and weight it down. Let it cure overnight.
While you've making sawdust, cut out the mast hole (partner) in the forward thwart by drilling holes in the four corners (for the square mast we're going to make), then cut out the sides, file it smooth, then round over the top edge with the router.
Any time after the bulkhead thwart fillets have cured, you can seal the airtank chambers. Paint the bottom, sides, inside of the bulkhead and transom up to the level where the thwart will be.
Step 6: Rail & Sailboat Parts...

There are several processes in this boat building instructable that can be done concurrently. While you're waiting for the epoxy on one part to cure, you can be doing woodworking or epoxying another part. This step illustrates that point. While you're waiting for the epoxy on the rub rail (outwale) to cure, you can be fabricating the sailboat accessories (e.g. daggerboard, rudder, tiller, spars, etc.).
In order for the outwale to be thick/strong enough to be effective, you'll need to laminate it in two strips on each side. You can't bend a single piece that thick around the curvature of the hull without either breaking the wood or softening it by steaming it which is a complicated process.
Take a strip that's half the final thickness and a little longer than the boat edge (I made mine a bit beefier), mix up some peanut butter with the colloidal silica and carefully spread it on the inside of the strip. Starting at the stern, clamp it in place, perfectly align it with the top edge of the plywood. Now you have a long, springy lever to bend the wood strip along the compound curve. It dips both vertically (shear), and bows out at the widest part of the boat (beam), then back in toward the bow. At least every foot, clamp it as you go, moving forward. More is better. Toward the bow, the strip will get stiffer as it gets shorter. Once clamped in place, scrape/wipe off all the squeeze-out. It's much easier to remove now than after it hardens. Let it sit overnight. You'll have to repeat this three more times, meaning this step takes four days (if you're using "slow" epoxy hardener).
During those four days that you're dealing with the outwale, you can make major progress on the sailboat parts. They're completely separate from the hull. If you're just making a rowboat, then you can skip making these parts.
The daggerboard and rudder are cut out and laminated. Then a bevel is ground onto the leading and trailing edges to make it slice through the water more efficiently. Then they're covered in layers of epoxy. The mast step is assembled. This has to be very strong because all of the force of the sail is transmitted to the boat through the mast step and the mast is a very long lever arm. The rudder cheek plates and tiller also have to be assembled similarly to the daggerboard case.
NOTE: Whenever there's a hole to be drilled into any part of the boat, you must take additional steps to make sure the water doesn't penetrate and damage the wood. The correct procedure is to drill an over-sized hole, completely fill that hole with epoxy (I usually put a piece of masking tape on the back side to act as a dam), then once the epoxy cures, re-drill in the center of the epoxy plug the correct hole size. That makes each hole in the boat possibly a 2 day process, so plan accordingly. You can also use 5 minute epoxy to knock out a bunch of holes quickly, but be careful, they're not kidding. This stuff gets rock hard very quickly and will permanently glue anything touching. This is exactly how you drill the hole for the pivot point for the rudder/cheek plate assembly. If the pin is 1/4", then drill 1/2" hole and fill that with epoxy. Now the 1/4" hole will fit nicely in the center and be completely waterproof.
Since all the parts need several coats of unthickened epoxy and they just about all have holes in them, I hung them up with some twine and painted them on all sides, one layer at a time, for several days. Make sure the rudder doesn't get too thick to fit inside the cheek plates.
Step 7: Making the Spars...

More sailboat parts you can make while waiting for other parts to cure are the spars, the structural parts that support the sail. The mast is another glue up. I used 3 - 1x3's of hemlock. A relatively soft wood, but with a nice tight grain with no knots. A mast would break at a knot, regardless of how strong the wood is. Using the waterproof glue, align the pieces as perfectly as you can then clamp up the assembly and let dry overnight. Then run it through a table saw to get the final dimensions. Use a router and a round-over bit to ease the edges. Cut to length and sand the sharp corners. It should fit easily, but snugly into the forward thwart.
The boom (bottom of sail) is a little more complicated. Cut out the gooseneck (boom pivot point) by using a hole saw first, making sure to clamp it securely to the workbench, then cut out the profile. This gets attached to another piece of 1x3 hemlock, after it's been cut to length and the edges have been rounded over.
The yard (top of sail) is easy. Just cut to length and round over the edges. Drill and fill any holes in the spars at this time. You'll need at least one hole on each end to lash the sail grommets to.
This time, everything gets covered with several coats of varnish, epoxy is not necessary. The varnish protects the wood from water and UV damage.
The reason we had to make at least the mast at this point is because we'll need it in the next step to establish the location of the mast step.
Step 8: Finishing Up the Interior & Exterior...

Once the outwales are successfully attached, trim them flush with the face of the transom(s). While you're at it, use a flush cut saw (with no sawtooth offset to mar the wood) to trim the sides flush with the transom. This will show you how well your injected silica mix worked earlier. Now you're ready to install the mast step.
The mast step must be precisely located on the floor (sole) of the boat to give the mast the proper angle (rake). This is very important because it directly affects the boat's ability to sail upwind. Using your mast, insert it into the forward thwart (partner) and into the mast step. With the mast at a 3° angle (mostly vertical but with a small, yet noticeable and graceful tilt toward the stern of the boat), trace the location of the mast step. Use a combination square to make sure it's perfectly aligned side to side (athwartship). You can now set the mast aside. Drill and fill holes in the bottom of the boat so that you can securely screw the mast step from the outside of the hull. The mast base must also be epoxied to the sole with peanut butter. After it's screwed into place but before the epoxy cures, make sure to test fit the mast again and verify the rake angle is correct. It would be a little messy at this point if you had to tweak it, but at least you wouldn't have to cut it off.
Now comes the most unpleasant part of the whole build. On your hands and knees, make a 1" radius fillet on the underside of every part in the boat. I didn't worry about making these pretty, just structural and water tight (these create the flotation tanks that keep the boat from sinking if you capsize). Let that cure overnight.
Next is the scariest part of the build, making the slot in the hull for the daggerboard. Using a drill bit extension, from the inside of the boat, reach down through the daggerboard case and drill a hole at each end of the slot through the bottom of the boat (make sure to use a backer board). Drill a couple holes in between, then take a jigsaw and connect the dots. This weakens the hull enough so that the router won't tear out any extra wood. Note, this step can easily be done prior to affixing the center thwart. Using a flush trim/laminate router bit, let the bearing run around the inside of the daggerboard case. This will make the hole in the hull perfectly match the slot. This is important because you don't want a shoulder on the inside for the daggerboard to hit and you don't want to damage the waterproof lining of the case. Last, ease the sharp edge of the daggerboard slot with the router and a small radius round-over bit.
The skeg must be cut to fit the curve of the hull (rocker), then using silicone bronze screws, attach it to the hull using the same drill and fill/peanut butter techniques. Make sure to snap a chalk line on the centerline of the boat for reference. Then make a 1" fillet where it meets the hull which will support the skeg and make it strong. The skeg keeps the boat tracking straight in the water. I optionally used some fiberglass cloth to cover the skeg and overlap onto the bottom to make the entire assembly stronger and more waterproof. The skeg will take the brunt of the abuse when launching, beaching, loading and unloading, etc. I also installed a stainless steel rubstrake on the aft end of the skeg with this in mind. In wooden boat building, silicone bronze screws are often used because they won't corrode when encapsulated like stainless steel screws can.
Install the skids parallel to the skeg. These are solid pieces of hardwood because they will also take a lot of abuse when the boat is sitting on shore, protecting the thin hull from rocks, etc. They get installed the same way as the skeg, although it's a little tough to bend the wood along the rocker. Scrape off the excess peanut butter once they're screwed in place.
I also installed the optional outboard motor pad at this point because I plan to use an electric trolling motor on the back to quietly putter around the lake in the evenings to relax with the family after work.
That should be the last parts that go into making the boat!
Step 9: Finishing the Hull...

Now comes the last dash to the finish line. One of the more tedious steps is that you now have to sand the entire boat. I actually built the entire boat inside, but for the sanding stage, I took her outside. Several hours of sanding all of the fillets nice and smooth. Everything will show in the finished product whether you paint the boat or leave it "bright" (unpainted). If you've been careful about cleaning up the peanut butter as you go, you should be able to sand the boat with mostly 220 grit. Be careful not to sand through the thin veneer of the plywood. After the sanding is done (make sure to use a dust mask), vacuum the entire boat and then wipe it down with a tack cloth to remove any dust. I also reversed the hose on the shop vac and used it to blow the sawdust off since I was outside.
Next, you must coat the entire interior and exterior with 3-4 coats of unthickened epoxy. This makes the entire boat waterproof. It will also give you an idea of how beautiful the wood will look when varnished. This is why a lot of boat builders decide to leave their boats bright so the beauty of the wood shows through.
Mix up 1 cup batches of unthickened epoxy and pour out large puddles onto the surface. Taking a foam roller, distribute the epoxy in a smooth coat. Now take a wide foam brush and gently smooth (tip) the rolled out surface. This should remove any lap marks or bubbles. Move along to the next area, making sure to not touch the wet parts. Also, make sure no dust or bugs get on your finish or it'll mean even more sanding later.
Start with the exterior first. It'll be much easier to get good by practicing on the convex surfaces. The interior is more tricky because you want to prevent sags and pooling by only applying very thin coats.
Make sure to check with the manufacturer's directions during this step in case you have to deal with "blushing", a thin layer that can sometimes form on the surface of epoxy when it cures. This could cause your layers to not stick to each other. If your epoxy does blush, it's easy to just wipe the entire boat down with a rag soaked in acetone after each coat has cured. Some people sand between coats of epoxy. This is how you would make an extremely smooth/shiny finish, so if you want your boat to be museum quality, invest the effort. I'm planning on banging my boat around so opted out of an extreme, fancy, mirror finish.
I was originally going to paint the exterior of the hull, which would require priming and painting, but I'm leaving it bright for the time being. The good news is that you can always paint later if you change your mind, but if you paint it and change your mind, it's tough to go back. There aren't a lot of pics of this step, which took a couple of days because there wasn't much visible progress after that first coat went on. At this point, any surface that's not painted should be varnished using the same "roll and tip" method as the epoxy, with the optional sanding between coats. Note that epoxy has no UV resistance, so to keep your boat from getting sunburned, you must either paint or varnish every surface. Giving a boat a "museum quality" paint and/or varnish finish can literally take as long as building the boat.
Step 10: Making the Sail...

Another step you can do while other parts are curing is make the sail. This particular design uses a "lug" sail, a classic looking sail for small boats with wood masts. It increases the sail area (therefore the force generated by the wind) without it having to be as tall as a modern sailboat mast made of aluminum. There is a kit from an online sailmaking company that you can get for a reasonable price. The Dacron cloth panels are all cut out by a CNC machine, so they fit perfectly together. I used a regular, domestic sewing machine, not an industrial one. The only time I had trouble was when sewing through all 7 layers at the reinforcement patches. When I got to those parts, I had to manually push down on the foot of the sewing machine with a flat-bladed screwdriver (minus) to help push the needle through the Dacron. We jokingly call Philips head screwdrivers "plus".
The panels/parts all come labeled. The directions were a bit confusing because they suggest you make sub-assemblies after the fact to make wrangling the large sail easier but they mention it after you've already sewn the large panels together. It's important to understand what parts go together while the panels are still small and more manageable. For example, the batten pockets are tricky enough to build on a single panel, much less the finished sail. Building the sail was about as difficult for me as building the boat, but it was worth it.
The lug sail gets reinforcement patches on all four corners where you attach it to the spars (bend), and there's also a reefing point for when the wind starts to pick up (freshen). Modern sails have three corners (Marconi rig).
I opted for the less expensive white Dacron sail kit, but there's also a classic red (tanbark) colored kit that's $100 more expensive. Before I sewed a single stitch, I carefully traced every part of the sail kit onto painter's tarp poly film so I can always use the templates to build another sail, all I need to do is buy the tanbark cloth.
Step 11: Rigging Your Sailboat...

This seems to be the trickiest part for most people, probably because there are numerous ways it can be successfully rigged, depending on your experience, preferences or criteria. It's confusing because you have to know what the finished setup will look like in your mind while you're staring at a pile of ropes. I chose a setup that allows the most room in the cockpit for a full-sized adult, so the mainsheet is led forward of the skipper's position. This keeps the skipper's attention forward so they're looking where they're going. I have another boat where the mainsheet is behind the skipper and it takes some practice getting used to.
The lines I made up (rope becomes a line when you give it a job description) were the halyard (hauls the sail up), the mainsheet (adjusts the angle of the sail to the wind = trim) and a traveler bridle (where the mainsheet attaches to the boat). I got fancy and spliced all my ends, but you can just as well use a bowline knot.
I installed a cheek block at the top of the mast instead of the large diameter hole in the directions. I wanted the halyard to run as smoothly as possible when setting the sail. Then I installed a pair of cleats at the base of the mast, one for the halyard and one for the downhaul (cunningham). With both of these lines pulling in opposite directions, it locks the sail in place, flat, so it effectivley acts like a wing. The main halyard attaches to the gaff with a snap onto a padeye. This allows easy on/easy off when rigging at the boat ramp. I also used a small loop (parrel) around the mast and through the eye to keep the gaff located close to the mast. I looped the downhaul over the boom and down to the cleat to try to keep the gooseneck from twisting. Note, except for the blocks, just about all of the hardware used on rigging a boat this size can come in stainless steel or brass/bronze, depending on the look you're going for. If you plan on installing oarlocks to row the boat, this decision becomes even more important to the final look of the boat.
For the mainsheet, I made a short bridle between the handles on the transom with a small eye tied in the center. This allows a place for the snap on the end of the mainsheet to attach to. I could've just as easily allowed the snap to slide, which would give the bridle the function of a traveler, but would affect its pointing ability (sail upwind). The mainsheet is then run to a block on the end of the boom, then to another block in the middle of the boom. This leaves the main cockpit area unobstructed with running rigging. Make sure your mainsheet is long enough for your boom to swing forward of 90° to the boat, with enough to still come back to the cockpit for the skipper to control. A stop knot at the end of the mainsheet will keep the mainsheet from getting away from you and give you something to grip.
The rudder pivot hardware (gudgeons and pintles) must be installed perfectly vertical and on the exact centerline of the boat so that she will sail well. Drill and fill the necessary holes for this hardware. Be careful with the spacing. It's designed to be easily installed and uninstalled while underway.
With this particular rigging layout, when under sail, the skipper must constantly keep the mainsheet in hand, which is a good idea anyway for safety reasons (if you get hit by a gust of wind = puff, you won't get blown over = capsize). The tension on the mainsheet is easily manageable for any size skipper. On larger boats, the mainsheet is held by a fiddle block with a cam cleat, which is not necessary for a boat this size. With that being said, a possible future upgrade would be to install a block and a camcleat somewhere on the centerline of the boat so that more advanced sailors wouldn't need to constantly have to oppose the tension on the mainsheet. Of course the trade-off would be the hardware would probably be somewhere you might want to sit.
Another upgrade I figured out after actually taking her sailing would be to rig up a bungee/shock cord system that will hold the daggerboard both in an up and down position. With the current setup, the centerboard is held down by gravity and must be pulled out of the slot when beaching.
Step 12: Go SAILING!

Because I wanted to be able to go sailing by myself if needed, I made a dolly out of 2x4's and large pneumatic tires (which makes the dolly float). The dolly fits securely between the center and aft thwarts when driving out to the lake. The sides on the dolly lock against the skids on the bottom of the boat so it can't twist. Roll the sail up with the spars and wrap it with the main halyard. At the designed length, the mast doesn't fit inside the boat, but it seems a bit long, so some people have cut the mast down enough so that it fits inside the boat.
Out at the lake, unload the boat, slide the dolly underneath and you're ready to roll down to the ramp. At the launch, roll the boat out into the water until it floats off the dolly, toss the dolly off to the side out of everybody else's way. Drop the daggerboard into the slot and install the rudder assembly. Facing into the wind (important), stick the mast into the receiver hole (partner), tie off the downhaul (cunningham) and hoist the sail until the downhaul is tight, then cleat off the main halyard. Reave the mainsheet (run the line through the blocks) and you're ready to go sailing.
I've found that this boat sails very well. The lug sail makes it very easy to sail upwind (weather helm), it's a little more tender for a large adult, more so than a boat with a hard chine, like an El Toro/Optimist but it's a lot more graceful looking. The payload is very reasonable for a boat this size. My wife and son can easily (and safely) go sailing with me and I don't even need anyone's help to get it rigged and launched. All in all, this is one of the best projects I've every built. I hope you too can discover the joy of building your own boat and then take her sailing. Remember, in sailing, the wind is free, but nothing else is...
This is my very first Instructable after many years of referencing this excellent site to build numerous cool projects (you should see my next post). Anyway, I hope you enjoy it and please feel free to ask any questions you may have and I'll do my best to answer them. I'm planning on building a larger boat in the near future so stay tuned...

Participated in the On a Budget Contest

Participated in the Wood Contest
Recommendations

Make it Resilient

Green Future Student Design Challenge

Engineering in the Kitchen - Autodesk Design & Make - Student Contest

Chesapeake Bay Sailing Skiff 18
Kevin moroney-boat builder, the building of saoirse.
After clicking on the "Progress Photos" tab above, click on any small photo and it will enlarge. Click on the arrows on the left or right of the expanded photo and navigate through the photos. Notes are included under each photo.

1/2 half inch subtracted for thickness of side planking

notched for keelson

you can see the plans on workbench

Start: Nov. 16, 2012
Launched feb 8, 2015.
VIDEO
COMMENTS
How to Build a Sharpie Part II The Most Boat for the Least Cost By EDWIN S. PARKER From the January 1931 issue of Yachting. In the December 1930 issue of Yachting, the plans and directions for building a 15-foot Sharpie were given that carried the work as far as planking the bottom. In the present article the directions for work are continued ...
I built this skiff based loosely on several designs in Raul Parker's Sharpie Book. Chesapeake Oyster Skiff, Mississippi River yawl, and Crab skiff. The sail ...
John's Sharpie is similar in proportion to the sharpies used around New Haven, Connecticut for oyster tonging in the 19th century. Rendered in modern materials, this 21st century sharpie is fast, light, easy to handle, and easy to build. Renditions of John's Sharpie have been built from CLC kits and plans all over the world, from the 15th floor ...
So why butt blocks on this boat? The sharpie hull resembles the long shapes of the trimaran more than the short beamy shape with which I've had difficulties. I'm building this boat by myself. A complete panel all scarfed together would weigh on the order of 90 pounds. Even if it weighed half that, at 3′ by 30′ it is unwieldy.
Sharpie 24 Hampton Flattie. 24′ Chesapeake Bay Hampton FlattieL.O.A.: 24′ 2″L.W.L.: 22′ 8″Beam: 7′ 9″ Draft: 2′ ½″/3′ 9″Sail Area: 263 sq ftWeight: 2,500# (approx)Proportionately, this is the largest sharpie type known, and shows the maximum beam ratio successfully used in the sharpie type. Hence, this is a 'big little ...
The sharpie design is believed to have originated along the Long Island Sound in the 1800's as a workboat in the oyster fishery. Sharpies are long, narrow sailboats with flat bottoms, extremely shallow draft, centerboards and straight, flaring sides. They are noted for being relatively easy to build, very fast, stable and had the ability to ...
This sharpie has sprit-booms. They provide maximum headroom in the cockpit, are easy to rig and give a fair amount of lower-sail camber adjustment with a minimum of complexity and hardware. Sprit-booms are self-vanging. The geometry of the foot and sprit prevents the aft end of the boom from being able to lift in use.
In this video I discuss and show how I designed my 7 meter (23ft) design based on the Sharpie concept of yachts. You can follow the steps from deciding the l...
What a beautiful boat . Have been looking to build a weekend boat and the Sharpie 600 ticks all the boxes for me. I served my apprenticeship as a boat builder, building fireballs, firefly,merlin rocket and Flying Dutchman. For the last 30 years I have been building super yachts with GRP. My shed has now been extended read to build a sharpie.
John's Sharpie is similar in proportion to the sharpies used around New Haven, Connecticut for oyster tonging in the 19th century. Rendered in modern materials, this 21st century sharpie is fast, light, easy to handle, and easy to build. Renditions of John's Sharpie have been built from CLC kits and plans all over the world, from the 15th floor ...
H ere's a flat-bottomed sharpie ketch that we can build in the backyard. This shoal-draft boat will sail on the morning dew, right itself after a knockdown, and leave most deep-keel cruisers in its wake. Photo by NIS Boats. The sheet-plywood Norwalk Islands Sharpie (above and opposite) can easily be built in the backyard, yet it outperforms ...
Whatever the case, Chesapeake sharpie skiffs were common, especially in the smaller sizes, because of their easy and cheap construction. Howard I. Chapelle, a naval architect and curator of maritime history, wrote several books on traditional work boats and boat building, some of which include sharpie design and construction. He was a ...
Welcome to Straydog Boatworks, the World of Norwalk Islands Sharpies and Iain Oughtred wooden boats. Designs from the world famous Laser designer, Bruce Kirby and Iain Oughtred. nisboats : Norwalk Islands Sharpies : plans kits building sailing rigging & lots of boat stuff : Bruce Kirby Designs & Straydog Boatworks
A quick walkthrough of my latest build. A modified Matt Layden Sharpie that I built in my living room of my house.
The Sharpie Catalogue includes 30 sailing sharpie designs and 3 power sharpies. Construction is plywood/epoxy/fabric of the simplest kind. These vessels are intended to be built by amateurs in the garage or back yard. Most are flat-bottomed; a few are V- or arc-bottomed; all sailboats are centerboarders. The larger sharpies can be built in steel […]
NEW DRAKE 13' SHARPIE: The DRAKE 13 fits snuggly between the 11 and 18 footers and offers a lighweight and roomy dinghy/dayboat for family sailing. She can be built with or without the centreboard and rig to offer a simple rowing boat that can be used as a utility tender for fishing etc and which can take an outboard on the transom or fully fitted out with the lug sail, centreboard and rudder ...
Photos of the building of a sharpie sailboat. Photos of the building of a sharpie sailboat. top of page Chesapeake Bay Sailing Skiff 18 Kevin Moroney-Boat Builder. Home. About. Progress Photos. Sailing Photos. Contact. More. The Building of Saoirse. After clicking on the "Progress Photos" tab above, click on any small photo and it will ...
Building of an Ohio Sharpie Steve Brookman "Nice boat, did you build her?" At the boat ramps and on the water, Vika, our 19' Ohio Sharpie draws attention to herself. Put some oiled wood on a classic design and you get some strokes. While I have to admit to a bit of swagger when she is being admired by onlookers, I
The Building of Saoirse. After clicking on the "Progress Photos" tab above, click on any small photo and it will enlarge. Click on the arrows on the left or right of the expanded photo and navigate through the photos. Notes are included under each photo. Boat building project of a sharpie sailing skiff by Kevin Moroney.
The "E. E. Moore" was built by Swain Boat Builders LLC over a 9-year period as a personal boat for John E. Swain while building, restoring, or repairing other boats.John designed this boat from the lines drawn by Howard I. Chapelle from fishing boats in the Juan de Fuca Islands and included in his book "Small American Sailing Craft".
Step 1: Cutting Out the Parts... First, you'll need boat building plans. I purchased some very nice ones from a popular boat building website because I had a specific style in mind to build, a "pram". It's a Norwegian design with lots of buoyancy in the bow and building a pointy boat is a little more difficult.
Gordon takes on the restoration of a classic original Sharpie designed dinghy and discovers he's bitten off more than he can chew? ***Are you a wooden boat e...
Photos of the building of a sharpie sailboat