- Vanquish 65
- Mini Maniac
- RG65 Appendages
- Maniac MK II
- IOM Appendages
- Marblehead Class
- Marblehead Appendages
- RT65 Ragnarok
- RT65R Armageddon
- RC65 Adrenaline
- ST65 Sowelu
- Mini40 / F48 Class
- Nightmare X
- Nightmare MK VIII
- MultiOne Class
- FireDragon 1000
DIY Sail Winch
- Rig Building


Sail Winches


- RMG SailWinch Manuals
- Marine Equipment
- SmartWinch 280D
- User manual
RMG SailWinch SmartWinch 280D User Manual
- page of 15 Go / 15
Table of Contents
- Introduction
- Summary of Features
- Special Smartwinch Features
- Standard Connections
- Alternate Connections
- Setting TX End Points, Travel and Battery Monitoring
- Adjusting Deceleration, Scaled Linear Travel, Speed & Dead Band
- Maintenance
- Mechanical Specifications
- Electrical Specifications
Advertisement
Quick Links
Summary of contents for rmg sailwinch smartwinch 280d.
- Page 1 RMG S AILWINCH SmartWinch U S E R G U I D E...
Page 2: Table Of Contents
Page 3: introduction.
- Page 4 Stall Protection When a conventional winch becomes stalled, it will stay stalled until the problem is solved or the battery is flattened or the electronics damaged etc. But the SmartWinch knows when it is stalled and can protect itself by shutting down. The winch then signals that it is stalled by sounding a two-tone beep at 2 second intervals until reset.
Page 5: Batteries
Page 6: wiring, page 7: standard connections, page 8: mounting, page 9: sheeting, page 10: setting up, page 11: setting tx end points, travel and battery monitoring, page 12: adjusting deceleration, scaled linear travel, speed & dead band.
- Page 13 Deceleration Rate Adjustment Turn Winch on and wait 14 seconds till the 3 rising tones signal then push plug into RX within 2 seconds. If a single long beep is heard, the adjustment has been noted. If not then the plug was not inserted in time so turn winch off and start again.
Page 14: Maintenance
Page 15: mechanical specifications, this manual is also suitable for:, rename the bookmark, delete bookmark, delete from my manuals, upload manual.
RMG Sailwinches
Rmg smartwinch the best winches on the market, header content region, insert text, image or banner ads here, or just delete this text and leave this area blank.

1/25 (36") Scale America's Cup high performance model sailboat
5ft Replica of the 1962 Americas Cup 12 Meter
45" Scale Model of the Olympic Star Boat
J Class Boat-Shamrock V
1/16 (8'-10')Scale Replica of the 1930's America's Cup Class Yacht
RMG Sail Winches
High Performance sail control winches

- Create as many news links as you need. News links are simple bullet lists.
This is where you would add your text, images, or advertising banner

Chesapeake Performance Models is the authorized North American service center for the RMG winches

All RMG Smartwinches are compatible with Spektrum Radios
Standard Drum Sizes
Tapered Spiral Drums

Copyright © 2021. Chesapeake Performance Models LLC. All Rights Reserved..
Klaus Harris
Dragonforce 65 Setup, Tuning and Review
Updated: 31st Jan 2022 – covers the new V7
Table of contents
- Flysky FS-i6 TX
- Tuning / solving problems
- Different rigs and sails
- V6 vs V7 what’s new?
Final thoughts
Alternatives.
In June 2017 I finally bought myself a radio controlling sailing boat having wanted one for longer than I can remember, I went for a Joysway Dragonforce 65 V.6 (DF65) an inexpensive RC sailboat. I regularly sail a full sized boat and having made plenty of boats and gliders as a kid was especially curious about sailing an RC scaled down version. I hadn’t had RC models of any kind till now.
Having set it up and working, I realised there were a few things I wish I’d known before embarking on building it which prompted this post.
The post has since expanded into guide covering tuning , electrics , rigs , solving problems and sailing tips.
First off, in addition to a tape measure, make sure you have super glue, a sharp craft knife and ideally two pairs of forceps. I found myself using the forceps to tie small knots. The super glue is essential to prevent the dyneema thread fraying when you cut it, an alternative would be nail varnish. The idea here is to dab a drop of glue onto the thread, wait for it to dry and cut on that spot. Alternatives to super glue would be nail varnish and others have suggested a Berkley Hot Line Cutter .

Get used to this, you’ll be doing it a lot. Also, look carefully at how to tie the black bowsies correctly, there is a right way and a wrong way, fortunately the instructions are pretty clear. Before handling the sails, cut your fingernails as it’s easy to dent them.
Make sure you’re familiar some some basic knots, at a minimum:
- slip knot that won’t undo itself, see a slip knot
- a knot for making a non slip loop at the end of a line such as a bowline
- a round turn and two and a half hitches
- a knot for adding a loop to a line e.g. farmer’s loop , also known as a alpine butterfly knot

Preparing a farmer’s loop
Out of the box, the stand is quickly assembled and there isn’t a whole lot to do with the hull which is easily and quickly assembled which takes us to the rig.
Setting up the rig is a bit fiddly but once set up, nearly all rig adjustments will be made by moving the tensioning bowsies which is quick and easy. This post should also help prevent you making some of the mistakes I made.
I think the most important thing before putting the rig together is to set the mast step on the first graduation forward from centre. The mast step position alters the vertical angle of the mast, this is called mast rake. The mast can be raked forward and back.

The reason I do that before set up is it makes setting the forestay easier later on and gives you room for mast rake adjustments later.

For normal sailing the mast will mostly be set to centre.
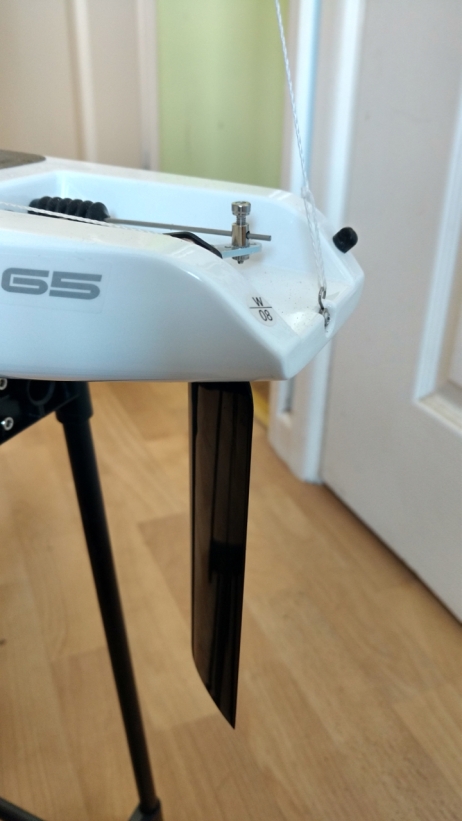
Continuing the theme, it’s also important to get the jib boom as low a possible. In the picture on the below, the boom is a too high, that could make tensioning the jib difficult and throws other settings out.

The image below shows the boom better attached, the line is attached to the boom using a round turn and two and a half hitches and hooked around the half eyelet with a bowline. A small drop of superglue on the knots is still a good idea to help prevent them slipping. The bowline below has slipped and will need redoing.
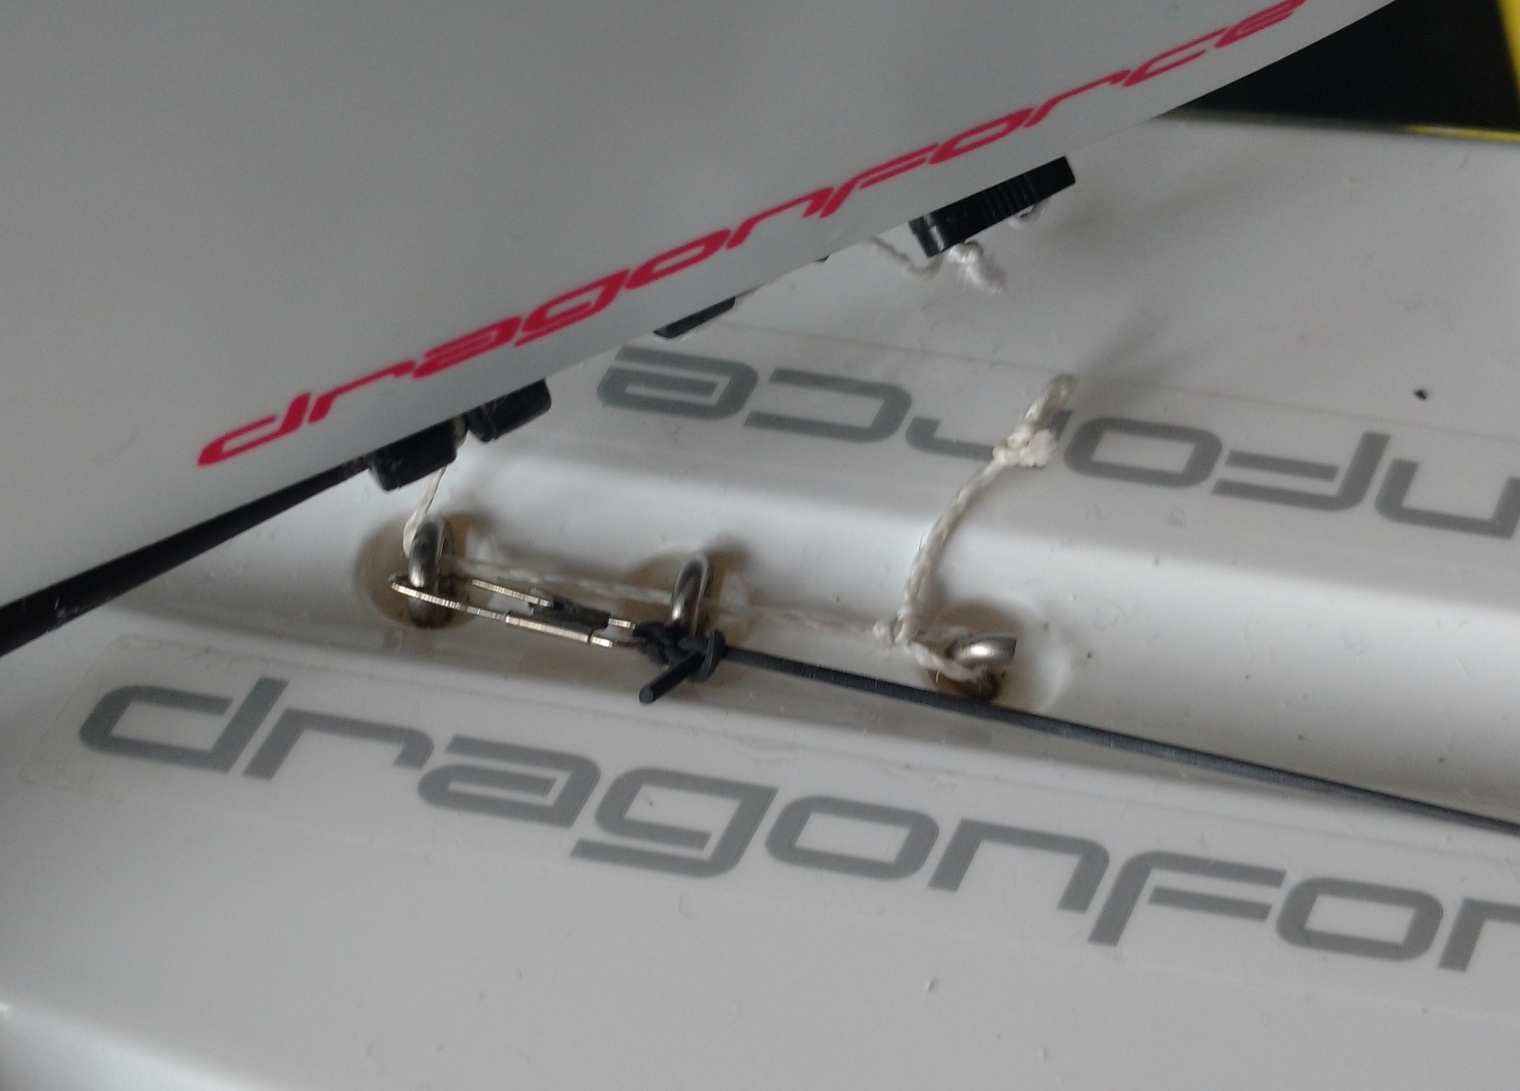
Using a metal swivel to fix boom to eyelet might work, but would probably break class rules if you intend to race. If I did need to rake the mast back, raising the jib boom would still be easier than reattaching forestay and jib halyard with more play.
You could even have two attachment lines permanently tied to the boom, one for a low boom position one for a higher boom position. Or with some nifty knot work, even two loops on one line.
There are other places where it’s important to get dyneema lengths and bowsies right. The picture below shows the downhaul tensioning bowsie for tensioning the main sail luff. The luff is the leading edge of the sail. In this picture below the bowsie is set correctly and the downhaul will be easy to set.

Make sure the sail is tied to the mast boom as close to the top as possible, in the picture below, this gap could be smaller. If this gap is too large, it becomes impossible to tension the luff with the downhaul bowsie (see above). N.B. not the luff needs much tension.

Once the rig is correctly set up, a nice design feature of the Dragonforce 65 becomes apparent which is that the whole rig can be removed from the boat very quickly by unhooking it in four places.

Smaller and larger sets of sails are available for the Dragonforce 65 for sailing in different wind strengths and the boat comes with an A set. For lighter winds there’s an A+ set and B and C sets for increasingly stronger winds. Rig suppliers are listed below.
All optional of course, I’ll be sticking with the A set. Keen racers will no doubt have rigs with different sail sizes ready to go.

When constructing the mast make sure you glue the top and bottom parts together, C on the left . The mast won’t be straight under pressure if you don’t glue it.
As on a real boat, the rig is very adjustable; there is a downhaul to adjust main luff tension, a halyard for jib luff tension, adjusters for forestay and backstay tension and jib leech and main leech tension can be adjusted via a jib leech tensioning line and fully functioning vang respectively. Both jib and main also have simple adjustable outhauls for altering sail depth.
The mast rake setting will affect the lengths of the forestay and backstay, bear this in mind as you read tuning guides for the boat. If a tuning guide suggests fore/backstay measurements in conjunction with the mast rake setting, then this should be fine.
The instruction booklet provides a good guide to get you going and the tuning guide from Soch Sails is very good.

This video from Patrick Rynne is an excellent tuning guide. See the original Facebook post and discussion here .
This is the bit I knew least about not having owned an RC model previously but it’s all quite straightforward. There is a servo for the rudder and a servo for the winch which adjusts the sheeting of the jib and main. Sheeting is about pulling the sails in or letting it out.
The pictures below show the electrics tray with servos and batteries. Note how the coloured cables are connected, this is hard to determine from the greyscale instructions sheet.

(Images showing how DF65 J5C01R receiver for J4C05 transmitter is connected to the servos).
It is possible to put the batteries further up into the hull near the mast and keel housing which alters the trim of the boat moving weight further forward. The images below show a Vapex 6v NiMH 950mah AAA pack connected with an extension lead.
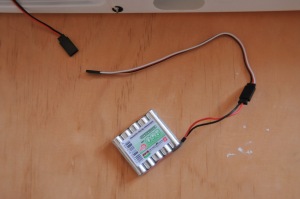
If even a few drops of water get into your hull, check the extension cable connector periodically as this will be prone to corrosion which will reduce electrical conductivity.
Mounting batteries by the keel box will raise the transom a tiny bit reducing drag which should theoretically increase boat speed, although in stronger winds more weight forward will increase the tendency to nosedive off wind.
Water can get inside the hull and you could wrap the batteries in cling film before putting them into the housing to keep them dry. I also put some tissue paper inside the hull to mop up odd drops. A standard measure to protect electrics from water is to spray them with Corrosion X , ( discussion ).
It’s probably a good idea to get some decent rechargeable batteries such Panasonic Eneloops . You’ll need eight of them, and the transmitter appears to beep when batteries are running low.
Don’t have too wide a rudder throw range, e.g. throwing the rudder more than about 35° will effectively turn it into a brake ( discussion ). If you do have a big throw, just be aware that you can easily brake the boat, especially in lighter winds.
Make sure the rudder is dead centre in its neutral position and use the transmitter rudder trim adjuster button to center it as needed.
If your winch servo constantly chatters when sheeted in, loosen the main sheet a little. A constantly chattering servo is working which will wear it out sooner and eat the battery.
Alternative Transmitter and Receiver – Flysky FS-i6
During a recent boat refit, I recently switched my DF65 over to the Flysky FS-i6 system. This is a slightly more advanced system than the default one which – among other things – lets you monitor battery power in the both transmitter and boat and set the endpoints better. I like it better and consider it a worthwhile upgrade.
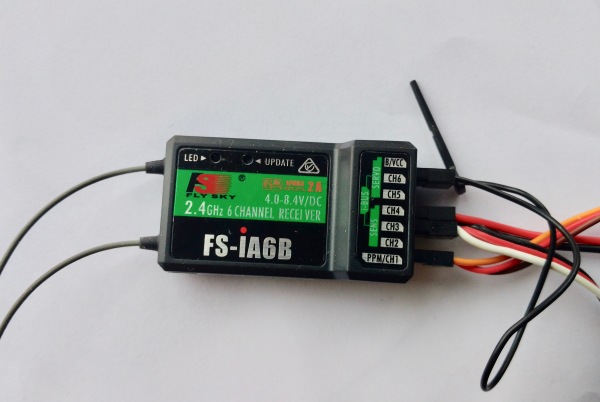
Out of the box, to set it up I did connected it as follows:
B/VVC – the binding plug
Channel 1 – Rudder: red and black Channel 3 – Winch: white, red, black Channel 4 – On switch (power): orange, red, brown.
To bind the receiver to the transmitter do this:
1. On the transmitter, push the switches up and pull the left winch control down 2. Turn the receiver on 3. Hold the bind button on the transmitter and and turn it on
See an instruction and setup guide for the FlySky FS-i6 Transmitter(Tx) and FS-iA6B Receiver(Rx) by David Flakelar, here .

I always leave some paper tissue in the hull whilst sailing to collect odd drops of water which might get in to the hull.
Clean the boat with fresh water after use, and dry the hull and sails with a soft cloth or paper tissue, paying attention to the sail eyelets and all metal parts.
After sailing, remove the deck hatch / seals to air and dry the hull should there be any water ingress, do this immediately. Also release any tension from the sails.
I always dry the two metal boom bearings as best I can with a paper tissue and drop a couple of drops of oil on them to displace water. These can rust.
Take care not to dent or bend the sails, hard objects including finger nails will damage them, more so with third party sails made of thinner materials e.g. Soch Sails.
If you mount batteries on the keel box, check the extension cable connector periodically as this will be prone to corrosion which will reduce electrical conductivity.
Water can get in through the on/off switch bellows so check your on/off switch periodically. After a year and a half of use I replaced mine as it had rusted and become unreliable.
I also put silicon grease into the the mast hole periodically, this and the mast where it sits will eventually wear giving a bit more mast wobble.
Finally get the batteries on a charge ready for the next sail. 🙂
Tuning the Dragonforce 65
Or solving basic sailing issues.
1. The boat keeps heading up and won’t track straight
Check the basics; is the mast rake central? Check that the angles of jib and main sail booms are correct, that sail depth (outhauls) and leech tension (vang and jib leech line) are correct (see the booklet, tuning guides # , # ). Check that the rudder has the correct neutral position. Check that the jib boom is attached correctly and is the correct distance forward from the mast.
If your basic boat settings are correct and it still heads up, try the following (one at a time and not necessarily in order):
- flatten the main by increasing its outhaul
- increase main twist by reducing vang (main boom will go up)
- ease the main sheeted in position a little or
- tighten the job sheeted in position a little
any of those changes in light to moderate winds can make a big difference.
Experiment!
Also, it’s likely not possible to make it track straight in all winds, e.g. it could be set up perfectly for light winds and still want to head up in gusts.
2. The boat won’t tack
Check that the jib boom isn’t too far forward, do not extend the jib boom counter balance. If the jib appears to flick across the deck back and forth, it’s too far forward. It could also be that you don’t have enough speed going into the tack, in stronger winds with waves, bear away to gather extra speed and then tack. Waves hitting the side of the boat can prevent it tacking. Does the jib have enough depth in the sail? Is the forestay and jib halyard too tight? If you have tacking problems bring the boat back to you by gybing it around.
3. You can’t get the boat out of irons
Meaning you tack and the boat stops and won’t move, ease the sails a little then try pumping the rudder on one side (fast, slow return and repeat), check your jib boom position (above). Don’t force the rudder into a far left or right position, you aren’t driving a car.
4. The boat won’t respond to the rudder
Assuming electrics and battery are ok, check your rudder throw. Is it moving? Is the rudder stiff or stuck? When heeled over, the boat will be less responsive to rudder steering because as the boat lies flatter, the rudder acts more as a hydroplane . In this situation, sheet out first to level the boat, then steer. Did you use the correct lubricant for the rudder bellows? Grease will make very sticky. Is the boat caught in weed? Be patient and it will hopefully free itself.
5. The boat is heeled over all the time
The wind strength is too strong. Your options are to use a smaller set of sails, wait for less wind, or de-power the rig. De-powering only works so far but to de-power the sails, flatten them by increasing the outhaul, increase main twist. Also, sheet in less the reduce the sheeted in position so long as the boom doesn’t drag in the water.
The closer the booms are to the centreline when sheeted fully in, the better the boat will point (sail closer to the wind) but the more it will heel over. You can sacrifice pointing ability for rudder control and better course direction. Remember, the more the boat heels, the more it also slips sideways.
Experiment with feathering the boat into the wind to get a good balance of forward speed and heel, and experiment with different sailing angles and degrees of sheeting. I’ve had good results with the default A rig even in quite strong winds.
6. The boat won’t go downwind
First, make sure the booms will go out far enough when fully sheeted out. Assuming rudder and electrics are good, and that otherwise the boat is well set up, it’s likely that there is too much wind and your boat just wants to head up. It is perfectly possible to have the boat trimmed so that it will beat (go into the wind) in strong winds but it won’t then come back to you easily. Either use a smaller set of sails or don’t sail, it’s not worth losing the boat.
7. The boat only tracks straight on one tack
Is the mainsheet bridle dead central? Is the rudder dead central?
8. The boat nose dives
This can happen in stronger winds. Make sure the rig isn’t raked forward, use batteries in the servo tray location to move weight further back. Allow the boat to gain speed before bearing away downwind, use a smaller set of sails. Avoid sailing dead downwind, this is the slowest point of sail and as such pressure on the rig will be strongest. The wind could also just be too strong.
9. The boat won’t power up
Most likely the battery holder, connector cables or switch is rusty. Replace any components with rust anywhere and spray with some corrosion x , it’s not worth risking your DF 65 losing power on the water.
Different rigs and sail sets
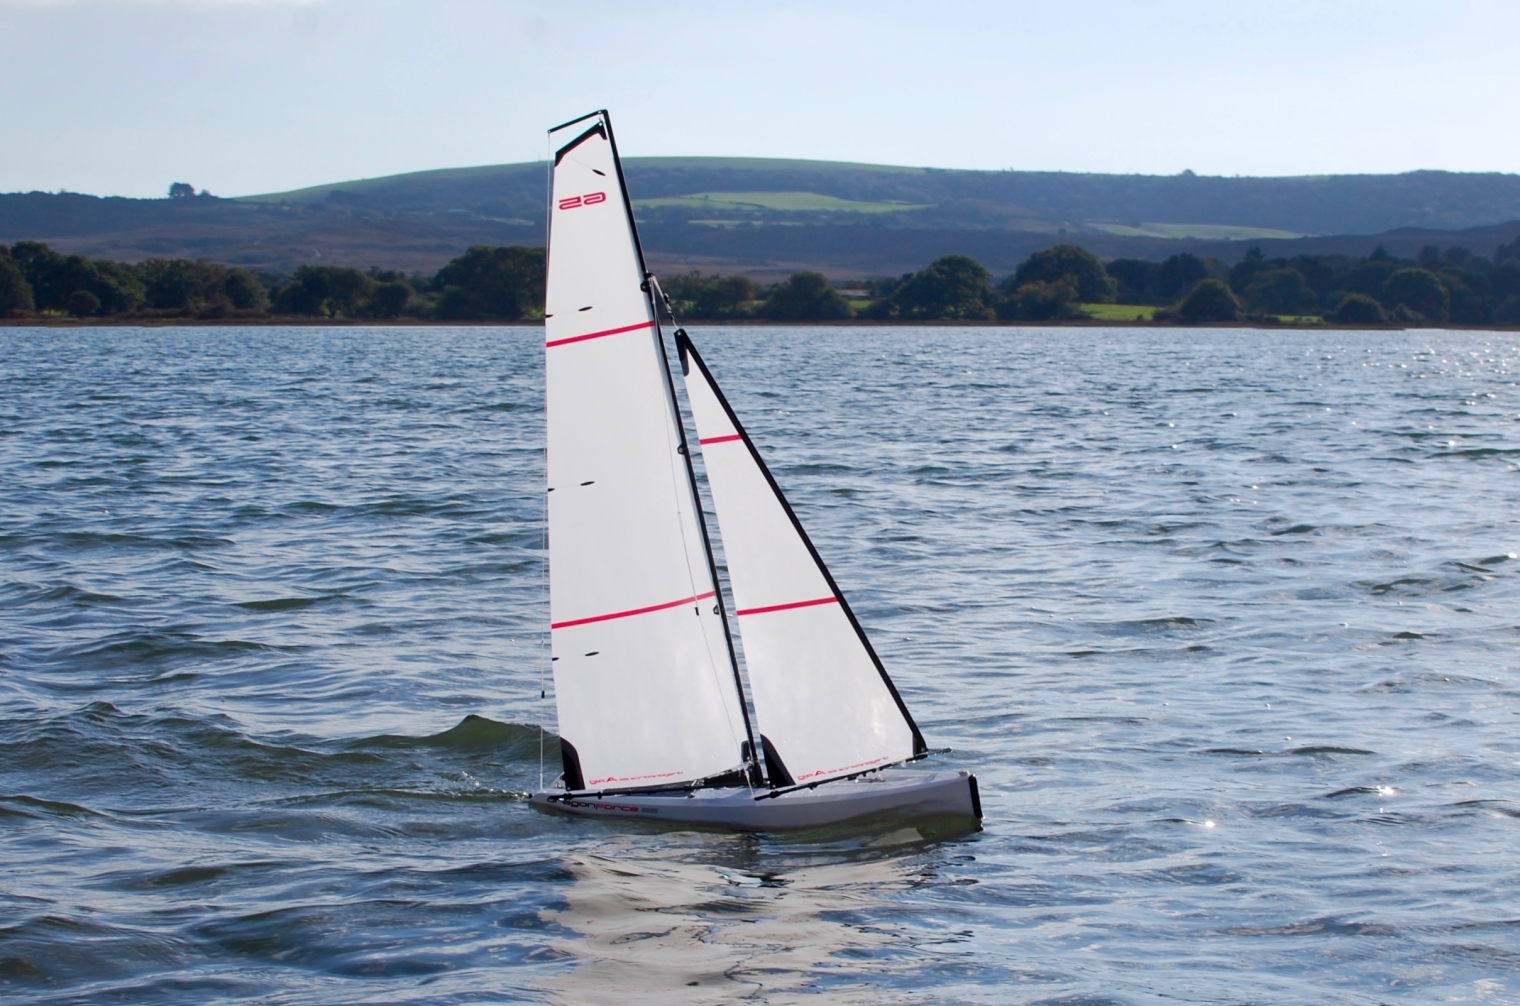
From the factory, the DF 65 comes with an A rig. Smaller and larger rigs are available made from different materials. Since I first wrote this post in 2017 I bought a set of A+ sails from Sochsails which have become my favourite rig set.
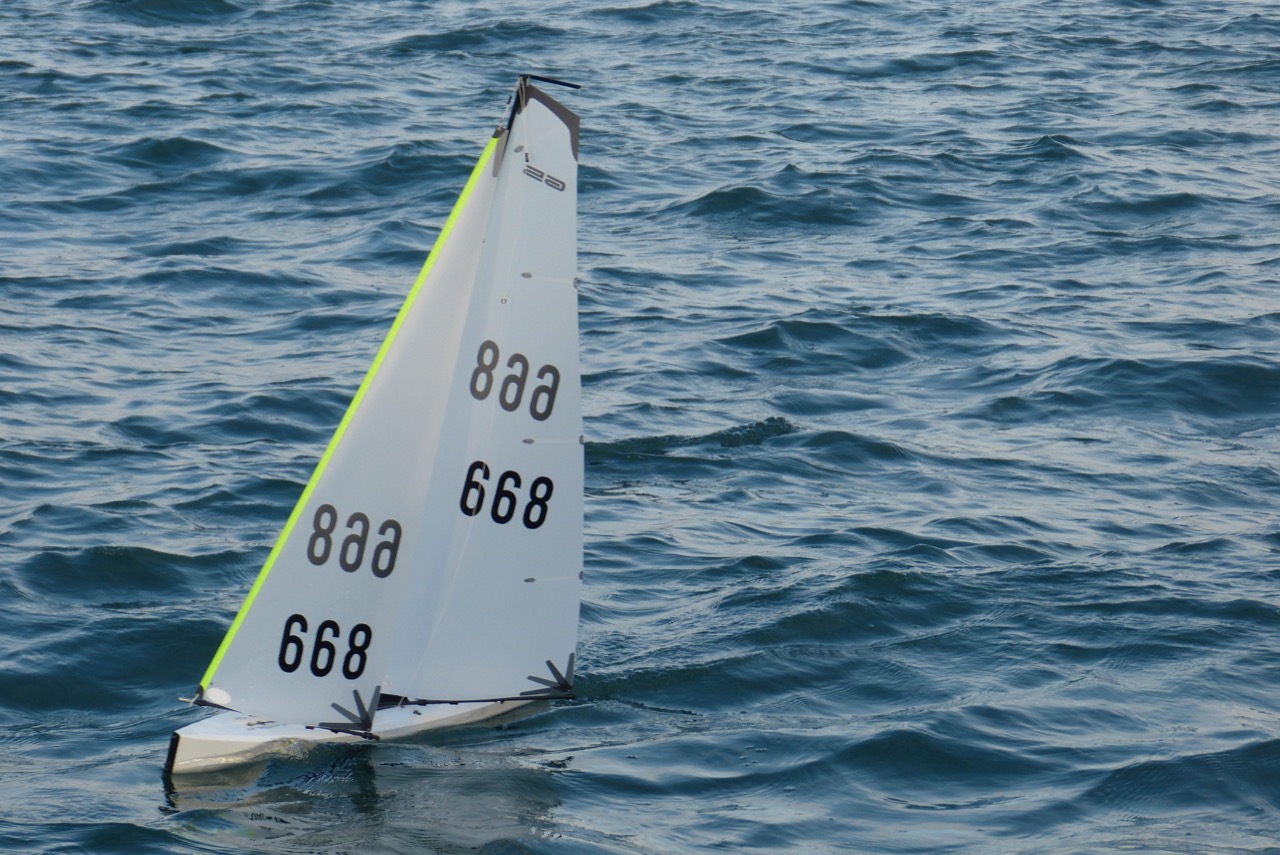
The A+ rig is bigger than the default A rig and transforms the performance of the boat. It’s much more responsive in very light winds and in my experience is manageable up to 11 – 12 knots. The images above were a 7-12 knot day.
Third-party sails are available in different materials. My A+ set is mylar which is a lighter less tough material than the stock sails. There are some pros and cons here worth bearing in mind; mylar film is lighter and more responsive in light winds e.g. the sails will flip across more readily when tacking, is louder when luffing which provides better audible cues to know what the boat is doing, but the material is more sensitive to hard objects such as finger nails, or dents.
Transporting the boat fully rigged with mylar film sails in a vehicle need more care and it’s probably worth looking into a sail bag.
Another tip with mylar sails is to make sure the clew is crimped closed so that a flapping sail doesn’t come free.
V6 vs V7 What’s New?
The DF 65 V7 was launched in 2021 and is different in two ways from the V6:
- Upgraded sail winch, higher power and increased accuracy. Read more here .
- An upgraded stand which allows laying on the side. Thestand upgrade can be purchased, e.g. here .
Otherwise, it’s the same. Hardcore racers might go for the upgraded winch on their v6, but it’s quite a bit more expensive.
The Dragonforce 65 V6 /V7 is a good quality product and great value for money. The boat has very good sailing qualities and its relatively small size means it can be put in the car fully assembled, avoiding the hassle of dissembling and reassembling. The transmitter is solid and works well.
The rig is very configurable, easy to tune and comes in a variety of size options. Switching rigs is super quick and easy, parts and sails are easy to find and also relatively inexpensive.
The initial rig set up requires patience and a little time and this is definitely not a simple toy. The boat hull does need to be aired when off the water and the deck seals whilst simple are a bit fiddly, I use electrical tape now.
The Dragonforce 65 is a hugely popular class of boat which means if you want to race, the chances of finding a fleet probably look good, and for the money, I think it’s an excellent package and a lot of fun.
The RC Laser – http://www.rclaser.org.uk/ The Micro Magic – http://micromagic.info/ – similar price range The DF95 – the DF65’s big brother – https://dfracing.world/df95/
There are plenty of other boats but the top two seem to be well adopted at least in the UK. My local radio yacht sailing club have these classes which could give you further ideas.
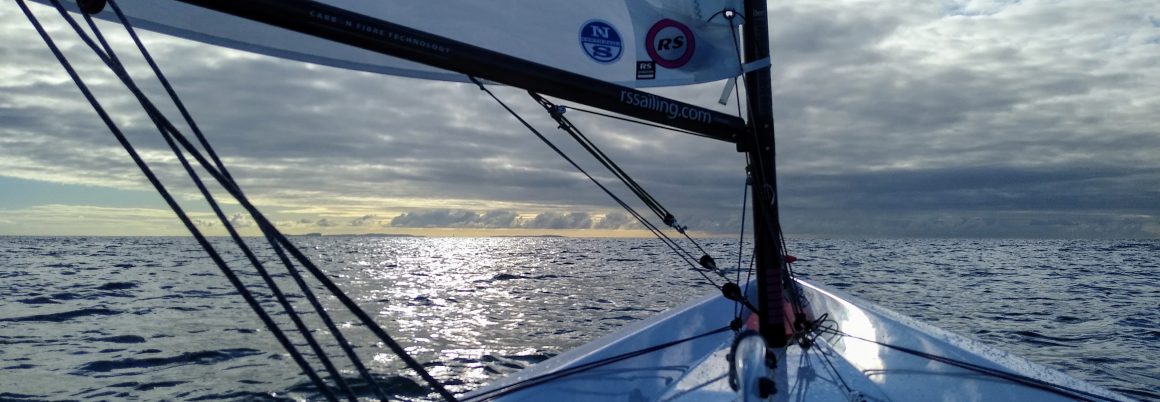
A bit of boat Zen with my DF 65 on a calm lake (read more ).
https://dfracinguk.com http://www.rg65usa.org/dragon-force-resource-center.html http://www.abersochboatyardservices.co.uk/Dragon%20Force.php
In the press
A good article in Sailing World, https://www.sailingworld.com/inside-classes-dragonforce-65/
The boat and spares
http://www.joysway-hobby.com/c/rc-sail-boat_0021 https://www.wirelessmadness.com http://www.radiosailing.co.uk/ , spares
https://www.modelsport.co.uk/joysway-dragon-force-65-v6-yacht-rtr-2-4ghz/rc-car-products/413315http://www.abersochboatyardservices.co.uk/Dragon%20Force.php
https://soch-sails.myshopify.com/ https://hotrcsails.com/ – CA http://www.catsails.co.uk/dragonforce65.html
Tips, Tuning and Mods
DragonForce 65 Tuning – Patrick Rynne Video, top tip! Sochsails tuning guide https://radiosailing.net/blogs/news/building-your-df65-a-rig-kit http://www.abersochboatyardservices.co.uk/Dragon%20Force%20Hints%20&%20Tips.php https://dragonforce65.us/tip-and-hints/ https://dfracinguk.com/hints-tips/ https://dfracinguk.com/df65-rigging-tuning/ Sealing the keel trunk and fin
DF65 Rigging and Tunning 1 , 2 , 3 Youtube vids
Instruction and setup guide for the FlySky FS-i6 Transmitter(Tx) and FS-iA6B Receiver(Rx) by David Flakelar, here .
http://www.animatedknots.com/indexboating.php https://www.netknots.com/fishing_knots DF65 Facebook group discussion on knots
Racing Associations
https://dfracinguk.com/ – register your boat to get a sail number (UK) https://mya-uk.co.uk/ http://theamya.org/boats/df65/ – register your boat (USA). https://dragonforce65.us/ – US DF65 class owners website
https://www.facebook.com/groups/dragonforce65worldwide/ – top tip! https://www.facebook.com/groups/DF65USA/

Share this:
10 thoughts on “ dragonforce 65 setup, tuning and review ”.
Very informative Have just purchased one of these to give it a go .⛵️
Like Liked by 1 person
Excellent run down. The DF 65 V6 is a much better boat than the previous version DF65 . One tip for you. The transmitter in the boat has a short aerial and this needs to be mounted horizontally near the deck underneath ( in the dry ) What I do is slip the small antennea cable into a plastic drinking strawer ( thus keeping it straight which is the best for transmitting and receiving ) and then tuck it up under the deck near the gunwhales. Hold it along the underside of the deck with doube sided velcro. Don’t have it waggling about behind the electrics and winch area.
We are starting up a club racing the DF65 and we are finding the transmitters interfere with other boats. Can you tell us how to deconflict them?
Sorry Robert, I don’t have experience with this. There are a number of DF65 facebook groups for different countries, perhaps they might help.
Hi You seem to have a problem with the ” binding ” process whcih electronically liknks your transmitter to each receiver. Courtesy of Josway J4Co5 unit. 1) Push down the throttle stick fully to its stop ( left stick, Mode 2 ) and switch on the transmitter 2) Switch ON the receiver on the boat. 3) Presss the button which says ” BIND” on the receiver until the LED flasheson the receiver, then release it. When the receivers green light is on the connection is syncronised for that selected transmitter and creciever. IE it is a unique link. Should you ever replace the reciver in the boat, do it all agai for that selection to your transmitter. See Joysway Instruction Manual from which this info has been taken
Hi, Hopefully you have an answer to this by now but just in case. You will need to _SET UP NEW ID for J4C05 TX: 1) only 1 boat and 1 transmitter, switch on RX (boat), make sure throttle stick on TX is at neutral position. 2) Push the two trim button (at bottom of two TX stick) toward the left side (left trim button) and right side (right trim button) and hold. 3) switch on TX, hold the two trim button for about 3 seconds and release, now you have set up the new ID for TX. 4) rebind the TX with the boat. make sure no other TX and RX(boat) are power on. Details in your manual.
I’ve just bought 2 DF65s and I followed the bind instructions but each transmitter controls both boats. Anyone else seeing this? I tried bind process 50 meters apart and still same problem.
Completely naive to any kind of sailing and I thought this was a “beginners” boat, nevertheless I am determined. I had just tied the first bowsie with a square knot and a drop of superglue when I realized I had it upside down. Will that really make a difference? Is there enough dyeema cord to allow for mistakes? I’ve stopped to learn more, which led me to your blog, and I’m learning the knots you’ve suggested. How do you know which knot to apply where?
>Will that really make a difference?
It’s been a while but I think this will make it prone to slip, correctly done it’ll lock in position. I made a fair few mistakes when I first did mine but if you can I would recommend buying another length of chord just to ease any concerns.
>How do you know which knot to apply where?
Good question and I’ll update my article to answer that, important to get right are the knots which tie things to things. e.g. it doesn’t matter if a loop tied around a ring slips to fully closed (but not further) whereas the loop which holds the jib mustn’t slip. When I set up my A+ rig I used a ’round turn and two and a half hitches’ further secured with a drop of glue for loops which could close (e.g. chord attached to rings) and a bowline for the jib loop.
Stick with it, assembly seems to take an age but soon you’ll be sailing.
Will you be updating your article soon? (I’m looking forward to doing this project correctly and waiting to continue assembly based on your response.)
Leave a comment Cancel reply
- Already have a WordPress.com account? Log in now.
- Subscribe Subscribed
- Copy shortlink
- Report this content
- View post in Reader
- Manage subscriptions
- Collapse this bar
Modifications to Main/Jib sheeting system on the Phantom Yacht Rudders Chain Plates Mast fitting for shrouds forestay Mainsheet fairlead Water proofing the hatch Improving Ballast Replacing Shrouds 'B' rig sails Radio Setup Clew/Tack Adjustment Improved sheeting system Gooseneck repair General Introduction One of the many frustrating things about the phantom is the sheeting system used to control the main and jib sheets. While the winch is OK - quite powerful and not too slow, the sheets are held in place on the drums by a close fitting plastic shroud. When under tension from the wind, the system works fine but if the conditions are light then as the sails are let out the turns on the drums do not run out of the shroud and wind over themselves. This often means that the next time the sails are pulled in the sheets pull in much further than they should often with the jib and main sheets no longer in sync - bad!. The way to overcome this is to maintain a constant tension on the cords which wrap around the drum Version 1 - Ben M is a complete loop system involving both winch drums and a rubber band in the loop to maintain tension. Version 2 Paul H is a simpler system using only one drum and a length of shock cord to maintain tension. Version 3 Bob Edgecombe is a quite sophisticated but elegant solution to this problem Version 1 One of the simplest ways of doing this is to make a continuous loop which winds up on one drum and winds out on the other. Note that the cords wrapped around the drums are now in opposite directions exiting on the same side. The line is joined by coiled spring or rubber bands slightly stretched to maintain tension in the loop. I have used silicone rubber bands as used in cooking as these are UV resistant and don't perish. The loop is set up so that when the sail control is fully in the spring is near one end. The lower drum has about 5 turns while the top drum only 1 or 2 turns. This means when the sail control is set to the fully out position, the spring moves to the other end of the top part of the loop with 5 or so turns on the top drum and 1 on the bottom. This gives about the 30-35mm of movement needed. The main and jib sheets are both attached to the end of the spring nearest the bottom drum - important!. This means the bottom drum takes all the strain of pulling the sails in. This is good as this drum is nearest to the bearing in the winch and reduces wear. The top drum simply maintains tension in the loop. The drums and bottom part of the loop are below decks while the spring and top part are above deck. The turning mechanism at both ends of the loop are about 40-50 mm apart. While it's possible to buy small deck blocks for turning the loop I chose to use the easier and cheaper option of bending fine brass tubing into a 180 ° hook and belled the two open ends with a fine punch. The cord is fed through the brass and slides with surprisingly little friction using spectra or dyneema cord. While I made a former to assist this bend by channelling a groove around a piece of plastic, bending it gently around a thumb can work OK. Aim for about a 20mm diameter curve. The brass tube is fed through a small hole drilled in the deck and the loop set up with tension. This holds the brass in position which can then be glued in position. Because both main and jib sheets attach to the cord and are pulled in the same direction, one of them will need to be redirected back to reach the boom sheeting position. I had one brass turning loop near the transom and the other near the mast position giving me the 45mm I needed. This means there is a direct pull set up for the jib but the main needs to go forwards around a turning point near the mast then back to the main sheeting point. This does require a new sheeting point for the main and jib. The jib is easy as the existing outlet could be used with a metal loop glued in it while the main sheeting point has previously been discussed in the ' Mainsheet Fairlead ' page previously The only other change was to slightly alter the direction the tension cord enters the top drum as it was angled up a little too much to ensure it didn't ride off. See the image to show one way of doing this. Does it work? Definitely! No more pulling the sheets in to find they go too tight, no more letting the sheets out and not having them move far. The booms go exactly where they should according to the control on your radio in even the gentlest of breezes. Version 2 Thanks to Paul H for this system. It is simpler to construct as there is only one exiting point rather than two with the sheet wrapping around the bottom drum only running to the rear of the deck and exiting via a tube similar to the above method. The sheet now runs aft around a turning block then forward sufficiently to allow main and jib sheet attachment and ends with a length of hat elastic or similar carried all the way forward to maintain pressure on the sheet and keep it on the drum. The jib sheets are led forward direct to a jib sheet fairlead set into the original jib sheeting exit point while the mainsheet is led forward to a turning point using one of the shroud attachments and back to the mainsheet fairlead. Paul has used this system only the once so far with no issues (and won the day!). It certainly seems to be the simplest way to solve the poor original sheeting system. Version 3 thanks to Bob Egdecombe This version like version 1 uses the two winch drums to wind a loop of cord in and out around a turning block. The interesting idea here is its all under deck. An inspection hatch was cut out near the front of the yacht and a turning block secured there. The open area is later covered with stickyback sail cloth. A loop in the cord allows the two sheets to be attached and during sail pull in are dragged forward. The mainsail cord goes directly to the existing mainsheet exit fitting (through a wire loop just to keep it in position) while the jib sheet loops back through a wire loop then back to the existing jib sheet fitting. The need to loop the jib sheet around a wire loop is to ensure enough movement is obtained in the jib sheet (~ 30 cms or so). Notice that this does not use the winch drum cover - never a good idea!! page last edited on 08/09/2020

How to Sail an RC Sailboat – Step by Step Instructions – 5 Minute Read

Affiliate Disclaimer
As an affiliate, we may earn a commission from qualifying purchases. We get commissions for purchases made through links on this website from Amazon, the Ebay Partner Network (EPN) and other third parties.
Sailing an RC sailboat is fun, but it takes some practice before you get good at it. I certainly needed it when I started! If you want to take your interest in RC model boats to another level, then you should consider learning how to sail an RC sailboat.
However, learning how to sail RC sailboats requires patience and perseverance. There are several things that you need to master before you can begin sailing. This article will teach you how to sail a radio-controlled sailboat.
Read on below to discover tips that will avoid failure in learning how to sail model sailboats, that apply to all size boats.
Step by step Instructions
How does a yacht sail, how are the sails and rudder of an rc sailboat moved, moving forward in a straight line, sailing into the wind, sailing away from the wind, final thoughts.
First, here’s a summary step by step approach to learning how to sail an RC sailboat:
- Consider joining a local club ( USA UK ) where you’ll find lots of helpful RC sailors and RC sailing events that will help you learn. You may even be tempted to get into RC sailboat racing.
- In any event, choose a day with a gentle, consistent, light wind, preferably with the wind direction towards you, just in case you lose control of your boat.
- Find a medium-sized lake or pond, and avoid rivers or the sea, where there may be strong undercurrents. A local club will have a safe sailing area. Look out for areas that may have weeds or reeds, or shallows that could strand your boat. Remember to factor in the depth of the keel, which, on most model sailing boats, is significant.
- Check you are able to sail in your chosen area – ie no prohibitions – and keep clear of swimmers, people fishing, full sized boat traffic, and wildlife.
- Avoid days when it’s busy in your sailing area with other modelers until your sailing skills are such that you can feel confident.
- Set up your RC sailboat on its stand, and check the rigging is as it should be according to the boat’s instructions. Ensure you have brought the boat battery pack charger, the batteries are charged, and you have spare AA batteries for transmitter. Turn on the transmitter, and test that the rudder control and sail servos are all working properly.
- Ensure you understand the basics of sailing, set out below, before launching your RC sailboat. Keep a keen eye on how your boat reacts to the wind, and be ready to react in turn by altering the sail angle to maintain the boat speed as far as possible.
The first thing you’ll need to know is how does a yacht sail? An rc sailboat sails just like a full size yacht. The wind energy pushes against the sails and flows over them, creating a difference in wind pressure on each side of the sail, which is translated to forward movement by the keel of the boat. Without the keel, the boat would be pushed in the direction of the wind.
To keep the yacht moving forward, the sail angle to the wind is adjusted depending on the position of the boat. Paradoxically, a sailing boat can sail into the wind, as well as with the wind. The only direction that can’t be sailed is with the wind directly in front.
The direction of the boat is adjusted by the rudder, which is at the back of the boat.
The following diagram shows the sail angles at different points of the wind:
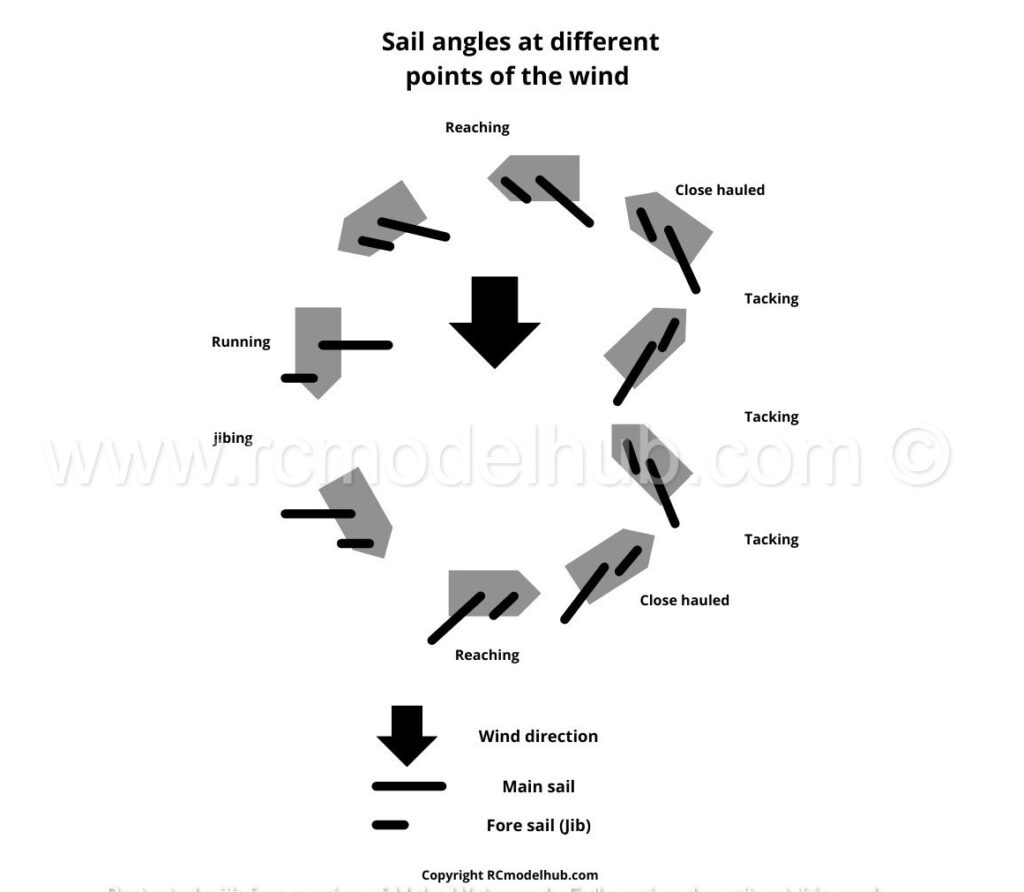
As a beginner RC sailing boat helmsman, many of these terms will be confusing to you, but they will soon become familiar.
The controls of an RC boat are explained in more detail in t his article , but basically, the hull (body) of the boat contains batteries that power servos which in turn move the rudder, the main sail, and the fore sail (the “jib”). The servos are controlled by a receiver, that takes commands from the RC transmitter which you hold in your hand. Here’s a short video that explains the transmitter controls:
How to sail an RC sailing boat
First, the basic skills. With the boat in the water, start with the wind half way between the front (bow) of the boat, and the side (beam). Keeping the rudder straight, trim (move) the sails so that they are close to the hull (close hauled) and the boat should move forward. If the wind is gusty, or very strong, move your transmitter control to let out the sails, spilling the wind, to keep the boat from keeling over.
If you’re sailing into the general wind direction, you’ll need to learn to “tack”, which involves turning the boat from a position where the wind is coming on one side of the bow, through the head-on wind, to end with the wind on its other side. This is achieved by moving the rudder to turn the yacht, whilst changing the angle of the sails to the wind – see the diagram above.
So the boat moves forward via a zig zag course.
As the boat turns into the wind, it slows, so this maneuver should be completed as quickly as possible, otherwise, the boat could get stuck with the sails flapping – this is called being “in irons”.
If the direction you wish to sail in means the wind is behind the boat, it is called running before the wind. In this case, turning the boat involves “jibing”, which is the opposite of tacking.
To change direction whilst running with the wind, move the rudder so the wind goes around the back (stern) of the boat and haul the sails in. As the boat comes round, the wind will move from one side of the sails to the other.
If this is not done smoothly, it could cause the sails to violently move in the opposite direction, possibly causing damage and maybe even capsizing the boat.
So those are the basics of learning how to sail an RC sailboat. As I’ve said above, the best way to refine your skills is to get out on the water and practice.
if you have any interest in remote control sailing but aren’t sure where to begin, use the step-by-step guide above to learn how to sail an RC sailboat. Once you’ve mastered the basics, you can move on to the exciting world of racing sailboats.
If you’re still considering your first RC beginner sailboat, take a look at our article on beginner RC sailboats , or for the more adventurous, consider building your own RC sailboat from a kit. More about that here .
Image credit Nick Kinkaid
About the author
It all started with a line controlled spitfire 50 years ago….
That turned into a life long interest in models, in particular radio controlled models, but I’ve only got back into it since I’ve been retired. As a result a lot has changed, and I’ve been happily starting afresh, researching into the hobby and finding answers to the questions all beginners have when starting out.
I hope you find some answers to the queries you have, and go on to enjoy all aspects of this fascinating hobby.
Latest posts

VOLANTEXRC P51 Mustang RC Plane Review: A Beginner’s Dream?
I was thrilled when I discovered the VOLANTEXRC RC Plane. This 4-channel WWII RC Airplane, specifically the P51 Mustang model, is truly a beginner’s dream come true. With its ultra-stable Xpilot gyro stabilizer system and 3-level flight control system, it’s incredibly easy to fly, whether you’re a novice or an experienced flyer. The impressive 2.4…

RTF RC planes with SAFE technology: No More Crashes?
RTF RC planes with SAFE technology have revolutionized the world of remote control aviation, offering a new level of ease, control, and safety for both beginners and experienced hobbyists. What a change from my early days of flying RC planes, when you fully expected to come home with your plane in bits! These innovative aircraft…

Top Race RC Plane TR-C385 Review: Stunt Flying Delight
I recently had the chance to test out the Top Race 4 Channel RC Plane TR-C385. It surpassed all my expectations. Designed for adults and older kids, this ready-to-fly airplane offers an exhilarating stunt flying experience. With precise control and maneuverability, thanks to its 4-channel system, this RC plane is a great starter or intermediate…
- Classifieds
- Remember Me Forgot Password?
- Boats Sailboats Help! Newbie needs help with servos and sail winch.
- Electric Flight
- Advertising
- Our Sponsors
- Review Policies
- Terms of Service
- Privacy Policy
- Site History
- Mark Forums Read
- Member Search
- Upcoming Articles
- Do Not Sell My Data
- Manage Consent
- Back to Top
VIDEO
COMMENTS
Here's how I built the sail winch system in my RC (48" schooner) sailboat. I use a HiTec radio and operate the winch servo with the throttle channel. I also ...
Here are four most popular commercial sail winches used in boat classes between 90 cm and 1.50 m length: - RMG sail winch from Australia - Powerful, fast, the most famous. - Regatta sail winch from Graupner, Germany. - Sail Winch SW-2 from Robbe, Germany. - High torque and 180 degree servos, servos from 1/5 scale cars or servos for quarter ...
Top is sail winch. Line runs from copper tube tostern, around a 180 turning block to top of deck and then forward to jib. Near the stern, the mainsheet is attached to the long jib sheet so both move togehter. Fine adjustment is made at the mainsail boom and the jib boom. On the bottom is the rudder servo but without the pushrod connecting to ...
The double haul (pulley on end of servo arm) provides twice the winch line travel than would be available if the winch line was connected directly to the servo arm. This sort of setup suits smaller boats (say up to 800mm), a drum winch is more appropriate for larger boats. Arm winches are fast, drum winches are strong.
In this very simple video we explain how to set up K2 and its RMG winch & Drum, hope we helped out to many of you who approached us with a request to help yo...
About Press Copyright Contact us Creators Advertise Developers Terms Privacy Policy & Safety How YouTube works Test new features NFL Sunday Ticket Press Copyright ...
Boats Sailboats Discussion Sail winch setup; Thread Tools: Jul 02, 2015, 07:49 AM #1; wayne from Fla. wayne from Fla. Registered User. Thread OP. ... Winch set up. The Tippecanoe T 50 That I built a few years ago has a pretty simple set up. There are 2 half circle shapes that are built up of 3 pieces of ply. I can't remember what the diameter ...
RC Sailboats - Winch Setup? - Hello everyone, I'm new to r/c sailboats and I have this Proboat Ragazza that I'm trying to get on the water. I was wondering if someone could give me a few pointers on how to install the winch lines, in what direction? I'm guessing install one line going one way, and the other line going.
But, here goes. I'll try my best to help, culling information from some good sources, Model Yachting Magazine issues #119 and #120 both reference one meter class boats, the US1m and Soling 1M respectively. The details as I know them. The US 1M is limited to 600 Sq in of sail area, the Soling 1m is rated at 592 sq in of sail.
5. Wiring Regulator The SmartWinch contains a 5 volt regulator which can supply up to 1 amp of current to the controller circuit, radio receiver (rx) and rudder servo. This allows for the use of only one battery pack inside the yacht. The motor runs on the full battery voltage via the MOSFET output circuit.
J Class Boat-Shamrock V. 1/16 (8'-10')Scale Replica of the 1930's America's Cup Class Yacht. View Page. ... North American service center for the RMG winches. Suitable for IOM to East Coast 12 meter Sailboats. ... Once set up to suit the transmitter, the winch is programmed to ignore signals which are above maximum and below minimum pulse width ...
This is the easiest way to set your winch servo and sail in average winds. You need a 20 Kilograms servo or greater.
In June 2017 I finally bought myself a radio controlling sailing boat having wanted one for longer than I can remember, I went for a Joysway Dragonforce 65 V.6 (DF65) an inexpensive RC sailboat. I regularly sail a full sized boat and having made plenty of boats and gliders as a kid was especially curious about sailing an RC scaled down version. I hadn't had RC models of any kind till now.
A big piece can be cut from the clamshell container for grocery store cupcakes/cookies. Punch a hole where the sail servo stem comes through and just let it rest on the top of the servo. The slack sheets just lay on the guard. Keep it simple and it works better. And make sure you place a drop of CA on the knots.
One of the many frustrating things about the phantom is the sheeting system used to control the main and jib sheets. While the winch is OK - quite powerful and not too slow, the sheets are held in place on the drums by a close fitting plastic shroud. When under tension from the wind, the system works fine but if the conditions are light then as ...
RC Boats General Discussion - Sailboat winch servo question - How beneficial is a winch servo compared to a standard servo with a long arm? Is the Hitec 3.5 turn winch servo a good one? My father has an RC sailboat and is currently using a standard servo for the sail. ... A drum winch requires an entirely different type of setup than an arm ...
Moving forward in a straight line. First, the basic skills. With the boat in the water, start with the wind half way between the front (bow) of the boat, and the side (beam). Keeping the rudder straight, trim (move) the sails so that they are close to the hull (close hauled) and the boat should move forward.
Visit http://www.bearospaceindustries.com/boats2.html to learn about Gary's unique RC sailboat designsMusic - My Trains a comin' by Unicorn Heads - A Schoone...
An RMG drum and an arm winch can go full in to full out in about 1 second. With a fast winch, sail response is instantaneous. With a slow winch, I am always chasing the right setting - overrunning and pulling back. A fast winch can always be moved slowly (by the stick), but a slow winch is always slow. Try the 785 as you have one.
Re-rigging a 40-foot boat with wire is estimated to cost roughly $100 per foot. Which includes the round-trip costs of hauling, launching, and unstepping the rig (about $2,500). Final Words. We've discussed here in detail on the rc sailboat rigging setup. This should help with the rigging setup, and we sincerely hope it does.
Received 32 Likes on 32 Posts. RE: Drum sail winch. My personal favourite way of doing the job is to have the winch below deck, use a double drum, and a continuous loop. Starting from the lower part of the drum and assuming that the sails are fully in, there would be however many turns the winch would offer plus a bit for luck, then through a ...
RC CRAWLING WINCH BASICS. Scale winches, such as the RC4WD Mini "Warn" 9.5cti Winch, look like their full-scale counterparts. These are great for pulling off a scale look and even get you scale points in a competition. They're also functional as recovery winches. You can use them to get your rig out of a tough spot on the trail or course.
I guess from my experience with ETNZ (Drum winches) and Victoria (arm), do not use drum winches as you need to keep the tension on the sail control link or it'll get tangled easily, plus it's much slower response but realistic. It is also bigger in size. I think you should choose your type of servo before making your servo box.