

Specializing in restorations of Sunfish Sailboats

Photo Gallery 1
Photo gallery 2, photo gallery 3, photo gallery 4 new year 2020, photo gallery 5, 2021 new year- photo gallery #6, photo gallery #7 2021, hiking strap installation- 6/18/2021, photo gallery 2021-2022, my restored sunfish pic mix to santana.
This is what happens after Winter boredom sets in
or It’s the fumes ........
New Merch ....
Taking it down to the finish...., my shop mission, keep it original.
The Sunfish sailboats I restore are not painted. I hand wet sand the original gelcoat to bring back the gloss finish through a multi step process. The hulls are weighed and force dried with hot air if needed. Upgrades include access ports added for inspection to vital areas of the hull. All hulls are stripped of all hardware and refitte
The Sunfish sailboats I restore are not painted. I hand wet sand the original gelcoat to bring back the gloss finish through a multi step process. The hulls are weighed and force dried with hot air if needed. Upgrades include access ports added for inspection to vital areas of the hull. All hulls are stripped of all hardware and refitted with new or refinished parts as needed. All boats are re-rigged with new lines , sail rings, sails( if wanted). Other upgrades and custom features can be added to make your sailing experience even better.
Keep It Green
In Vermont clean water is a paramount issue as with other states. Conservation and reclamation of resources keeps toxic materials from entering the environment. My Water reclaiming system reuses the water I use for wet sanding while the by-product is captured through a multi filter medium . This ensures nothing will be going down the
In Vermont clean water is a paramount issue as with other states. Conservation and reclamation of resources keeps toxic materials from entering the environment. My Water reclaiming system reuses the water I use for wet sanding while the by-product is captured through a multi filter medium . This ensures nothing will be going down the drain and into the ground or sewer systems. While I still enjoy being outside during the warmer months to do my initial washing and prep work, I still keep the heavy sanding work inside in my containment wash booth. Also recycling these sailboats in many cases keeps them out of the landfills and on the water for many more years to come.
Keep em' Sailing
These Iconic and colorful sailboats have been around for over 60 years putting wet smiles on both young and old alike. Every Sunfish has a story and my restorations rekindle many lost memories of sailing adventures in just about every body of water world wide. As a kid I was fortunate to have learned how to sail a sunfish in Montego Bay,
These Iconic and colorful sailboats have been around for over 60 years putting wet smiles on both young and old alike. Every Sunfish has a story and my restorations rekindle many lost memories of sailing adventures in just about every body of water world wide. As a kid I was fortunate to have learned how to sail a sunfish in Montego Bay, Jamaica and I have been "hooked" ever since. I travel all over New England hand picking the best hulls for restorations to ensure I turn out the best possible restored turnkey Sunfish Sailboats available so all you have to do is sail away!
For More Information
Drop us a line.
This site is protected by reCAPTCHA and the Google Privacy Policy and Terms of Service apply.
Better yet stop by my shop in person!
Call for more information or to set up an Appointment
Sail Fish LLC
46 Kellogg Road, Suite 3, Essex Junction, Vermont 05452, United States
1-802-318-2863
Copyright © 2018 Sail Fish LLC - All Rights Reserved.
Powered by GoDaddy
How To Refinish A Sunfish: A Step-By-Step Guide For A Beautiful Restoration
- Last updated Dec 09, 2023
- Difficulty Beginner
- Category Sunfish

Have you ever sailed on a Sunfish and noticed that its once vibrant finish has faded and become dull over time? If so, you're not alone. Many Sunfish owners find themselves wanting to restore the beauty of their beloved boat, but may not know where to start. Fear not, as I am here to guide you through the process of refinishing your Sunfish, so you can hit the water with a fresh and revitalized vessel that will turn heads once again. Get ready to learn the secrets of bringing new life to your Sunfish!
What You'll Learn
What materials and tools are needed to refinish a sunfish sailboat, what steps should be taken to remove the old finish and prepare the boat for refinishing, what types of paint or varnish should be used to refinish a sunfish, how long does the refinishing process typically take, and what are the recommended drying times between coats, are there any specific tips or techniques to achieve a smooth and professional-looking finish when refinishing a sunfish sailboat.
Refinishing a Sunfish sailboat can be a rewarding project for boat enthusiasts. Whether your sailboat is showing signs of wear and tear or you simply want to give it a fresh new look, refinishing can bring your Sunfish sailboat back to its former glory. Here are the materials and tools you will need to get started:
- Sandpaper: To ensure a smooth and even finish, you will need different grits of sandpaper. Start with a coarse grit (around 80 grit) to remove any old paint or varnish, and gradually move to finer grits (120-220 grit) for a smooth finish.
- Paint scraper: A paint scraper is useful for removing stubborn paint or varnish. Use it along with sandpaper to prep the surface of the boat.
- Cleaning supplies: Before refinishing, it is essential to thoroughly clean the sailboat. Use a mild detergent or boat cleaner to remove any dirt, grime, or grease from the surface. You may also need a scrub brush or sponge for scrubbing harder-to-reach areas.
- Masking tape: To protect certain areas from paint or varnish, use masking tape to create clean lines. This is particularly important if you plan on painting different colors or sections.
- Primer: A primer is necessary before applying the final coat of paint. It helps the paint adhere better and provides a more durable finish. Choose a marine-grade primer that is compatible with your paint type.
- Paint or Varnish: The choice between paint or varnish depends on your desired look and level of protection. Paint offers more color options and protection against UV rays, while varnish enhances the natural beauty of the wood. Select a marine-grade product in a color or finish of your preference.
- Paintbrushes and rollers: Use high-quality paintbrushes and rollers to apply an even coat of paint or varnish. Ensure they are suitable for use with your chosen product. Opt for smaller brushes for intricate areas and larger ones for larger surfaces.
- Screwdrivers and wrenches: Depending on the level of refinishing you are pursuing, you may need to remove hardware and fittings from the sailboat. Have screwdrivers and wrenches of various sizes on hand to assist in this process.
- Protective gear: It is crucial to prioritize safety when refinishing a sailboat. Wear gloves, safety glasses, and a dust mask to protect your hands, eyes, and lungs from chemicals, dust, and fumes.
- Work area: Find a well-ventilated and well-lit area to work on your sailboat. Ideally, you should choose a space where you can leave the boat undisturbed during the refinishing process. A garage or a shed can work well for this purpose.
Remember to follow proper safety guidelines and manufacturer instructions when using the materials and tools mentioned above. Take your time, be patient, and enjoy the process of refinishing your Sunfish sailboat. With the right materials and tools, you can transform your sailboat into a stunning vessel that is ready to hit the water again.
The Step-by-Step Guide to Gutting a Sunfish for a Delicious Meal
You may want to see also
Removing the old finish and preparing a boat for refinishing is a critical step in the restoration process. It ensures that the new finish will adhere properly and provide long-lasting protection to the boat. Additionally, removing the old finish allows you to address any underlying issues or damage before applying the new finish. Here are the steps you should take to successfully remove the old finish and prepare your boat for refinishing:
- Evaluate the current finish: Start by assessing the current state of the boat's finish. Determine if it is a varnish, paint, gelcoat, or another type of finish. This will help you choose the best method for removal.
- Choose the appropriate removal method: Depending on the type of finish, you have several options for removal. For varnish or paint, you can use chemical strippers, sanding, or a combination of both. Gelcoat removal typically involves sanding or using a gelcoat peeler. Research the specific requirements for the type of finish you are working with.
- Protect yourself and the environment: When working with chemical strippers or sanding, it is important to protect yourself, as well as the environment. Wear protective clothing, gloves, and eyewear to prevent contact with chemicals or particles. Work in a well-ventilated area or consider using a respirator. Dispose of any waste materials properly, following local regulations.
- Apply the chosen removal method: Follow the instructions provided by the manufacturer for chemical strippers. Apply the stripper using a brush or roller, and allow it to sit for the recommended time. Once the finish has softened, use a scraper or putty knife to gently remove the old finish. Work in small sections to ensure thorough removal.
- Sanding the boat: After the majority of the old finish has been removed, use sandpaper to smooth the surface and remove any remaining residue. Begin with a coarse grit sandpaper and gradually work your way to a finer grit. Sand using light, even strokes and pay attention to any contours or difficult-to-reach areas. This step helps to remove any remaining finish and prepares the surface for the new finish.
- Repair any damage: As you remove the old finish, you may come across areas of damage or imperfections in the boat's surface. Take this opportunity to repair any cracks, chips, or dents. Use a suitable filler or epoxy to fill in the damaged areas and sand them smooth once the filler has cured.
- Clean the surface: After sanding and repairing, thoroughly clean the boat's surface to remove any dust or debris. Use a mild detergent and water solution, followed by a clean water rinse. Allow the boat to dry completely before proceeding to the next step.
- Apply a primer (if necessary): Depending on the new finish you plan to apply, you may need to use a primer. Primers provide a secure base for the new finish and help with adhesion. Follow the manufacturer's instructions for applying the primer and allow it to dry completely before proceeding to the next step.
By following these steps, you will effectively remove the old finish from your boat and prepare it for refinishing. Remember to take your time, be thorough, and prioritize safety throughout the process. Investing the effort and care into proper preparation will ensure a successful and long-lasting finish for your boat.
Understanding the Reproduction Process of Ocean Sunfish
When it comes to refinishing a Sunfish sailboat, choosing the right type of paint or varnish is crucial. Not only will it enhance the appearance of the boat, but it will also protect it from the harsh marine environment. In this article, we will discuss the different types of paint and varnish that can be used to refinish a Sunfish, as well as provide step-by-step instructions on how to do so.
Types of Paint:
There are two main types of paint that can be used to refinish a Sunfish: one-part and two-part paints. One-part paints are easier to apply and are a good option for beginners. They typically consist of a resin and a pigment and require only a single coat. Two-part paints, on the other hand, involve mixing a catalyst with the paint, which results in a more durable and long-lasting finish. These paints are often used in professional boatyards.
Types of Varnish:
Varnish is another option for refinishing a Sunfish sailboat. Similar to paint, there are one-part and two-part varnishes available. One-part varnishes are easier to apply and require minimal preparation. They provide good protection against UV rays, but may not be as durable as two-part varnishes. Two-part varnishes, on the other hand, offer superior protection and durability. They require more preparation and multiple coats, but the end result is a beautiful glossy finish that can withstand the elements.
Step-by-Step Instructions for Painting:
- Begin by thoroughly sanding the surface of the boat to remove any old paint or varnish.
- Clean the boat using a mild detergent, making sure to remove any dirt, grease, or wax.
- Apply a primer to the surface of the boat. This will help the paint adhere better and provide a smooth base for the topcoat.
- Once the primer is dry, apply the paint using a brush, roller, or spray gun. Follow the manufacturer's instructions for the specific paint you are using.
- Allow the paint to dry completely between coats, and apply additional coats as necessary to achieve the desired finish.
- Once the final coat is dry, you may choose to apply a clearcoat for added protection and shine.
Step-by-Step Instructions for Varnishing:
- Start by sanding the surface of the boat to remove any old varnish and to create a smooth surface.
- Clean the boat using a mild detergent to remove any dirt or grease.
- Apply a sealer or primer to the surface to ensure proper adhesion of the varnish.
- Mix the two-part varnish according to the manufacturer's instructions.
- Apply the first coat of varnish using a brush or roller in long, even strokes. Avoid overbrushing to prevent air bubbles.
- Allow the first coat to dry, and lightly sand the surface with fine-grit sandpaper.
- Apply additional coats of varnish, sanding between each coat for a smooth finish.
- Once the final coat is dry, buff the surface to a glossy shine using a polishing compound.
It's important to note that the specific products and techniques used may vary depending on personal preference and local regulations. Always follow the manufacturer's instructions and consult with a professional if needed. Refinishing a Sunfish sailboat can be a rewarding project that will not only protect the boat but also enhance its beauty for years to come.
The Battle of Predators: Do Gar Feast on Sunfish?
Refinishing furniture is a great way to give it a fresh new look and extend its lifespan. However, it can be a time-consuming process that requires patience and attention to detail. The refinishing process typically involves several steps, including sanding, staining, and applying a protective finish. In this article, we will discuss how long the refinishing process typically takes and the recommended drying times between coats.
The amount of time it takes to refinish furniture can vary depending on factors such as the size of the piece, the type of finish being applied, and the condition of the furniture. However, as a general guideline, you can expect the process to take several days to complete.
The first step in the refinishing process is sanding the furniture. This is done to remove the existing finish and create a smooth surface for the new finish to adhere to. Sanding can be a time-consuming task, especially if the piece has intricate details or hard-to-reach areas. Depending on the size and condition of the furniture, sanding alone can take anywhere from a few hours to a full day.
After sanding, the next step is to apply a stain or paint to the furniture. This is where you can get creative and choose a color or finish that suits your taste and the style of the piece. Applying the stain or paint can be relatively quick, depending on the size of the piece and the type of application method used.
Once the stain or paint has been applied, it is important to allow it to dry thoroughly before moving on to the next step. The drying time can vary depending on factors such as humidity levels and the type of finish being used. In general, it is recommended to wait at least 24 hours for the stain or paint to dry before moving on to the next coat or applying a protective finish.
When it comes to applying a protective finish, such as varnish or polyurethane, it is important to follow the manufacturer's instructions for drying times between coats. Typically, you will need to wait anywhere from 2 to 4 hours between coats, allowing the previous coat to dry and cure properly. It is important not to rush this process, as applying a new coat too soon can result in a sticky or uneven finish.
In some cases, multiple coats of protective finish may be required to achieve the desired level of protection and sheen. This can add additional drying time to the overall refinishing process. It is best to allow each coat to dry thoroughly before applying the next coat to ensure a smooth and durable finish.
In conclusion, the refinishing process for furniture can take several days to complete. The sanding process can be time-consuming, and it is important to allow the stain or paint to dry thoroughly before moving on to the next step. Drying times between coats of protective finish will vary depending on the type of finish being used, but it is important to follow the manufacturer's instructions to ensure a high-quality result. By taking your time and allowing each step to fully dry, you can achieve a beautifully refinished piece of furniture that will last for years to come.
Unveiling the Secrets: Age of Giant Sunfish Revealed
When it comes to refinishing a Sunfish sailboat, achieving a smooth and professional-looking finish is essential. With the right techniques and tips, you can transform your boat into a stunning masterpiece. In this article, we will explore some best practices that can help you achieve a top-notch result. We will cover everything from preparation to application, providing you with a step-by-step guide to follow.
Preparation is Key:
Before you begin the refinishing process, it's crucial to prepare the surface properly. This involves removing any old paint or varnish, sanding the boat, and filling any cracks or imperfections with an appropriate filler. Taking the time to prepare the surface will ensure that the new finish adheres correctly and provides a smooth and even surface.
Choose the Right Materials:
Selecting high-quality materials is essential for achieving a professional finish. When it comes to paint, opt for marine-grade epoxy-based paints that are designed for boat applications. These paints are durable, weather-resistant, and provide excellent adhesion. Additionally, invest in high-quality brushes, rollers, and sandpaper for a flawless finish.
Use Proper Application Techniques:
When applying the paint, follow these steps for a smooth and professional result:
A. Start by applying a thin and even basecoat. This coat will fill in any remaining imperfections and provide a solid foundation for the subsequent layers.
B. Once the basecoat is dry, sand it lightly to create a smooth surface for the topcoat.
C. Apply multiple thin coats of paint rather than one thick coat. This technique helps prevent drips, runs, and unevenness.
D. Use smooth and even brush strokes or a roller to apply the paint. Avoid excessive pressure, as it can lead to streaks or uneven areas.
E. Allow each coat to dry thoroughly before applying the next. Follow the manufacturer's recommendations for drying times.
Pay Attention to Detail:
To achieve a truly professional finish, pay attention to the small details:
A. Tape off any areas that should not be painted, such as hardware or logos.
B. Sand between each coat of paint to ensure a smooth and seamless finish.
C. Keep your workspace clean and free of dust or debris that could mar the finish.
D. Apply a clear protective topcoat to enhance the durability and gloss of the finish.
Finishing Touches:
Once the paint is dry, take some time to add any finishing touches that will elevate the appearance of your boat:
A. Apply decals or custom graphics to personalize your boat.
B. Install new hardware or accessories for a fresh and updated look.
C. Clean and polish any metal components to restore their shine.
Remember, achieving a smooth and professional-looking finish requires patience, attention to detail, and the right techniques. By following these tips and steps, you can transform your Sunfish sailboat into a stunning vessel that will impress both on and off the water. So roll up your sleeves and get ready for a rewarding refinishing project that will leave you with a boat you can be proud of.
The Surprising Size of Red Ear Sunfish: How Long Do They Actually Get?
Frequently asked questions.
Before refinishing the sunfish hull, it is important to thoroughly clean and sand the surface. Start by washing the hull with a mild detergent and water to remove any dirt or grime. Next, use a medium-grit sandpaper to roughen up the surface and remove any old paint or varnish. Be sure to sand evenly and smooth out any rough patches. After sanding, wipe down the hull with a clean cloth to remove any dust or debris.
For refinishing a sunfish, it is recommended to use a marine-grade paint that is specifically designed for fiberglass surfaces. Look for a paint that is durable, UV-resistant, and waterproof. Two-part epoxy paints or polyurethane paints are commonly used for sunfish refinishing projects. Make sure to choose a paint that matches the color and aesthetic you desire for your sunfish.
To achieve a smooth and professional finish when refinishing a sunfish, proper preparation and technique are key. After cleaning and sanding the hull, apply a primer coat to create a smooth base for the paint. Once the primer is dry, apply several thin coats of paint, allowing each coat to dry completely before applying the next. Use a high-quality brush or roller to minimize brush marks or roller lines. Sand lightly between each coat to ensure a smooth surface. Finally, apply a clear topcoat to protect the paint and add a glossy finish.

- Clay Jenkins Author Veterinarian

- Hadwin Blanton Author Editor Reviewer
It is awesome. Thank you for your feedback!
We are sorry. Plesae let us know what went wrong?
We will update our content. Thank you for your feedback!
Leave a comment
Sunfish photos, related posts.

Mastering the Techniques to Obtain the Enigmatic Sunfish in Abyssrium
- Dec 09, 2023

The Best Spots to Catch a Glimpse of Sunfish

The Astonishing Size of the Hoodwinker Sunfish Unveiled

Protecting the Bluebarred Pygmy Sunfish: A Conservation Effort

Will Carps Eat Sunfish: A Guide to Predatory Behaviors in Freshwater Fish

The Connection Between Opah and Sunfish: Exploring their Relationship
- Dec 08, 2023
- CREATE AN ACCOUNT
- Boat Cover Finder
- Bimini Top Finder
- Boat Propeller Finder
- Engine Parts Finder
- Anchor & Dock
- Watersports
- Clothing and Footwear
- Engine Parts
- Cabin and Galley
- Covers and Biminis
- Electronics
- Paint and Maintenance
- Pumps and Plumbing
- Anchor Chains & Ropes
- Boat Fenders
- Boat Mooring
- Boat Protection
- Dock Storage & Protection
- Ladders, Steps, & Platforms
- Top Sellers

- Fishing Rods
- Fishing Reels
- Fishing Rod & Reel Combos
- Fishing Tools & Tackle Boxes
- Fishing Line
- Fly Fishing
- Fishing Bait & Fishing Lures
- Fishing Rod Holders & Storage Racks
- Fish Finders, Sounders & Sonar
- Trolling Motors
- Fishing Nets
- Fishing Downriggers & Acessories
- Fishing Outriggers & Acessories
- Fishing Kayaks
- Fish Cleaning Tables

- Inflatable Rafts
- Paddle Boarding
- Paddles & Oars
- Wakeboard, Wakesurf & Ski
- Wakeboard Towers
- Tow Ropes & Handles
- Life Jackets & PFDs
- Snow Sports
- Roof Racks, Carriers, Dollies

Men's Clothing
- Accessories
Men's Footwear
- Atheltic Shoes
- Water Shoes
Women's Clothing
- Dresses & Skirts
Women's Footwear
- Fuel Systems
- Sacrificial Anodes & Zincs
- Generator Parts
- Inflatable Boats
- Propeller Parts & Accessories
- Boat Manuals
- PWC Parts & Accessories

- Fishing Boat Seats
- Offshore Boat Seats
- Ski Boat Seats
- Pontoon Boat Seats & Furniture
- Boat Seat Pedestals & Hardware
- Boat Seats by Manufacturer
- Boat Tables & Hardware
- Boat Seat Covers
- Boat Seat Vinyl
- Floating Boat Cushions

- Barbeque Grills
- Boat Drink Holders
- Cabin Accessories & Hardware
- Boat Ventilation
- Interior & Cabin Lighting
- Marine Teak Products
- Carbon Monoxide & Smoke Detectors
- Binoculars & Telescopes

Boat Bimini Tops
- Bimini Top Accessories
- Pontoon Bimini Tops
- Other Biminis
- RV & Trailer Covers
- Boat Shrink Wrap & Accessories
- Boat Shelters
Boat Covers
- Boat Cover Accessories
- Boat Lift Canopy Covers
- Other Covers
- Boat Wiring & Cable
- Marine Batteries & Accessories
- Marine DC Power Plugs & Sockets
- Marine Electrical Meters
- Boat Lights
- Marine Electrical Panels & Circuit Breakers
- Power Packs & Jump Starters
- Marine Solar Power Accessories
- Marine Electrical Terminals
- Marine Fuse Blocks & Terminal Blocks
- Marine Switches
- Shore Power & AC Distribution

- Marine Audio & Video
- GPS Chartplotters & Accessories
- Electronic Navigation Charts & Software
- Digital Instruments
- Display Mounts
- VHF Radios & Communication
- Marine Radar
- Auto Pilot Systems
- Action Cameras

- Fiberglass & Epoxy Boat Repair
- Boat Paint & Varnish
- Marine Adhesives, Sealant, & Caulking
- Marine Engine Maintenance
- Boat Cleaners & Waxes
- Boat Cleaning Supplies

- Fresh Water Boat Systems
- Bilge Pumps
- Marine Plumbing Parts
- Wash Down Pumps
- Livewell Aerator Pumps & Live Bait Wells
- Toilet & Waste Pumps
- Marine Pump Replacement Parts

- Tires, Rims, & Hub Kits
- Boat Trailer Winches
- Boat Motor Supports & Transom Savers
- Boat Trailer Guides & Rollers
- Boat Trailer Fenders
- Boat Trailer Lights
- Boat Trailer Hardware
- Boat Trailer Jacks
- Boat Trailer Brakes & Axles
- Boat Trailer Tie Downs
- Couplers, Mounts, Hitches, & Locks

- Boat Deck Harware
- Marine Nuts, Bolts, & Screws
- Boat Handles, Pulls, & Rings
- Prop Nut Kits & Hardware
- Boat Cabin Hardware
- Marine Fasteners
- Boat Windshield Parts
- Boat Tubing & Rails
- Boat Mirrors
- Marine Tools & Tool Kits
- Boat Lettering

- Women's Clothing Deals
- Men's Clothing Deals
- Fishing Deals
- Anchor & Dock Deals
- Electrical Deals
- Electronics Deals
- Paint & Maintenance Deals
- Pumps & Plumbing Deals
- Boat Seats Deals
- Trailering Deals
- Camping & RV Deals
- Dealer Login

- Forums Login

- Search forums
- Boat Repair and Restoration
- Boat Restoration, Building, and Hull Repair
Refinishing a old Sunfish sailboat
- Thread starter RickM101
- Start date Jun 27, 2011
- Jun 27, 2011
Hi All, new to the forum... I looked but could not find an answer in the forum. I have an old sunfish with some good nicks in the gel coat down to the fiber glass and lots of stress cracks in the finish. My question is can I just prep and paint with Imron or do I need to repair the deep nicks? I just want to increase the integrity of the hull and protect it from further damage. Not concerned with a perfect look, just want a quick fix to get it in the water soon. Thanks!

Woodonglass
Supreme mariner.
Re: Refinishing a old Sunfish sailboat For the BIG nicks I get some acetone and Gelcoat repair kit and wash em down with acetone an mix up a gel coat paste and fill em, and sand em smooth. the rest I'd sand, Prime with a high build primer and shoot it with Imron. She'll look great.

RickM101 said: I just want to increase the integrity of the hull and protect it from further damage. Not concerned with a perfect look, just want a quick fix to get it in the water soon. Thanks! Click to expand...
- Jun 28, 2011
Woodonglass said: For the BIG nicks I get some acetone and Gelcoat repair kit and wash em down with acetone an mix up a gel coat paste and fill em, and sand em smooth. the rest I'd sand, Prime with a high build primer and shoot it with Imron. She'll look great. Click to expand...
ondarvr said: If the only thing you're concerned with is further damage, then you don't need to do anything at all, what you plan to do is only cosmetic, it won't do any thing to increase the integrity of the hull, or protect it from further damage. If you do want it to look better, then it?s a little more work because any cracks in the gel coat that aren?t fixed correctly will show up again very soon. Click to expand...
Jay's Technical Talk
My external memory, 1977 amf alcort sunfish sailboat restoration.

I purchased an old (1977 manufacture date) AMF Alcort Sunfish 14 foot sailing dinghy. It was mostly complete and almost “ready-to-sail”, except for the broken auto-bailer, and cracked rudder, but the price was right.
Since I had to repair the crack in the rudder, I decided to go overboard and completely restore the entire rudder and tiller assembly. And once the rudder looked nice, I had left-over varnish and decided to go ahead and re-surface the daggerboard as well.
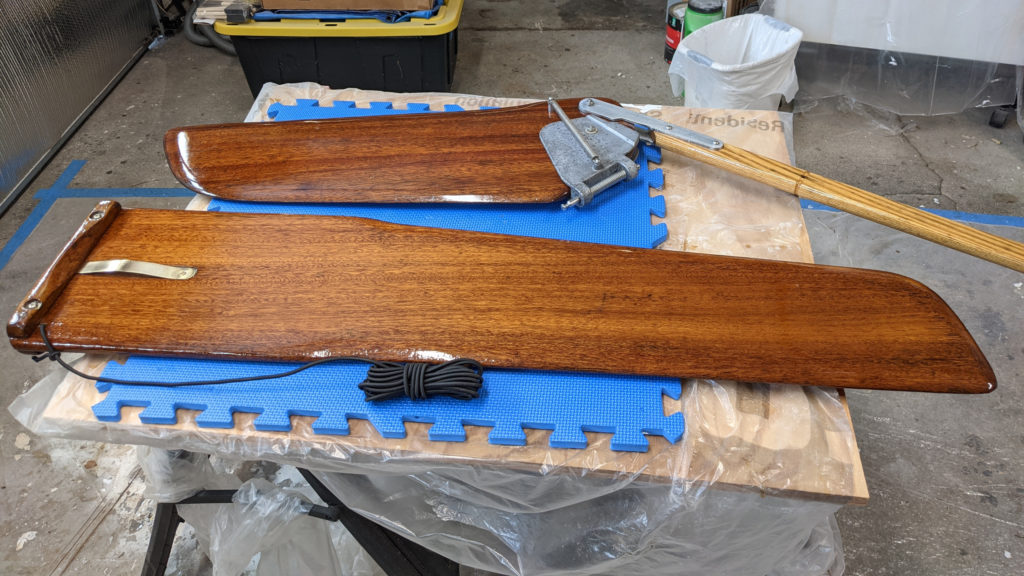
After the first sail I drained all of the water out of the hull (which MIGHT have already been in there…..maybe….) and purchased a better drain plug and rigged up a solar powered fan to dry things out. If I find water inside after the second sail, I’ll probably be doing some fiberglass hull repair.
You can see all of the details by watching the (multiple!) videos in this YouTube playlist: https://www.youtube.com/playlist?list=PLmHP4lUqxKmv13lkNpPqG2FbnV9L4aaL0
I’ve found that the Better Boat Mini-Paddle fits perfectly into the rear cubbyhole on my 1977 boat.
Related posts:
- Philips Norelco QT4085 beard trimmer disassembly and battery replacement
- Using Cloudflare to speed up webpage loading speeds
- Nissan Leaf 12 volt accessory battery replacement
Leave a Reply Cancel reply
Your email address will not be published. Required fields are marked *
Building, restoration, and repair with epoxy

Sunfish Wood Restoration
By don gutzmer – gbi technical advisor.
During the fall of 2016, I took a technical call from a customer who owned a Sunfish Sailboat. He lived in the area and was looking for help repairing a few minor gel coat cracks and restoring his wooden daggerboard and rudder. I told him I would be happy to help because this would be a good opportunity to write an article about using WEST SYSTEM 105 Resin and 207 Special Clear Hardener for the wood restoration part of his project. The mahogany daggerboard and rudder had weathered over the years because of only being varnished.
Rudder before work began
To remove all the varnish I used 100-grit sandpaper on an orbital sander, then sanded by hand with 120-grit sandpaper parallel to the grain. After everything was sanded a shop vacuum helped remove any remaining sanding dust.
WEST SYSTEM 105 Resin and 207 Special Clear Hardener were used to provide the clear, natural wood finish. The epoxy was rolled on the surface with an 800 Roller Cover and tipped off by dragging a section of roller cover over the wet epoxy to remove air bubbles and roller marks; this method is called rolling and tipping.
The Sunfish’s rudder and daggerboard sanded and the first coat of epoxy was applied.
The epoxy was re-coated every three to four hours to build-up three coats on each side. One side was done each day. To make sure the epoxy coating was smooth and flat, a single-edged razor blade was used at a slight angle to scrape the surface. The razor blade would only remove the high spots of the epoxy. Then the epoxy coating was sanded dull with 220-grit sandpaper. Two coats of Captain’s Varnish 1015 provided the final finish.
After 3 coats of epoxy were applied
The customer was very pleased with the results of the finished boards.
The finished Sunfish rudder and daggerboard
- Sports & Outdoors
- Water Sports
Enjoy fast, free delivery, exclusive deals, and award-winning movies & TV shows with Prime Try Prime and start saving today with fast, free delivery
Amazon Prime includes:
Fast, FREE Delivery is available to Prime members. To join, select "Try Amazon Prime and start saving today with Fast, FREE Delivery" below the Add to Cart button.
- Cardmembers earn 5% Back at Amazon.com with a Prime Credit Card.
- Unlimited Free Two-Day Delivery
- Streaming of thousands of movies and TV shows with limited ads on Prime Video.
- A Kindle book to borrow for free each month - with no due dates
- Listen to over 2 million songs and hundreds of playlists
- Unlimited photo storage with anywhere access
Important: Your credit card will NOT be charged when you start your free trial or if you cancel during the trial period. If you're happy with Amazon Prime, do nothing. At the end of the free trial, your membership will automatically upgrade to a monthly membership.
Buy new: $39.95 $39.95 FREE delivery: Tuesday, April 2 Ships from: Amazon.com Sold by: Amazon.com
Return this item for free.
Free returns are available for the shipping address you chose. You can return the item for any reason in new and unused condition: no shipping charges
- Go to your orders and start the return
- Select the return method
Buy used: $35.49
Fulfillment by Amazon (FBA) is a service we offer sellers that lets them store their products in Amazon's fulfillment centers, and we directly pack, ship, and provide customer service for these products. Something we hope you'll especially enjoy: FBA items qualify for FREE Shipping and Amazon Prime.
If you're a seller, Fulfillment by Amazon can help you grow your business. Learn more about the program.
Other Sellers on Amazon
Download the free Kindle app and start reading Kindle books instantly on your smartphone, tablet, or computer - no Kindle device required .
Read instantly on your browser with Kindle for Web.
Using your mobile phone camera - scan the code below and download the Kindle app.

Image Unavailable

- To view this video download Flash Player
Follow the author

Sunfish Owners Manual: Buy, Sail, Maintain, Repair and Sell your Sunfish Paperback – December 17, 2013
Purchase options and add-ons.
- Print length 146 pages
- Language English
- Publication date December 17, 2013
- Dimensions 8 x 0.35 x 10 inches
- ISBN-10 1484987217
- ISBN-13 978-1484987216
- See all details

Frequently bought together

Customers who viewed this item also viewed

Editorial Reviews
About the author, product details.
- Publisher : CreateSpace Independent Publishing Platform (December 17, 2013)
- Language : English
- Paperback : 146 pages
- ISBN-10 : 1484987217
- ISBN-13 : 978-1484987216
- Item Weight : 10.7 ounces
- Dimensions : 8 x 0.35 x 10 inches
- #50 in Instructional Sailing
- #54,236 in Reference (Books)
About the author
Kent enjoys flying and has been involved in aviation for 40 years. He is a certificated Airline Transport Pilot and is a graduate of the Naval Postgraduate School Aviation Safety Officer's course. In 2010 he attained a Master of Library Science degree and uses those skills to maintain signalcharlie.blogspot.com to share aerospace safety information.
Kent and the Skipper also enjoy messing about in small boats, and keep a log of their hobby adventures on smallboatrestoration.blogspot.com. Their Alcort/AMF collection includes a wooden Sunfish, Standard Sailfish, Super Sailfish and Catfish to keep their fiberglass Sunfish company. They published The Sunfish Owner's Manual in 2013, recently built a Penobscot 14 sailboat and in 2016 restored the 1880s Mississippi River Yawl BARBASHELA.
Customer reviews
Customer Reviews, including Product Star Ratings help customers to learn more about the product and decide whether it is the right product for them.
To calculate the overall star rating and percentage breakdown by star, we don’t use a simple average. Instead, our system considers things like how recent a review is and if the reviewer bought the item on Amazon. It also analyzed reviews to verify trustworthiness.
- Sort reviews by Top reviews Most recent Top reviews
Top reviews from the United States
There was a problem filtering reviews right now. please try again later..

- Amazon Newsletter
- About Amazon
- Accessibility
- Sustainability
- Press Center
- Investor Relations
- Amazon Devices
- Amazon Science
- Start Selling with Amazon
- Sell apps on Amazon
- Supply to Amazon
- Protect & Build Your Brand
- Become an Affiliate
- Become a Delivery Driver
- Start a Package Delivery Business
- Advertise Your Products
- Self-Publish with Us
- Host an Amazon Hub
- › See More Ways to Make Money
- Amazon Visa
- Amazon Store Card
- Amazon Secured Card
- Amazon Business Card
- Shop with Points
- Credit Card Marketplace
- Reload Your Balance
- Amazon Currency Converter
- Your Account
- Your Orders
- Shipping Rates & Policies
- Amazon Prime
- Returns & Replacements
- Manage Your Content and Devices
- Recalls and Product Safety Alerts
- Conditions of Use
- Privacy Notice
- Your Ads Privacy Choices
- United Kingdom
- United States

How To Restore A Faded Gelcoat
When the gelcoat on your boat has faded, it can make your boat look dull, tired and lacklustre and can certainly make you lose your enthusiasm for its appearance. Through damage caused by the elements, the soft surface of the gelcoat is eroded and can leave it looking chalky and dull in its appearance. However, restoring your gelcoat is one of the easiest boat tasks that you can undertake and is easy to do yourself.
To help to restore the color, shine and appearance of your boat, choose a gelcoat restorer . Gelcoat restorers are suitable for fiberglass (GRP) gelcoats and can help to give long lasting effects, wetting the pigment to restore a strong and vibrant color and shine. Rather than waxes and polishes which simply sit on the surface and will not have lasting results, Owatrol’s Marine Polytrol penetrates deep into the material to help to protect against corrosion and blemishes, helping you to not only restore your gelcoat but also make maintenance much easier.
Gelcoat Restorer is full of benefits:
- Long-lasting effects
- Protection against corrosion
- Restores color and shine
- Easy to apply
- Doesn’t need wax or polish on top
While it is natural for time and exposure to erode the appearance of a gelcoat, by restoring it, you are not only making your boat more pleasing to the eye, but you are enhancing the value of your boat and making it last longer.
The beauty of Marine Polytrol is that you don’t need expensive waxes or polishes that merely sit on the surface. Applying waxes can be time-consuming and is often a fruitless task, with Gelcoat Restorer you know that the formula is penetrating deep within the gelcoat to give long-lasting and more effective results which restore the pigments while eliminating the need for more frequent maintenance and re-waxing.
How To Apply Gelcoat Restorer
Marine Polytrol is simple and easy to apply and can be done in five short steps, some of which you can often omit depending on the state of your gelcoat to begin with:
- Firstly, tape off and protect all of the areas of the boat you don’t want to treat.
- Thoroughly clean the boat, this can be done with soapy warm water or more effectively with Deck Cleaner . If you have any mildew then use a bleach-based solution to get rid of it. If there is waterline scum or limescale you should use a more specialist cleaner to remove it.
- With Marine Polytrol , drying times are short (usually less than 10 minutes) so section off your work in small, achievable areas.
- Soak a soft, clean cloth in Marine Polytrol and wipe onto the gelcoat, remembering to wipe off the excess liquid as quickly as possible. (Failure to do so may result in a patchy and uneven appearance).
- Gently shine the gelcoat with a lint-free cloth to achieve a superior sheen.
Ensuring The Best Results
For best results when using Marine Polytrol , do not apply in direct sunlight or when the gelcoat surface is hot to the touch. Marine Polytrol is designed to restore pigment, color and shine to the gelcoat, so it is not suitable to be used on white surfaces.
With Marine Polytrol, maintenance is easy. The results are long-lasting but when you see they are fading, simply repeat the easy process again.
About Owatrol Team
Our team are ready and willing to support you with your requirements whether it is protecting your newly laid deck or renovating a luxury yacht, whatever the application Owatrol US has the solution you are looking for.
34 thoughts on “ How To Restore A Faded Gelcoat ”
Your ad states” so it is not suitable to be used on white surfaces.” why not and what happens if you do use it on white? Thanks
Hello Mike,
Thank you for your interest in our products. White does not contain any colored pigments in it and thus there is no color for the Polytrol to revive. As this is an oil-based product, it could give a brownish look to the surface – that is why we do not recommend Polytrol for white surfaces.
Hope it helps !
I need to restore gelcoat on my dog rooming fibreglass trailer. I like the Marine Polytrol idea but: There is a lot of decals( business name, phone, a puppy….) which after 6,7 years being sittting on sun looks better, as good as new actually, than gelcoat arround. It would be impossible to tape protect those decals, also impossible not to touch them with Marine Polytrol when applying.
Will Marine Polytrol damage shiny decals in tthe process of applying?
Thanks Kind regards, Emil
Hello Emil,
Thank you for your interest in our products. No, Marine Polytrol should have no effect on the decals or their level of gloss. For precautionary sakes, we do however suggest that a small amount be applied to be absolutely certain.
Hope it helps.
Good evening I have a older 18’ Kenner I am looking for something to restore my blue color on the bottom
If you are talking about the hull of the boat, underneath the waterline, Marine Polytrol would not be suitable. Marine Polytrol works well on blue gelcoat above the waterline. Hope this helps!
The Owatrol Team
Amazing post. Articles which have meaningful and insightful remarks are more enjoyable, at least to me. It is interesting to read what others thought and how it relates to their customers, as their perspective could possibly help you in the future.
Best regards, Balle Griffin
what is the difference between penetrol and polytrol
Hi Jim, as Penetrol is produced by Flood company I would not be able to comment on this. Polytrol restores the color and appearance of dull and faded surfaces caused by exposure to sunlight, rain and pollution The Owatrol Team
Super disappointed with the results of Owatrol Gelcoat Restorer. Purchased the product, used it on a 2 year old RV Gel coat that looked good. At first your product made the surface look like new – after it dried there were lots of hazy and sections that looked streaked.
Hi William, Unfortunetly sometimes certain areas are more faded than others and this will cause the haze appearance. Normally applying another application of Polytrol will overcome this issue.
I have two questions: 1) I have a older boat that is teal and almond colored (not white but more of an off white, almond or biscuit color) . Will the Polytrol work on the Lamond color and bring it up to a shine or will it only work on the teal. 2) I live in Arizona and it is summer so it is over 100 degrees F most days. How long do I leave the Polytrol on before wiping it off?
Hi Michael, In answer to your questions: 1. It is very difficult to say with this type of color (almond) since it is getting so close to white. Unfortunately the only suggestion I can make is to test a small area as some times it will work and other times it won’t. 2. I would strongly suggest trying to do the work at the end of the day and in the evening when the heat of the day has subsided. However if this is not possible then the work should only be carried out on areas not directly in the sun and I would suggest no longer than 10 minutes before wiping off any excess. When working in these sort of conditions and because the Polytrol has not had the full time period to penetrate and restore the surface it may mean that the application will need to be done twice. The Owatrol Team
I have a 1970 Tahiti bayliner that is original magenta-ish with sparkle. the the front top is seriously sun faded while the interior that inside rim is vibrant and glossy with sparkles showing through. Do you think marine polytrol will bring back this 50 year old color to a vibrant shine?
Hi Brian, this is definitely worth a try! Just to note that Polytrol is a color restorer. If you require a high gloss finish, then a good quality vehicle polish should be applied after the Polytrol is dry (I suggest 48 hours) The Owatrol Team
In your videos you show a disposable paint brush to apply Polytrol onto a marine gel coat. On your website instructions it says to use a no lint rag. Which works better? Additionally, it says to wipe it off immediately vs. the videos that say to let it sit for 10-15 minutes before wiping off. Lastly, if this come out poorly on 2016 navy blue Downeast style boat how do I remove it? Thank you! I am excited to try the product on the transom of my boat which since new fades very easily despite my constant wax upkeep.
I have recently purchased a 2015 Montana RV, with an Almond Gel-coat covering. This rig was in Texas for a few seasons, and the Finish is very dull now and chalky and has lost its shine. I don’t think anything has ever been done for the coating since it was new. So now, I have been applying cleaner and wax by hand, then following up with a good coat of Carniba wax. The his process is working OK, but even though shiny when I’ve polished it out, it seems to be uneven, and shiner in some area than others. Is there some product I should use to bring the gel-coat back to an even shine, or are my expectations set too high for an even, shiny coat?
I’m curious about this also I am having the same problem. Have you had any luck yet?
Hi, I have a 20 year old yacht with blue topsides and faced with many days work polishing just to try and keep on top things. Is it feasible to apply Polytron on a 45 foot yacht by just one person? My boat is kept afloat. How resistant is Polytrol to the inevitable abrasion from fenders? If required would it be possible to restore just a small area?
Hi Mike It may take you quite some time, also when applying Marine Polytrol you should work in small areas which you would be able to complete in around 10-20 minutes. Marine Polytrol is a color restorer which dries to a tough and long-lasting flexible finish which does not leave a film – so it won’t peel or flake. This will give your boat protection from abrasion from fenders. I would recommend applying to the whole area for a uniform finish. The Owatrol Team
Hi, will this work on sun faded metallic gelcoat? Or will it have the effect of dulling the metal flakes?
Hi Barcus Yes it will, providing the color is not white. It will not dull the flakes 🙂 The Owatrol Team
Leave a Reply Cancel reply
Your email address will not be published. Required fields are marked *

How To Store A Sunfish Sailboat
Key Takeaways:
- Before putting the Sunfish away for storage, it is essential to clean it thoroughly to remove salt, dirt, and debris . Any moisture should be completely dried off to prevent mold and mildew from developing on the sail and hull. This includes drying out the cockpit, storage compartments, and any other areas where water could collect.
- The sail should be stored separately, ideally rolled rather than folded, to prevent creases and damage to the fabric. The hull should be protected from UV exposure , which can degrade the fiberglass over time. A breathable cover is recommended to prevent moisture buildup and to protect the boat from dust and pests.
- To avoid water accumulation in the cockpit or on the deck, the Sunfish should be stored upside down if possible , supported at the strong points of the hull to prevent warping. If it cannot be stored upside down, then a well-fitted cover that allows for ventilation while preventing water pooling is necessary.
- Choose a storage location that is secure and safe from strong winds or falling debris. If storing outdoors, ensure the boat is securely tied down. If storing indoors, such as in a garage or storage facility , make sure the space is not prone to drastic temperature changes, which could cause the hull to expand and contract, potentially leading to damage.
Ever since its introduction in 1960, the sunfish sailboat is not only popular among the old folks, it is something millennials also grew with. Most of them had their first sailing experience in this sailboat.
The 14 inches sailboat is portable, cheap to purchase, and durable.
With the leaves falling quickly and the weather getting hotter daily ― winter is around the corner. What all owners are thinking of is “how to store a sunfish sailboat”.
The method of storage is dependent on your preference and notably the size of the room it will be stored.
Table of Contents
Storage During Summer
During summer, it is important to place the sunfish sailboat where it can be easily accessed. Since you will always be needing it for sail most of the time.
Summer’s here and you’ve got a sunfish boat! You’re ready to make some serious waves, but how do you store that shiny water steed when you’re not using it? Let’s make sure your sunfish is as bright and ready as you are when you’re itching for the next sail.
- Cover Up : First things first, get a good quality boat cover. It protects your sunfish from damaging UV rays, rain, bird droppings, and prying eyes. Ensure it’s breathable to prevent mold and mildew growth.
- Out of the Water : If possible, it’s best to keep your boat out of the water when not in use. This reduces the risk of water damage and unwanted growths on the hull.
- Keep it Dry : If your boat took on some water during your adventures, make sure to drain it before storing. Check the bailer and drain plug to ensure they are functioning properly.
- Shady Spot : Find a place that doesn’t get direct sunlight. UV rays can harm not just your boat’s exterior but its sails too.
- Support : Use a rack or cradle to support your boat properly during storage. It helps maintain the shape and prevents any undue stress on the hull.

Storing Right-Side Up
In a small storage space, storing sunfish sailboats right-side up is okay. It creates space as you can even put your spars and mast on top. To avoid any scratching of the deck finish by the spars, put some padding materials in between.

Storing Upside Down
Storing upside down is one of the most recommended methods of how to store a sunfish sailboat. It prevents the deck from getting oxidized by the sunlight. Water will also be unable to get retained in the flat places on the tarp and in the cockpit.
You also do not need to ensure the tarp is tightly stretched throughout storage. The curve design of the keel makes the water runoff seamlessly.
The only thing to avoid is storing upside down without anything beneath to raise the hull. You can also place some 2x4s across the trailer as deck support. About two of such is okay. Also, place some materials like pad or old towels between the boards and deck to avoid scratches.
Multiple Sunfish Side Storage
The multiple sunfish side storage is best for storing more than two sunfish when the space is small for either right-side up or upside-down storage. The boats are arranged on their sides tilting at about 20 degrees against each other.
Place foam or any other padding material between them to avoid the hulls sliding against each other.
The key here is to optimize your space, and storing your Sunfish sailboats on their sides (also known as “edge storing”) is a solid strategy. It’s a common method used by sailing schools and rental businesses, and it can work just as well for you.
You’ll need a sturdy rack system that can securely hold each boat on its side. You can either purchase a commercial rack or build one yourself if you’re handy. The rack should be designed so that the boats rest on their gunwales. This helps distribute the weight evenly and minimizes stress on the hull.
The boats should be stacked closely together, but not so tight that they’re rubbing against each other. You don’t want any unnecessary scratches or damage, right? A neat row of Sunfishes all cozied up side by side is a pretty sight!
Cover each boat to protect them from the elements. If you’re storing them outdoors, use a cover that’s waterproof and UV-resistant.
And just like in individual storage, don’t forget to give each boat a thorough cleaning and inspection before storage. Repair any damage, loosen or remove the lines and sails, and open any inspection ports to let air circulate.
Pro tip : If you’re dealing with a lot of boats, it can be helpful to label each boat and its corresponding gear. That way, you won’t waste time in the new season figuring out which sail goes with which boat.
Tie the last boat to the wall using its front handle and rear bridle to avoid any movement whatsoever. This will prevent the boats from falling over.
How to store A Sunfish Sailboat during summer?
During the summer season, it is imperative that you place a sunfish sailboat at a place from where it can be accessed easily. This is the time when you’ll need a sunfish sailboat most of the time. You may simply tie it to a tree near the lake or the water body and also make sure you cover it with a protective material, which is most commonly a tarp. Ensure 100% safety when you store the sunfish sailboat outdoor.
How to store a Sunfish Sailboat during winter?
Run your boat once again after use, drain off the water from the boat, clean the boat, winterize the engine, lubricate the moving parts and then remove the battery. During the winter season, it is better to remove the battery and charge it and also remove all sorts of sensitive materials. Next, you have to seal all the exhausted ports. While you cover and store the boat, don’t forget to check every 2 weeks. Also change the boat oil, safeguard the fogging oil and fill the tank.
Can I store a sailboat outdoor?
In case you don’t have enough space for storing your boat at home, you can certainly keep it outside. Each parking spot is covered with a small roof that offers protection against all weather elements. Hence, you can cover the boat and make sure it remains protected in the place that you choose for storing the sailboat.
Related posts:

Leave a Reply Cancel reply
Your email address will not be published. Required fields are marked *
Save my name, email, and website in this browser for the next time I comment.

Learn How To Sail A Sunfish Like a Pro: Essential Tips and Techniques
Alex Morgan

Sailing a Sunfish sailboat can be an exhilarating and rewarding experience for water enthusiasts. Whether you’re a beginner or a seasoned sailor, mastering the art of sailing a Sunfish requires knowledge, practice, and a little bit of adventure. In this comprehensive guide, we will take you through the essential steps and techniques involved in sailing a Sunfish.
The Sunfish sailboat is a popular recreational single-handed dinghy known for its simplicity, maneuverability, and versatility. Before getting on the water, it is crucial to understand the key features of the Sunfish sailboat, such as its design, hull construction, and rigging components.
To ensure a safe and enjoyable sailing experience, proper preparation is essential. This includes checking the equipment and safety gear to ensure they are in good condition and preparing the Sunfish sailboat by inspecting the hull, mast, sail, and rudder.
Mastering the basic sailing techniques is the foundation of sailing a Sunfish. This involves rigging the sailboat, understanding wind direction, adjusting sail trim, and effectively steering and controlling the rudder.
For those looking to take their sailing skills to the next level, advanced techniques such as sail positioning and shaping, tacking and jibing, and harnessing the power of the wind will be explored. These skills allow for greater control, speed, and maneuverability while sailing.
Safety should always be a top priority when sailing. We will provide important safety tips and precautions to ensure your well-being on the water, including proper use of personal flotation devices and understanding weather conditions.
We will discuss common mistakes to avoid while sailing a Sunfish, such as improper weight distribution, overestimating wind conditions, and neglecting maintenance and equipment checks.
By following this comprehensive guide, both novice and experienced sailors can enhance their Sunfish sailing skills, gain confidence on the water, and enjoy the thrill of sailing a Sunfish to the fullest. So, get ready to set sail and embark on an exciting journey with your Sunfish sailboat.
Key takeaway:
- Understanding the Sunfish Sailboat: Familiarize yourself with the key features of a Sunfish sailboat to ensure a safe and enjoyable sailing experience.
- Master the basics: Learn how to properly rig the Sunfish sailboat, understand wind direction and sail trim, and control the rudder for basic sailing techniques.
- Advance your skills: Explore sail positioning and shaping, practice tacking and jibing, and harness the power of the wind to enhance your sailing abilities.
Understanding the Sunfish Sailboat
Get ready to embark on an exciting journey into the world of sunfish sailboats ! In this section, we’ll dive deep into understanding the ins and outs of these magnificent vessels. From exploring the key features that make the sunfish sailboat a true marvel, to discovering the secrets of its exceptional performance, we’ll uncover everything you need to know to become a knowledgeable sailor. So buckle up and get ready to set sail with us!
Key Features of a Sunfish Sailboat
The hull of a Sunfish sailboat is fiberglass, making it lightweight and easy to maneuver. It has a triangular lateen sail that can be easily raised and lowered. The mast is aluminum, providing durability and stability. A daggerboard is used for lateral resistance and can be easily raised or lowered to adjust direction. The cockpit is spacious enough for one or two people to sit or move around comfortably. It has a simple rigging system, allowing for quick and easy setup and takedown. The Sunfish sailboat has a self-bailing cockpit, meaning water automatically drains out for enhanced safety. It has a kick-up rudder, which can be lifted out of the water to avoid obstacles or shallow areas. Known for stability and ease of handling, the Sunfish sailboat is suitable for beginners and experienced sailors. It can be easily transported on top of a car or trailer, making it convenient for sailing in different locations.
The Sunfish sailboat was introduced in 1952 by Alex Bryan and Cortlandt Heyniger . They aimed to create a small, affordable, and versatile sailboat for recreational sailing. The design quickly gained popularity, and millions have been sold worldwide since then. Its accessibility, simplicity, and reliability have made it a favorite choice for beginners and seasoned sailors. Over the years, the Sunfish sailboat has undergone minor design modifications but has remained true to its principles of stability, easy handling, and fun on the water. Today, it continues to be a beloved sailboat for individuals and families looking to enjoy the thrill of sailing in a compact and budget-friendly vessel.
Preparing for Sailing
Want to set sail on a Sunfish ? In this section, we’ll cover all the essential steps to get you ready for a smooth sailing experience. From checking your equipment and safety gear to preparing the Sunfish sailboat , we’ve got you covered. So, grab your sunscreen and let’s dive into the preparations that will ensure a fantastic time out on the water!
Checking Equipment and Safety Gear
Checking Equipment and Safety Gear is essential before setting sail on a Sunfish sailboat. Here is a comprehensive list of steps to follow:
1. Inspect life jackets: Ensure enough life jackets onboard for each person in good condition with no tears or damages.
2. Check safety lines: Verify securely attached and in good working condition.
3. Examine anchor and rope: Make sure anchor securely fastened and rope in good condition, free from fraying or knots.
4. Test horn or whistle: Ensure functioning properly and can produce a loud sound to signal for help if needed.
5. Inspect first aid kit: Check fully stocked with essential items such as bandages, antiseptic wipes, and pain relievers.
6. Verify presence of fire extinguisher: Confirm readily available on the boat and within expiry date.
7. Check communication devices: Test VHF radio or other communication devices onboard to ensure proper working order.
8. Ensure navigation lights are functional: Confirm working correctly, especially if planning to sail at night.
9. Check for any leaks: Inspect boat’s hull for any leaks or damages that could affect buoyancy.
10. Examine rigging and sails: Inspect for signs of wear, tear, or damage. Replace or repair as necessary.
True story: Once, while preparing to sail on a Sunfish, a sailor discovered a tear in their life jacket during the equipment check. Thanks to their thorough inspection, they promptly replaced the damaged life jacket and ensured everyone’s safety on the water. Remember, checking equipment and safety gear is crucial for a safe and enjoyable sailing experience.
Preparing the Sunfish Sailboat
To prepare the Sunfish sailboat, follow these steps:
1. Inspect the hull for damage or cracks. Repair or replace damaged parts.
2. Check the mast and boom for wear or damage. Ensure they are securely attached.
3. Attach the main sail to the halyard and raise it up the mast. Properly tension the sail.
4. Attach the boom to the mast and secure the mainsail to the boom using sail ties.
5. Check the daggerboard and rudder to ensure they are securely in place.
6. Attach the rudder to the stern of the boat and ensure it moves freely.
7. Inspect the lines and rigging to ensure they are in good condition and properly rigged.
8. Check the bailer and mast flotation to ensure they are functioning properly.
9. Attach any necessary safety equipment, such as a life jacket or whistle.
10. Double-check that all equipment is secure and properly fastened.
The Sunfish sailboat , known for its simplicity, affordability, and ease of use, can be prepared by following these steps. It was designed by Alcort, Inc. in the United States during the early 1950s and has gained popularity ever since. The design of the Sunfish sailboat has remained largely unchanged, with minor modifications made for better performance. It is a popular choice among sailors of all skill levels due to its lightweight design and stable hull, which make it suitable for racing, recreational sailing, and teaching sailing techniques. With its timeless design and versatility on the water, the Sunfish is a beloved classic in the world of sailboats.
Basic Sailing Techniques
Mastering the art of sailing a Sunfish requires a deep understanding of basic sailing techniques. From rigging the Sunfish sailboat to navigating wind direction and sail trim, and even mastering the art of steering and controlling the rudder , each sub-section in this voyage of discovery will unlock the essential skills needed to glide smoothly across the water. So grab your lifejacket and let’s embark on this thrilling adventure of Sunfish sailing mastery .
Rigging the Sunfish Sailboat
Rigging the Sunfish Sailboat is necessary before sailing. Follow these steps:
- Attach the mast to the mast step at the front of the Sunfish sailboat.
- Secure the sail to the halyard and hoist it up the mast, ensuring proper attachment.
- Connect the boom to the gooseneck at the bottom of the mast.
- Attach the mainsheet to the rear of the boom and thread it through the blocks on the Sunfish.
- Connect the mainsheet to the traveler, a sliding bar at the back of the boat.
- Attach the rudder to the back of the Sunfish, making sure it is securely in place.
- Check all the lines and rigging to ensure proper tightening and securing.
Once the Sunfish sailboat is rigged, you can start your sailing adventure. Always double-check your rigging before going on the water and familiarize yourself with the boat’s operation. Remember that weather conditions can impact sailing, so adjust the sail trim accordingly. Happy sailing!
Understanding Wind Direction and Sail Trim
Understanding wind direction and sail trim is crucial for successful sailing of a Sunfish sailboat. Adjusting the sail trim based on wind direction is key to optimizing the boat’s performance.
To determine wind direction, look for visual cues such as flags, water ripples, or movement of tree branches. It’s important to remember that wind can change direction, so regularly assess its angle relative to your boat.
Once wind direction is identified, adjust the sail trim accordingly. For effective upwind sailing, tightly trim the sail to catch more wind, creating lift and propelling the boat forward. Conversely, when sailing downwind, ease the sail to maximize the catching area and take advantage of the force of the wind pushing from behind.
Sail trim requires continuous monitoring and adjustment as the wind changes. Experimenting with different trim settings will help you find the optimal balance between speed and control .
Understanding wind direction and sail trim improves with practice and experience. Sailing and observing wind behavior will enhance your ability to instinctively trim the sail and enjoy a smooth and exhilarating sailing experience.
Steering and Controlling the Rudder
- 1. Check rudder position: Before steering the Sunfish sailboat, ensure that the rudder is centered, aligned with the boat’s keel, and straight.
- 2. Hold tiller extension: Firmly grasp the tiller extension, a long handle connected to the rudder. Maintain a comfortable grip while allowing for movement and flexibility.
- 3. Understand tiller and rudder relationship: The tiller is connected to the rudder, and any tiller movement directly affects the rudder’s position. Moving the tiller to the right turns the rudder right, and moving the tiller to the left turns the rudder left.
- 4. Adjust rudder angle: To steer the Sunfish sailboat, adjust the rudder angle. Push the tiller extension to the left to turn right, and push it to the right to turn left.
- 5. Maintain balance and stability: When steering and controlling the rudder, maintain balance and stability on the sailboat. Distribute weight evenly, stay centered in the boat, and make subtle adjustments for control.
Practice steering and controlling the rudder in different weather conditions and sailboat speeds to enhance proficiency. Through practice, you will develop a better understanding of effectively maneuvering the Sunfish sailboat.
Advanced Sailing Skills
Mastering the art of sailing a Sunfish requires more than just the basics. In this section, we’ll dive into advanced sailing skills that will take your Sunfish adventures to the next level. Discover the secrets of effective sail positioning and shaping , the art of tacking and jibing with finesse, and how to truly harness the power of the wind . Get ready to elevate your sailing game and navigate the waters with confidence.
Sail Positioning and Shaping
When sailing a Sunfish, proper sail positioning and shaping are key to efficient sailing. Consider the following factors:
– Wind direction: Position the sail perpendicular to the wind for maximum power.
– Sail shape: Adjust the sail’s shape using the cunningham, outhaul, and boomvang control lines.
– Cunningham: Tighten the cunningham to flatten the sail and reduce draft, especially in strong winds or for better upwind performance.
– Outhaul: Adjust the outhaul to control tension on the foot of the sail. Tightening it flattens the sail for increased speed and control in stronger winds.
– Boomvang: Properly adjust the boomvang to control tension on the leech of the sail and achieve optimal sail shape and control.
– Weight distribution: Positioning your body weight correctly on the boat is crucial for stability and performance. Adjust your position to maintain control and balance.
– Foot position: Properly position your feet on the hiking straps to balance and stabilize the boat. This allows for necessary sail adjustments and effective boat control.
– Continuously observe the sail and make necessary adjustments to adapt to changing wind conditions and optimize performance.
Mastering sail positioning and shaping in Sunfish sailing can greatly enhance your sailing experience and improve overall performance on the water.
Tacking and Jibing
– Prepare the Sunfish sailboat for tacking or jibing by trimming the sail and maintaining a steady speed. Begin the maneuver by turning the bow of the boat into the wind and crossing to the other side. Release the sail as the boat turns to make the turn smoother. Change sides on the boat to balance the weight and aid in the turn. Quickly switch the sail to the new side as the boat completes the turn and the wind fills the sail. Pull in the sail and adjust the trim for the desired speed and direction.
For jibing , turn the stern of the boat through the wind to change the direction. Prepare to release the sail as the boat turns and let it swing across. Cross over to the opposite side of the boat for balance during the turn. Guide the sail smoothly to the new side and adjust the trim accordingly. Continuously monitor the wind and make minor adjustments to maintain control and maximize efficiency.
Harnessing the Power of the Wind
Harnessing the Power of the Wind is crucial for successful Sunfish sailing. Here are some key points to consider:
1. Positioning the sail: Properly position the sail to catch the wind and propel the boat forward. Adjust the sail based on the wind direction and intensity.
2. Sail trim: Maintain proper sail trim to optimize wind capture. Adjust the sheet to keep it taut but not too tight. Watch for signs of luffing or flapping, which indicate insufficient use of wind power.
3. Using the telltales: Utilize the telltales on the sail to determine wind flow across its surface. The position and direction of the telltales help gauge proper sail trim. Adjust the sail to maximize wind efficiency.
4. Feathering: Reduce wind resistance and maintain forward momentum in strong winds by angling the sail away from the wind. This technique prevents excessive heeling and maintains control over the boat.
5. Understanding gusts and lulls: Be aware of changes in wind intensity. In gusts, loosen the sail to prevent overpowering. In lulls, adjust the sail to catch any available wind. Adapting to changing wind conditions improves overall sailing performance.
By implementing these techniques, you can effectively harness the power of the wind during your Sunfish sailing adventures. Practice and experience will improve your understanding of wind dynamics and enhance your sailing skills. Enjoy the exhilaration of harnessing nature’s force and explore the open water with confidence.
Safety Tips and Precautions
- Always prioritize safety when sailing a Sunfish by following these safety tips and precautions.
- Check the weather forecast before setting sail to ensure a safe and enjoyable experience.
- Before launching your Sunfish, inspect it for damages or leaks to prevent any potential accidents.
- To stay within the rules and regulations , familiarize yourself with the sailing rules of your location.
- Be mindful of your surroundings and keep an eye out for other boats or obstacles in the water to maintain a safe voyage.
- Keep a whistle or horn on board so you can easily signal for help in case of emergencies.
- Stay hydrated during your sailing trip by bringing enough water for your journey.
- Protect yourself from the sun’s harmful rays by wearing sunscreen and a hat.
Always prioritize safety when sailing a Sunfish and follow these precautions for a pleasant and secure sailing experience.
Common Mistakes to Avoid
- Not wearing a life jacket: Avoid not wearing a life jacket while sailing a Sunfish. Prioritize safety on the water and always wear a properly fitted life jacket to prevent accidents or drowning.
- Ignoring weather conditions: Avoid ignoring weather conditions. Check the weather forecast before sailing. Strong winds, storms, or other adverse conditions can make sailing difficult and dangerous.
- Overlooking proper rigging: Properly rigging the Sunfish is essential for a successful sail. Don’t overlook the rigging process. Ensure the mast, boom, and sail are correctly attached and tensioned for optimal sailing.
- Not understanding the centerboard: The centerboard plays a crucial role in maneuvering the Sunfish. Understand how to use it correctly for control and stability. Learn how to adjust it based on wind and water conditions.
- Forgetting to secure the mainsheet: The mainsheet controls the sail’s position and power. Avoid forgetting to secure it properly to prevent accidental jibes and loss of control.
Some Facts About How To Sail A Sunfish:
- ✅ The Sunfish is a small, one-person sailboat that has been popular for generations. (Source: Our Team)
- ✅ It is a personal-size, beach-launched sailing dinghy with a flat hull and a crab claw sail. (Source: Our Team)
- ✅ The Sunfish was developed by Alcort, Inc. in the 1950s and has since become the most popular fiberglass boat ever designed, with a quarter million sold worldwide. (Source: Our Team)
- ✅ Setting up a Sunfish takes less than 10 minutes and requires no special knowledge or fancy sailor’s knots. (Source: Our Team)
- ✅ There are resources available, such as YouTube videos and sailing classes, to help beginners learn to sail a Sunfish. (Source: Our Team)
Frequently Asked Questions
1. how long does it take to set up a sunfish sailboat.
Setting up a Sunfish takes less than 10 minutes and requires no special knowledge or fancy sailor’s knots.
2. Can a Sunfish sailboat be launched from anywhere?
Yes, a Sunfish sailboat can be launched from the beach, dock, or anywhere with water access.
3. Are there resources available to help beginners learn to sail a Sunfish?
Yes, there are resources available such as YouTube videos and sailing classes that can help beginners learn to sail a Sunfish.
4. What is the sail plan and hull of a sailboat?
The sail plan and hull of a sailboat create lift forces in 3 dimensions as they react to wind and water.
5. How can I achieve balance and control while sailing a Sunfish?
Balancing the forces of the sail and hull is key to maintaining control and speed. Experimentation and practice are necessary to find the best settings and achieve comfort and control while sailing.
6. What are some tips for adjusting the sail’s center of effort and improving control?
Lowering the sail on the mast can help reduce heeling and allow for better control through hiking. Adjusting the gooseneck on the boom can reduce weather helm and improve control. Other controls like the vang, outhaul, and cunningham can further tweak the sail’s center of effort and de-power the sail.
About the author

Leave a Reply Cancel reply
Your email address will not be published. Required fields are marked *
Save my name, email, and website in this browser for the next time I comment.
Latest posts

The history of sailing – from ancient times to modern adventures
History of Sailing Sailing is a time-honored tradition that has evolved over millennia, from its humble beginnings as a means of transportation to a beloved modern-day recreational activity. The history of sailing is a fascinating journey that spans cultures and centuries, rich in innovation and adventure. In this article, we’ll explore the remarkable evolution of…

Sailing Solo: Adventures and Challenges of Single-Handed Sailing
Solo Sailing Sailing has always been a pursuit of freedom, adventure, and self-discovery. While sailing with a crew is a fantastic experience, there’s a unique allure to sailing solo – just you, the wind, and the open sea. Single-handed sailing, as it’s often called, is a journey of self-reliance, resilience, and the ultimate test of…

Sustainable Sailing: Eco-Friendly Practices on the boat
Eco Friendly Sailing Sailing is an exhilarating and timeless way to explore the beauty of the open water, but it’s important to remember that our oceans and environment need our protection. Sustainable sailing, which involves eco-friendly practices and mindful decision-making, allows sailors to enjoy their adventures while minimizing their impact on the environment. In this…
- PRO Courses Guides New Tech Help Pro Expert Videos About wikiHow Pro Upgrade Sign In
- EDIT Edit this Article
- EXPLORE Tech Help Pro About Us Random Article Quizzes Request a New Article Community Dashboard This Or That Game Popular Categories Arts and Entertainment Artwork Books Movies Computers and Electronics Computers Phone Skills Technology Hacks Health Men's Health Mental Health Women's Health Relationships Dating Love Relationship Issues Hobbies and Crafts Crafts Drawing Games Education & Communication Communication Skills Personal Development Studying Personal Care and Style Fashion Hair Care Personal Hygiene Youth Personal Care School Stuff Dating All Categories Arts and Entertainment Finance and Business Home and Garden Relationship Quizzes Cars & Other Vehicles Food and Entertaining Personal Care and Style Sports and Fitness Computers and Electronics Health Pets and Animals Travel Education & Communication Hobbies and Crafts Philosophy and Religion Work World Family Life Holidays and Traditions Relationships Youth
- RANDOM QUIZ
- Browse Articles
- Learn Something New
- Quizzes Hot
- This Or That Game New
- Train Your Brain
- Explore More
- Support wikiHow
- About wikiHow
- Log in / Sign up
- Cars & Other Vehicles
How to Restore the Gelcoat on a Boat
Last Updated: October 8, 2022 References
This article was co-authored by Travis Lund . Travis Lund is the General Manager at the Vallejo Marina, a large marina located between the San Francisco Bay and the Delta in California. Sailing since he was six-years-old, Travis has over 15 years working in sailing operations and instruction and has pioneered a coaching platform that combined traditional coaching with multi-camera video support. He studied English at Michigan State University, where he was on the sailing team. This article has been viewed 64,773 times.
Over time and with use, the gelcoat on your boat can become dull, making your boat look old. Restoring your gelcoat can help restore the shine of your boat and protect its surface. Begin by making sure any surface dirt and stains are removed. If your gelcoat is looking really dull, with no bright or shiny spots, you'll need to apply polish first. Once you've applied the polish, or if your boat isn't overly dull, you can move on to using wax.
Cleaning Your Boat

- You can find boat soap at most home improvement and boat supply stores.
- You can use non-skid cleaners to clean the deck of the boat where the plastic is molded in and hard to clean. [1] X Research source

- If you find small, hairline cracks in your boat, you can repair it yourself by using epoxy. Fiberglass epoxy is available at most boat supply stores. Follow the instructions on the epoxy for repairing the cracks.
- If the crack is deep or larger than a hairline crack, you'll need to take your boat to a professional to have it restored.

- Depending on how bad the stain is, you may need to apply more than 1 coat.
- If you find that one type of stain is resistant to the remover, look for a specialty remover. You might need one to remove mold, black streaks, or rust.

Using Polish to Restore Shine

Applying Wax to Restore the Gelcoat

- The best wax to use for restoring your gelcoat is marine wax. It's specifically designed for use on boats and it's waterproof. You can also use car wax, as long as it's hard shell wax.
- Use a cloth if you're applying the wax by hand.
- Use a foam pad if you're applying the wax with a buffer.

- Reload the pad with wax every few feet.

Expert Q&A

You Might Also Like

- ↑ https://www.westmarine.com/WestAdvisor/Gelcoat-Care-and-Restoration
- ↑ http://www.boats.com/how-to/how-to-restore-faded-gel-coat-on-a-boat/#.WoXJGGbMy3U
- ↑ http://www.boatus.com/boattech/casey/restore-shine-to-fiberglass.asp
- ↑ http://www.boats.com/how-to/how-to-restore-faded-gel-coat-on-a-boat/#.Wob3w2bMy3U
About This Article

- Send fan mail to authors
Did this article help you?

Featured Articles

Trending Articles

Watch Articles

- Terms of Use
- Privacy Policy
- Do Not Sell or Share My Info
- Not Selling Info
Don’t miss out! Sign up for
wikiHow’s newsletter
IMAGES
VIDEO
COMMENTS
Recently Mass Audubon hired me to restore 8 sunfish sailboats they use at summer camp. I figured this would be the perfect opportunity to sho you all how to ...
Use a putty knife to fill in any holes or cracks in the surface with an appropriate filler or putty. Allow it to dry and then sand it down to create a smooth, even surface. Step 4: Clean the surface. Use a mild detergent and water solution to remove any dirt, grease, or contaminants from the sunfish.
Sail Fish LLC. 46 Kellogg Road, Suite 3, Essex Junction, Vermont 05452, United States. 1-802-318-2863. Get directions. Sunfish sailboat restorations, customization and sale of used restored Sunfish Sailboats.
This summer I have restored a 1981 Force Five, a 1985 Laser and two mid-1980s Sunfish. The Force Five had some trailer roller damage and required a few hours of WEST epoxy work, but the other three boats were barn finds that were very dirty, stained, mildewed and, in one case, covered in lichens but virtually undamaged.
Learn how to restore your Sunfish sailboat to its former glory with this step-by-step guide. From sanding and stripping to painting and varnishing, this comprehensive tutorial will help you turn your old Sunfish into a stunning and sea-worthy vessel once again. 117 Upper Cibolo Creek Rd, Boerne, Texas 78006.
I'm new to sailing and boats in general and don't know that much about repairing boats. I recently came into possession of a sunfish sailboat and I would like to restore it if possible. Any information would be greatly appreciated. I believe the boat is from the 1980s. There is a sticker that says AMF Alcort Sunfish on it if that helps.
In this video we sand the hull and start prepping the dings, nicks, and other blemishes in the hull for fairing and fiberglass. Comment below if you have any...
MUST WATCH TOPIC: I get asked many times a week what the proper way to sand freshly applied gelcoat without sanding through. If you think I've never sanded t...
Jun 28, 2011. #4. Re: Refinishing a old Sunfish sailboat. Woodonglass said: For the BIG nicks I get some acetone and Gelcoat repair kit and wash em down with acetone an mix up a gel coat paste and fill em, and sand em smooth. the rest I'd sand, Prime with a high build primer and shoot it with Imron. She'll look great. Thanks Woodonglass.
I purchased an old (1977 manufacture date) AMF Alcort Sunfish 14 foot sailing dinghy. It was mostly complete and almost "ready-to-sail", except for the broken auto-bailer, and cracked rudder, but the price was right. Since I had to repair the crack in the rudder, I decided to go overboard and completely restore the entire rudder and tiller ...
It was made in 1959, but is a 1960 because it is fiberglass. (2449 on the rudder fitting) All the hardware is bronze except for the bow fitting and screws which hold down the splash rail which are stainless. I just took off the splash rail and noticed the boat was actually yellow. It is now a faded cream color everywhere else.
The Sunfish's rudder and daggerboard sanded and the first coat of epoxy was applied. The epoxy was re-coated every three to four hours to build-up three coats on each side. One side was done each day. To make sure the epoxy coating was smooth and flat, a single-edged razor blade was used at a slight angle to scrape the surface.
In this video I cover the final sanding, applying totalboat structural repair putty, and some home made fairing compound. I use totalboat gelcoat and some si...
The Sunfish Owner's Manual is a one stop resource for the world's most popular sailboat. Inside there are chapters on the History of the Sunfish, and illustrated chapters on how to Buy, Rig, Sail, Maintain, Restore, Store, Transport and Sell the Sunfish.
With Marine Polytrol, drying times are short (usually less than 10 minutes) so section off your work in small, achievable areas. Soak a soft, clean cloth in Marine Polytrol and wipe onto the gelcoat, remembering to wipe off the excess liquid as quickly as possible. (Failure to do so may result in a patchy and uneven appearance).
Rigging the Sunfish sailboat involves the following steps: - Attach the mast to the mast step on the boat's deck. - Connect the boom to the mast and secure it with a boom vang. - Slide the daggerboard into the daggerboard trunk and secure it. - Attach the rudder to the rudder gudgeons at the back of the boat.
Re: Restoration of a 40+ year old sunfish, looking for ideas, instructions from infor Just a little help with your terminology so you might have a better chance of getting the right answers: For "putting on the sails " search "rigging a sunfish". Also, you probably have what we call an "old-style" rudder, which essentially clamps on to the ...
Storing uprightly is the best at saving space but the most dangerous to your sunfish sailboat if done wrongly. Mount pulleys at the top (at least two) at the top of the garage to hold the boat. To efficiently support the weight of the boat, support it with some wood blocks.
The Sunfish sailboat, known for its simplicity, affordability, and ease of use, can be prepared by following these steps. It was designed by Alcort, Inc. in the United States during the early 1950s and has gained popularity ever since. The design of the Sunfish sailboat has remained largely unchanged, with minor modifications made for better ...
Shoreline fiberglass batten method for fixing inaccessible areas in a sailboat hull.
2. Rub the polish into the gelcoat. Hold the cloth with the polish on it in your dominant hand. Then use small circular motions to rub the polish into the gelcoat. Continue rubbing until the surface gets a glassy shine. [6] 3. Move along the hull horizontally.
My first sunfish acquired from a friend. Ready to jump in, learn, and get on the water this coming spring. Follow my journey to the first sail!
Small Boat Restoration, Suffolk, Virginia. 3,545 likes · 30 talking about this. Small Boat Restoration, Sunfish Sailboat Restoration