

The $tingy Sailor
Diy trailerable sailboat restoration and improvement without throwing your budget overboard.
Refinish Your Interior Teak to Better Than New
One of the things about older sailboats that I appreciate most is their abundance of teak woodwork. As a woodworker, I admire good craftsmanship, creative design, and a fine finish. It’s harder to find on today’s modern sailboats. Teak is in short supply so it’s more expensive than it once was and most modern sailors don’t want to spend time maintaining their brightwork. For the rest of us, beautiful teak appointments are an opportunity to set our sailboat apart from the rest and a sign of pride of ownership. Few improvements freshen up a sailboat’s interior like well maintained woodwork.
Before I continue, a bit of legal housekeeping. This post contains affiliate links. That means I receive a small commission if you make a purchase using those links. Those commissions help to pay the costs associated with running this site so that it stays free for everyone to enjoy. For a complete explanation of why I’m telling you this and how you can support this blog without paying more, please read my full disclosure .

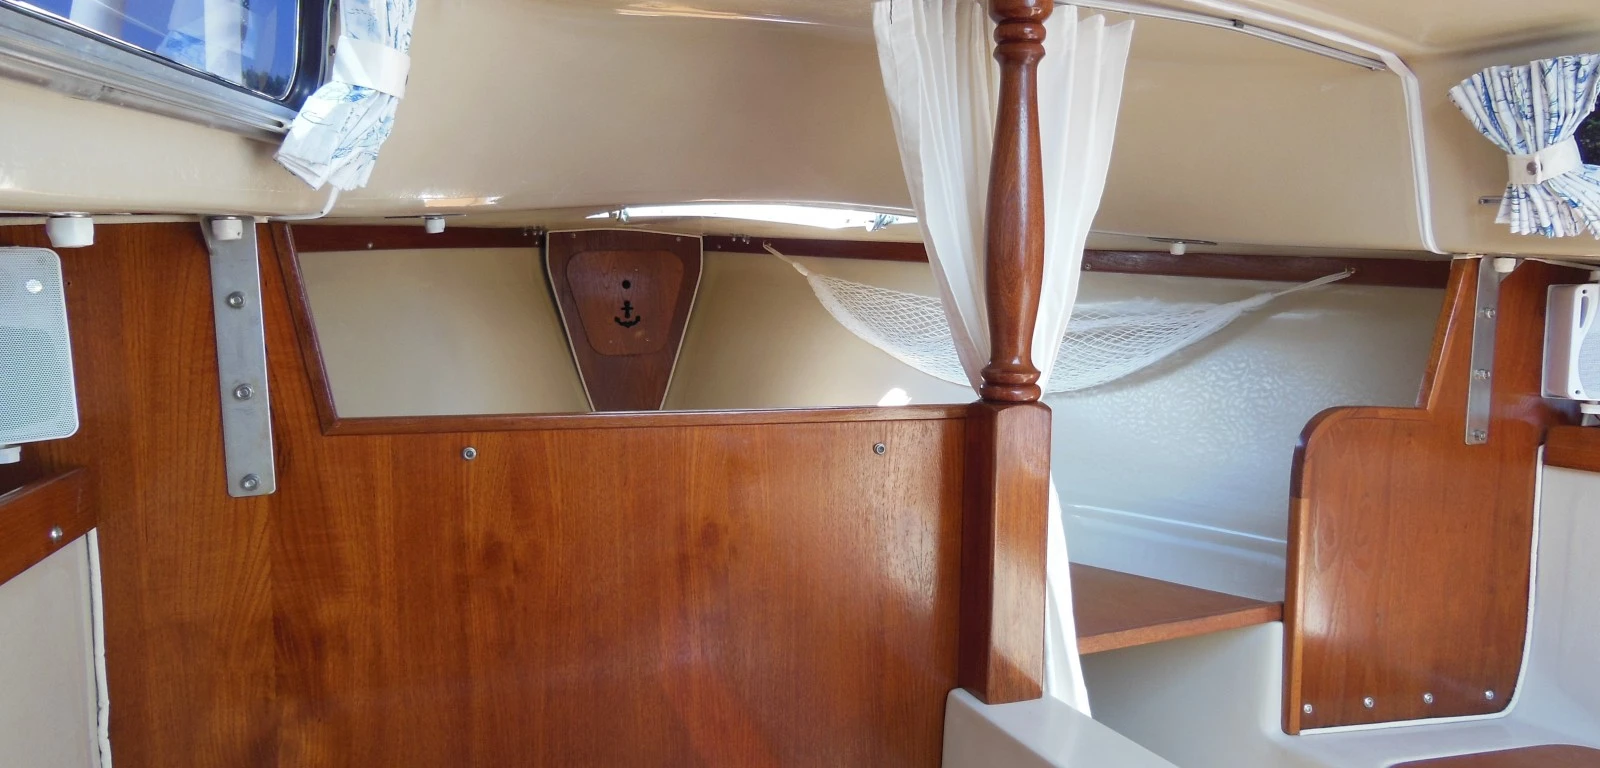
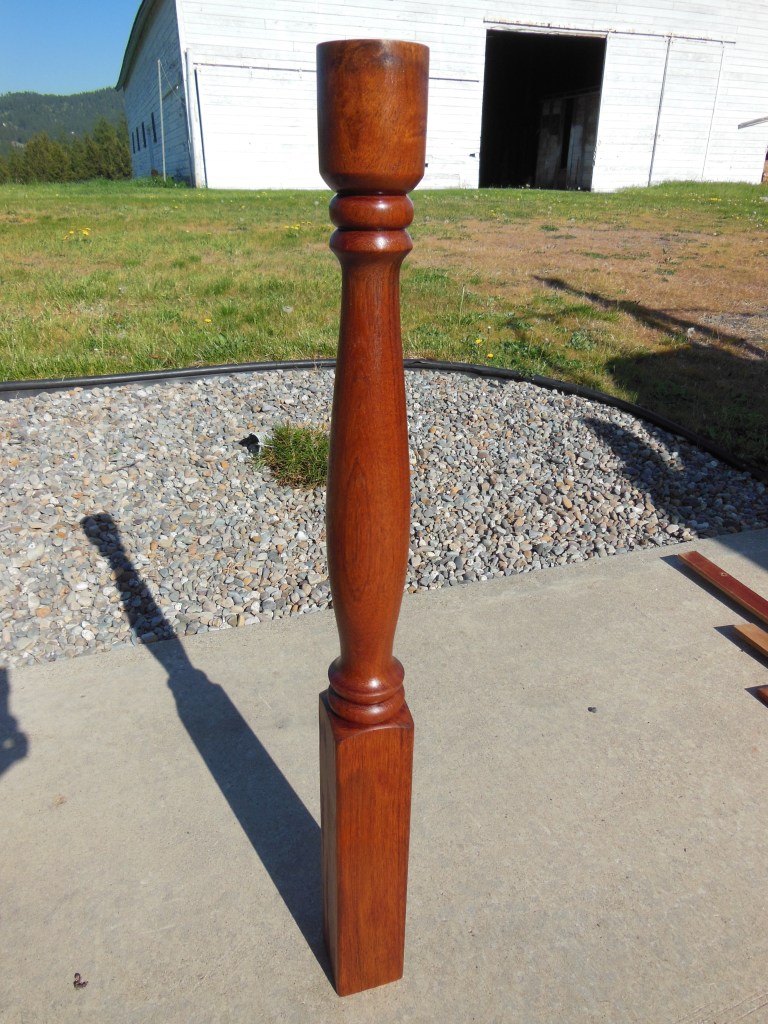
Catalina Yachts was generous with the teak woodwork in their first generation sailboats, less so in the “new design.” The forward bulkheads and removable panels except for the locker lids are marine grade teak veneer plywood. Solid wood was used where it made the most sense: handrails, trim, compression post, and moldings.
The down side of wood in a sailboat is, of course, water damage. Teak is very water resistant; it contains a lot of natural oil. But it’s not invincible and if neglected for too long it will begin to look more like firewood. Ultraviolet light can bleach the color, persistent deck leaks can delaminate plywood, and sustained humidity can foster mildew and add to that old boat smell. The best defense is a durable finish.
An inch of teak is a terrible thing to waste
You have a lot of options to choose from for a finish. They run the spectrum of cost, ease of application, performance, and appearance. Some finishes are better choices for some locations on a sailboat than others. Protection from the elements is most important for topside brightwork; UV resistant and waterproof. Below deck, the finish should also be water resistant but ease of application is also very important so that the finish can be repaired or reapplied without having to remove all of the woodwork from the sailboat as I show here.
Most experienced skippers have a favorite finish that they recommend and there is little consensus among them. Before you begin refinishing your own woodwork, it’s worth spending some time looking at other sailboats and talking to their owners to help you decide on a finish for your own sailboat. If your teak already has an aftermarket product on it like Cetol or a spar varnish, it might be best to stick with that product rather than try to strip it all off so that you can apply something else.
For woodwork that gets a lot of use and abuse, like the companionway step lid on a C-22, consider applying a more durable finish like polyurethane, epoxy, or non-skid material like I describe in Turn Carpet Remnants into Custom Floor Mats .
Get started on that finish
Here are the basic steps that I follow to refinish interior teak:
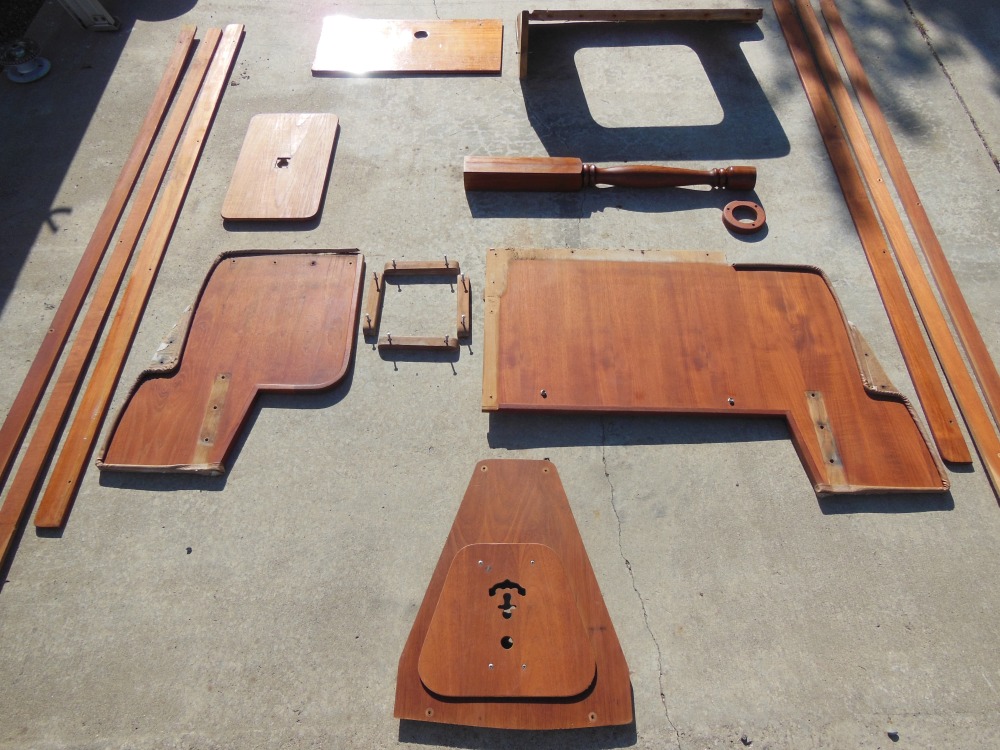
1. If the wood has never been refinished or if the existing finish is in poor condition, remove it all from the sailboat so that you can work on it easier and apply the finish to all the surfaces.
2. Remove all attached hardware (screws, snaps, etc.) and other non-wood materials like vinyl welting.
3. If there is any visible (black) mildew, apply a mild acid like white vinegar or diluted laundry bleach to remove it completely, especially in the grain and any recesses. Test first in an inconspicuous spot. You might have to bleach the entire part to get even coloring. For more about bleaching prior to applying a finish and using oxalic acid, see Restore Your Exterior Teak to Better Than New .

3. Use a sanding block with 220 and 320 grit open face paper to sand all the exposed surfaces smooth. Since the wood is so hard and oily, it takes such fine sandpaper to remove all the sanding marks and bring out the beautiful grain and coloring of the teak.
4. Wipe all the parts thoroughly with a tack rag to remove all sanding dust from the pores and grain.
5. Wipe all the parts thoroughly with a clean cloth wetted with acetone. This will remove surface oils that can prevent the finish from soaking into the wood.
6. Apply the first coat of finish. If you chose a spar varnish, thin it with the maximum amount of thinner recommended by the manufacturer. This will help the first coat to soak in more and provide an excellent base for the subsequent coats. With the first coat of teak oil, the color of the wood will really warm up and the grain will start to show some depth. It will get better with every coat.

7. When dry, if you chose a spar varnish, lightly sand with 220 or 320 grit open face sandpaper to remove any dust particles that may have settled on the surfaces.
8. Apply additional unthinned coats to achieve the desired thickness and appearance. If you chose a spar varnish, sand after each coat except for the last coat. If you chose teak oil, lightly polish after each coat with a clean cloth while it is still damp, then allow it to dry completely before applying the next coat.
9. If your sailboat has welting where the wood panels meet the fiberglass hull liner and they’re ugly or decaying, now is a good time to replace them. You can make new welting out of synthetic cord from a fabric store covered with vinyl or another material. For more on making welting, see How to Sew Cabin Cushion Covers .
10. Replace the parts in the sailboat but leave it open with good air circulation until all the fumes dissipate. If you chose teak oil, it is slow to harden and it can take a couple of weeks for the fumes to go away completely.
After you refinish your interior teak, it might make the exterior woodwork look worse. To read about my different process for refinishing topside brightwork, see Restore Your Exterior Teak to Better Than New .
I’ve worked with tropical woods before in various woodworking projects, but I’ve come to love teak for its golden, irregular coloring, interesting grain patterns, weather resistance, and durable hardness. After you work with it, you’ll understand why it’s been the go-to wood of boat builders for hundreds of years. I plan to use it in several future projects that I have in mind. For some easy and practical woodworking projects and how to use other hardwoods that look like teak but are more economical, see:
Make a Door to Storage Space Under the V Berth Make a Door for More Storage Under the Galley Make this Easy and Elegant Wine Glass Rack Add More Cockpit Seating With DIY Stern Perch Seats Make This Fold-Up Paper Towel Holder
Would you like to be notified when I publish more posts like this? Enter your email address below to subscribe to this blog and receive notifications of new posts by email. You will also receive occasional newsletters with exclusive info and deals only for subscribers and the password to the Downloads page. It’s free and you can unsubscribe at any time but almost nobody does!
Share this:
19 thoughts on “ refinish your interior teak to better than new ”.
Just this morning I removed all of the interior wood on my Precision 23 and plan to follow your good instructions. Just curious – did you treat the mildew the same as you explained for your outdoor teak restoration project?
My interior teak was in pretty good shape so I didn’t have to, but I would have done it the same.
Good luck with your project!
OK, the mildew in your “before” picture must have come off during sanding. I’ll hope for the same. By the way, the links to Daly’s Wood Finish in your exterior teak page are dead – you might want to update these especially if it helps pay for a few bills!
Exactly right, Tom. It was just on the surface and came right off with light sanding. The exterior mildew had penetrated deep into the wood so it had to be treated chemically.
Thanks for the heads-up about the links. They’re fixed now.
Love your site! I am a Navy Veteran in SoCal looking to buy a cheap Catalina 25 for my first boat. You have given me inspiration to not only go ahead searching but great ideas for getting a great discount for things that look like easy DIY.
Dear Stingy Sailor,
I bought a Catalina 22 ( 70-something) just a few weeks ago. I’m toatally in love with it.
The bed in the front is just to small for me, so I’m thinking about removing the ‘wall’ between the front and the bench on the stirn side. All catalina 22 but one that I’ve seen on the net have this metal bracket that seems to connect the mid stay to this wall.
Do you have a reccomendation: is it really neccesary the keep it there or not so much? . Hope I’ll here from you.
Kind regards, Robert Amsterdam, Holland
Yes, the forward wooden bulkheads between the V berth and the main cabin area are CRITICAL structural components. They transfer the force of the upper shrouds down to the hull. If you remove them, you could severely damage your sailboat.
Instead, I’d recommend you remove the galley from the starboard berth so you can stretch your feet out under the cockpit. It’s narrow, but it should be long enough for you. Another alternative is to lower the dinette table to make the port berth and use the portable toilet compartment cover boards and an ice chest to fill in the center aisle and make a large berth in the salon area. This is how my wife and I sleep when anchored out. It’s quite spacious. You can see how we do it toward the end of How to Sew Cabin Cushion Covers

Thanks for your question.
Met Vriendelijke Groeten, $tingy
Am I understanding you correctly? You oil outside teak and then varnish it???
That’s right, Jim. Especially if you bleach it first. That takes almost all the color out of it. The oil brings it back.
$tingy, earlier this week I started the task of conditioning the teak on my Cat 22 with teak oil. I started with the crib boards and now am planning to move interior. I am a little apprehensive to pull the interior teak out. More so, just not sure how to go about it. Any tips?
Hello, Shanna
It all comes out pretty easily without many tricks. All of the fasteners are relatively easy to access except the four small machine screws along the bottom of each forward bulkhead. The nuts are inside the adjacent lockers so you have to be a bit of a contortionist to hold them yourself or have a helper hold them while you remove the screws.
Label each piece so that you know where it came from and keep the fasteners together for each piece. Sandwich bags work well for this. Taking pictures as you go can help too. There are several different sizes and types of fasteners used and it’s important that you replace the same sizes in the same locations.
The trickiest part of the job is reattaching the pieces. The screw holes can be randomly spaced and difficult to realign, especially for the long, thin strips along the hull/deck joint. But once you get a couple screws started, the rest should go easier.
It’s also important that the bulkheads are firmly anchored at the top by the chain plates and the bottom by those four machine screws. The bulkheads transfer the force from the upper shrouds to the hull so you don’t want them to be loose or your rig won’t stay in tune. For that reason, be sure the bottoms of the bulkheads aren’t rotted and soft.
Best of luck with your refinish. Let us know how it turns out! $tingy
Hello $tingy, I have my exterior teak sanded, bleached and ready for finish. Have you heard anything about using Starbrite teak sealer for a couple coats, then varnishing with the same varnish you used for another 5+ coats? Also did you use varnish on your interior or just the teak oil? If just teak oil, did it have a bit of gloss? Thanks for ALL the helpful tips!
Hi, Christian
I haven’t heard of anybody using sealer only under varnish but someone may well have tried it. I don’t see much purpose to it, though. Seal coats are typically just thinned varnish so that it penetrates, which is the same process that Epifanes recommends when applying their varnish.
I use only teak oil on my interior teak and yes, you can build it up to a nice gloss if you want to but it will take 3-5 coats to get there, whereas you could just apply one or two coats of varnish over one coat of teak oil and achieve much the same result.
Hope that helps!
Thank you for sharing this informative article! All the information provided by you is really very helpful for all. I agreed that by using tack cloth you can keep your project dust-free and it is useful for cleaning fine dust off a surface. Everyone should follow the tips provided by you, it will make their work easier. Keep Posting! Keep Sharing!
This couldn’t have come at a better time for me, just about to do some interior teak work before we fit a new teak and holly sole
I really appreciate your article. I am in the process of stripping all of the think varnish from the teak handrails and fittings on my grand banks trawler and was thinking about going with just teak oil instead of using a urethane finish. Does the oil leak on to the gelcoat over time? Was also considering maybe using awlwood which is water base but requires 8 or more coats.
No, it dries hard like the linseed oil in oil based paints.
Hello, We tried to take unbolt the starboard bulkhead where the chainplate is located due to some rot at the bottom the bulkhead after a leak started from the plate of the middle shroud the top of the chainplate on deck. It was very difficult to reach in and get a hold on the bolts! We also found that the bolts were not flush with the teak plywood wall. But were hanging out a few inches. Can the bulkhead be taken out by itself without removing other pieces? How do you get a grip on the bolts inside the interior area? We are fixing the deck leak with cleaning, polyurethane sealant, new slightly longer screws, backed up by Butyl tape. Also, I am considering using Git Rot for the bottom of the bulkhead rot for this season and taking out this bulkhead in the fall. Do you think that is a good solution? Thank you, Doris
Hi, Doris Yes, they’re hard to reach but critical that they provide a strong connection between the bulkhead and hull liner since they transfer all of the load of the upper shrouds to the hull structure. You might need to have a helper hold the nuts while you turn the screws. The original screws aren’t extra long so it sounds like a previous owner installed whatever they had on hand. You can remove the bulkhead for repair or replacement after slackening the shroud and disconnecting the chain plate. I recommend that over any quick fix that might not be strong enough.
Leave a comment Cancel reply
This site uses Akismet to reduce spam. Learn how your comment data is processed .

- Already have a WordPress.com account? Log in now.
- Subscribe Subscribed
- Copy shortlink
- Report this content
- View post in Reader
- Manage subscriptions
- Collapse this bar
A Complete Guide to Teak Maintenance on Your Sailboat

By Joshua Bremmerer, CEO at Komodo Covers Teak surfaces are divisive in the boating world—loved by some for their sparkling appearance and perfect grip, loathed by others for the perceived difficulty of teak maintenance. The reality is that teak is nothing to be afraid of, as long as you follow some essential tips to take care of the material properly, minimizing costs in the process.
Teak is famed for its various grains of hard and softwood, making it naturally adhesive and anti-slip in practically any weather condition. Furthermore, it maintains a relatively cool temperature , insulating a boat to avoid engine overheating. Due to the several types of wood, different teak maintenance methods can drastically affect its ability to last.
So, it’s crucial to take the following steps into account to make sure you don’t mark the surface and keep your boat in excellent condition.
Cleaning is king
First things first, whatever you do, don’t use high-pressure cleaners on your teak because they will destroy the softer wooden elements, leaving ridges and areas that can quickly rot. Additionally, hard brushes or powerful cleaning detergents will cause a similar effect, damaging the vulnerable soft sections.
Instead, it’s much better to do regular cleaning—weekly if possible—with a very soft brush or Brite pad. You will see good results from lightly brushing against the grain with a mild detergent. If you see mildew or just want to make your sailboat sparkle, you could consider using a tiny amount of bleach, but do it with caution.

Smooth sailing with sanding
Most boaters with a teak deck consider it a standard practice to sand the surface once a year before the start of a season. Sandpapers come in various grits—for a teak deck, between 80 and 120-grit is the ideal level. The higher the number of grit, the more slippery the deck will be, so a medium level is suitable for teak as it will maintain the characteristic non-slip.
Seal the deal
Once you have cleaned and sanded the teak evenly, you can be forgiven for clapping your hands together and proclaiming a “job well done.” But you are still missing one last step—and it is a crucial one. A teak sealer will prolong the natural appearance of the wood for years to come while maintaining the pristine condition. Depending on the type of seal, some can contain biocides and even UV inhibitors which go that extra step in terms of preservation.
Aside from sealers, you can also consider using teak oil products, but be careful on how much you apply as sometimes overapplication of oil can promote mildew growth. If your boat isn’t going to be used regularly, this may not be the best course of action. The other issue with teak oil is that it doesn’t last particularly long, usually 4-12 weeks, depending on how well you have applied it.
Following these tips will put you in a great position to get your boat ready for a season on the water. If you choose the right cleaning products, sand your deck appropriately, and seal it with a good sealer, you should be able to maintain your sailboat deck for longer than you had ever imagined!
About Josh Bremmerer

Josh Bremmerer is an innate navigator, an experienced leader in the boating industry with over a decade of experience in management and company development and a lifelong passion for boating. As the manager of Glacier Ski Shop, Josh grew the small Shop into a nationally recognized business and increased profits by 400%. With that background, it’s no wonder Josh started his own business in the boating industry: Komodo Covers .
Five Best Places Where To Sail At Least One Time In Your Life
Sailing for beginners: a guide to ensuring the safety of guests on your boat, us debut of the sunreef 80 eco zeahorse at palm beach international boat show 2024, registration opens for the 2024 camden classics cup , live your passion, subscribe to our mailing list.
- BOAT OF THE YEAR
- Newsletters
- Sailboat Reviews
- Boating Safety
- Sailing Totem
- Charter Resources
- Destinations
- Galley Recipes
- Living Aboard
- Sails and Rigging
- Maintenance
- Best Marine Electronics & Technology
From the Archives: Cleaning Interior Teak
- By Jan Irons
- Updated: November 5, 2015
The teak inside my 1985 Passport 37 is staved teak—the real thing. It was originally finished in satin varnish, and I cannot even think about how much it would cost (or how much work and time it would take) to refinish. Therefore I have a BIG vested interest in keeping it pristine. Twice a year I clean it completely—including every slat of the 204 slats aboard—with Murphy’s Oil Soap, let it dry, and then wipe down every inch with plain old lemon oil. The only caution is that “plain old lemon oil” in some other countries—Panama comes to mind—smells more like chemicals than lemons. Stay away!
I woke up this morning to a cloudy dreary day that looked like an ideal candidate for cleaning and lemon oiling Winterlude ‘s interior teak. It’s a project I try to tackle twice a year — once when we return to the boat and once just before we leave. Otherwise 30 year old teak will become tired and worn. Unfortunately this year I’ve been lazy and didn’t do it in November when we returned and knew I had to get it done before we leave to cruise for three months — when there will be MUCH more fun things to do than play with teak.
We are so lucky — the interior of our boat is solid teak staving — i.e. individual teak 2″ slats with a groove to all fit together. Although we did not want ANY teak when we were boat shopping, the teak is homey, warm and inviting and we’ve grown to love it… well at least 363 days a year. 🙂 So what’s up with the missing two days? That’s when I have to provide it the required TLC or it won’t stay looking pretty!
As I said I’ve been procrastinating this project for months. First I had get motivated to move everything that came into contact with the teak — books, hats, cameras, all the spices in the spice race – you’re starting to get the picture The boat is a wreck and I’m always astonished at how much CRAP we have “unstowed” everywhere! Every year I make a promise to myself to “clean up the mess” i.e. get rid of stuff just sitting around, not hidden, but every year when I do the teak I remember that I have not succeeded!
The second step is to wash all the walls and teak trim, drawers and louvered doors with Murphy Oil and water. I just squirt a bit of Murphy Oil cleaner in my little red bucket and fill it half full of water. Then I use a soft cotton rag to begin the process, starting in the front and working my way back to the companionway. I wipe down every bit of the teak – this portion of the project takes about 3 hours, without doing the quarterberth – that’s where I stuff all the stuff so that I can actually SEE the teak to clean it.
After letting it dry, I start back at the front of the boat with pure lemon oil. I use a Viva papertowel dipped in the lemon oil and proceed to wipe lemon oil over everything — generously. Despite the satin varnish, our teak will begin to soak up the lemon oil almost right away. After a half hour or hour, it begins to look quite splotchy, but I continue with getting a generous coat on all the teak and leave it alone. We’ll leave it alone for at least 24 hours. After 24 hours, I’ll take a rag and rub over to redistribute lemon oil, letting the splotchy areas that have already soaked it up have a bit more and getting rid of too much lemon oil on everything.
At this point, I start to put stuff away and regain my life. The entire project takes most of a day – by happy hour, I’m ready to celebrate it being done!
And the boat smells so good – if you like lemons!
- More: DIY Sailboat Projects , How To , Living Aboard , teak
- More How To

3 Clutch Sails For Peak Performance

It’s Time to Rethink Your Ditch Kit

8 Ways to Prevent Seasickness

How To De-Winterize Your Diesel Engine

Bitter End Expands Watersports Program

Sailboat Review: Tartan 455

Miracle in a Bowl

Cole Brauer Completes the Global Solo Challenge
- Digital Edition
- Customer Service
- Privacy Policy
- Email Newsletters
- Cruising World
- Sailing World
- Salt Water Sportsman
- Sport Fishing
- Wakeboarding
- The Great Loop
- Anchoring/Ground Tackle/Dock
- Cruising Gear/Electronics
- Power/AMPS/Alternative Energy
- Leave the Boat
- On the Hard or In the Water
- Hurricane Preparedness
- Return to the Boat
- Problem Solving
- Preventative
- Sails & Canvas
- What Works/What Doesn’t
- Anchoring/Ground Tackle
- Foreign Check In/Check Out
- Galley/Provisioning/Life Aboard
- Safe Cruising/Local Knowledge
- Seamanship/Sailing the Boat
- Throw Off the Dock Lines!
- What’s It Cost … How Much?
- Bahamas and Exumas
- Providencia, San Andres
- Florida Keys
- Mexico/Yucatan Coast
- Kuna Yala/San Blas Islands
- AICW – Atlantic Inter Coastal Waterway
- Georgian Bay & The North Channel
- Inland Rivers
- Trent Severn Canal System, Ontario
- About/Contact
- Cruise Planning
Caring For Interior Teak

363 days a year I love the teak interior of our Passport 37 sailboat. Twice a year, I curse it. That’s the two days I have to pay attention to the teak or it will turn dark, spotted and ugly. 204 louvers, hundreds of solid teak staves, Murphy’s Oil Soap and some serious lemon oil and the spring session has concluded!
WooHoo, next week’s looking good to go play on the boat! If you’d like more detailed information about how I keep the teak looking good after 28 years, click on the link below the photo. The same article that Cruising World featured in their online newsletter about taking care of interior teak.
Click here for more …..
Teak Teak Teak … Inside This Time
How do you take care of your interior teak? Please leave a comment and share! Cheers! Jan
RELATED ARTICLES MORE FROM AUTHOR

Step By Step: How to Use the CBP ROAM App to Check In to the US

FCC Radio Licenses for Great Loopers

Time To Go Explore!
10 comments.
Im curious, why not varnish? Not much more work involved, and inside, it should last for years without the damage from salt and sun. And it looks nice!
Of course, I could be missing something important here!
Hi Keith! Actually, it IS varnished. Satin sheen varnish originally done at the boatyard in Taiwan in 1985. When we bought the boat, the prior owner told me the only thing he did to it was clean the wood annually with murphy’s oil soap. Our original caretaker was a teak guru and he suggested doing the murphy oil clean twice a year and coating with lemon oil, letting it soak in & then wiping it off. I have no idea if this is the right approach, all I know is the teak inside sv Winterlude still looks good and isn’t starting to turn dark. So I keep doing it.
P.S. You mean I wouldn’t have to do this maintenance at all and it would continue to look good? There’s a thought! 🙂 But there’s no way we could ever redo the varnish inside, so ….
Hmm… Jan, I’m not positive, but IF the oil you apply is soaking in, then I have to assume that the varnish is long gone. Varnish is water-proof. I’m guessing that the 1985 varnish has been worn away by the annual washing you describe, so you are, in fact, maintaining an oil finish perfectly by your twice-a-year cleaning and rubbing. Nothing wrong with that, and as you said, it smells wonderful! If you wanted to do the varnish over, you’d start by cleaning the surface oil off, then perhaps use a mineral spirits wipe to get the surface pores opened up a bit, then two coats of varnish – the first thinned 50% with spirits, the second straight – would likely be enough on interior teak to last for years, unless you scrub it twice a year with Murphy’s! It’s a thought, but if you like the look of the rubbed oil and don’t mind the 2-days-out-of-365 routine… 🙂 BTW your boat looks stunning with all that teak! I’m jealous!
Hi Jan….had to smile that you know there are 207 louvers….but then again, when I thought about it, of course it’s you. If it makes you feel any better, Winterlude looks gorgeous in the pics and you deserve a lot of respect. I always wonder why someone would spend thousands of dollars (usually scores of thousands) on a boat and allow it to deteriorate — most would never allow a luxury sport car to sit out in the elements unprotected or uncleaned to waste away…one of life’s quandaries.
oops, that would be 204 louvers, I guess! 🙂
🙂 — Hi Bari! I had to do SOMETHING while cleaning each and every one of those louvers. And I am amazed every time and how filthy they get in such a short period of time. Cheers! Jan
[…] Caring for Interior Teak […]
LEAVE A REPLY Cancel reply
Save my name, email, and website in this browser for the next time I comment.
Notify me of follow-up comments by email.
Notify me of new posts by email.
Currently you have JavaScript disabled. In order to post comments, please make sure JavaScript and Cookies are enabled, and reload the page. Click here for instructions on how to enable JavaScript in your browser.

Tips for Stinky Boat Cushions

Insurance for Your Windlass: 7 Tips for Using a Snubber

Recommended Mooring Tie Up for Storms
- New Sailboats
- Sailboats 21-30ft
- Sailboats 31-35ft
- Sailboats 36-40ft
- Sailboats Over 40ft
- Sailboats Under 21feet
- used_sailboats
- Apps and Computer Programs
- Communications
- Fishfinders
- Handheld Electronics
- Plotters MFDS Rradar
- Wind, Speed & Depth Instruments
- Anchoring Mooring
- Running Rigging
- Sails Canvas
- Standing Rigging
- Diesel Engines
- Off Grid Energy
- Cleaning Waxing
- DIY Projects
- Repair, Tools & Materials
- Spare Parts
- Tools & Gadgets
- Cabin Comfort
- Ventilation
- Footwear Apparel
- Foul Weather Gear
- Mailport & PS Advisor
- Inside Practical Sailor Blog
- Activate My Web Access
- Reset Password
- Pay My Bill
- Customer Service

- Free Newsletter
- Give a Gift
How to Sell Your Boat

Cal 2-46: A Venerable Lapworth Design Brought Up to Date

Rhumb Lines: Show Highlights from Annapolis

Open Transom Pros and Cons

Leaping Into Lithium

The Importance of Sea State in Weather Planning

Do-it-yourself Electrical System Survey and Inspection

Install a Standalone Sounder Without Drilling

Rethinking MOB Prevention

Top-notch Wind Indicators

The Everlasting Multihull Trampoline

In Search of the Snag-free Clew

What’s Involved in Setting Up a Lithium Battery System?

Reducing Engine Room Noise

Breaking Point: What Can Go Wrong With Your Yanmar?

Mildew-resistant Caulks for Boats

Can We Trust Plastic Boat Parts?

Repairing Molded Plastics

Mailport: Marine plywood, fuel additives, through bolt options, winch handle holders

The Day Sailor’s First-Aid Kit

Choosing and Securing Seat Cushions

Cockpit Drains on Race Boats

Rhumb Lines: Livin’ the Wharf Rat Life

Safer Sailing: Add Leg Loops to Your Harness

Resurrecting Slippery Boat Shoes

Tricks and Tips to Forming Do-it-yourself Rigging Terminals

Marine Toilet Maintenance Tips

Learning to Live with Plastic Boat Bits

The Ultimate Guide to Caring for Clear Plastic
- Boat Maintenance
- Sailboat Reviews
How to Restore Teak Wood on Boats
Probably nothing can make or break the appearance of a fiberglass boat more quickly than the appearance of the exterior teak trim. Contrary to popular belief, teak is not a maintenance-free wood that can be safely ignored and neglected for years at a time. Though teak may not rot, it can check, warp, and look depressingly drab if not properly cared for.
Although it is not immune to neglect, teak is incredibly resilient, and can be brought back to life after remarkable amounts of abuse. Therefore, there is no excuse for drab, ugly exterior teak on any boat.
Unlike other woods used for exterior trim, the grey weathering of teak rarely extends very far below the surface of the wood. Instead of the tedious scraping and sanding essential to restore the weathered surface of, for example, mahogany, a fairly simple chemical cleaning usually suffices to bring even the worst of grungy teak back to a semblance of its original glory.
However, chemical cleaning can be pretty tough on the wood. Most chemical cleaners rely on a caustic and/or an acid to clean and bleach the surface of the wood. Inevitably, these powerful cleaners gradually erode the surface, softening the pithy portions of the grain and leaving raised ridges along the tougher growth rings of the wood.
Chemical cleaners can, however, almost miraculously clean weathered teak. The four-color brochures published by teak care product companies do not exaggerate when they show bright tan teak next to grey ugly teak, claiming that only a few minutes work will transform the dirty to the clean.
For best results, however, you should never let your teak trim get to the point that such drastic measures are called for: and once you get it back to like new condition, you should be prepared to put in the time and effort required to keep it in that condition.
Cleaning Teak on Boats
If your teak is dark brown from old, oxidized dressing, or weathered grey from neglect, the first step is a thorough cleaning.
The severity of the discoloration of the wood will determine the severity of restorative measures required. Because cleaners containing acids and caustic are hard on the wood, you should try to use as mild a cleaner as will do the job, even though it may take some experimentation and a few false starts to come up with the right combination of ingredients.
The mildest teak cleaner is a general purpose household powdered cleaner such as Spic n Span . A concentrated solution of powdered cleaner and vigorous scrubbing using a very soft bristle brush or, better yet, a 3M pad, will do a surprisingly good job on teak that is basically just dirty. Don’t scrub any harder than you have to, and always scrub across the grain. Every time you scrub the teak, you are removing softer wood, which eventually results in an uneven surface that raises the grain. Regularly using a firm brush to scrub with the grain will lead to problems down the road.
The advantage of a gentle scrub using mild cleaners is that while it is more work for you, it is by far the most gentle for your teak. Since you are likely to have some powdered detergent around, always try this method before going on to more drastic measures.
Simply wet down an area with water, clean with the detergent solution, rinse with fresh water, and let it dry. If the wood comes out a nice, even light tan, youre in luck. If its still mottled or grey, a more powerful cleaner is called for.
The next step is a one part cleaner specifically designed for teak, or the equivalent. These can be either powdered or liquid. Most consist of an abrasive and a mild acid, such as phosphoric acid or oxalic acid. They are more effective in lightening a surface than a simple detergent scrub. Many household cleaners like Barkeeper’s Friend contain oxalic acid.
If the cleaner contains acid, however, some care in handling must be taken. It is advisable to wear rubber gloves and eye protection using any cleaner containing even a mild acid.
The cleaning procedure with most one-part cleaners is the same: wet the teak down, sprinkle or brush on the cleaner, scrub down, and rinse off. Be sure to rinse well.
Even badly weathered teak should come up reasonably well with a one part cleaner. When the wood dries, it should be a uniform light tan. If some areas are still grey, a repeat cleaning should do the job. If, however, the teak is still mottled or discolored, the time has come to bring out the heavy guns, and with them the heavy precautions.
The two part liquid cleaners are, with only a few exceptions, powerful caustics and acids which do an incredible job of cleaning and brightening teak, but require care in handling to avoid damage to surrounding surfaces, not to mention your own skin.
While the instructions on all two-part cleaners are explicit, a reiteration of the warnings on the labels is useful.
Adjacent surfaces, whether gelcoat, paint, or varnish, must not be contaminated by the cleaners, most of which can bleach gelcoat or paint, or soften varnish. Constant flushing of adjoining surfaces with water while cleaning is usually adequate, but masking off of freshly painted or varnished surfaces may be more effective.
Hand protection, in the form of rubber gloves, is absolutely essential. In addition, do not use these cleaners while barefooted, and preferably not while wearing shorts. Eye protection is also a good idea. The chemical burns which can result from some cleaners can be disfiguring and painful. If the product label has the key words caustic, corrosive, or acid, wear protection and avoid splashing!
There is slight variation in the instructions for the various two-part cleaners, but the general principles are the same:
1. Wet the teak down;
2. Apply part one (the caustic), spreading and lightly scrubbing with a bristle brush;
3. When the surface is a uniform wet, muddy brown, apply the second part (the acid), spreading with a clean bristle brush;
4. Apply and spread enough of the acid to turn the teak a uniform tan;
5. Rinse thoroughly, and allow to dry completely.
It is fairly common to use almost twice as much of the second liquid (the acid) as the first, in order to get uniform light color. For this reason, its a good idea to buy an additional bottle of the second solution, when it is available. Despite the fact that most manufacturers package two-part cleaners in kits of two equal-sized bottles, they usually make additional bottles of the second part available.
Unless the instructions require it, do not rinse off the muddy brown surface of the teak after it has been treated with the caustic. You will be washing unneutralized, corrosive liquid all over the rest of your boat. Thorough neutralizing with the acid wash will minimize problems.
Surface Preparation for Finishing
A freshly cleaned teak surface is a joy to behold, but it wont stay fresh, clean, and light for long if you don’t take care of it. In fact, the surface will begin to oxidise instantly as it dries. The sooner you complete treatment after cleaning, the better.
Teak, like many woods, has grain which varies a great deal in hardness, even within the same piece of wood. Over time, even a simple scrubbing with detergent will wear away the softer portions of grain, leaving ridges of harder grain. The irregularity of such a surface merely accelerates the rate at which it gets dirty again.
Before getting out the sander to smooth out the grain, however, look at both the function and construction of the wood youre dealing with.
If the teak surface youve cleaned is teak-faced plywood, theres a good chance that a thorough sanding to smooth the surface will go right through the layer of veneer, effectively ruining the piece. On the typical fiberglass sailboat, veneered or plywood components include conpanionway drop boards, hatch tops, and sometimes cockpit seats and soles. Before sanding any of the parts, examine them carefully to see if they are solid lumber or veneer. Since exposed edges of plywood are sometimes covered with veneer strips to make them look like solid lumber, you must look pretty closely.
Although decks are usually solid lumber, they also can present problems. If the decking is much less than 1/2″ thick, and has plugged (bunged) fastenings, sanding out the grain ridges may sand away enough material to sand through or loosen the bungs, exposing the fastenings.
Even when bungs are set in epoxy, they require a counterbore at least l/8″ deep to hold them in place.
Even if the grain is quite pronounced on laid teak decks, you may be better off living with a cleaned irregular surface than opening Pandoras box by trying to create a perfectly smooth surface.
On other solid teak items such as handrails, toerails, and Dorade boxes, thorough sanding of the chemically cleaned surface before treating with a sealer will result in a much more attractive surface.
Do not, as we have seen many times, attempt to restore badly weathered and grey teak by sanding before chemical cleaning. Chances are that you will quickly discover that a discouraging amount of sanding is involved, and you will end up using a chemical cleaner in any case. Sanding both before and after treatment is a waste of effort, and is likely to remove more wood than is necessary. On teak with pronounced surface irregularities, it could take forever to sand them out to get a uniform surface color, while chemical cleaning will quickly lighten even the deepest gouges or grain defects.
Wait until the cleaned teak is thoroughly dry before sanding or applying teak dressing.
Sanding of cleaned teak is not always required, particularly if the surface is to be treated with an oil-type dressing rather than a gloss finish such as varnish. Surface irregularities show far less with the matte finish of teak oils.
Granted, perfectly smooth teak is likely to be more even in color, and some esthetic sensibilities are offended by a surface showing pronounced grain pattern. From a simply functional point of view, however, irregularities are unimportant except in terms of simplified cleaning in the future.
Unless you intend to put in the effort required to maintain your teak between major cleanings, sanding the teak smooth is a waste of time. The next chemical cleaning will simply repeat the grain-raising cycle, requiring another sanding.
If you swear youre going to keep the teak up, however, a good sanding will enhance the woods appearance.
The safest tool for general sanding is a high speed orbital sander such as the Makita B04510. If you use successively finer grades of aluminum oxide sandpaper, and don’t slow the machine down by applying pressure, it will leave a smooth, relatively swirl-free surface suitable for finishing with a teak dressing.
Inexpensive, heavy, slow-speed orbital sanders should be avoided. They leave telltale swirl marks on the surface which are accentuated by the application of finish, and their sanding is generally too slow.
Never use a disc sander on a surface to be finished bright (oiled or varnished), unless you are one of the few experts who really know how to handle this potentially destructive tool.
The same goes for the belt sander. It is perhaps the most efficient tool for smoothing large, flat surfaces, but is capable of doing heartrending and irreversible damage in the hands of the inexperienced. For decks and hatches of solid lumber, the belt sander is the answer – but only if you are thoroughly experienced with the tool, and only with a heavy duty machine that has a large sanding surface.
When power sanding, always mask off adjacent areas of gelcoat. Even lightly touching a polished gelcoat surface with a sander will damage it. The same rule applies for hand sanding.
Remove masking tape immediately when sanding is completed. Even leaving the tape on overnight on an exterior surface is likely to make it difficult to remove. Tape adhesive residue can be removed with a mild solvent, such as alcohol, and gentle rubbing with a coarse cloth, such as a piece of toweling.
After sanding, remove sanding dust from all surfaces with a vacuum cleaner. If electricity is not available, sweep thoroughly with a dusting brush or a large paintbrush which will no longer be suitable for painting because it is full of sanding dust. Obviously, you don’t sacrifice your best badger hair brush for this. The cheapest bristle brush will do fine.
Applying a Finish to the Teak
The final step in rejuvenating an exterior teak surface is the application of a dressing or sealer to retain for as long as possible the appearance of the freshly prepared wood.
Our own preference is a dressing which does not darken the wood. For our top-recommended sealer check out the six-month results of our ongoing test of wood finishes . For really durable finishes on teak trim, or caprails, there are a variety of options. Search under wood finish, or teak treatments to turn up our most recent wood finish test results . This article on varnishing also has some good tips.
The choice of a teak dressing is, however, as much a matter of esthetics as function. Look around at the boats whose exterior teak looks best to you, and query the owners about the products they use.
A major caveat is in order. No exterior teak finish lasts very long. For optimum results, monthly application of dressing is required, with a good scrubbing with detergent and water before applying a fresh coat. Youre kidding yourself if you think a once-a-year treatment will keep your teak looking good.
Do not attempt to use household-type furniture oils for exterior teak. They will not stand up to the weather.
Whatever teak dressing you use, be neat in applying it. Slopped-about teak dressing may not show when it first gets on fiberglass, but it inevitably darkens with age, leaving stains that look just as bad as varnish spills, and are just about as hard to remove. Clean up spills and overruns immediately with a rag dipped in mineral spirits unless another solvent is specified by the manufacturer of the dressing.
Masking tape is not particularly effective in protecting surfaces from spills of teak dressings, as the viscosity of most dressings is so low that they simply bleed under the edge of the tape. The answer is careful application, and careful cleanup.
Maintaining Your Teak
Your job isn’t over when the last coat of dressing is applied. To look its best, exterior teak needs frequent attention. With a boat used in salt water, frequent washdowns with fresh water will prolong the life of the dressing, but scrubbings with salt water and a brush will reduce it.
Horizontal surfaces, such as hatch covers, will require more frequent coats of sealer than vertical surfaces, such as companionway dropboards. High traffic areas like a teak cockpit sole will require the most attention of all, but are the easiest to scrub and retreat, since sanding is not usually desirable.
If all this sounds like a lot of work, thats because it is. That explains why the exterior teak on so many boats looks so grubby.
It is still, however, less work than maintaining a varnished exterior teak surface – a lot less. If you really think you want varnished teak, try maintaining a clean oiled surface for a season first.
Few things look better on a boat, particularly a white on white fiberglass boat, than well-maintained exterior teak trim. An owner who neglects exterior wood is likely to be the same owner who rarely changes the oil in the engine, and who rarely bothers to put on the sail covers after a days sail when he expects hes going sailing again tomorrow.
Owning a boat isn’t all play. A boat is a major investment, and like most investments, the more attention you pay to it, the more it will return. The time you put into maintaining your exterior teak is well invested. The return is not only pride of ownership, but dollars in your pocket when the time comes to sell the boat.
RELATED ARTICLES MORE FROM AUTHOR
Well written and informative We just bought a 21 ft 1991 celebrity Cuddy and it’s like an antique with beautiful teakwood adorning this old girl! The boat has been well taken care of but teak is teak thanks for the tips Any tips on removing the discoloration on bottom after a few rides in the river I tried washing off but won’t rinse off I guess I waited too long to rinse Is there something you can put on the bottom so that dirt doesn’t stain
Starbrite hull cleaner
What is the caulking between the teak strips (usually black) I would like to replace some that has come out.
Jimbo. There are a few different types, each with their own characteristics. Here is a test that should help you find one that works for you. https://www.practical-sailor.com/boat-maintenance/paints/teak-deck-caulks-rated-for-durability-and-resistance-to-chemicals
That’s really nice post. I appreciate your skills. Thanks for sharing.
I really enjoy the simple yet concise steps on how to restore teak wood on a boat. As teak wood outdoors is exposed to different pollutants, it can require to keep it well-maintained as long as it is used. Thank you so much this information was certainly helpful
This was certainly the best written and most informative article I have read on the subject. I recently bought a sailboat with poorly maintained exterior teak, and now I have a solid plan going forward. Thanks
Enjoy your boat comments. Would appreciate your best idea for a older boat to be sold. I have a 43’Gulf Star Trawler,well kept,that l would like to sell How would you go about this? Will appreciate your comments.
LEAVE A REPLY Cancel reply
Log in to leave a comment
Latest Videos

Island Packet 370: What You Should Know | Boat Review

How To Make Starlink Better On Your Boat | Interview

Catalina 380: What You Should Know | Boat Review
- Privacy Policy
- Do Not Sell My Personal Information
- Online Account Activation
- Privacy Manager
- Skip to main content
- Skip to primary sidebar
- Skip to footer
The Boat Galley
making boat life better

🎧How to Clean Your Boat’s Interior Teak
Published on July 19, 2022 ; last updated on November 29, 2023 by Carolyn Shearlock
[sc name=”podcast_icons_short”]
Is your boat teak looking tired and dirty? Here’s step-by-step instructions for cleaning your teak so it’s as good as new.
ScotchBlue Painter’s Tape (Amazon)
Small Foam Brushes (Amazon)
Libman Scrub Brush Set (Amazon)
Small Bucket for Water (Amazon)
Wet Dry Sandpaper (Amazon)
Sanding Blocks (Amazon)
DeWalt Orbital Sander (Amazon)
Prefer to Read? Check out Boat Renovation: Cleaning Teak.
Click to see all podcast sponsors, past and present.
Music: “Slow Down” by Yvette Craig
Be sure to subscribe to The Boat Galley podcast to get new episodes automatically in your podcast player.

Check out our courses and products

Find this helpful? Share and save:
- Facebook 72
- Pinterest 18
Reader Interactions
Leave a reply cancel reply.
Your email address will not be published. Required fields are marked *
Each week you’ll get:
• Tips from Carolyn • New articles & podcasts • Popular articles you may have missed • Totally FREE – one email a week
SUBSCRIBE NOW

- Forum Listing
- Marketplace
- Advanced Search
- About The Boat
- Gear & Maintenance
- SailNet is a forum community dedicated to Sailing enthusiasts. Come join the discussion about sailing, modifications, classifieds, troubleshooting, repairs, reviews, maintenance, and more!
What is the best interior Teak Oil?
- Add to quote
Never mind the price, looking for the best quality and protection. Heard that Watco Danish teak oil from Home Depot is pretty good? Any suggestions on brand and best application method?

All of my interior teak is varnished. Frankly, not sure I would want it oiled. On deck is not too bad. I redid my interior with "Top Secrete" spar varnish, I would assume any other brand would work just as well. This brand did not have the yellow tint like some brands of spar varnish has. marty
Watco is a brand...
Not sure if it is technically appropriate or not, but I used lemon oil on the cabin teak. It gave the cabin a nice smell and seemed to refresh the wood.

conditioning teak So this may seem silly and I'm all ears when it comes to alternatives but, when I owned my last boat I treated my teak with Johnsons Paste Wax. Yes, the stuff that comes in the yellow can that you can buy anywhere. I'd put a glob in my hand, or on a non-absorbent fabric, and rub it into the bare teak until it was smooth. It conditioned the teak, made it repel water and moisture, kept it smelling nice and made the teak grippy, especially on your hands. I did it for three years. The teak always looked great and an application lasted quite a while. Did I mention I could buy it at almost any store and it was tres' cheap?

I just use regular old orange oil and it comes out looking and smelling great. I tried buying expensive special teak oil at the marine store and it doesn't work half as good. Also I don't know about your boat but sometimes on mine I get a little whiteish in color mold that forms on the interior teak and makes the wood look dry and worn out. I go over the entire surface of the interior cabin with a cleaning solution containing bleach to kill the mold and to clean the wood. I then follow up with the orange oil and it really transforms the boat, makes it smell great and keeps the teak in good shape. I have also heard simple lemon oil works great as well. Save your money on the expensive stuff. Nick

Teak is a naturally oily wood that resists decay. This is why is is used in marine applications and why it must be wiped with acetone or laquer thinner prior to varnishing to remove the surface oils and allow the film finish to dry. There is no reason to put oil on an oily wood. Even if that wood is a veneer. The only reason to put any finish on teak at all is to protect it and keep it clean. Oils that are applied to teak act to trap dirt and grease. On both our boats, I had to strip years of grime and Murphy's Oil with acteone followed by a light sanding and 6 coats of satin urethane. High traffic or UV areas received gloss urethane. The result is a finish that needs no maintenance other than a wipe of a mild soap from time to time. VICTORIA (and her mistress)
Watco wood oil is primarily a furniture-quality finish. I don't think it would fare well on outdoor teak. And in-cabin teak would probably fare better being varnished. Just my opinion, but I spent a few years in the paint industry and sold and used quite a bit of that stuff. A boat interior is generally about the same environment as occasional-use patio furniture... fair amount of moisture, etc. And varnish is mfr'd. from the same kinds of oils that are used as wood finishing oils... I would be concerned that oiling the wood wouldn't hold up as well as several coats of varnish, especially if you've got a moist boat interior (some are better than others - mine tends to get a bit wet inside).

On my previous boat the spring routine was to wash all the interior teak with Murphys Oil Soap and then apply teak oil. Teak looked great. I used West Marine and other brands. Didn't see much difference between brands. My new boat has varnished interior teak. I love the look but hope it doesn't take a lot of time to keep it up. If it was oiled, I would continue my old routine, not bother varnishing it.
As I mentioned earlier, my boat is all varnish, probably equal to the pics by nk235 in my Jeanneau. When I revarnished everything 3 yrs ago, it was the first varnish added to the interior since it was manufactured in 85, so 22'ih yrs! Not bad if one asks me, not that any of you did. And what I did, still looks good. Exterior, from trying to keep the varnish on that the original owner did. not worth it! Time to sand off what varnish is there, add some oil, let it go gray! My 02, nto that 02 is worth much these days! marty
In case there's any confusion (and I hope no one think's I'm trying to get into the middle of a disturbance here) I'd like to point out that "oiling" and using a product like WATCO Danish Wood Oil, etc. is really not the same thing. WATCO is a rubbing varnish basically. The oil/varnish product dries, just like varnish, requires proper prep just like varnish, and because it dries more slowly than varnish can be prone to problems in high-humidity areas. I used to have to troubleshoot this product for unhappy consumers who had used it expecting miracles. It's a great product in the proper application. Just make sure you're not expecting miracles!

An oil finish on interior Teak will eventually turn dark as the oil/wood oxidizes over the years. My choice for the 'best' oil finish for interiors is a 'resinated' oil finish: 25% oil-based varnish, 75% oil. Resinated oil finishes are easily stripped, as easy as stripping any other oil finish, with TSP, etc. A commercially available 'resinated' oil is: NuTeaK by Marykate, but virtually 'front line 'teak oil' sources also offer 'resinated oils'. You can apply this thin like traditional oil, or for best results brush it on thick - like varnish. Resinated oil finishes when dry/cured can be flat sanded and then hand-rubbed for a gloss shine that exceeds the gloss of straight varnish. With a bare/clean hand, use Rottentstone and water to rub into a gloss finish, or Rottenstone and oil for a semigloss ... or pumice and oil for a 'true' hand rubbed satin finish. Rottenstone is available in all paint stores. You can also wax over a cured oil finish to make it 'last longer'.
I have a varnished interior on my tayana 37 built in 1985 and have used Old English furniture "oil" on it from day one. Still looking good after all of those years.
Varnish in the cabin is also great but takes a lot of time and precision to do a whole cabin especially one with a lot of teak such as the boat I have. Click to expand...
- ?
- 173.8K members
Top Contributors this Month

- Popular Professionals
- Design & Planning
- Construction & Renovation
- Finishes & Fixtures
- Landscaping & Outdoor
- Systems & Appliances
- Interior Designers & Decorators
- Architects & Building Designers
- Design-Build Firms
- Kitchen & Bathroom Designers
- General Contractors
- Kitchen & Bathroom Remodelers
- Home Builders
- Roofing & Gutters
- Cabinets & Cabinetry
- Tile & Stone
- Hardwood Flooring Dealers
- Landscape Contractors
- Landscape Architects & Landscape Designers
- Home Stagers
- Swimming Pool Builders
- Lighting Designers and Suppliers
- 3D Rendering
- Sustainable Design
- Basement Design
- Architectural Design
- Universal Design
- Energy-Efficient Homes
- Multigenerational Homes
- House Plans
- Home Remodeling
- Home Additions
- Green Building
- Garage Building
- New Home Construction
- Basement Remodeling
- Stair & Railing Contractors
- Cabinetry & Cabinet Makers
- Roofing & Gutter Contractors
- Window Contractors
- Exterior & Siding Contractors
- Carpet Contractors
- Carpet Installation
- Flooring Contractors
- Wood Floor Refinishing
- Tile Installation
- Custom Countertops
- Quartz Countertops
- Cabinet Refinishing
- Custom Bathroom Vanities
- Finish Carpentry
- Cabinet Repair
- Custom Windows
- Window Treatment Services
- Window Repair
- Fireplace Contractors
- Paint & Wall Covering Dealers
- Door Contractors
- Glass & Shower Door Contractors
- Landscape Construction
- Land Clearing
- Garden & Landscape Supplies
- Deck & Patio Builders
- Deck Repair
- Patio Design
- Stone, Pavers, & Concrete
- Paver Installation
- Driveway & Paving Contractors
- Driveway Repair
- Asphalt Paving
- Garage Door Repair
- Fence Contractors
- Fence Installation
- Gate Repair
- Pergola Construction
- Spa & Pool Maintenance
- Swimming Pool Contractors
- Hot Tub Installation
- HVAC Contractors
- Electricians
- Appliance Services
- Solar Energy Contractors
- Outdoor Lighting Installation
- Landscape Lighting Installation
- Outdoor Lighting & Audio/Visual Specialists
- Home Theater & Home Automation Services
- Handyman Services
- Closet Designers
- Professional Organizers
- Furniture & Accessories Retailers
- Furniture Repair & Upholstery Services
- Specialty Contractors
- Color Consulting
- Wine Cellar Designers & Builders
- Home Inspection
- Custom Artists
- Columbus, OH Painters
- New York City, NY Landscapers
- San Diego, CA Bathroom Remodelers
- Minneapolis, MN Architects
- Portland, OR Tile Installers
- Kansas City, MO Flooring Contractors
- Denver, CO Countertop Installers
- San Francisco, CA New Home Builders
- Rugs & Decor
- Home Improvement
- Kitchen & Tabletop
- Bathroom Vanities
- Bathroom Vanity Lighting
- Bathroom Mirrors
- Bathroom Fixtures
- Nightstands & Bedside Tables
- Kitchen & Dining
- Bar Stools & Counter Stools
- Dining Chairs
- Dining Tables
- Buffets and Sideboards
- Kitchen Fixtures
- Wall Mirrors
- Living Room
- Armchairs & Accent Chairs
- Coffee & Accent Tables
- Sofas & Sectionals
- Media Storage
- Patio & Outdoor Furniture
- Outdoor Lighting
- Ceiling Lighting
- Chandeliers
- Pendant Lighting
- Wall Sconces
- Desks & Hutches
- Office Chairs
- View All Products
- Side & End Tables
- Console Tables
- Living Room Sets
- Chaise Lounges
- Ottomans & Poufs
- Bedroom Furniture
- Nightstands
- Bedroom Sets
- Dining Room Sets
- Sideboards & Buffets
- File Cabinets
- Room Dividers
- Furniture Sale
- Trending in Furniture
- View All Furniture
- Bath Vanities
- Single Vanities
- Double Vanities
- Small Vanities
- Transitional Vanities
- Modern Vanities
- Houzz Curated Vanities
- Best Selling Vanities
- Bathroom Vanity Mirrors
- Medicine Cabinets
- Bathroom Faucets
- Bathroom Sinks
- Shower Doors
- Showerheads & Body Sprays
- Bathroom Accessories
- Bathroom Storage
- Trending in Bath
- View All Bath
- How to Choose a Bathroom Vanity

- Patio Furniture
- Outdoor Dining Furniture
- Outdoor Lounge Furniture
- Outdoor Chairs
- Adirondack Chairs
- Outdoor Bar Furniture
- Outdoor Benches
- Wall Lights & Sconces
- Outdoor Flush-Mounts
- Landscape Lighting
- Outdoor Flood & Spot Lights
- Outdoor Decor
- Outdoor Rugs
- Outdoor Cushions & Pillows
- Patio Umbrellas
- Lawn & Garden
- Garden Statues & Yard Art
- Planters & Pots
- Outdoor Sale
- Trending in Outdoor
- View All Outdoor
- 8 x 10 Rugs
- 9 x 12 Rugs
- Hall & Stair Runners
- Home Decor & Accents
- Pillows & Throws
- Decorative Storage
- Faux Florals
- Wall Panels
- Window Treatments
- Curtain Rods
- Blackout Curtains
- Blinds & Shades
- Rugs & Decor Sale
- Trending in Rugs & Decor
- View All Rugs & Decor
- Pendant Lights
- Flush-Mounts
- Ceiling Fans
- Track Lighting
- Wall Lighting
- Swing Arm Wall Lights
- Display Lighting
- Table Lamps
- Floor Lamps
- Lamp Shades
- Lighting Sale
- Trending in Lighting
- View All Lighting
- Bathroom Remodel
- Kitchen Remodel
- Kitchen Faucets
- Kitchen Sinks
- Major Kitchen Appliances
- Cabinet Hardware
- Backsplash Tile
- Mosaic Tile
- Wall & Floor Tile
- Accent, Trim & Border Tile
- Whole House Remodel
- Heating & Cooling
- Building Materials
- Front Doors
- Interior Doors
- Home Improvement Sale
- Trending in Home Improvement
- View All Home Improvement
- Cups & Glassware
- Kitchen & Table Linens
- Kitchen Storage and Org
- Kitchen Islands & Carts
- Food Containers & Canisters
- Pantry & Cabinet Organizers
- Kitchen Appliances
- Gas & Electric Ranges
- Range Hoods & Vents
- Beer & Wine Refrigerators
- Small Kitchen Appliances
- Cookware & Bakeware
- Tools & Gadgets
- Kitchen & Tabletop Sale
- Trending in Kitchen & Tabletop
- View All Kitchen & Tabletop
- Storage & Organization
- Baby & Kids

- View all photos
- Dining Room
- Breakfast Nook
- Family Room
- Bed & Bath
- Powder Room
- Storage & Closet
- Outdoor Kitchen
- Bar & Wine
- Wine Cellar
- Home Office
- Popular Design Ideas
- Kitchen Backsplash
- Deck Railing
- Privacy Fence
- Small Closet
- Stories and Guides
- Popular Stories
- Renovation Cost Guides
- Fence Installation Cost Guide
- Window Installation Cost Guide
- Discussions
- Design Dilemmas
- Before & After
- Houzz Research
- View all pros
- View all services
- View all products
- View all sales
- Living Room Chairs
- Dining Room Furniture
- Coffee Tables
- Home Office Furniture
- Join as a Pro
- Interior Design Software
- Project Management
- Custom Website
- Lead Generation
- Invoicing & Billing
- Landscape Contractor Software
- General Contractor Software
- Remodeler Software
- Builder Software
- Roofer Software
- Architect Software
- Takeoff Software
- Lumber & Framing Takeoffs
- Steel Takeoffs
- Concrete Takeoffs
- Drywall Takeoffs
- Insulation Takeoffs
- Stories & Guides
- LATEST FROM HOUZZ
- HOUZZ DISCUSSIONS
- SHOP KITCHEN & DINING
- Kitchen & Dining Furniture
- Sinks & Faucets
- Kitchen Cabinets & Storage
- Knobs & Pulls
- Kitchen Knives
- KITCHEN PHOTOS
- FIND KITCHEN PROS
- Bath Accessories
- Bath Linens
- BATH PHOTOS
- FIND BATH PROS
- SHOP BEDROOM
- Beds & Headboards
- Bedroom Decor
- Closet Storage
- Bedroom Vanities
- BEDROOM PHOTOS
- Kids' Room
- FIND DESIGN PROS
- SHOP LIVING
- Fireplaces & Accessories
- LIVING PHOTOS
- SHOP OUTDOOR
- Pool & Spa
- Backyard Play
- OUTDOOR PHOTOS
- FIND LANDSCAPING PROS
- SHOP LIGHTING
- Bathroom & Vanity
- Flush Mounts
- Kitchen & Cabinet
- Outdoor Wall Lights
- Outdoor Hanging Lights
- Kids' Lighting
- Decorative Accents
- Artificial Flowers & Plants
- Decorative Objects
- Screens & Room Dividers
- Wall Shelves
- About Houzz
- Houzz Credit Cards
- Privacy & Notice
- Cookie Policy
- Your Privacy Choices
- Mobile Apps
- Copyright & Trademark
- For Professionals
- Houzz vs. Houzz Pro
- Houzz Pro vs. Ivy
- Houzz Pro Advertising Reviews
- Houzz Pro 3D Floor Planner Reviews
- Trade Program
- Buttons & Badges
- Your Orders
- Shipping & Delivery
- Return Policy
- Houzz Canada
- Review Professionals
- Suggested Professionals
- Accessibility
- Houzz Support
- COUNTRY COUNTRY
Interior Designers & House Decorators in Elektrostal'
Location (1).
- Use My Current Location
Popular Locations
- Albuquerque
- Cedar Rapids
- Grand Rapids
- Indianapolis
- Jacksonville
- Kansas City
- Little Rock
- Los Angeles
- Minneapolis
- New Orleans
- Oklahoma City
- Orange County
- Philadelphia
- Portland Maine
- Salt Lake City
- San Francisco
- San Luis Obispo
- Santa Barbara
- Washington D.C.
- Elektrostal', Moscow Oblast, Russia
Featured Reviews for Interior Designers & House Decorators in Elektrostal'
- Reach out to the pro(s) you want, then share your vision to get the ball rolling.
- Request and compare quotes, then hire the Interior Designer & Decorator that perfectly fits your project and budget limits.
An interior designer is a professional who helps you make your indoor spaces beautiful and functional. They can assist you with various projects, whether it’s complete home remodeling or simply refreshing the look of a room. Hiring an interior designer early in the process ensures proper planning and maximizes the potential of your project.
Here are some main things an interior designer does:
- Designs your space to match your style and needs.
- Makes the best use of your space for practicality and flow.
- Selects the right colors and materials for a pleasing look.
- Provides visualizations to see how your space will look.
- Manages the project and works with contractors.
- Ensures your space meets all regulations and codes.
In short, hiring an interior designer in Elektrostal' ensures your space is not only beautiful but also suits your lifestyle and functions well for your daily activities.
- Interior design
- Floor Plans
- Holiday Decorating
- Kids Bedroom Design
- Create functional and appealing spaces, collaborating with professionals.
- Manage projects from start to finish, ensuring a smooth process.
- Formal education in interior design, including color schemes, materials, and CAD.
- Handle design and decoration, offering a comprehensive approach.
- Focus on understanding your needs and lifestyle.
- Specialize in surface-level aesthetics like paint colors and furnishings.
- Enhance the overall look and feel with decorative elements.
- Can work independently or for a decorating firm.
- Typically lack formal educational requirements in interior design.
What does an interior designer do?
Questions to ask when you meet with local elektrostal' interior designers:, business services, connect with us.

Turn Your Curiosity Into Discovery
Latest facts.

How To Protect Children From Junk Food Marketing

12 Intriguing Facts About Balatro
40 facts about elektrostal.
Written by Lanette Mayes
Modified & Updated: 02 Mar 2024
Reviewed by Jessica Corbett

Elektrostal is a vibrant city located in the Moscow Oblast region of Russia. With a rich history, stunning architecture, and a thriving community, Elektrostal is a city that has much to offer. Whether you are a history buff, nature enthusiast, or simply curious about different cultures, Elektrostal is sure to captivate you.
This article will provide you with 40 fascinating facts about Elektrostal, giving you a better understanding of why this city is worth exploring. From its origins as an industrial hub to its modern-day charm, we will delve into the various aspects that make Elektrostal a unique and must-visit destination.
So, join us as we uncover the hidden treasures of Elektrostal and discover what makes this city a true gem in the heart of Russia.
Key Takeaways:
- Elektrostal, known as the “Motor City of Russia,” is a vibrant and growing city with a rich industrial history, offering diverse cultural experiences and a strong commitment to environmental sustainability.
- With its convenient location near Moscow, Elektrostal provides a picturesque landscape, vibrant nightlife, and a range of recreational activities, making it an ideal destination for residents and visitors alike.
Known as the “Motor City of Russia.”
Elektrostal, a city located in the Moscow Oblast region of Russia, earned the nickname “Motor City” due to its significant involvement in the automotive industry.
Home to the Elektrostal Metallurgical Plant.
Elektrostal is renowned for its metallurgical plant, which has been producing high-quality steel and alloys since its establishment in 1916.
Boasts a rich industrial heritage.
Elektrostal has a long history of industrial development, contributing to the growth and progress of the region.
Founded in 1916.
The city of Elektrostal was founded in 1916 as a result of the construction of the Elektrostal Metallurgical Plant.
Located approximately 50 kilometers east of Moscow.
Elektrostal is situated in close proximity to the Russian capital, making it easily accessible for both residents and visitors.
Known for its vibrant cultural scene.
Elektrostal is home to several cultural institutions, including museums, theaters, and art galleries that showcase the city’s rich artistic heritage.
A popular destination for nature lovers.
Surrounded by picturesque landscapes and forests, Elektrostal offers ample opportunities for outdoor activities such as hiking, camping, and birdwatching.
Hosts the annual Elektrostal City Day celebrations.
Every year, Elektrostal organizes festive events and activities to celebrate its founding, bringing together residents and visitors in a spirit of unity and joy.
Has a population of approximately 160,000 people.
Elektrostal is home to a diverse and vibrant community of around 160,000 residents, contributing to its dynamic atmosphere.
Boasts excellent education facilities.
The city is known for its well-established educational institutions, providing quality education to students of all ages.
A center for scientific research and innovation.
Elektrostal serves as an important hub for scientific research, particularly in the fields of metallurgy, materials science, and engineering.
Surrounded by picturesque lakes.
The city is blessed with numerous beautiful lakes, offering scenic views and recreational opportunities for locals and visitors alike.
Well-connected transportation system.
Elektrostal benefits from an efficient transportation network, including highways, railways, and public transportation options, ensuring convenient travel within and beyond the city.
Famous for its traditional Russian cuisine.
Food enthusiasts can indulge in authentic Russian dishes at numerous restaurants and cafes scattered throughout Elektrostal.
Home to notable architectural landmarks.
Elektrostal boasts impressive architecture, including the Church of the Transfiguration of the Lord and the Elektrostal Palace of Culture.
Offers a wide range of recreational facilities.
Residents and visitors can enjoy various recreational activities, such as sports complexes, swimming pools, and fitness centers, enhancing the overall quality of life.
Provides a high standard of healthcare.
Elektrostal is equipped with modern medical facilities, ensuring residents have access to quality healthcare services.
Home to the Elektrostal History Museum.
The Elektrostal History Museum showcases the city’s fascinating past through exhibitions and displays.
A hub for sports enthusiasts.
Elektrostal is passionate about sports, with numerous stadiums, arenas, and sports clubs offering opportunities for athletes and spectators.
Celebrates diverse cultural festivals.
Throughout the year, Elektrostal hosts a variety of cultural festivals, celebrating different ethnicities, traditions, and art forms.
Electric power played a significant role in its early development.
Elektrostal owes its name and initial growth to the establishment of electric power stations and the utilization of electricity in the industrial sector.
Boasts a thriving economy.
The city’s strong industrial base, coupled with its strategic location near Moscow, has contributed to Elektrostal’s prosperous economic status.
Houses the Elektrostal Drama Theater.
The Elektrostal Drama Theater is a cultural centerpiece, attracting theater enthusiasts from far and wide.
Popular destination for winter sports.
Elektrostal’s proximity to ski resorts and winter sport facilities makes it a favorite destination for skiing, snowboarding, and other winter activities.
Promotes environmental sustainability.
Elektrostal prioritizes environmental protection and sustainability, implementing initiatives to reduce pollution and preserve natural resources.
Home to renowned educational institutions.
Elektrostal is known for its prestigious schools and universities, offering a wide range of academic programs to students.
Committed to cultural preservation.
The city values its cultural heritage and takes active steps to preserve and promote traditional customs, crafts, and arts.
Hosts an annual International Film Festival.
The Elektrostal International Film Festival attracts filmmakers and cinema enthusiasts from around the world, showcasing a diverse range of films.
Encourages entrepreneurship and innovation.
Elektrostal supports aspiring entrepreneurs and fosters a culture of innovation, providing opportunities for startups and business development.
Offers a range of housing options.
Elektrostal provides diverse housing options, including apartments, houses, and residential complexes, catering to different lifestyles and budgets.
Home to notable sports teams.
Elektrostal is proud of its sports legacy, with several successful sports teams competing at regional and national levels.
Boasts a vibrant nightlife scene.
Residents and visitors can enjoy a lively nightlife in Elektrostal, with numerous bars, clubs, and entertainment venues.
Promotes cultural exchange and international relations.
Elektrostal actively engages in international partnerships, cultural exchanges, and diplomatic collaborations to foster global connections.
Surrounded by beautiful nature reserves.
Nearby nature reserves, such as the Barybino Forest and Luchinskoye Lake, offer opportunities for nature enthusiasts to explore and appreciate the region’s biodiversity.
Commemorates historical events.
The city pays tribute to significant historical events through memorials, monuments, and exhibitions, ensuring the preservation of collective memory.
Promotes sports and youth development.
Elektrostal invests in sports infrastructure and programs to encourage youth participation, health, and physical fitness.
Hosts annual cultural and artistic festivals.
Throughout the year, Elektrostal celebrates its cultural diversity through festivals dedicated to music, dance, art, and theater.
Provides a picturesque landscape for photography enthusiasts.
The city’s scenic beauty, architectural landmarks, and natural surroundings make it a paradise for photographers.
Connects to Moscow via a direct train line.
The convenient train connection between Elektrostal and Moscow makes commuting between the two cities effortless.
A city with a bright future.
Elektrostal continues to grow and develop, aiming to become a model city in terms of infrastructure, sustainability, and quality of life for its residents.
In conclusion, Elektrostal is a fascinating city with a rich history and a vibrant present. From its origins as a center of steel production to its modern-day status as a hub for education and industry, Elektrostal has plenty to offer both residents and visitors. With its beautiful parks, cultural attractions, and proximity to Moscow, there is no shortage of things to see and do in this dynamic city. Whether you’re interested in exploring its historical landmarks, enjoying outdoor activities, or immersing yourself in the local culture, Elektrostal has something for everyone. So, next time you find yourself in the Moscow region, don’t miss the opportunity to discover the hidden gems of Elektrostal.
Q: What is the population of Elektrostal?
A: As of the latest data, the population of Elektrostal is approximately XXXX.
Q: How far is Elektrostal from Moscow?
A: Elektrostal is located approximately XX kilometers away from Moscow.
Q: Are there any famous landmarks in Elektrostal?
A: Yes, Elektrostal is home to several notable landmarks, including XXXX and XXXX.
Q: What industries are prominent in Elektrostal?
A: Elektrostal is known for its steel production industry and is also a center for engineering and manufacturing.
Q: Are there any universities or educational institutions in Elektrostal?
A: Yes, Elektrostal is home to XXXX University and several other educational institutions.
Q: What are some popular outdoor activities in Elektrostal?
A: Elektrostal offers several outdoor activities, such as hiking, cycling, and picnicking in its beautiful parks.
Q: Is Elektrostal well-connected in terms of transportation?
A: Yes, Elektrostal has good transportation links, including trains and buses, making it easily accessible from nearby cities.
Q: Are there any annual events or festivals in Elektrostal?
A: Yes, Elektrostal hosts various events and festivals throughout the year, including XXXX and XXXX.
Was this page helpful?
Our commitment to delivering trustworthy and engaging content is at the heart of what we do. Each fact on our site is contributed by real users like you, bringing a wealth of diverse insights and information. To ensure the highest standards of accuracy and reliability, our dedicated editors meticulously review each submission. This process guarantees that the facts we share are not only fascinating but also credible. Trust in our commitment to quality and authenticity as you explore and learn with us.
Share this Fact:

- Air Quality
- Aircraft Acquisition & Completions Management
- Aircraft Orders & Deliveries
- Cabin Equipment
- Certification
- Completion, Refurbishment & Maintenance
- Events & Awards
- Galleys & Catering
- Human Resources
- IFEC & CMS
- Interior Design
- Sustainability
- Dec 2023 / Jan2024
- Sept / Oct 2023
- March / April 2023
- Dec 2022 / Jan 2023
- Archive Issues
- Subscribe Free!
- Supplier Spotlight
- Browse Industry Jobs
- Post a Job – It’s FREE!
- Manage Jobs (Employers)

Jet Aviation Moscow Vnukovo gets EASA approval for Falcon 900EX EASy
Jet Aviation Moscow Vnukovo has received EASA Part-145 approval for Dassault Falcon 900EX EASy aircraft, authorizing it to provide line maintenance to the aircraft.
“Our ability to support long-range aircraft in this region is vital to our customers,” said Vitaly Aleksikov, general director at Jet Aviation Moscow Vnukovo.
May 29, 2015

Izzy has been part of the Business Jet Interiors International team since its second issue, and the editor since 2011. She also edits Auditoria and Railway Interiors International. Outside of work, Izzy is rediscovering her love of art by learning how to paint with watercolors.
Related Posts
Aero-dienst expands hangar space at vienna maintenance station, smartsky adds haggan aviation as sales and installation partner, duncan aviation unveils refurbished falcon 50.
Type above and press Enter to search. Press Esc to cancel.
- Forums New posts Unanswered threads Register Top Posts Email
- What's new New posts New Posts (legacy) Latest activity New media
- Media New media New comments
- Boat Info Downloads Weekly Quiz Topic FAQ 10000boatnames.com
- Classifieds Sell Your Boat Used Gear for Sale
- Parts General Marine Parts Hunter Beneteau Catalina MacGregor Oday
- Help Terms of Use Monday Mail Subscribe Monday Mail Unsubscribe
water damaged interior wood
- Thread starter Dan Geltmacher
- Start date Feb 4, 2000
- Hunter Owner Forums
- Mid-Size Boats
Dan Geltmacher
I have some water damage wood (Teak veneer) in my galley. The veneer is almost white. The rest of the interior looks fine. How can I repair this water damaged wood and match it to the rest of the interior? Dan Ps already fixed the leak!
Restore your teak A good soak with teak oil should bring the washed wood right back to a match with the remainder of your interior. In fact give the whole interor a coat or two a couple of times a year and keep it looking like new.
john geiger
I had water stained teak Last year I bought 79 H 27 Which had been abandon at the marina. The hull was in good shape, but the teak interior was all bleached out and waterstained. I tried differant things,but what worked best was: I took a very fine Scotch Brite soaked in odorless mineral spirits to remove the wax and mildew. let this evaporate till dry. If really bad repeat. I then put 2 coats of Amazon Teak Oil on everything. It took 1 gallon for my boat-yours will probly need 1 1/2 gallons. I am very happy the way it came out.
Interior Finish Dan, Hunter uses a product called Daly's Seafin and Daly's Profin. You can order directly from Daly's at 1-800-735-7019. Good luck. Alan
Deck wash! The suppliers of the teak marine equipment located in BC informed me that it was fine to use deck wash to removed that grey/bleached appearance and some stains from teak. I will however, try some on an out of the way area first.
Starbrite products avail at West Marine I would suggest staying away from Teak cleaners that are two part acid/base type. Acid is a bad chemical to be messing with below decks. However, you can buy at west marine, or through their mail order a couple of products that will get your interior looking bristol again. 1) Starbrite (I believe) teak cleaner.a 2) Starbrite Teak brightener to get the gray and washed out appearance to go and the natural beauty of the teak to resurface. 3) Good soaking of teak oil (starbrite is good). Slop it on real heavy...let it sit for a good 15-20 minutes and then buff it real good. You will not have spent that much time (as this cleaning/brightening method will drastically shorten sanding times) and you will love the outcome. Note: if it is currently varnished...sand until varnish is gone but dont try to sand to clean pretty wood. That much graying will be very deep. Let the cleaning and brightening chemicals do the job instead of leaving your teak in the form of sawdust on your sole. Happy sailing doug
- This site uses cookies to help personalise content, tailor your experience and to keep you logged in if you register. By continuing to use this site, you are consenting to our use of cookies. Accept Learn more…
IMAGES
VIDEO
COMMENTS
Here are the basic steps that I follow to refinish interior teak: 1. If the wood has never been refinished or if the existing finish is in poor condition, remove it all from the sailboat so that you can work on it easier and apply the finish to all the surfaces. BEFORE - dull and dirty. 2.
With resistance to weathering as its primary virtue, however, teak makes less sense for use as trim below. Nevertheless, the simplicity of finishing teak, the economy of a single variety of wood in inventory, and the ready acceptance by boat buyers, are all attractive reasons why boatbuilders use the wood for interior decor.. Typically, only the most expensive boats have interior teak that is ...
Smooth sailing with sanding. Most boaters with a teak deck consider it a standard practice to sand the surface once a year before the start of a season. Sandpapers come in various grits—for a teak deck, between 80 and 120-grit is the ideal level. The higher the number of grit, the more slippery the deck will be, so a medium level is suitable ...
Does your boat have a teak interior? Follow these reader-suggested steps to keep it gleaming. By Jan Irons Updated: November 5, 2015 The teak inside my 1985 Passport 37 is staved teak—the real thing. It was originally finished in satin varnish, and I cannot even think about how much it would cost (or how much work and time it would take) to ...
Barefoot Gal's interior teak refinishing project A funny thing happens when you tell sailing friends that you're writing a do-it-yourself (DIY) series—they start sharing stories of projects they have undertaken on their boats. When my friend Carolyn Shearlock (the founding owner of The Boat Galley) started telling me about refinishing the teak on her Gemini catamaran Barefoot Gal, my ears ...
363 days a year I love the teak interior of our Passport 37 sailboat. Twice a year, I curse it. That's the two days I have to pay attention to the teak or it will turn dark, spotted and ugly. 204 louvers, hundreds of solid teak staves, Murphy's Oil Soap and some serious lemon oil and the spring session has concluded!
1. Wet the teak down; 2. Apply part one (the caustic), spreading and lightly scrubbing with a bristle brush; 3. When the surface is a uniform wet, muddy brown, apply the second part (the acid), spreading with a clean bristle brush; 4. Apply and spread enough of the acid to turn the teak a uniform tan; 5.
30. Down East Yachts Downeaster 38 040 Milford, CT. Jan 14, 2014. #1. Argyle has a teak post that sort of supports a portion of cabin trunk overhead and also supports the aft end of the saloon table. The post has the typical decorative shapes carved in to it, as if patterned on a lathe. From it's location, it's used as a handhold as you pass ...
The Boat Galley can be overwhelming with over 1,000 articles. We have four FREE mini-courses to guide you to just the info you need, whether you're discovering what living on a boat would be like, preparing to cruise, overwhelmed with the first-year learning curve, or needing help with cooking aboard.
For interior teak, a cup of laundry detergent and a cup of chlorine bleach mixed into a gallon of water may be sufficient to clean away grime and mildew. For exterior teak you need the stronger bleaching action of oxalic acid. Scrubbing the treated wood with a Scotchbrite pad will help the cleaning process. If the exterior teak has been long ...
Right up front, what most experts suggest is disarmingly simple—clean the interior wood you want to upgrade with cotton rags and a spray bottle (the 32-ounce size works well) filled with water and a couple of tablespoons of Murphy's Oil Soap. "Spray it on and then quickly wipe the surface off—you don't want water spots," says John ...
Thin the first coat 50% by volume—1/2 ounce of thinner to every ounce of varnish. Thin the second coat 25 percent, the third 10 percent. Wipe off surface oil with a rag dipped in thinners. Just before varnishing, wipe teak down with an acetone-saturated rag to remove surface oil. Use a foam brush.
But there are still many ways to update a 1980s boat interior because upholstery and other textiles can go a long way. When I shared the first tour of our Ticon 30 sailboat, you got a glimpse of the all-beige interior: beige headliner, beige fiberglass, accented with… beige upholstery ! I really find myself warming up to beige, cream, and off ...
An oil finish on interior Teak will eventually turn dark as the oil/wood oxidizes over the years. My choice for the 'best' oil finish for interiors is a 'resinated' oil finish: 25% oil-based varnish, 75% oil. Resinated oil finishes are easily stripped, as easy as stripping any other oil finish, with TSP, etc.
In response to my inquery as to how to take care of my interior teak, they told me to wipe (I don't have to brush it on) on some SeaFin, wait fifteen minutes and then wipe it off. You don't have to sand it, however, if you want an extra smooth service, you can sand with a wet/dry 440 grit paper--while it is on the teak wet. Then wipe.
Get directions to Yuzhny prospekt, 6к1 and view details like the building's postal code, description, photos, and reviews on each business in the building
Interior Designer VS Interior Decorator: Interior designers: Create functional and appealing spaces, collaborating with professionals. Manage projects from start to finish, ensuring a smooth process. Formal education in interior design, including color schemes, materials, and CAD. Handle design and decoration, offering a comprehensive approach.
Known as the "Motor City of Russia." Elektrostal, a city located in the Moscow Oblast region of Russia, earned the nickname "Motor City" due to its significant involvement in the automotive industry.. Home to the Elektrostal Metallurgical Plant. Elektrostal is renowned for its metallurgical plant, which has been producing high-quality steel and alloys since its establishment in 1916.
Feb 4, 2005. 524. Catalina C-30 Mattituck, NY. Mar 19, 2007. #2. I would not use oil for interior. Bob -u000bu000bI teak-oiled my interior Catalina 30 and was not pleased with the results. Teak oil holds dust and does not seal the wood off from any moisture which leads to mold, mildew and odors.u000bu000bI would instead research some varnish or ...
Read The Latest Issue. 31st March 2023. In This Issue - March/April 2023
Feb 4, 2000. #2. Restore your teak. A good soak with teak oil should bring the washed wood right back to a match with the remainder of your interior. In fact give the whole interor a coat or two a couple of times a year and keep it looking like new. J.