Practical Boat Owner
- Digital edition


Tiller locks tested
- Ben Meakins
- September 25, 2015
Being able to leave the helm for short periods of time is made much easier with something to hold the tiller for you. We compared three tiller locks for effectiveness, ease of set-up and user-friendliness

Short- and single-handed sailing is made much easier with some way of securing the helm so you can do other things. Autopilots are perhaps the best solution, but they are expensive and can draw too much power for some small boats. Wheel-steered boats generally have a friction lock on the wheel boss to secure the wheel, but tiller-steered boats generally have had to look to lashing the tiller to make an escape from the helm.
That’s where tiller-locking devices come in handy. They vary in design, price and function, but at their most basic level they will hold the tiller in one place, allowing you to quickly nip off and tie on a fender, adjust a halyard or, if you’ve set the boat up properly, make a cup of tea.
How we tested them We mounted all three devices on the spare tiller for an Impala 28 and headed out into a brisk 15- to 20-knot south-westerly breeze in the Solent. We engaged each tiller- locking device in turn, looking at how easy it was to set up, engage and disengage each one, and what each one felt like to use. We set the boat up so that the sails were balanced nicely before allowing each one to steer for a while.
Davis Tiller Tamer

The Davis Tiller Tamer is screwed to the top of the tiller and comprises an injection-moulded base with a friction screw mounted on a spring, which adjusts the friction in the line. A line is installed, running from points at 45° to the tiller: it runs over a sheave and through two fairleads on the Tiller Tamer. The manual recommends that the bitter ends of the line are secured in two cam or clam cleats so that it can be easily released in an emergency. Unlike the other products tested, you can adjust the resistance, which means you can potentially leave the tiller for a few minutes and easily fine-tune it if necessary.
A disadvantage of the design and being able to adjust the tension is that it can take a short while to unscrew the knurled knob and regain control of the tiller – not more than 10 seconds, but that could be enough to make a difference in an emergency. This accounts for the stipulation that quick-release cleats are used for the bitter ends. The design was also prone to catching lines and clothes, but the Tiller Tamer can also be mounted on the underside of the tiller, which would help solve this problem.
Midshipman II Tiller Lock

Seasure make the Tiller Lock, which comprises an aluminium body with a sheave and a clamping lever. A line is supplied with a rubber snubber and a small cleat, which allows the line to stay tight at all times. The instructions say that you should mount the Tiller Lock on the underside of the tiller. This we did, and found that it was effective to use, although unless the line was as tight as possible, it was liable to fall out of the sheave when the locking lever was disengaged. This didn’t happen when mounted on top of the tiller. In use, the lever was simple and easy to operate, and held the tiller firmly.
TillerClutch

We found this product online. Made in the USA by WaveFront Marine and now available from Force 4 ., it’s a similar idea to the Tiller Lock, but in a much smaller package. Made from anodised aluminium with stainless fastenings, it’s designed to be screwed to the handle end of the tiller so that the clutch lever can be operated with one hand while steering normally. A 5mm line is supplied, and, like the Tiller Tamer, is designed to be cleated at each end for quick release.
In use, we found the TillerClutch to be the easiest and quickest to flick on and off thanks to its mounting location and the design of the lever. It gripped the line well and the captive line was in no danger of falling out.
Length of shock cord
£1.75 per metre

We thought it would be worth trying a DIY alternative, so we bought a length of 8mm shock cord which we looped around the boat’s mooring cleats in a double loop. When required this could be looped twice around the tiller, holding it fast. With effort, you could still adjust the tiller a little, but it held it without difficulty. The slight ‘give’ in the shock cord actually helped the boat stay on course, especially in a quartering sea.
£28.60 ($48.95) +P&P

PBO Verdict
So, is it worth buying one of these kits? They’re no substitute for an autopilot, but on a well set up boat they will let you leave the helm for a short while, whether at sea or perhaps motoring slowly up a river so you can sort out the fenders. Our favourite of the bunch was the TillerClutch, the simple yet compact design of which allowed you to flick the lock on and off as required in no time at all. The Midshipman II Tiller Lock was a similar concept and held the line effectively, but the line was liable to fall out of the sheave when disengaged if it wasn’t tight enough.
The Davis Tiller Tamer held the line captive and you could adjust the friction to suit your needs, but it was slow to release and engage and had the potential for snags. Finally, the shock cord was cheap and simple – it didn’t have the instant engagement of the TillerClutch and Midshipman II Tiller Lock and didn’t hold the line as securely, but it was remarkably effective nonetheless.

The $tingy Sailor
Diy trailerable sailboat restoration and improvement without throwing your budget overboard.
Make This Simple, Low-Cost Tiller Lock
If you don’t have a locking mechanism on your tiller yet, don’t you sometimes wish you did? Then you could lock the tiller in place while you attend to other things for a few minutes or under the right conditions, relax and let the boat sail itself. A tiller lock is the next best thing to having a crew member or an autopilot take the helm for you. There are several tiller lock designs on the market and all of them do a reasonable job. But like everything else marine-related, they can be expensive for what they are.
Before I continue, a bit of legal housekeeping. This post contains affiliate links. That means I receive a small commission if you make a purchase using those links. Those commissions help to pay the costs associated with running this site so that it stays free for everyone to enjoy. For a complete explanation of why I’m telling you this and how you can support this blog without paying more, please read my full disclosure .
If you’ve procrastinated adding a lock to your tiller, this project is for you. I’ll show you how you can make a simple but effective tiller lock for just a few bucks. The design is by Tom Luque, a personal friend and the mastermind at Mastgates.com . Tom invented and tested the design as a possible new product on his website. Instead, he decided to release it into the wild and he asked me to present it to you here.
Note: Except for the optional quick-release lever mentioned at the end of this article, neither Tom or I will receive any compensation if you purchase parts to make this tiller lock.
An Adjustable Rope Clamp on Your Tiller
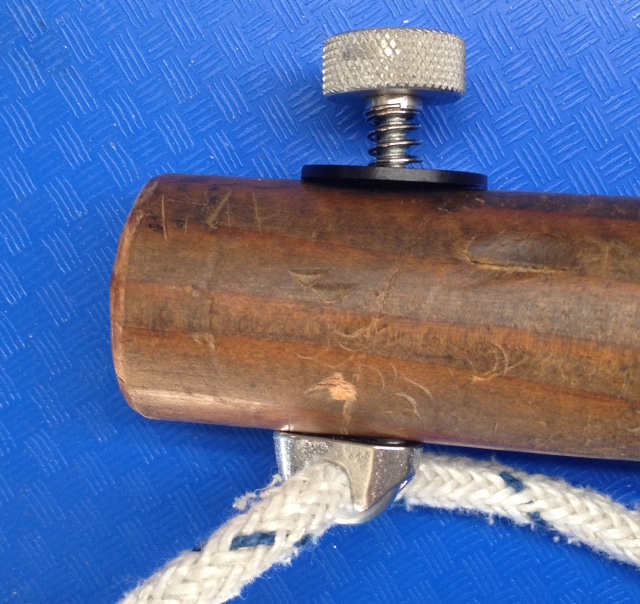
All tiller locks are rope clamps of one variation or another. For comparison, one of the more popular commercial tiller locks is the Davis Tiller Tamer . Tom’s design avoids all unnecessary parts, complexity, and cost with an adjustable J-bolt mounted right through the tiller itself. In its simplest form, it’s three parts: a piece of rope and a J-bolt with a knob to clamp the rope between the J-bolt and the tiller.
Here are the parts that you’ll need and a few optional parts that you may want to consider:
- 1/4″ rope long enough to tie between both sides of the transom and to lead through the J-bolt on the tiller. For very small sailboats, this could be accessory cord or paracord.
- 3/16″ diameter stainless steel J-bolt 2-1/2″ long with 10-24 threads. A shorter J-bolt may be used if it is long enough to accept a knob on top of your tiller. An online source for J-bolts is Unicorn Stainless . You can substitute a zinc plated bolt if you don’t want to use stainless steel.
- Knurled knob with 10-24 threads tapped through. You might have one of these in your spare parts from a sail track stop. If not, try your favorite hardware store.
- #10 nylon or stainless steel washer to reduce friction when you tighten the knob and to reduce wear on your tiller
- 3/16″ compression spring to keep the J-bolt pulled against the rope so that the rope cannot fall out (optional)
- Saddle from a wire rope clip the same size to fit the J-bolt and increase the grip on the J-bolt against the rope (optional). Compress the J-bolt slightly with a vise to fit the saddle, if necessary.
The only tool you will need is an electric hand drill with a 1/4″ bit.
Installation Instructions
To install the tiller lock:
- With your tiller mounted on your sailboat and aligned with the keel, find a location on the tiller where you want to install the J-bolt. It should be easy to reach but out of harm’s way. A good place is behind where you normally grip the tiller.
- Tie the 1/4″ rope to both sides of the transom—around the pushpit stanchions is a good place. You can also tie it to the aft mooring cleats. Leave enough slack in the rope so that the middle can pass through the J-bolt. The angle formed by the rope should not be less than about 90°. See How to Install a Tiller Lock for a picture of the general arrangement.
- When you are satisfied with the location of the J-bolt and the rope ends, remove the tiller and drill a 1/4″ hole vertically through the tiller handle.
- Measure the distance across the opening of the J-bolt and drill a second hole on the bottom side of the tiller behind the first but not all the way through. Make this hole only deep enough for the short side of the J-bolt to recess into the hole and clamp the rope tightly without hitting the bottom of the hole. If you will use the optional wire rope clip saddle, the hole does not need to be as deep as it does without it. The holes should look like the picture below.
- Assemble the tiller lock as shown in the first picture.
- Make sure the J-bolt moves freely in the holes when the knob is loose and it clamps the rope tightly when you tighten the knob.

To use your new tiller lock on the water, just tighten the knob when you want to lock the tiller in place. Loosen the knob to take manual control again. If the threaded end of the J-bolt is long enough, you can loosen the knob to unhook the rope and tie it out-of-the-way when you don’t need it. If it’s not long enough but the hook end of the J-bolt has plenty to spare, you can cut a little off the hook to make it easier to remove the rope. Perfect fit and function depend on your tiller thickness and the parts you buy.
Final Thoughts
If you want to make the tiller lock even more convenient, contact Tom at Mastgates.com about a quick-release cam handle to replace the knob. Then you can apply and release the lock with a flick of the lever. If you’re an extreme DIYer, try adapting a bicycle seat clamp lever to fit the J-bolt.

If you make this tiller lock, be sure to drop by Mastgates.com and thank Tom for the great idea and his generosity. If you’re more interested in an electronic autopilot, see How to Install a Tiller Autopilot .
Would you like to be notified when I publish more posts like this? Enter your email address below to follow this blog and receive notifications of new posts by email. You will also receive occasional newsletters with exclusive info and deals only for followers and the password to the Downloads page. It’s free and you can unsubscribe at any time but almost nobody does!
Subscribe to Blog via Email
Enter your email address to subscribe to this blog and receive notifications of new posts by email.
Email Address:
Share this:
6 thoughts on “ make this simple, low-cost tiller lock ”.
Thanks Stingy! Jim
I’ve thought about this and I like the cam clamp idea. I’m not sure this is compatible with my tiller extension though.
Another simple winner – thank you, Mr $tingy!
I’ve only had this one installed a couple of weeks, but I love the simple, convenient, and effective design. $60 mol. http://www.wavefrontmarine.com/index.html
Love this Idea, simple and economical, and all parts readily available, Thanks
This is Tom Luque, the designer of this simple Tiller Lock. Another variation use of this system is to replace the rope with a firm shock cord. This allowed me to make immediate course changes by grabbing the tiller when some obstacle was in front of the boat and then releasing tiller to let the shock cord reset the rudder position. Thank you Stingy Sailor for sharing tips for making Sailing more enjoyable.
Leave a comment Cancel reply
This site uses Akismet to reduce spam. Learn how your comment data is processed .

- Already have a WordPress.com account? Log in now.
- Subscribe Subscribed
- Copy shortlink
- Report this content
- View post in Reader
- Manage subscriptions
- Collapse this bar
Please verify you are a human
Access to this page has been denied because we believe you are using automation tools to browse the website.
This may happen as a result of the following:
- Javascript is disabled or blocked by an extension (ad blockers for example)
- Your browser does not support cookies
Please make sure that Javascript and cookies are enabled on your browser and that you are not blocking them from loading.
Reference ID: b6a00b41-f0bb-11ee-9845-e4395155cdda
Powered by PerimeterX , Inc.
- New Sailboats
- Sailboats 21-30ft
- Sailboats 31-35ft
- Sailboats 36-40ft
- Sailboats Over 40ft
- Sailboats Under 21feet
- used_sailboats
- Apps and Computer Programs
- Communications
- Fishfinders
- Handheld Electronics
- Plotters MFDS Rradar
- Wind, Speed & Depth Instruments
- Anchoring Mooring
- Running Rigging
- Sails Canvas
- Standing Rigging
- Diesel Engines
- Off Grid Energy
- Cleaning Waxing
- DIY Projects
- Repair, Tools & Materials
- Spare Parts
- Tools & Gadgets
- Cabin Comfort
- Ventilation
- Footwear Apparel
- Foul Weather Gear
- Mailport & PS Advisor
- Inside Practical Sailor Blog
- Activate My Web Access
- Reset Password
- Customer Service

- Free Newsletter
Ericson 34-2 Finds Sweet Spot

How to Sell Your Boat

Cal 2-46: A Venerable Lapworth Design Brought Up to Date

Rhumb Lines: Show Highlights from Annapolis

Solar Panels: Go Rigid If You have the Space…

Leaping Into Lithium

The Importance of Sea State in Weather Planning

Do-it-yourself Electrical System Survey and Inspection

When Should We Retire Dyneema Stays and Running Rigging?

Rethinking MOB Prevention

Top-notch Wind Indicators

The Everlasting Multihull Trampoline

What Your Boat and the Baltimore Super Container Ship May Have…

Check Your Shorepower System for Hidden Dangers

DIY survey of boat solar and wind turbine systems

What’s Involved in Setting Up a Lithium Battery System?

The Scraper-only Approach to Bottom Paint Removal

Can You Recoat Dyneema?

How to Handle the Head

The Day Sailor’s First-Aid Kit

Choosing and Securing Seat Cushions

Cockpit Drains on Race Boats

Re-sealing the Seams on Waterproof Fabrics

Safer Sailing: Add Leg Loops to Your Harness

Waxing and Polishing Your Boat

Reducing Engine Room Noise

Tricks and Tips to Forming Do-it-yourself Rigging Terminals

Marine Toilet Maintenance Tips

Learning to Live with Plastic Boat Bits
- Personal Gear & Apparel
The Many Faces of Tiller Extensions
In search of the ideal tiller extension, our tech editor puts the most popular models to the test..

Wheel steering is all the rage, even on cruising boats under 30 feet. It looks “shippy,” holds a steady course, and makes fighting weather helm less tiring. Yet just a few decades ago a wheel would have been considered inefficient on smaller boats. It adds complexity, crowds the cockpit, and isolates the helmsman from all-important helm feel, hampering efficient windward work. Tiller steering dominates racing boats up to considerable size.
A tiller is not without downsides. In anything but a mild conditions, the helmsperson usually must sit, since there’s no comfortable handhold for support while standing. Visibility can be poor, especially if there is a high cabin or dodger, and you’re limited in your ability to move around the cockpit.
Enter the tiller extension. It frees the helmsman to move about the cockpit to tend a winch or sit up on the combing for a better view. They can move their weight to windward, if that will help, or adjust their seating position to ease back pain. On lazy days they can find a spot in the shade, and what’s wrong with that?
Picking the right tiller extension is as personal as picking shoes. It is your point of contact with the rudder, and if it’s not comfortable and responsive in both light and heavy winds, sailing performance and enjoyment will suffer. Racers are known to bring their own extension, in case they dislike the one that is fitted.
Some sailors will immediately love the extension, while others might need a trial period. A few just don’t hold up, and some were never comfortable. The most glaring failures, however, always been related to having the wrong type of extender or the wrong length—not the particular brand or model. For specific product reviews, see “Tiller Extensions: Forespar’s Cobra and Spinlock’s E-Series,” September 2000.
What We Tested
During this investigation and prior PS investigations we’ve used many styles from Forespar, Harken, Ronstan, Spinlock, and a few specialty manufacturers. Styles range for the lightest dingy wands to stout D-handled keelboat extensions, and lengths from 2 feet to 8 feet.
How We Tested.
We sailed in all sorts of weather, from sultry summer days when the extension helped us move into the shade, to survival conditions when keeping the boat upright was the main challenge. We evaluated comfort, ease of use, and durability.
Choosing the Right Style
The upsides of using an extension are obvious. Increased mobility, increased comfort, a better view, and weight to windward. But there are downsides. Picking the right stick is critical to minimizing these.
There are also downsides. If the tiller is hinged, it can lift instead of turn when you tug on the extension from your perch high on the coaming. If sitting forward you may only be able to turn a small amount before the extension-to-tiller angle becomes zero and you can’t pull the rudder any farther, perhaps a very short distance if there is strong weather helm. While pulling the tiller toward you, an extension can jam against the coaming or in the stern pulpit rails, causing loss of control.
Specific to multihulls, an extension that is long enough to reach the side deck is a compromise. While it’s nice to have extra weight to windward, you’re a long way from the sail trim controls. With a full crew, staying near the sheets is less important. Shorthanded, however, the ability to quickly ease a sheet or make small tweaks may be more important than getting your weight outboard.

Using an extension adds one more element to tacking, either a nuisance or a benefit, depending on how it is handled. Like most things sailing, there is no single best way, only trends within certain geometries. For dinghies, there are many excellent boat-specific videos online. For the rest of us, there are these general rules:
If the tiller and helmsman are in front of the traveler, start the tack holding the extension in the same hand as before the tack in a dagger grip. Facing forward, push the tiller across. As soon as the rudder is hard over, pass the extension across forward, being careful not to mow down your crew. Alternatively, you can wait until near the end of the tack, but soon after the start seems less hectic.
If the tiller and helmsman are behind the traveler, proceed as above but using a golf grip and passing the extension aft. The extension may also be passed in a more vertical position, since it may be behind the boom.
If the tiller is behind the traveler and the helmsman is in front of the traveler (common on smaller multihulls), hold the extension in the aft hand with a golf grip, face aft, passing the extension behind the mainsheet just as the tack begins, preferably before the rudder is hard over since this results in a shorter arm reach.
If the extension is long it is very helpful to hold it vertically, close behind the boom (see photo); this reduces the weight and makes for an easy pass. As you move across, switch hands and sit down on the new side. Somewhere in that process you pass the mainsheet from hand-to-hand.
Because you are reaching around the mainsheet tackle, this won’t work for jibing unless the traveler is centered and fixed. To jibe, either center the traveler, park the extension in a holder, or pass the extension before the jibe begins. You don’t want to be reaching around the mainsheet during the jibe. The best practice is generally to park the extension and use the tiller directly.
If the extension is very long (as with some trimarans) twin extensions can be used. The unused extension is typically kept in position along the rail by light bungee cords. It must be long enough not to jam on something when pulled inboard and then back out, but not so long as to drag in the water.
If it seems like there’s too much going on, park the extension during tacks and jibes.

A Place to Park
There will be times when you want to put the extension down and just steer with the tiller.
Do not simply drop the extension. Except for the lightest dinghy sticks with polymer hinges, which stand straight up when released, the extension will jam against something, locking the helm at the worst moment. Dropped overboard it will drag in the water and be difficult to recover.
Our Stiletto 27 had a cradle on the tiller cross arm where it could be rested when not in use (see photo this page). Many sailors add a boat hook clip to the top of the tiller, about 1-foot aft of the pivot, and clip it there. On our Corsair F-24, we added horns to the stern rail, providing a safe resting place for even our 8-foot extension.
There are also times when a tiller pilot or tiller lock is the better answer. A tiller extension does not allow you to move everywhere or use both hands. A tiller extension lock box, in combination with an adjustable extension, is sometimes heralded as a tiller lock and auto-pilot substitute.
In our experience, these are useful for preventing the rudder from flopping around at anchor but are not for holding course; they are just too fiddly to adjust. See “ Tiller Taming with Two Fingers ,” Practical Sailor , December 2014. As for tiller pilots, I’ve had Raymarine ST2000s on two boats and liked them. Renowned West Coast sailor Skip Allan reported on these in the June 2009 issue of Practical Sailor .
Dagger vs. Golf Grip
You can grasp the extension either as a dagger (palm under the extension) or as a golf club (fingers under the extension). Both approaches have adherents and often the choice depends on the boat. Each require learning certain habits.
- Dagger grip. This grip is helpful if you sit well aft, for small boats, and if the coaming is high. The cross-chest motion is extremely responsive and the butt of the extension won’t jam against the coaming. The neutral wrist position is comfortable.
- Golf grip. This is grip good for beach cats because it is more comfortable with long extensions. It works well on boats without coamings or seat backs, where it can rest on the seat. It is handy when moving farther forward, since it keeps the direction of pull at a greater angle to the tiller. Your wrist is constantly flexed, which can be irritating if you have wrist or hand problems.
Sometimes making your own extension is the best solution to steering challenges on tiller-steered boats.
The steering arm can be solid wood, or tubing—usually aluminum or carbon fiber. The hinges are available from many sources. Your main decision is whether you want the extension to be easily removable.
If you just want an over-the-counter version, then refer to the Value Guide on page 18 for our ratings. If you are not sure what you want, the normal response is, “I’ll get an adjustable extension.”
However, most of the extensions you see on race boats or larger boats are fixed length. It is no mystery why. They are lighter than adjustable extensions, smooth to handle, harder to break, and won’t slip under high load.
You can choke up when you need a shorter length. Even if you decide that an adjustable extension might be the best answer to satisfy the whole crew—you still need to determine the right length. And that is when a mock up tiller handle comes in handy.
MAKING A MOCKUP TILLER EXTENDER
This mock-up is not intended for extended sailing use. It is only for a light wind trial, to help determine what length and style will work best, and perhaps to decide if adjustable or fixed length will suit you best.

- Start with a 15-inch length of 1/2-inch webbing and form a loop that fits snugly over your tiller. To form the loop a simple overhand, or figure-eight knot works well. You want everything snug, but you also want to allow enough space between the pipe and the tiller to create a free-moving swivel (see photo 3).
- Slot the ½-inch PVC pipe with a hand saw about ¾ inch deep on both sides.
- Slide the webbing tails through the slots (see photos 1 and 2), lay them down the sides of the pipe, and use a hose clamp to squeeze the slots closed on the webbing. A second clamp backs it up. Cover the hose clamps with athletic tape to prevent scratching.
- Slide the webbing loop onto the tiller and tape it in place with 1½-inch athletic tape (see photo 3). The webbing will stretch for a snug fit.
- Cut the extension to the proposed length, leaving it a little long to start.
- If you cut off too much, it can be added back using either glued couplings (fixed) or threaded adapters (to simulate an adjustable extension).
A mock-up is just a fitting aid, not a DIY option. It will be floppy and heavy, to the point of convincing you to do without an extension, but stick with it. Try a number of seating positions, postures, and grip styles (dagger vs. golf). The coaming offers good visibility ahead, but will need padding if you want to sit there for long. Is your back in a weird twist? How’s the wrist holding up? Try multiple position grips and seating positions, since the best choice will change with the weather. Be fussy and get it right.

Try a few tacks and jibes to learn how it swings when you pass the extension. You may find that when it blows you like to sit down in the cockpit, fist on the tiller. Our F-24 trimaran requires two extensions to cover the enormous range of requirements— a 4–foot extension for cockpit and coaming use, and a 10-foot length when sitting on the ama (see photos above). Fortunately, our stern rail rest supports them both “Tacking and Self-steering with a Tiller Extension”).
Is the tiller forward or aft of the mainsheet? If aft, very long extensions can be passed behind the mainsheet. If forward of the mainsheet the length is constrained by what you can pass between the end of the tiller and the mast or cabin, and how many crewmate heads you are willing to smack. That’s an exaggeration, of course, but it is a factor.

Duckworks , www.duckworks.com ■ Racelite Tiller Extension (part# RL494) www.duckworksbbs.com/product-p/rl-494.htm , ■ Ronstan Universal Tiller Extension Joint (part# RF3133) www.duckworksbbs.com/product-p/rf3133.htm
Murrays sports , www.murrays.com ■ Hobie Tiller Yoke (SKU# 01-0062) www.murrays.com/product/01-0062
Ronstan , www.ronstan.com ■ Ronstan Tiller extension hardware (multiple parts) www.ronstan.com/marine/range.asp?RnID=075
Forespar , www.forespar.com ■ Spinlock TFP Quick Release (part# 104004) www.forespar.com/products/tiller-extension-twist-lock.shtml .
Spinlock , www.spinlock.co.uk , ■ Spinlock Spinflex Joint (SPEJB-KIT) www.adventurehardware.com.au/tiller-extensions/tiller- extension-spares/spinlock-spinflex-joint-for-ejb-600-and-900- tiller-extensions/
Carbon Fiber Tube Shop , (tubes of various sizes), www.carbonfibertubeshop.com
Handle design
- Straight pole. A golf-style grip works well with a simple stick extension. It’s easy to choke up. You can also use a dagger grip.
- Ball-end. The ball is easy to grip and improves ergonomics of the dagger grip by providing a pivot point. Proper length is critical to comfort and efficiency.
- D-handle. Because the extension rotates, you can use the same grip and motion as you would holding a tiller; these are found primarily on larger boats and when the cockpit is too wide to grip the tiller directly. These are only for small boats that are hard to steer or for boats over 27 feet.
Some folks keep several extensions onboard and switch to a golf or dagger grip in lighter winds. Before deciding which style is best, determine whether your boat has an easily balanced helm or whether it has a heavy helm that requires more force to steer.
- Grip Size. We like skinny tubes for dagger grips and fat carbon poles for long extensions that will be held with a golf grip at multiple points (common on multihulls). Athletic tape is good for renewing a slippery grip, but it will need to be re-wrapped every so often.
Attachment hardware
To attach the extension to the tiller, we like the polymer ball-joint type for dinghies and sport boats up to about 24 feet. Both Ronstan and Forespar offer this type, and both provide an excellent feel.
However, expect to replace the joint every few years, depending on sun exposure and use. These polymer joints are not the best choice if the extension will be left in place. They also are not a good choice for larger boats.
The Spinlock Diablo is a stronger version for larger boats. The tiller is not as comfortable to hold directly when the polymer couplings are removed, since the receptacle that remains on the tiller is sharp and lumpy.
When released, the Diablo has a joint that allows it to stand vertically, so there’s no need to tend the extension at all times. However, after about a year in the weather, the extension will no longer stand up straight, nor will it clip down as easily. We’d reserve these for boats that always use an extension.
Metal hinges have the clear edge in strength and durability in the sun. You can leave these installed on the tiller. If you do, you can extend the life of the grip by covering it with a Sunbrella sleeve.
An inexpensive hinge, such as the Racelite swivel , can be used as the basis of a very functional DIY extension. We’ve used this and variations for many years.
We like the flush-mount Forespar TFP Quick Release for boats that don’t always use a the tiller extension. When you remove it, the tiller is essentially free of any obtrusive hardware and is still comfortable in the hand.
A carbon or fixed-length stick is preferred if the extension might be stepped on. Adjustable aluminum extensions jam at the slightest kink or dent. Most important, be certain the adjustment won’t slip during a high-force steering adjustment.
We liked all the straight-tube extensions we tested, but have a practical preference for metal hinges for cruising or racing boats and for polymer hinges for dinghies. We like the Ronstan TFP on our F-24 and Murray Sports’ Hobie hinge on beach cats. The Spinlock EA is a good choice for on heavier boats, and the Harken Battlesticks are a great match for smaller boats.
The polymer joint on the Spinlock is pre-molded to rest at a 30-degree angle. This means that although it won’t stand completely vertically, it will lie down more easily in the clips.

For most sailors, one tiller extension is enough, but for some racers, the best extension can vary by arm length.
- The Spinlock EA D-grip is a favorite among racers. The swiveling grip allows the hand to rotate for best comfort. The the grip and action are similar to holding the tiller directly.
- A folding hook fits into a slot in the Spinlock EA D-grip tiller extension. This can help keep the rudder locked at anchor, or keep the helm steady when the helm is balanced and the boat will hold a course on its own.
- Athletic tape (renewed frequently) is an inexpensive way to ensure a positive grip. Racquet tape also works.
- To steer comfortably with a dagger grip, you might have to move to the outer rail.
- The Ronstan Battlestick with its flexible rubber hinge and universal-type joint is a great match for smaller boats. In this photo, it is “parked” on a clip on a carbon-fiber tiller.
- The Spinlock Diablo Universal joint allows a positive connection with the tiller, and easily swivels through 360 degrees on multiple planes. The spring-loaded pins adjustments are more secure that twist-lock.
All the D-lock designs are pin-lock. Because the handle rotates, a twistlock is impractical. On the good side, pin-locks are more secure under high load.
The pin lock adjustment on the Forespar Ocean Racer is activated by squeezing two handles together. It’s available with a quick release or Forespar’s “StaFast” attachment.
The adjustment on the Spinlock EA is triggered by a button, requiring a second hand to release but resulting in a lighter, cleaner design than the Forespar pinch system; both had fans among our testers.
Tiller Extensions
Tiller extensions are a personal choice. It has to feel right in your hand, provide good feedback, and deliver powerful steering adjustments when needed. It must be the correct length and be easily passed from one side to the other when tacking. It must be capable of delivering adequate force without being too heavy, offer great sensitivity in light wind, and withstand getting sat on without kinking. It’s a tall order to fill. No wonder we’re still looking for that ideal stick that provides perfect control and improved comfort.
Technical Editor Drew Frye is the author of “Rigging Modern Anchors.” He blogs at www.blogspot/sail-delmarva.com
RELATED ARTICLES MORE FROM AUTHOR
How is it that the recent “WayPoints” email has this title on its front page: “The Many Faces of Tiller Extensions” followed by the paragraph below and further same-context paragraphs? “Chips and scrapes in a carefully painted mast start out as a cosmetic issue. But as moisture intrudes and corrosion takes over the paint blisters and hard metal becomes powdery aluminum oxide. Left unattended, especially in damp, salty areas, such as in the bilge or underneath mast hardware, this corrosion process can destroy metal and impair the integrity of the spar.” Once again there is some disconnect in proofing an article.
LEAVE A REPLY Cancel reply
Log in to leave a comment
Latest Videos

Safety At Sea For You & Your Family – The Joe...

What’s The Best Vinyl Window Cleaner for Your Boat?

40-Footer Boat Tours – With Some Big Surprises! | Boat Tour

Electrical Do’s and Don’ts
- Privacy Policy
- Do Not Sell My Personal Information
- Online Account Activation
- Privacy Manager
Log in or Sign up
You are using an out of date browser. It may not display this or other websites correctly. You should upgrade or use an alternative browser .
How do I made a tiller comb or tiller lock for a smaller sailboat
Discussion in ' Sailboats ' started by Zammie , Mar 5, 2015 .
Zammie New Member
Hello all. I have an older Snipe sailboat and REALLY need to be able to temporarily lock down that tiller (for sail adjustments, grab a new beer, man over board, etc...) I found this sample (see link below) but would like to consider other affordable options and see what you brilliant minds are thinking & doing! Cheers mate. Jason
PAR Yacht Designer/Builder
Tiller combs have been around for generations and making one up, shouldn't prove a terribly difficult engineering problem or fabrication project. They also have manufactured products, such as the "tiller tamer" and the like. For what it's worth, you should never (NEVER) lock down the tiller for MOB operations. The image above shows an excessive amount of comb, which just isn't reasonable. You only need enough comb to hold the helm at about 5 degrees to the centerline. That one looks like it could hold a 30 degree helm deflection, which is way over the top in terms of need.
gonzo Senior Member
Traditionally, you hold the tiller with your foot or between your legs. Locking the tiller on a centerboard dinghy is never a good idea.
In light air locking down the tiller isn't problematic, though most do it anyway, in spite of the potential issues. The same is true of cleating sheets, most do it, in spite of the potential issues. Everyone learns this lesson once they have to chase down a runaway boat, with it's sheet cleated and just after they've decided to inadvertently self practice a MOB drill.
philSweet Senior Member
For casual sailing, a larger rudder is the single best thing you could do. Next comes a tiller extension. Mine was just a 1/2 x 1/2 strip of mahogany attached with a lashing to a hole drilled in the tiller. The extension allows you to take the tiller with you for 3 feet (or be 3 feet closer to it, at least). Lastly, you probably already have some way of locking the tiller for transport or when leaving the boat at the dock. I used a bungee straight down to the floor frame. The tiller had an eye on its underside. If the gf and I were dallying our way across the Florida Bay in light air for three hours with cameras, binoculars, tunes, and a couple of lines out, that bungee did just fine.
I came across this tiller "tamer" (as we all agree locking the tiller is bad) on Amazon and think it is worth sharing. http://www.amazon.com/gp/product/B0...as2&tag=boatdesignnet&linkId=R64W2QZORAZB3PLG
tdem Senior Member
You can just have a bungy/elastic that runs across the width of the cockpit underneath the tiller. When you want to lock it down take a turn or two around the tiller.
OrcaSea Senior Member
I'm not close to rigging my 16' yet, but this is something I have been spending a lot of time thinking about. I will almost always be single handing my little boat, and I have wondered about tiller control while trying to adjust the vang or luff tension or jib block position, etc., on a boat when those things are not all ran through blocks, etc., to a central location. It certainly makes good safety sense to never cleat the main sheet, etc., but I can't see a way to not have some sort of temp friction lock, etc., on the tiller and properly trim & adjust while single handed and trying to keep a simple/inexpensive rig...? If there are ways to do it I'd love some pointers!
- Advertisement:
coachjpg New Member
'61 Friendship Sloop, 25' on deck.
New handmade sailboat launched
Custom made keel?
what was name of tiny sailboat made 1999?
Tiller handle length
Waszp rudder box & tiller
Whipstaff (broomstick) vertical tiller inside helm station - Roger Taylor's version...
Carbon tiller design
Self Centering Dinghy Tiller
- No, create an account now.
- Yes, my password is:
- Forgot your password?

- Battery Cable Terminals and Covers
- Tin Plated Starter Lugs
- Sailboat Steering
- Tiller-Tamer - Tiller Stabilizer and Lock
Tiller-Tamer - Tiller Stabilizer & Lock

Like Having an Extra Crew Member
- Copyright 1998-2024 SB Owners, LLC. All rights reserved.

- Policies | Contact Us

- Forum Listing
- Marketplace
- Advanced Search
- About The Boat
- Gear & Maintenance
- SailNet is a forum community dedicated to Sailing enthusiasts. Come join the discussion about sailing, modifications, classifieds, troubleshooting, repairs, reviews, maintenance, and more!
tillerlock vs tiller clutch

- Add to quote
Hi there I'm trying to decide between these two tiller conrolling devices I've checked out many of the others and researched and or tried some of the simpler options (bungies , cajun tamer etc) I realize they're not autopilots but a convenience for getting the odd thing done as well as useful for tacking, heaving to etc. I live in Vancouver Canada (this is somewhat relevant) Both these units seem good and are constructed out of metals The Clutch (a newer product made in the USA by Wavefront Marine out of aluminium and stainless)looks easier to use (one hand operation right by where your hand would sit) but it costs almost twice as much 69.99 + 12 S&H + 8-10 duty + roughly $90-$92 (pricey) WaveFront Marine - The TillerClutch The Lock (been around for a while, made in Canada out of stainless and navy brass) looks easy to use(but perhaps not as easy as it's farther from you hand and might require 2 hands briefly), is very striking in appearance(haha) and is a fair bit cheaper at 44.95 + 10.95 S+H (no duty) roughly $56 canSail Marine Supplies or Sailboat Tillerlock, tiller lock your rudder. | eBay I must admit being Canadian I like how the Cansail tillerlock is made here(patriotism and no duty!)and made out of brass and stainless but my tiller is 7/8" wide and quite rounded top and bottom so I'm not sure how it'll mount as it looks flat on the base, I guess a contoured shim could be made to rectify that problem. I'm waiting on question to the manufacturer The Wavefront tillerclutch looks like it'd mount without mods and is handier but it comes with the larger price tag..(and it's aesthetic isn't as nice...I know insignificant when you're using it but both look functional)I do have a correspondant who has the same boat who uses one and he highly reccomends it) My question is has anyone tried either of these units and can they reccomend them?

I have no experience with either but there is a third option here Salty John: Tiller-Hand and other fine boat and yacht chandlery products. I have purchased other items from them and received my order within 5 days (yes, from the UK) and no duty was applied. Also if the clutch is made in the US there is no duty on it.
Hmmm I checked it out Thanks for the input It looks like the Davis tiller tamer ,roughly the same principle and made of plastic, except it looks to cost around $50 (25 UK pounds!)before S&H or as they would say P&P . At that price I'd happily buy the stainless and brass Canadian version There's no duty from the states on stuff you can't buy here but there definitely is often provincial sales tax applied coming through the border. As there's currently no PST I though it might be HST I could be wrong though..I very often am !!Thanks for your reply

I have used the Davis Tiller Tamer but did not like it. It required two hands: one to hold the tiller and one to turn the knob. The process took too long when I was in a hurry. I used a lever type lock for many years and was pretty satisfied with it. It is no longer available but was very similar to the tiller lock you show except that it mounted on the bottom of the tiller. The base was a little wider than the tiller so I had to mount it with the screws angled in. I got a new tiller this year and it is even narrower than the old one. No way could I mount the old tiller lock to it without fabricating some kind of mounting plate so I decided to try the new Tiller Clutch. Am I glad I did!! It works like a dream! I can flick it on or off with just my little finger on the hand holding the tiller. I can lock the tiller, use both hands to trim a sheet, and grab the tiller and unlock it in fractions of a second! Bottom line: I highly recommend the Tiller Clutch. It is functionally superior to the other types IMHO.
At today's rates 25 British Pounds equals $40.89 Cdn. When I purchased from them last year there was no Hst or Canadian tax of any kind. It just arrived in the mail. I have never used any tiller tamer type product so cannot comment on which is best.
see I knew I'd be wrong about something! That's good to know it's a little cheaper and I appreciated the additional input I know when I've ordered British Seagull bits from the UK there's been no duty or tax but sometimes with things from the states I would be charged PST Not sure how it works now with the combined HST. As far as mounting goes I know the cansail tillerlock can be mounted top or bottom and is about 3/4" wide

Rather than spend $100 on a tiller lock, I'd seriously look at a tiller pilot. Back in the day, we had a Tillermaster we used for years. My memory is a bit faulty, but I almost think that it was developed and built initially here in the Tacoma area in the early '70s, but I can't be sure. The Tillermaster was crude by today's standards, but it did what it said it would. It would hold a consistent compass course. Current tiller pilots are a lot better, both in their mechanics, electronics, and water resistance. The advantage with these is that it will hold a heading, and not simply a tiller position. Back when we would need to go to the bow to put on or change a hanked on jib, it was nice to be able to do it knowing the boat would maintain a consistent course. I'd look at something like the Simrad TP10. It will cost over $300 more than your tiller lock, but I think will end up being a lot more useful. They are easy to simply pop on the tiller and set. (one thing I liked about the old Tillermaster was the rotary knob for adjusting course). Dave
THanks I probably should've mentioned I have a Danica 16 "Nutmeg"which is a 15 foot long double ended full keel, ballasted boat that sleeps two, I paid $1200 for it and it's trailer. Whilst they have been sailed to Hawaii and up to Desolation sound from Vancouver and are considered a very weatherly sea boat for their size, I don't plan to go so far a field , mostly a bit of coastal cruising/island hopping/gunkholing I since sunk a 4-5 hundred into it and the trailer (I do all my own work)but spending another 4-5 hundred isn't at all possible right now or in the near future. If I did I would first buy a handheld VHF and then a GPS For now I'm mostly interested in a unit that frees up my hands for a bit to do the odd necessary task or go up front to change a sail etc And I'm hoping to solicit some opinion about the two tiller lock units mentioned above Thanks though, if I get a larger boat. more money,and want to spend longer stretches at sea I'll definitely take your advice and get an auto pilot
Windkiller said: I since sunk a 4-5 hundred into it and the trailer (I do all my own work)but spending another 4-5 hundred isn't at all possible right now or in the near future. Click to expand...
For years I have used a simple line and two clam cleats. You can see a pic in this thread. http://www.sailnet.com/forums/c-c/79350-does-anyone-know-what.html#post781751 Cost all of 15$. Not a great set up but allows me to pop down below for something or go forward to deal with the sail etc. I have to admit the tiller clutch looks great and my be my next upgrade. Dan S/V Marian Claire
On my previous boat (18.5 Crown(little Cal20)I used a length of shock cord with a turn or two around the tiller, worked well and would hold a course in mild conditions(it had some give) But it would wear the finish off the tiller and then wear indentations into the wood, I had duck tape around the tiller to help(ick), I guess I could've used some thin brass plate or aluminium wrapped around. i found it annoying as I'd just done the brightwork, Same thing with the new boat. works okay but when you get it tight enough it wears the tiller down, I've also looked at the tensioning block sort of unit that mounts underneath..I think something simple would be good though with minimal holes in the tiller, so I'm trying to decide between these two units both of which look quite simple and have a minimum of lines
Windkiller said: On my previous boat (18.5 Crown(little Cal20)I used a length of shock cord with a turn or two around the tiller, worked well and would hold a course in mild conditions(it had some give) But it would wear the finish off the tiller and then wear indentations into the wood, I had duck tape around the tiller to help(ick), I guess I could've used some thin brass plate or aluminium wrapped around. Click to expand...

Used tiller lock for a long period of time. It is very easy to use and locks the tiller without any problems.
Oh heck now I have to learn to tie a turk's head I can make a thump mat.

I've used the Tillerlock clutch on my Catalina 25 for three seasons now, and I LOVE it. Very intuitive; even nonsailors first-timing on the boat don't question "How's this work?". Rugged design; no maintenance problems. Easy to use as a brake, not just clamping in one position but taking some rudder pressure off hand-sailing. To neaten the installation, I routed out a shallow, flat-bottomed indentation in the top of my rounded tiller. Occasionally use our Raymarine Tillerpilot autopilot for longer passages, but seldom now bother to get it out and mount it, because the clutch is always there. And of course it's super easy to lock the tiller amidships when leaving the boat on its mooring.

I had a tiller lock style device on last boat and liked it. Current boat I installed the Davis Tiller tamer and it also works well. Of the two I prefer the Lock device over the tiller tamer. Either will do

I have the Davis Tiller Tamer on my Capri 18 and it works well for lake sailing; I haven't had a chance to use it on salt water yet. There were plenty of crew on my last (first with this boat) trip last year who were eager to take the helm. I now have a Forespar telescoping tiller extension and I believe they have a bulkhead mounted fitting that allows it to work as a tiller lock. Has anyone used one of those? I hesitate to get one because it looks like I'd need to cut a 2"x3" hole in my cockpit coaming to mount the fitting. That's a much bigger commitment that just drilling holes for 2 #8 screws. Ken Capri 18 #299 Moment of Zen
You could surface mount it in a block of teak or starboard but it would certainly be neater flush mounted.
Attachments

Hey jjablonowski Thanks for your reply To Clarify, you said you used a "tillerlock clutch" There's a Tillerlock annnd a Tiller Clutch I'm trying to decide between, from your description I'm assuming you mean the brass and stainless Tillerlock? Is that right? Thanks
I bought and installed a tiller clutch about 6 months ago and I love it. To set it is instantaneous and simple to disengage is just as easy. It is literally a finger tip away. Prior to that I was using bungee cords. No comparison.
I have to agree with the others. On a boat that size and with a limited budget, a simple line and cleat rig is the way to go.
I am about as much of a ghetto fabulous sailor as they get...my current tiller is actually an axe handle... But I read about something that sounded good, I've never seen it in person, but: Seems if you go get a timing belt or chain off an old car, it looks like a tiny ladder, string it across your cockpit, then put some sort of small lug on the underside of your tiller, simply drop the lug into the right spot on the timing belt, and viola! Tiller is locked in place. I thought it was really clever when I read about it.
A Davis tiller tamer came with our old Beneteau 235, but the plastic quickly gave up. When it died, I replaced it with the Canadian tiller lock. Great construction and simple to operate...I could lock the tiller with one hand. Bungee cords and other lines work well, but I enjoyed just having to flip the handle. I'll also add, we kept our boat in a slip and the tiller lock kept the rudder locked in position.
Tillerlock, from Canada. Heavy line, strung across rear of cockpit, goes into a pinch point. Rotate ball-topped lever, and a cam squeezes the pinch point closed onto the line. Very intuitive! Lasts and lasts.

I don't want to drill holes in my tiler, so I took an old surfboard leash and removed the neoprene ankle part and attached old line to it. It grips the tiller well and can be removed quickly.

I use a simple bungy cord from a cleat either side of the cockpit with either one turn around the tiller for light air or two turns if the wind gets up a bit. I wrapped a piece of aluminum around the tiller to stop the bungy from biting into the wood of the tiller. It does just fine with the tiller just stretching the bungy a little with the wave action. Also have a tiller pilot that will really hold course when I'm up on the foredeck when the wind gets up a bit. Cheap easy and not in the way
In the video it looks like the clutch is threatening to clip the helmsman's knees.

This has been my solution. Pretty cheap. Two adjustable loops (adjustable grip hitches) and a loop in the middle (alpine butterfly). Works pretty good. Doubles as a dock line.

- ?
- 173.9K members
Top Contributors this Month

Sailboat Tillerlock, Tiller Lock Your Rudder on 2040-parts.com
Welland, Ontario, Canada
Sailing Hardware & Gear for Sale

Vauxhall & Opel could merge with Peugeot Citroen.
GM Europe (Opel and Vauxhall) could extend their deal with PSA (Peugeot Citroen) with a Joint Venture or merger. When GM Europe and PSA announced they were forming an alliance earlier this year, we asked if this was an admission that the mainstream car market in Europe had changed forever, and an alliance between Opel, Vauxhall, Peugeot and Citroen was the only way to keep the brands viable. But we did also question what use a projected annual saving of €2 billion by sharing suppliers and co-developing platforms would be to PSA and GM considering their woeful losses.
Caterham announces cut-price Seven 160 sports car
BRITISH sports car maker Caterham has announced a new low- priced version of its long-running Seven model. Dubbed the Seven 160, the new model starts at a measly £14,995 in component form or £17,995 fully built. Under the bonnet there is a turbocharged 660cc Suzuki engine and although this only offers up a modest 80bhp, that's still enough to power the lightweight Seven from 0-60mph in 6.5 seconds.
Mazda MX-5 20th Anniversary Limited Edition launched
Mazda has released a limited edition MX-5 in Japan to commemorate 20 years of the MX-5 It’s hard to believe that the little Mazda MX-5 – or Mazda Roadster, as it’s known in Japan – has been with us for 20 years, but it has. And in that time it has racked up sales of more than 850,000, making it the best-selling open roadser in history. Deservedly so.
2040Parts.com © 2012-2024. All Rights Reserved.
Designated trademarks and brands are the property of their respective owners.
Use of this Web site constitutes acceptance of the 2040Parts User Agreement and Privacy Policy .
0.23 s, 11190 u

Current time by city
For example, New York
Current time by country
For example, Japan
Time difference
For example, London
For example, Dubai
Coordinates
For example, Hong Kong
For example, Delhi
For example, Sydney
Geographic coordinates of Elektrostal, Moscow Oblast, Russia
City coordinates
Coordinates of Elektrostal in decimal degrees
Coordinates of elektrostal in degrees and decimal minutes, utm coordinates of elektrostal, geographic coordinate systems.
WGS 84 coordinate reference system is the latest revision of the World Geodetic System, which is used in mapping and navigation, including GPS satellite navigation system (the Global Positioning System).
Geographic coordinates (latitude and longitude) define a position on the Earth’s surface. Coordinates are angular units. The canonical form of latitude and longitude representation uses degrees (°), minutes (′), and seconds (″). GPS systems widely use coordinates in degrees and decimal minutes, or in decimal degrees.
Latitude varies from −90° to 90°. The latitude of the Equator is 0°; the latitude of the South Pole is −90°; the latitude of the North Pole is 90°. Positive latitude values correspond to the geographic locations north of the Equator (abbrev. N). Negative latitude values correspond to the geographic locations south of the Equator (abbrev. S).
Longitude is counted from the prime meridian ( IERS Reference Meridian for WGS 84) and varies from −180° to 180°. Positive longitude values correspond to the geographic locations east of the prime meridian (abbrev. E). Negative longitude values correspond to the geographic locations west of the prime meridian (abbrev. W).
UTM or Universal Transverse Mercator coordinate system divides the Earth’s surface into 60 longitudinal zones. The coordinates of a location within each zone are defined as a planar coordinate pair related to the intersection of the equator and the zone’s central meridian, and measured in meters.
Elevation above sea level is a measure of a geographic location’s height. We are using the global digital elevation model GTOPO30 .
Elektrostal , Moscow Oblast, Russia
- Forums New posts Unanswered threads Register Top Posts Email
- What's new New posts New Posts (legacy) Latest activity New media
- Media New media New comments
- Boat Info Downloads Weekly Quiz Topic FAQ 10000boatnames.com
- Classifieds Sell Your Boat Used Gear for Sale
- Parts General Marine Parts Hunter Beneteau Catalina MacGregor Oday
- Help Terms of Use Monday Mail Subscribe Monday Mail Unsubscribe
- Thread starter Squidd
- Start date Feb 10, 2012
- Forums for All Owners
- Ask All Sailors

Without going to the expence of a full blown "Autopilot"... Does anyone use a "Tillerlock" or special knotwork to hold the tiller when they go forward (hoist main, unbind jib, etc...) on the occasional singlehand sail... Nothing long term or long distance, just the run up and secure the fender or snug a line.. Or will the boat hold a line long enough/steady enough to get up and back...I can't see that happening at all points of sail/conditions

In the December issue of SAIL magazine (on page 52) there was a photo of Robert Burgess sailing his Com-Pac 16 in the Florida Keys. The caption reads “When the wind is right, Nomad sails herself.” What caught my eye was a length of line with a toggle that was rigged to apply light pressure against the tiller ... which evidently had a slight amount of weather helm. Presumably the toggle allows quick and easy adjustment of the helm ... without having to tie (or re-tie) any lines. Since then I have rigged one on my Hunter 25.5. It works great. Here’s the original photo ... in which I have circled the line holding the tiller.
Attachments

I sail 90% of my time singlehanded. I use a length of 1/4" line that is 2-3 feet shorter than the width of my boat at the point of where you hold the tiller. To each end it tied about a foot of latex tubing, and to the end of that a carabiner. The carabiners are attached to the toe rail about at foot behind the end of the tiller, the line part is wrapped around the tiller once or twice (or more) depending on how much resistance I need out of the tubing. When close reaching and the sails are balanced, this works great with very little input by me. And works fairly well for other points of sail. It also works great for motoring and putting up and down the sails.

Balancing the sail plan is key to being able to get her to steer herself. course that is not always possable going down wind with the boom out to one side. But asiling DDW is not the fastest way to get there anyway so why stress yourself.

the surgical tubing is the method I hear works best. I have a 'tiller tamer' and that holds the tiller, but doesn't make adjustments. ps: my tiller pilots has been the best money I spent on my boat...

I always have my Tiller Tamer attached. Most of the time I am sailing my Highlander hands-off. Unless the breeze is up of course. With a twist of the knob I can go from hands-off to full control. I used to use the rope around the tiller but it took off the varnish and friction would loosen as you moved off center. I put my Davis Tiller Tamer on the bottom of the tiller instead of the top. http://www.newportnautical.com/Davis-Tiller-Tamer-sailboat-tiller-control-p/dav-2205.htm
I use a tiller lock from Cansail.com.I had a tiller tamer and it wore out replaced it with Cansails product.I have no interest in this co.Practical Sailor endorsed it back in 92.Bought mine on Ebay.

When I sailed a Pearson 26 last year, there was a bungy, with a loop in the middle, that ran from each side to keep the tiller in place when it was in the slip. I slipped one end on a cleat and then the loop over the tiller and it held it nicely for me when I raised the main.

HukilauMike
Another vote for the Davis Tiller Tamer. Like Ed, I put mine on the bottom of my tiller. With the sails balanced, I can go forever without touching the tiller. I also use it to hold course while I go forward to raise the main or lower the main. It is less effective for this; wind and waves acting on the bow will push the boat around without an active hand on the tiller. But I don't think any of the gadgets described thus far will do a better job than the Tiller Tamer in these situtations.

I have a Tiller Tamer with some broken plastic. The PO added it to the bottom of the tiller. So far all it has done is scratch up my leg. So I took it off. Still have it, just don't use it.
I have used a tiller tamer on a Hunter 26, and it worked pretty well. I have had other boats, including Mac 25 and Venture 222, that required regular input on the tiller to hold a line, and tying off the tiller was not very useful. How well does your boat hold a course?
Don't know yet, bought it this fall motored it to the marina to be hauled out and have it at home for "refresh"... Getting ready for next spring, should "usually" have an extra hand to hold the tiller, but may from time to time have need of self sufficency...Spent too much of the budget getting resupplied to get an autopilot right now so looking for alternatives that I can have onboard from day one...

I've used the tiller tamer on our mac/venture 22 and our hunter 240. Worked perfectly on both.

I put a Tiller-Tamer on our boat about 2 years ago, when my wife's schedule forced me to do more solo-sailing. On the whole, I like it... it holds the tiller for long enough when i need to jump forward to do sail trim, retrieve fenders, etc. Sometimes I just set it for friction, and if I'm jumping about I just have to hit the tiller every half-minute or so to correct my course. It squeaks with the crappy old line I'm using with it, so I may put new, softer line on it this season.

Tiller tamer too I use the Tiller Tamer too. Works well enough that I can eat lunch or go up and sit on the bow dangling my feet in the waves. Doesn't work well in heavy weather (a larger friction area would help that) and I've had it come loose when anchored at night. I now tie my tiller off when anchoring overnight. I also use it to go forward and setup my sym spinnaker and pole, as well as when I gybe the thing. Adjusting it to have some friction allows the boat to turn through smoothly. I've replaced the line on my tamer twice in 5 years of use. JerryA

A few years ago I found myself laminating up a new tiller from scratch. While building it I was considering this subject. My solution was to mill a /4" slot in the bottom of the tiller about 2/3 the thickness and within about 8 inches of the hand-end. I then cross-drilled the slot for a length of line to pass through. the location of the cross-drilled hole is critical, with a little over 1/4" of slot depth remaining over the drilled hole. A 1/4" stainless eyebolt was fitted into the slot and a line passed through the drilled hole and eyebolt. This is where cross drilled hole location is critical. You want the eyebolt to go up in the slot enough to let the line slide easily when the eyebolt is "bottomed" in the milled slot. A A large plastic knurled knob with 1/4" female threads was then screwed onto the eyebolt. When the knob was tightened it pulled the eyebolt down, creating a clutch-like "jam" on the line. You could either lock the tiller tight or allow minor adjustment with the knob... I really liked the design as it was robust, simple, and basically totally contained. No tacky bolt-on parts to mar the beauty of my homemade tiller either...
That's cool...took a second to "visualize it" but sounds like a smooth setup... Are you sure you want it so close to the "hand end" most I see are further back...??
Good question, and good point. Location will be more a preference thing but the closer to the hand end, the lower the load. Mine was 8" off in part because this was a VERY short tiller on a boat I set up with almost no weather helm. My 8" off on that tiny tiller was probably about where you would think to put it on a much longer tiller...
Gotcha...I was just picturing mine (longer) and it's quite a bit thinner near the hand end... Further back there is more "meat" to play with...

Squidd said: Gotcha...I was just picturing mine (longer) and it's quite a bit thinner near the hand end... Further back there is more "meat" to play with... Click to expand
- This site uses cookies to help personalise content, tailor your experience and to keep you logged in if you register. By continuing to use this site, you are consenting to our use of cookies. Accept Learn more…
Museum and Exhibition Center

Most Recent: Reviews ordered by most recent publish date in descending order.
Detailed Reviews: Reviews ordered by recency and descriptiveness of user-identified themes such as wait time, length of visit, general tips, and location information.

Museum and Exhibition Center - All You Need to Know BEFORE You Go (2024)
- (0.03 mi) Elektrostal Hotel
- (1.15 mi) Yakor Hotel
- (1.42 mi) Mini Hotel Banifatsiy
- (1.65 mi) Apelsin Hotel
- (1.33 mi) Elemash
- (0.20 mi) Prima Bolshogo
- (0.30 mi) Makecoffee
- (0.40 mi) Mazhor
- (0.42 mi) Amsterdam Moments
- (0.42 mi) Pechka
IMAGES
VIDEO
COMMENTS
Midshipman II Tiller Lock. £34.50. Seasure make the Tiller Lock, which comprises an aluminium body with a sheave and a clamping lever. A line is supplied with a rubber snubber and a small cleat, which allows the line to stay tight at all times. The instructions say that you should mount the Tiller Lock on the underside of the tiller.
TillerClutch is brilliant: it locks/unlocks very smoothly and surely. It holds perfectly when locked and slides easily when open. Gunnar Flugsrud Oslo Norway. ... The standard TillerClutch is intended for lighter or well-balanced tiller-steered sailboats that typically sail in fair to moderate conditions or sheltered waters. It is recommended ...
Then you could lock the tiller in place while you attend to other things for a few minutes or under the right conditions, relax and let the boat sail itself. A tiller lock is the next best thing to having a crew member or an autopilot take the helm for you. There are several tiller lock designs on the market and all of them do a reasonable job.
Description. The standard TillerClutch is intended for lighter or well-balanced tiller-steered sailboats that typically sail in fair to moderate conditions or sheltered waters. It is recommended for all but the lightest trailer-size sailboats and day sailors generally up to 24 (7 m) or so. The steering effort you feel in the tiller is usually ...
2. We used our existing tiller pilot pin, but you can make one from a 1/4-inch bolt or screw. 3. The aluminum pivot pin is easy to drill. 4. A slot in the end allows the tiller lock to pivot. We used a drill for most of the work, followed by a file. 5. You just need flick your thumb to set and release the stop.
The standard TillerClutch is intended for lighter or well-balanced tiller-steered sailboats that typically sail in fair to moderate conditions or sheltered waters. It is recommended for all but the lightest trailer-size sailboats and day sailors generally up to 24 ft (7 m) or so. The steering effort you feel in the tiller is usually under 15 lb (7 kg), about the weight of a bowling ball.
Lock in your course with the twist of a knob. The Tiller Tamer® is a simple system that mounts to the tiller and will hold your course temporarily. Ideal for short-handed sailing or single-handed sailing on smaller boats, this system allows you to leave the helm to douse a spinnaker, skirt the jib or man the radio.
Many sailors add a boat hook clip to the top of the tiller, about 1-foot aft of the pivot, and clip it there. On our Corsair F-24, we added horns to the stern rail, providing a safe resting place for even our 8-foot extension. Auto-pilot. There are also times when a tiller pilot or tiller lock is the better answer.
Mine was just a 1/2 x 1/2 strip of mahogany attached with a lashing to a hole drilled in the tiller. The extension allows you to take the tiller with you for 3 feet (or be 3 feet closer to it, at least). Lastly, you probably already have some way of locking the tiller for transport or when leaving the boat at the dock.
Teak and bungee self steering Tiller lock in action. I have since modified this using a much thinner piece of teak, about 1/4 to 3/8 of on inch thick which...
Tiller extension Use a tiller extension. Install a locking hub into the side of the cockpit. no other installation required. Set course, lock tiller extension, adjust with a slight twist-extent or retract. Easy. Set a little rudder to leeward and it will come up and fall off slightly in frequency while maintaining an impressive course.
When I am sailing alone or motoring it's always handy to be able to leave the tiller to attend to something or go to the bathroom so I decided to make a simp...
The Tiller-Tamer holds the tiller steady, maintaining course with no hands in almost any weather or wind condition. The tension is smoothly adjustable from fully locked to fully free and can be used to help control weather helm with decreased effort. Improved control and feel to the tiller handle Does not interfere with automatic steering systems
The Clutch (a newer product made in the USA by Wavefront Marine out of aluminium and stainless)looks easier to use (one hand operation right by where your hand would sit) but it costs almost twice as much 69.99 + 12 S&H + 8-10 duty + roughly $90-$92. (pricey) WaveFront Marine - The TillerClutch.
Rudder Craft Varnished Sailboat Tiller - Stock 'D' Tiller $179.99. 0. ... Forespar TFP-S Quick Release Twist Lock Tiller Extension - 104016 $131.16. 0. Ronstan Tiller Extension End - RF3133 $15.69. 1. Ronstan Tiller Extension - Telescoping 60" to 98" Outboard Grip - RF3124 $138.33. 0. Forespar TFP Receptacle Assembly - 104006 ...
Sailboat Tillerlock, Tiller Lock Your Rudder on 2040-parts.com. US $44.95. Location: Welland, Ontario, Canada. Your Name Your Email Your Phone. Place Order. Condition: New Brand: Tillerlock Country//Region of Manufacture: Canada Manufacturer Part Number: TL001A. The best tiller locking device in the world! The Tillerlock.
Get directions to Yuzhny prospekt, 6к1 and view details like the building's postal code, description, photos, and reviews on each business in the building
Geographic coordinates of Elektrostal, Moscow Oblast, Russia in WGS 84 coordinate system which is a standard in cartography, geodesy, and navigation, including Global Positioning System (GPS). Latitude of Elektrostal, longitude of Elektrostal, elevation above sea level of Elektrostal.
Most of the time I am sailing my Highlander hands-off. Unless the breeze is up of course. With a twist of the knob I can go from hands-off to full control. I used to use the rope around the tiller but it took off the varnish and friction would loosen as you moved off center. I put my Davis Tiller Tamer on the bottom of the tiller instead of the ...
Round table 2021. "Electrostal" Metallurgical plant" JSC has a number of remarkable time-tested traditions. One of them is holding an annual meeting with customers and partners in an extеnded format in order to build development pathways together, resolve pressing tasks and better understand each other. Although the digital age ...
Speciality Museums. Write a review. Be the first to upload a photo. Upload a photo. Suggest edits to improve what we show. Improve this listing. The area. Raskovoi ul., d. 37, Elektrostal 144003 Russia. Reach out directly.